My Blinkie

Registered with TWInc

About Me
- Simone aka Lorraine
- Hi everyone! I'm a 52 year old scrap and Paint Shop Pro addict. I've been PSPing since 2004. I love creating and I love sharing. Programs I use: Paint Shop Pro 10 Particle Illusion 3.0 Animation Shop 3.0 CS3 PS 7
Thursday, August 15, 2013

♥♥♥
Please click on TAG to see in full size.
••• Supplies needed to complete this tutorial. •••
________________________________________________________________________
Programs: Paint Shop Pro, I'm using version 10. Animation Shop 3.
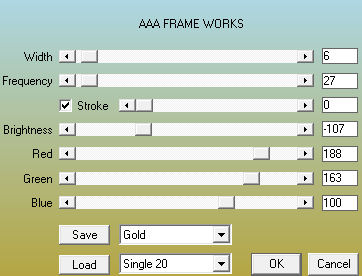
Plugin : AAA Frames/ Frame Works
Font used: Yankee Ghosts BB
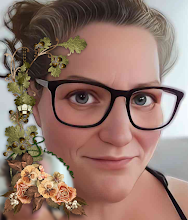
Tube of choice: I'm using "My Fairy" by The Hunter.
Scrap Kit : I'm using Hipster Look by Designs by Joan
which I can no longer find or you can use this one by Lizquis Scraps
Please click on TAG to see in full size.
••• Supplies needed to complete this tutorial. •••
________________________________________________________________________
Programs: Paint Shop Pro, I'm using version 10. Animation Shop 3.
Plugin : AAA Frames/ Frame Works
Font used: Yankee Ghosts BB
Tube of choice: I'm using "My Fairy" by The Hunter.
Scrap Kit : I'm using Hipster Look by Designs by Joan
which I can no longer find or you can use this one by Lizquis Scraps
Animation: none
Mask: none
________________________________________________________________________
♥♥♥
Save your tag often. Nothing like working long and hard on a tag and PSP crashes.
♥♥♥
Open a new image 851 x 350 transparent.
Copy and paste paper 4 as a new layer, position to the left.
Duplicate and move this paper over to cover the uncovered portion.
Try and line it up to the over lap doesn't show to much.
Merge all flatten.
Copy and paste the close up tube as a new layer and position on the right hand side of banner. Change blend mode to overlay.
Copy and paste the regular tube as a new layer and position in center right and move using your mover tool showing on her legs.
Copy and paste element 8 and 9 as new layers and position closer to the left side of tag but not touching the side.
Overlap the buildings a bit.
Copy and paste element 38 as a new layer and position on right side of tag, over the close up and beneath the legs.
Duplicate and mirror. Tweak after the majority of your elements are on the banner.
Copy and paste element 10 as a new layer. Make sure it's behind the buildings and in front of the roadway.
Copy and paste element 45 as a new layer and re-size by 72% and move to lower right hand side.
Copy and paste element 48 as a new layer and position as top layer in the lower left hand side.
Copy and paste element 49 as a new layer and position behind the buildings and in the left upper hand side of banner. Re-size by 80%.
Copy and paste element 62 as a new layer and re-size by 14%. Free rotate to the left by 14 degrees. Sharpen.
This butterfly should be on the globe.
Duplicate and mirror. This butterfly should be on the right side over your close up tube.
Copy and paste element 23 as a new layer and re-size by 72% and position between the taxi and the dog in the lower right hand side of banner.
Copy and paste element 50 as a new layer and free rotate to the right by 35 degrees. Position in background behind taxi and move to the left side.
Add element 11 in background.
Add drop shadow to all layers.
Add artist copyright but no URL as per Facebook rules.
Merge all flatten.
For avatar, open a new image 180 x 178.
Copy your banner and paste as a new layer on your avatar.
Using your mover tool, drag this layer around until you fit the face within the area.
Merge all flatten.
Add your name and artist copyright.
Let's add a border to each, the banner and the avatar.
Activate banner and go to Effects > Plugins > AAA Frames > Frame Works and enter the following.
SAVE both as PNG files and upload to Facebook.
Hope you enjoyed this tutorial,
Hugs Simone
Please, always direct people to my blog to download my animations.
Do not load to any other download site and don't claim as your own.
Tutorial written by SophisticatSimone aka Lorraine Halle on Friday August 16, 2013.
Subscribe to:
Post Comments
(Atom)
0 comments:
Post a Comment