My Blinkie

Search This Blog
Leave Some ♥
About Me
- Simone aka Lorraine
- Hi everyone! I'm a 52 year old scrap and Paint Shop Pro addict. I've been PSPing since 2004. I love creating and I love sharing. Programs I use: Paint Shop Pro 10 Particle Illusion 3.0 Animation Shop 3.0 CS3 PS 7
Total Pageviews
Thursday, April 13, 2023
I'm using Paint Shop Pro X for this tutorial.
I also use PSP 2022 and 2023.
Keep in mind, whatever is black gets completely removed.
Whatever is white stays.
Anything is between, (gray scale) varies in transparency.
Step 1 :
Getting some awesome brushes.
A couple of good sites I use are:
Brusheezy
So select a few of those and download and save to a folder called Brushes.
I believe that with the newer versions of PSP (version 15 and higher) you can install Photoshop brushes (ABR File) with no problem.
Older versions of PSP will not support PS brushes, therefore you will need to convert them.
You will need a program called abrMate
and a script that converts PNGs to brushes.
It's all in the tutorial.
Check it out and come back to make your mask.
CASSEL'S TUTORIAL
28 Ink and Watercolor Brushes
Download and unzip.
Step 2:
Open a new canvas 800 x 800 with a black background.
Add a new layer.
For every single brush I use, I add a new layer. Nothing worse than wanting to change position of one of the brushes and you have to hit the back button (undo) 40 times! This way I just select the layer and using my mover tool I adjust the location of brush.
Step 3:
Select your brush tool.
Left click on your first layer. Should be white, since left click is Foreground.
If it's too big you can resize in the tool bar. You can use your mover tool to position this brush wherever on your canvas. Just make sure to re-select your brush tool once you've moved your layer.
Add a new layer.
Let's rotate this brush in the tool bar, enter 75 and click on your new layer.
Now, duplicate this layer and change the blend mode to screen.
Add a new layer. Let's choose a new brush. Click on little drop-down arrow and click the letter i,
this gets you to the name Ink quickly.
Click on your layer and position your brush where you want.
***PLEASE BE AWARE to not use the brush outside of the parameters of your 800 x 800 canvas. No one likes cutoff on a tag, at least I don't.
Here is my mask so far.
This is about 4 layers of brushes and I moved them randomly on my canvas.
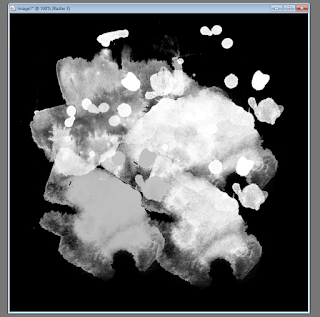
Just remember, you can play with size, rotation, blend mode etc.
You are only limited by your creativity.
Keep adding layers and brushes.
Add new brushes for cute little designs. Little stars, fish, circles, lines, splatter, grunge, etc
The list is endless.
You can use text, and you can use any of your plug-ins.
Mura copies is great for making perfect circles and for doing scatter.
Just add brush of choice in center of canvas and select "encircle" in Mura.
Play around with the different options, they are all great.
Also, if you have a lot of black background, what you can do is x-out your last layer (black bg) and using your crop tool, select "Snap crop rectangle to:Merged Opaque".

Un-hide the black layer. Everything will be nice and tight.
I never close any project or merge any project until I'm good and done.
I've had so many crashes over the years that I save often and leave all my layers un-merged until I'm completely done.
Minimize the one you are working on.
Step 6:
Test your mask.
Open some papers and test your new mask on a few different colors, textures etc.
Look to see if your mask has cutoff around the edges, if it does, you can go to original mask with all the layers and fix that, either with eraser took or selection tool.
Step 7:
Merge flatten and save.
I would love to see your masks once completed.
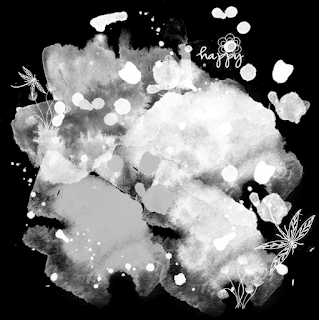
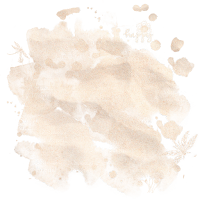
Here are 3 examples of this mask on papers from Bella Caribena scrap-kit
A Tropical Beach Party.

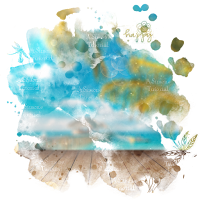
Hope this was helpful and well explained.
Simone xox
Labels:Mask Tutorial,PSP tutorial | 4
comments
Monday, September 5, 2022
My friend Gail has written a tutorial using two of my freebie animations to create a signature tag using Photo Shop.
She'll show you how to add 2 separate animations inside that program.
I never use it, so I can't help you guys when you ask :D
I never use it, so I can't help you guys when you ask :D
Hopefully this will help you out.
Go check out her awesome tutorial site over this way
Gail's PS Adventures
Gail's PS Adventures
Tutorial is POISON

Wednesday, August 31, 2022
Here's an a wonderful tutorial by René explaining how to use two different animations on one tag using Photoshop.
She has great tutorials, please check them out.


Tuesday, August 30, 2022
Swinging Into Fall
I don't claim this as an original idea, I learned how to do this a very long time ago.A few friends and members have asked me to show them how to make a swing go back and forth.
I finally had some time and thought I'd share with you this simple trick.
Enjoy!
I'm using Paint Shop Pro X and Jasc Animation Shop.
I'm sure this can be done in Photoshop but I just don't have time right now to write it up.
Some things to keep in mind while doing this animation:
You can make your tube a little smaller than you would normally have it to avoid the tube swinging out of frame.
Make sure to always bring your tube to it's pivot point.
(Explained below).
Using a beautiful tube by ©Elena Dudina www.elenadudina.com.
Purchased with license for use at CDO.
Scrap kit used is by Kizzed By Kelz, which you can get at CDO Here.
Let's start!
Open new image 800 x 800
Add paper and use a mask of choice.
I used mine SophisticatSimone0293.
HERE
Copy and paste the elements you want to create your tag.
Add drop shadow to all layers except the tube layer.
Add your copyright info and license number for your tube.
To make swinging animation:
Using your Elispe tool or pen tool, make a tiny circle at the top of chain or rope that represents the pivot point of swing.
This will be important in making it a smooth transition between your tube rotations.
X out this dot for now.
Let's add a drop shadow to the tube.
Go to selections, select all, copy merged.
Go to Animation Shop and right click, paste as new animation.
Come back to PSP, undo drop shadow and Un-X your little circle.
Making sure your tube layer is activated, go to Image, Free Rotate, Rotate left 45.
Using your move tool, drag tube so the rope/chain is directly under the tiny dot.
This is your pivot point and the top of rope needs to always be on this little dot to make the swing go smoothly.
X out dot layer and add drop shadow to your tube.
Go to selections, select all, copy merged.
Go to Animation Shop and right click on the animation you pasted and click "paste after current frame".
Come back to PSP, undo drop shadow and Un-X your little circle.
Making sure your tube layer is activated, go to Image, Free Rotate, Rotate left 25.
Using your move tool, drag tube so the rope/chain is directly under the tiny dot.
X out dot layer and add drop shadow to your tube.
Go to selections, select all, copy merged.
You should have 3 frames now.
Right click on the second frame and copy, scroll to last frame and right click on it and paste after current frame.
Play animation.
It might be very fast.
Two ways to fix this.
1- Go to Animation, Frame properties, Display time, change to 30.
(that's what I did for this tag)
or
2-Add more frames with different amounts of rotation. Example, add 45, 35, 25, 15 and then reverse.
To reverse, Select the first 4 or 5 frames depending on how many you added and copy.
Go to last frame, right click on it and paste after current frame. Go to Animation, Reverse frames. It should only reverse the ones you just pasted on.
Play animation.
Now you can add your name and any other animations or elements.
Save as a GIF.
Hope you enjoyed this simple and fun tutorial.
Please show me your creations, I would really love to see them.
Hugs Simone

Monday, June 13, 2022
The scrap kit Emerald City is by tagcatz: HERE
My supplies HERE include font called Photograph, mask, red glitter pattern
You can make this tag using any version of PSP.
I used PSP X and Animation Shop.
Part 2

Sunday, May 29, 2022
I'm using an exclusive tube by Misticheskaya called Josie and cinema. HERE
The scrap kit Movies Night is by All Dolled Up: HERE
Using my PTU animations: HERE
Font: Macho Barista HERE
Supply Mask : HERE
You can make this tag using any version of PSP.
I used PSP X and Animation Shop.
The scrap kit Movies Night is by All Dolled Up: HERE
Using my PTU animations: HERE
Font: Macho Barista HERE
Supply Mask : HERE
You can make this tag using any version of PSP.
I used PSP X and Animation Shop.
Let's Begin!
Open MovieNight Mask and minimize.
Promote background layer.
Apply mask to paper.
Go to Layers, Merge, Merge Group.
Adding elements and add drop shadow of choice as you go.
Remember to save as well.
Open element 86, resize by 40%, place in upper right hand corner of paper.
Open element 15, resize by 40%, center on tag.
Open element 17, resize by 70%, place in upper left hand side.
Open element 70, resize by 40%, place in lower right hand side.
Open element 75, place left of middle.
Open element 145, resize by 40%, place in lower right hand side.
Open element 143, resize by 30%, place in front down low.
Open element 131, resize by 30%, place lower left hand side.
Open element 99, resize by 30%, place upper left hand side.
Open element 104, resize by 30%, place middle right hand side.
Open element 53, resize by 26%, place in front near feet.
Open element 27, resize by 20%, place upper left hand and duplicate/mirror.
Adjust both.
Open element 64, resize by 40%, place upper left hand more to middle.
Open element 63, place to left of tag.
Open element 83, resize by 70% and make two copies.
I place one upper left hand side, lower left hand side and middle right hand side.
Open element 13, place over Director chair on right hand side.
Add artist copyright.
Go to selections, select all, copy.
Let's go to Animation Shop.
Right click and paste as a new animation.
Press and hold down Ctrl key and tap letter L 24 times.
You should have 25 frames.
Open Popcorn animation. I'm using SophisticatSimoneAnimation-908 which you'll find at CDO store.
I resized by 80% and placed over the popcorn bucket.
Open Quiet animation(909), found in same animation package.
Resize by 60% and position in upper left hand corner.
Back in PSP
Adding name.
Foreground color: #eae5e9
Background color: #fd432a
Now click on the background color in materiel palette and select Gradient.
Scroll to foreground-background and select.
Angle 90
Repeats 6
Style Linear
Click ok.
Select your text tool, and select font: Macho Barista
Size 100, Pixels, Sharp, Stroke 0, Vector.
Rotate by 45 degrees and add drop shadow.
Copy and Paste as a new animation in AS.
Copy and paste into your tag.
Save!
To save:
Go to File, Save as, enter the name of your file and select the folder to save to.
Now click on Customize:
Under COLORS TAB:
Number of colors: 255 Colors
Create palette by: OPTIMIZED OCTREE
Reduce colors by: Error Diffusion
Under OPTIMIZATIONS TAB:
set a check mark beside the second, third and forth choices. UN-check the 1st and last.
Under PARTIAL TRANSPARENCY:
check Convert pixels less than 92
Yes, blend with this color: change to white #FFFFFF
Click OK. Click Next, next, next, next.
Play your animation.
At times your animation may or will come out terrible. Optimization in Animation Shop is not the greatest.
You can play around will your settings, especially under the Tab: Optimization. I change this setting at times
from anywhere between 70 and 100.
Some people add a white background. To add background, go to Animation: Animation Properties, select
Opaque and change color to white.

Labels:PFD,Popcorn,ptu animation,PTU kit,PTU tube | 0
comments
Subscribe to:
Posts
(Atom)
Categories
- 2 animations same tag using Photoshop (2)
- 2 animations using PSP and AS (1)
- adding 2 animations to tag (2)
- Al Rio (1)
- aldodark (1)
- Alex McMillan (4)
- Alex Prihodko (1)
- AmyMarie Kits (2)
- Angelica S (6)
- Animation (63)
- ARMY (1)
- Barbara Jensen (2)
- Baseball (1)
- Bibi's Collection Kit (38)
- bling (9)
- BLOOD (1)
- bubbles (12)
- CDO Tutorial (1)
- Christine Marie Kotlark (6)
- Christmas (1)
- circles (1)
- Cowgirl (1)
- CU Animations (1)
- Danny Lee (6)
- Design by Joan (3)
- Diana Gali (9)
- Disturbed Scraps (9)
- Easter (1)
- Fairy Dust (3)
- Fire (3)
- Fish (1)
- Forum Set (2)
- Freebie Kit (1)
- FTU Kit (1)
- Glitter (17)
- Goth (9)
- Grunge (6)
- Gunshot (1)
- Hania Designs (1)
- Heatbeatz Creationz (2)
- Jay Trembly (4)
- Jose Cano Tubes (25)
- July 4th (1)
- Lady Mishka Tubes (2)
- LizquisScraps (7)
- Marc Duval (1)
- Mask Tutorial (1)
- Max-13-Tulmes (1)
- Meine Bastelwelt (1)
- Misticheskaya (5)
- Money (1)
- Music (1)
- P-O Concept Kits (4)
- Particle Illusion (1)
- PFD (2)
- PFD Tutorial (1)
- Pink (1)
- Pinup Bombshells (3)
- PIRATE (1)
- Popcorn (1)
- PSP tutorial (1)
- ptu animation (5)
- PTU kit (45)
- PTU tube (46)
- PTU Tutorial (1)
- Rock n Roll (3)
- Roses (1)
- S&Co Store (1)
- SATC (5)
- Scrapz n Pleazure (1)
- SkyScraps Kits (25)
- SkyScraps Tubes (8)
- Sparkle (5)
- Spazz (1)
- Spring (5)
- stars (1)
- Steam Punk (1)
- Summer (1)
- Sweet Occasion Designs (1)
- Teaching Tutorial (5)
- The Hunter (8)
- Timeline Banner (3)
- Tiny Turtle Designs Kits (6)
- Tutorial (43)
- tuts by Rene (1)
- USA (1)
- VeryMany (6)
- Video Tutorial (1)
- waterfall (1)
- ZlataM Tube (5)


