My Blinkie

Showing posts with label Teaching Tutorial. Show all posts
Showing posts with label Teaching Tutorial. Show all posts
Wednesday, August 31, 2022



Tuesday, August 30, 2022


Swinging Into Fall
I don't claim this as an original idea, I learned how to do this a very long time ago.A few friends and members have asked me to show them how to make a swing go back and forth.
I finally had some time and thought I'd share with you this simple trick.
Enjoy!
I'm using Paint Shop Pro X and Jasc Animation Shop.
I'm sure this can be done in Photoshop but I just don't have time right now to write it up.
Some things to keep in mind while doing this animation:
You can make your tube a little smaller than you would normally have it to avoid the tube swinging out of frame.
Make sure to always bring your tube to it's pivot point.
(Explained below).


Using a beautiful tube by ©Elena Dudina www.elenadudina.com.
Purchased with license for use at CDO.
Scrap kit used is by Kizzed By Kelz, which you can get at CDO Here.
Let's start!
Open new image 800 x 800
Add paper and use a mask of choice.
I used mine SophisticatSimone0293.
HERE
Copy and paste the elements you want to create your tag.
Add drop shadow to all layers except the tube layer.
Add your copyright info and license number for your tube.
To make swinging animation:
Using your Elispe tool or pen tool, make a tiny circle at the top of chain or rope that represents the pivot point of swing.
This will be important in making it a smooth transition between your tube rotations.
X out this dot for now.
Let's add a drop shadow to the tube.
Go to selections, select all, copy merged.
Go to Animation Shop and right click, paste as new animation.
Come back to PSP, undo drop shadow and Un-X your little circle.
Making sure your tube layer is activated, go to Image, Free Rotate, Rotate left 45.
Using your move tool, drag tube so the rope/chain is directly under the tiny dot.
This is your pivot point and the top of rope needs to always be on this little dot to make the swing go smoothly.
X out dot layer and add drop shadow to your tube.
Go to selections, select all, copy merged.
Go to Animation Shop and right click on the animation you pasted and click "paste after current frame".
Come back to PSP, undo drop shadow and Un-X your little circle.
Making sure your tube layer is activated, go to Image, Free Rotate, Rotate left 25.
Using your move tool, drag tube so the rope/chain is directly under the tiny dot.
X out dot layer and add drop shadow to your tube.
Go to selections, select all, copy merged.
You should have 3 frames now.
Right click on the second frame and copy, scroll to last frame and right click on it and paste after current frame.
Play animation.
It might be very fast.
Two ways to fix this.
1- Go to Animation, Frame properties, Display time, change to 30.
(that's what I did for this tag)
or
2-Add more frames with different amounts of rotation. Example, add 45, 35, 25, 15 and then reverse.
To reverse, Select the first 4 or 5 frames depending on how many you added and copy.
Go to last frame, right click on it and paste after current frame. Go to Animation, Reverse frames. It should only reverse the ones you just pasted on.
Play animation.
Now you can add your name and any other animations or elements.
Save as a GIF.
Hope you enjoyed this simple and fun tutorial.
Please show me your creations, I would really love to see them.
Hugs Simone
Saturday, May 21, 2022

Tube Little Fairy Girl Riding a Bird by Laguna found HERE
Scrapkit Fairy Garden by SadCrow found HERE
Font: Lovin Florist HERE
Mask 0292: HERE
You can make this tag using any version of PSP.
I used PSP X and Animation Shop.

Let's begin!
Open your tube in PSP, Hold the Shiftkey + letter D to duplicate. Close the original.
Open paper 17 from scrap kit. Shift + D to duplicate and close the original.
In layers palette right click on the background layer and promote background to layer.
Let's open our mask SophisticatSimoneMasks0292 and minimize in PSP.
Make sure your background layer is active and go to Layers, New Mask Layers, From Image.
In source window, select the mask.
Make sure Create mask from Source luminance is selected and Invert mask date is UN-checked.
Click OK.
In layers palette right click on Mask-Raster 1 layer, select Merge/ Merge Group.
Select Crop tool and click on the Merged Opaque option. Click the green check mark OR double click on your canvas/image.

Click on the tube image(this tube has many layers) and open and close whichever layer you want to get the colors you want for this tag.
I chose green t-shirt, green socks and yellow skirt.
Once you've closed all the layers except the one you want, right click on the top blue band on the image and select copy merged.

Right click anywhere on your workspace and paste as a new image.
Select Crop tool and click on the Merged Opaque option. Click the green check mark OR double click on your canvas/image.
Let resize this tube by 30%. Copy and paste on your mask/background image.
You can minimize your tube now.
Move your tube to the lower right hand side of canvas.
Save.
In layers palette activate the background layer(mask).
Activate your selection tool.
Selection type should be set to Rectangle, Mode set to Add(Shift), Feather set to 0 and anti-alias checked.
Let's make 3 long skinny rectangles on our canvas.
Right click on layer in layers palette and select Promote selection to layer.
Drag this layer below the promoted layer.
Flood fill with a matching color of choice and add noise.
Go to Adjust/Add Remove noise, add noise,
Random, 23, monochrome checked.
Click OK.
Go back to the original promoted layer and add blur.
Go to Adjust/Blur/Gaussian Blur and enter 4.
Let's add a texture.
Go to Effects/Textures/Mosaic-Glass, enter:
50
50
symmetric checked
50
Edge curvature 0
Grout width 2
Grout diffusion 50
click OK
Making sure you still have the mosaic layer active let's animate it.
Right click and copy. Open Animation Shop and right click on workspace and paste as a new animation.
Go to Effect, Insert Image Effect.
Select Underwater. Effect length 1.7sec, Frames per second 15 fps (25 frames total)
Click on Customize and enter the following:
Effects : Apply both
Sunlight intensity 44
Liquid properties (water depth) 8
Place your waves like mine in my screenshot and then click on OK

Delete Frame 1 (You will have 26).
Go to Edit/ Select All
Go to Animation/Cull.
Enter 2 in the box and click ok. Press play, which is the little black box.

It's a little fast so we are going to slow it down.
Go to Animation/Frame properties and enter 15, click ok.
Play again. It's better.
Ok let's go back to PSP, we will come back to this in little later.
Let's add a cutout.
Make sure your rectangle layer(mosaic glass layer) is still selected in layers palette and go to layers, add new raster layer.
Your should still have your marching ants(selections) visible.
Go to Effects/3D Effects/Cutout and enter the following.

Open element 85 and resize by 45%.
Copy and paste and position at the top of the rectangles.
Add the following drop shadow.

Add drop shadow to all your elements as you go.
Open element 134 and resize by 45%.
Copy and paste and position at the top and a little more to the side of previous element.
I moved this layer below the purple flowers.
You can just drag your layers up or down in the layers palette.
Add element 106, repeat steps and look at my tag for placement.
Element 63.
Element 69. Don't resize but Sharpen (I found it blurry, but it could be my eyes LOL).
Element 66.
Element 141. I duplicated this one just to see it better on the tag.
Element 137.
Element 114 (not resized).
Element 15, resize by 35% add drop shadow.
Element 19, resize by 25% add drop shadow.
Element 25, resize by 16% add drop shadow.
Element 45, resize by 30% add drop shadow.
Element 77, resize by 48% add drop shadow.
Add your copyright information.
Now in your layers palette X out the mask layer, the flood fill layer (rectangles) and the mosaic glass layer.

Activate any other layer and right click in layers palette and select Merge visible.
Now X out the newly merge layer and open the other 3 and merge visible again.
You should have two layers now.
Make sure your bottom layer is active.
Go to selections, select all and copy.
Let's go to Animation Shop.
Right click and paste as a new animation.
Hold your Ctrl key down and hit letter L until you have 13 frames.
Make sure your underwater animation we did earlier is active. If not go to edit, select all. Go to edit and copy.
Now on the background image, making sure it's active, go to edit, select all.
Go to Edit and select Propagate Paste,
Go to Edit and select Paste/ Paste into selected frame.
Using your mouse move the animation so if fits into the rectangle frames.
Click mouse to place.
Press play and if you like it let's go to PSP and copy the top layer (you may need to x out the background layer) and back in AS right click and paste as new animation.
Go to Edit and copy.
Now activate your tag and go to Edit select all, go to edit/ paste/paste into selected frame.
Try to position as best as possible.
You can use the cutout to line up perfectly on the rectangles.
You may need to adjust your frames properties again.
Go to Animation/Frame properties and enter 15, click ok.
Add your name and save.
Sunday, June 23, 2013

Another example of animation on a name.
You will need Paint Shop Pro, I'm using version 10.
Animation Shop 3.
Eye Candy 4000 and Lokas Software/3D Shadow
Select font of choice.
I'm using Qwigley
Using your text tool, click on your tag.
Set your font to "Qwigley" font or font of choice.
Size 100, Units: Pixel, Center Alignment.
Anti-alias: Sharp.
Stroke width: 0
Create as : Vector.
For this font I selected Kerning of -25. This does not apply to all fonts, but you can play around with it.
It brings your letters either closer or further apart.
Type your name out, choosing a color of choice in background materials box. Black is NOT a good color, doesn't show the effect very well, so choose a complimentary color from your tag/tube.
Click OK.
Convert to Raster Layer and duplicate.
On bottom name (original), add Effect of choice.
For this tutorial, go to Effects, Eye Candy 4000, Gradient Glow, enter the following:

Now add drop shadow. If using the plugin 3D Shadow by Lokas Software, use these settings:

If you don't have that plug in, use your normal drop shadow in PSP.
Go to Effects, 3d effects, drop shadow.
V=7 H=0 Opacity=83 Blur=6 Color=Black
Ok now click on the top name layer.
Go to Effect, Eye Candy, HSB Noise and enter the following settings:

Now add this drop shadow:
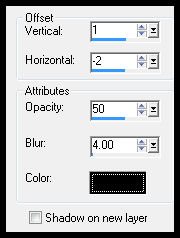
Go to Edit, copy merged.
Go to Animation Shop and right click paste as a new animation.
Back in PSP, go to Edit and undo drop shadow, undo HSB Noise.
Now repeat the effect, and click on Random Seed.
Add the same drop shadow.
Go to Edit, copy merged.
Go to Animation Shop and right click on the current name and paste after selected frame.
Back in PSP, go to Edit and undo drop shadow, undo HSB Noise.
Now repeat the effect, and click on Random Seed.
Add the same drop shadow.
Go to Edit, copy merged.
Go to Animation Shop and right click on the the last frame (2nd frame) and paste after selected frame.
You now have 3 frame with 3 different HSB Noise settings.
Play. If you like it, go to Edit, select all.
Go to Edit, Copy.
Activate your tag. Make sure all frames are selected.
Go to Edit, make sure Propagate Paste is depressed (selected).
Go to Edit, Paste, Paste into Selected Frame.
Position and click in place where you want name to appear.
SAVE
Hope you enjoyed this tutorial,
Hugs Simone
Please, always direct people to my blog to download my animations.
Do not load to any other download site and don't claim as your own.
Tutorial written by SophisticatSimone aka Lorraine Halle on Sunday June 23, 2013
Monday, April 1, 2013

Name Animation
You will need Paint Shop Pro, I'm using version 10.
Animation Shop 3.
Eye Candy 4000 and Lokas Software/3D Shadow
Select font of choice.
I'm using Xiomara.
Set size to 120, click on your tag and type your name out.
With your Text Entry box still open, highlight all letters in your name except the Upper case letter (1st letter).
Go to your font size and enter 90. You can also change the color at this time if you like.
You just need to click in your foreground color palette and select a color.
Animation Shop 3.
Eye Candy 4000 and Lokas Software/3D Shadow
Select font of choice.
I'm using Xiomara.
Set size to 120, click on your tag and type your name out.
With your Text Entry box still open, highlight all letters in your name except the Upper case letter (1st letter).
Go to your font size and enter 90. You can also change the color at this time if you like.
You just need to click in your foreground color palette and select a color.

Apply.
Convert to Raster Layer.
STEP 1:
Go to Adjust/Add Remove Noise/Add Noise
Check: Gaussian
Check: Monochrome
Noise: 36%
Click OK
STEP 2:
Go to Effects/3D Effects/Drop Shadow
V = -1
H = 0
Opacity = 96
Blur = 2
Color = black
STEP 3:
Go to Effects/PlugIn/Eye Candy 4000/Gradient Glow
Under Basic TAB:
Glow Width = 3
Soft Corners = 0
Overall Opacity = 100
Under Color TAB:
Select FAT
STEP 4:
Go to Effects/PlugIn/Lokas Software/3D Shadow
Blur: 17
Transparency: 23
Angle X: 0
Angle Y: 0
Angle Z: 0
Zoom: 100
Offset X: -3
Offset Y: 8
Perspective: 80
Color: black
FYI Depending on where you've place your name on your tag, the shadow placement WILL be different.
I always try to place my name in right lower hand corner of my tag when I work on this.
Click OK
STEP 5:
Copy and paste in Animation Shop.
STEP 6:
Go to Edit and undo until you get to your plain name.
STEP 7:
Repeat all steps to step 5. Change the noise in step 1 to 40%
Attention:
STEP 8:
When you are pasting this second frame in Animation Shop, make sure you right click on the current frame there and choose Paste/After Current Frame.
Go to Adjust/Add Remove Noise/Add Noise
Check: Gaussian
Check: Monochrome
Noise: 36%
Click OK
STEP 2:
Go to Effects/3D Effects/Drop Shadow
V = -1
H = 0
Opacity = 96
Blur = 2
Color = black
STEP 3:
Go to Effects/PlugIn/Eye Candy 4000/Gradient Glow
Under Basic TAB:
Glow Width = 3
Soft Corners = 0
Overall Opacity = 100
Under Color TAB:
Select FAT
STEP 4:
Go to Effects/PlugIn/Lokas Software/3D Shadow
Blur: 17
Transparency: 23
Angle X: 0
Angle Y: 0
Angle Z: 0
Zoom: 100
Offset X: -3
Offset Y: 8
Perspective: 80
Color: black
FYI Depending on where you've place your name on your tag, the shadow placement WILL be different.
I always try to place my name in right lower hand corner of my tag when I work on this.
Click OK
STEP 5:
Copy and paste in Animation Shop.
STEP 6:
Go to Edit and undo until you get to your plain name.
STEP 7:
Repeat all steps to step 5. Change the noise in step 1 to 40%
Attention:
STEP 8:
When you are pasting this second frame in Animation Shop, make sure you right click on the current frame there and choose Paste/After Current Frame.

Now click on frame 2 to activate it. If you don't see it, just click on the little arrow at bottom of your animation, it will move your frame out and you can click it. It's activated (selected) when the color changes to blue.
Go back to PSP.

STEP 9:
Go to Edit and undo until you get to your plain name.
STEP 10:
Repeat all steps to step 5. Change the noise in step 1 to 44%
STEP 11:
Your second frame should be selected. Right click on second frame and paste AFTER current frame.
You now have 3 frames with 3 different noise levels.

STEP 12:
Play your animation.
STEP 13.
Go to Edit, Select ALL.
Go to Edit, Copy.
STEP 14:
Activate tag you are working on or have completed.
Go to Edit, Select ALL.
Go to Edit, make sure Propagate Paste is depressed (selected).
Go to Edit, Paste, Paste into Selected Frame.
SAVE
Hope you enjoyed this tutorial,
Hugs Simone
Tutorial writen by SophisticatSimone aka Lorraine Halle on Monday, April 1st, 2013.
Play your animation.
STEP 13.
Go to Edit, Select ALL.
Go to Edit, Copy.
STEP 14:
Activate tag you are working on or have completed.
Go to Edit, Select ALL.
Go to Edit, make sure Propagate Paste is depressed (selected).
Go to Edit, Paste, Paste into Selected Frame.
SAVE
Hope you enjoyed this tutorial,
Hugs Simone
Tutorial writen by SophisticatSimone aka Lorraine Halle on Monday, April 1st, 2013.
Subscribe to:
Posts
(Atom)
CT TEAM