My Blinkie

Showing posts with label Grunge. Show all posts
Showing posts with label Grunge. Show all posts
Monday, May 20, 2013

♥♥♥
Please click on TAG to see in full size.
••• Supplies needed to complete this tutorial. •••
________________________________________________________________________
Programs: Paint Shop Pro, I'm using version 10. Animation Shop 3.
Plugin : Gradient Glow by Eye Candy 4000 (for name)
Font used: Carpenter
Tube of choice: I'm using "Zip It" by Barbara Jensen found in Package 32.
Scrap Kit : I'm using "Nina 2" by SkyScrap
Animation: SimoneAni-HOT
Mask: Masks0120
________________________________________________________________________
♥♥♥
Save your tag often. Nothing like working long and hard on a tag and PSP crashes.
♥♥♥
Open a new image 700 x 700.
C/P element 33 as a new layer.
Copy and paste your tube as a new layer and add drop shadow. Activate your frame layer.
Grab your selection tool and set your feather to 0. Selection type: rectangle, MODE: add shift, anti-alias checked.
Select the lower portion of your frame, (the portion covering your tube) and select it. Now promote selection to layer.
Drag this layer above your tube.
De-select.
If you have a close up of your tube, copy and paste it on your canvas. Move it to bottom in layers palette.
Activate your frame layer. Select your magic wand tool, tolerance 12, feather 0, match mode, RGB Value.
Click inside the frame. Go to Selections, Modify, expand by 10.
Go to Selections, Invert.
Activate your close up. Hit delete on your keyboard.
Copy and paste paper8 as a new layer and move to bottom.
Hit delete on your keyboard to remove extra.
Now activate your frame.
Go to Selections, Select all.
Go to Edit and Crop to Selection. This will remove any extra paper that we don't see on canvas.
C/P element 59 and move to the left, duplicate and mirror. Merge them and move down as last layer.
Click on frame layer.
C/P element 83 and paste as new layer. Re-size by 75%. If you need to enlarge your canvas, do so now, we can crop and re-size later.
Position castle at center and behind your frame. Make sure nothing is poking out anywhere.
Add drop shadow.
You can crop your tag now.
C/P element 7 and paste as new layer. Re-size by 50%. Move to the right side and over frame edge. Add drop shadow.
C/P element 13 and paste as new layer. Re-size by 25%. Move to the right side and over flower. Add drop shadow.
C/P element 35 and paste as new layer. Re-size by 55%. Move to the left side and at bottom of frame. Add drop shadow.
C/P element 65 and paste as new layer. Re-size by 60%. Move to the left side and at bottom of frame. In front of candle. Add drop shadow.
C/P element 88 and paste as new layer. Re-size by 80%. Move to the left side upper hand side and behind the frame. Duplicate and mirror. Add
drop shadow to both. Merge them together.
C/P element 10 and paste as new layer. Re-size by 80%. Position above frame layer and below the deep fushia flower layer. Add drop shadow.
Should be on the right hand side of frame.
C/P element 60 as a new layer. Re-size by 66%. Move to the right lower hand side of tag.
Open Paper 7 and duplicate. Re-size by 21% at 72 dpi.
Apply Mask 0120 and merge group.
Copy and paste as a new layer on your tag and send to bottom.
Merge visible.
Add your Artist Copyright.
Add your name and save as png.
If animating.
Go to Selections, select all.
Go to Edit and copy merged. Paste as a new animation in Animation Shop.
Hold your Ctrl key down and repeatedly hit letter L on your keyboard for a total of 22 frames you can cull animation afterwards.
You can watch the count on the lower right hand side of your screen in AS.
Open SimoneAni-HOT
Go to Edit, select all.
Go to Edit, copy.
Activate your tag.
Go to Edit, select all.
Go to Edit, make sure Propagate Paste is selected.
Go to Edit, Paste, paste into selected frames.
Position on your tag and click into place.
Play and save.
Don't forget to add your name.
You can see my name tutorial HERE.
To save:
Go to File, Save as, enter the name of your file and select the folder to save to.
Now click on Customize:
Under COLORS TAB:
Number of colors: 255 Colors
Create palette by: OPTIMIZED OCTREE
Reduce colors by: Error Diffusion
Under OPTIMIZATIONS TAB:
set a check mark beside the second, third and forth choices. UN-check the 1st and last.
Under PARTIAL TRANSPARENCY:
check Convert pixels less than 92
Yes, blend with this color: change to white #FFFFFF
Click OK. Click Next, next, next, next.
Play your animation.
At times your animation may or will come out terrible. Optimization in Animation Shop is not the greatest.
You can play around will your settings, especially under the Tab: Optimization. I change this setting at times from anywhere between 70 and 100.
Some people add a white background. To add background, go to Animation: Animation Properties, select Opaque and change color to white.
Hope you enjoyed this tutorial,
Hugs Simone
Please, always direct people to my blog to download my animations.
Do not load to any other download site and don't claim as your own.
Tutorial written by SophisticatSimone aka Lorraine Halle on Monday, May 20, 2013.
Please click on TAG to see in full size.
••• Supplies needed to complete this tutorial. •••
________________________________________________________________________
Programs: Paint Shop Pro, I'm using version 10. Animation Shop 3.
Plugin : Gradient Glow by Eye Candy 4000 (for name)
Font used: Carpenter
Tube of choice: I'm using "Zip It" by Barbara Jensen found in Package 32.
Scrap Kit : I'm using "Nina 2" by SkyScrap
Animation: SimoneAni-HOT
Mask: Masks0120
________________________________________________________________________
♥♥♥
Save your tag often. Nothing like working long and hard on a tag and PSP crashes.
♥♥♥
Open a new image 700 x 700.
C/P element 33 as a new layer.
Copy and paste your tube as a new layer and add drop shadow. Activate your frame layer.
Grab your selection tool and set your feather to 0. Selection type: rectangle, MODE: add shift, anti-alias checked.
Select the lower portion of your frame, (the portion covering your tube) and select it. Now promote selection to layer.
Drag this layer above your tube.
De-select.
If you have a close up of your tube, copy and paste it on your canvas. Move it to bottom in layers palette.
Activate your frame layer. Select your magic wand tool, tolerance 12, feather 0, match mode, RGB Value.
Click inside the frame. Go to Selections, Modify, expand by 10.
Go to Selections, Invert.
Activate your close up. Hit delete on your keyboard.
Copy and paste paper8 as a new layer and move to bottom.
Hit delete on your keyboard to remove extra.
Now activate your frame.
Go to Selections, Select all.
Go to Edit and Crop to Selection. This will remove any extra paper that we don't see on canvas.
C/P element 59 and move to the left, duplicate and mirror. Merge them and move down as last layer.
Click on frame layer.
C/P element 83 and paste as new layer. Re-size by 75%. If you need to enlarge your canvas, do so now, we can crop and re-size later.
Position castle at center and behind your frame. Make sure nothing is poking out anywhere.
Add drop shadow.
You can crop your tag now.
C/P element 7 and paste as new layer. Re-size by 50%. Move to the right side and over frame edge. Add drop shadow.
C/P element 13 and paste as new layer. Re-size by 25%. Move to the right side and over flower. Add drop shadow.
C/P element 35 and paste as new layer. Re-size by 55%. Move to the left side and at bottom of frame. Add drop shadow.
C/P element 65 and paste as new layer. Re-size by 60%. Move to the left side and at bottom of frame. In front of candle. Add drop shadow.
C/P element 88 and paste as new layer. Re-size by 80%. Move to the left side upper hand side and behind the frame. Duplicate and mirror. Add
drop shadow to both. Merge them together.
C/P element 10 and paste as new layer. Re-size by 80%. Position above frame layer and below the deep fushia flower layer. Add drop shadow.
Should be on the right hand side of frame.
C/P element 60 as a new layer. Re-size by 66%. Move to the right lower hand side of tag.
Open Paper 7 and duplicate. Re-size by 21% at 72 dpi.
Apply Mask 0120 and merge group.
Copy and paste as a new layer on your tag and send to bottom.
Merge visible.
Add your Artist Copyright.
Add your name and save as png.
If animating.
Go to Selections, select all.
Go to Edit and copy merged. Paste as a new animation in Animation Shop.
Hold your Ctrl key down and repeatedly hit letter L on your keyboard for a total of 22 frames you can cull animation afterwards.
You can watch the count on the lower right hand side of your screen in AS.
Open SimoneAni-HOT
Go to Edit, select all.
Go to Edit, copy.
Activate your tag.
Go to Edit, select all.
Go to Edit, make sure Propagate Paste is selected.
Go to Edit, Paste, paste into selected frames.
Position on your tag and click into place.
Play and save.
Don't forget to add your name.
You can see my name tutorial HERE.
To save:
Go to File, Save as, enter the name of your file and select the folder to save to.
Now click on Customize:
Under COLORS TAB:
Number of colors: 255 Colors
Create palette by: OPTIMIZED OCTREE
Reduce colors by: Error Diffusion
Under OPTIMIZATIONS TAB:
set a check mark beside the second, third and forth choices. UN-check the 1st and last.
Under PARTIAL TRANSPARENCY:
check Convert pixels less than 92
Yes, blend with this color: change to white #FFFFFF
Click OK. Click Next, next, next, next.
Play your animation.
At times your animation may or will come out terrible. Optimization in Animation Shop is not the greatest.
You can play around will your settings, especially under the Tab: Optimization. I change this setting at times from anywhere between 70 and 100.
Some people add a white background. To add background, go to Animation: Animation Properties, select Opaque and change color to white.
Hope you enjoyed this tutorial,
Hugs Simone
Please, always direct people to my blog to download my animations.
Do not load to any other download site and don't claim as your own.
Tutorial written by SophisticatSimone aka Lorraine Halle on Monday, May 20, 2013.


♥♥♥
Please click on TAG to see in full size.
••• Supplies needed to complete this tutorial. •••
________________________________________________________________________
Programs: Paint Shop Pro, I'm using version 10. Animation Shop 3.
Plugin : Gradient Glow by Eye Candy 4000 (for name)
Font used: Xiomara
Tube of choice: I'm using "Nina 2" by SkyScraps Pin Ups from SATC.
Scrap Kit : I'm using "Nina Terror" by Bibi's Collection from SATC
Animation: none
Mask: Masks0120 (one of mine)
________________________________________________________________________
♥♥♥
Save your tag often. Nothing like working long and hard on a tag and PSP crashes.
♥♥♥
Open Masks0120 in PSP and minimize. Open Paper 1 and duplicate. Close original.
Re-size by 90%. Make sure resolution is set to 72 dpi. Re-sample using: Smart Size and all layers checked.
Promote background to layer.
Go to Layers and select New Mask Layer/From Image. Find mask in drop down layer and apply.
Merge group. Triplicate this layer and merge them together.
Copy and paste your tube as a new layer. Add drop shadow. Move to left side of tag.
Click on your mask layer and go to Selections, select all.
Go to Edit, Crop to Selection.
Activate your tube layer.
Grab your selection tool and set your feather to 14. Selection type: rectangle, MODE: add shift, anti-alias checked.
Select the lower portion of your tubes thighs and delete. I usually hit delete twice. De-select.
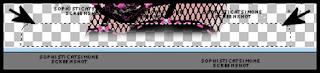
C/P element 4 as a new layer and re-size by 50%. Make sure "All Layers" is UN-checked. Place center bottom of tag. Duplicate and move it slightly over to the right.
C/P element 83 as a new layer and re-size by 50%. Duplicate and add drop shadows to both. Stagger their position and place them to the right hand side of canvas.
C/P element 26 as a new layer and re-size by 70%. Leave in center of tag bellow your tube. Add D/S.
C/P element 61 as a new layer and re-size by 70%. Move to right side and behind the shoes. Add D/S.
C/P element 25 as a new layer and re-size by 40%. Move to right upper side and in front of large black circle element. Add D/S.
C/P element 70 as a new layer. Position in front of large black circle element. Duplicate, merge and Add D/S. Move a little more to the right and a touch higher on your tag.
C/P element 59 as a new layer. Position in front of large black circle element. Move to the left side and add D/S.
Duplicate and free rotate by 90% and move to upper left hand side and move it below the black circle element.
Duplicate the original and move it to the right and make sure it's above the black circle.
C/P element 31 as a new layer and move to the top of tag and behind the black circle. Add D/S.
C/P element 55 as a new layer and move to the bottom of tag and in front of your tube on the left. Duplicate and drag over to the right side of tag and drag this layer below the shoes in the layers palette. Add D/S.
C/P element 24 as a new layer and place in front at bottom of tag.
C/P element 23 as a new layer and move this little kitty in front of your tube. Re-size to your liking. Add drop shadow.
C/P element 84 as a new layer and move this tiara on your kitty's head. Re-size to your liking. Add drop shadow.
Merge them together.
C/P element 60 as a new layer and re-size by 30% and move mid tag, over the bottom flowers. Add drop shadow.
C/P element 79 as a new layer and re-size by 30% and move to the top of one of the sexy shoes. Add drop shadow.
Merge visible.
Add artist copyright.
Add your name. I used font: Xiomara, size 72, color black and I applied the Gradient Glow effect from Eye Candy Plugin.
Merge down and save as a PNG.
Hope you enjoyed this tutorial,
Hugs Simone
Please, always direct people to my blog to download my animations.
Do not load to any other download site and don't claim as your own.
Tutorial written by SophisticatSimone aka Lorraine Halle on Monday, May 20, 2013.
Please click on TAG to see in full size.
••• Supplies needed to complete this tutorial. •••
________________________________________________________________________
Programs: Paint Shop Pro, I'm using version 10. Animation Shop 3.
Plugin : Gradient Glow by Eye Candy 4000 (for name)
Font used: Xiomara
Tube of choice: I'm using "Nina 2" by SkyScraps Pin Ups from SATC.
Scrap Kit : I'm using "Nina Terror" by Bibi's Collection from SATC
Animation: none
Mask: Masks0120 (one of mine)
________________________________________________________________________
♥♥♥
Save your tag often. Nothing like working long and hard on a tag and PSP crashes.
♥♥♥
Open Masks0120 in PSP and minimize. Open Paper 1 and duplicate. Close original.
Re-size by 90%. Make sure resolution is set to 72 dpi. Re-sample using: Smart Size and all layers checked.
Promote background to layer.
Go to Layers and select New Mask Layer/From Image. Find mask in drop down layer and apply.
Merge group. Triplicate this layer and merge them together.
Copy and paste your tube as a new layer. Add drop shadow. Move to left side of tag.
Click on your mask layer and go to Selections, select all.
Go to Edit, Crop to Selection.
Activate your tube layer.
Grab your selection tool and set your feather to 14. Selection type: rectangle, MODE: add shift, anti-alias checked.
Select the lower portion of your tubes thighs and delete. I usually hit delete twice. De-select.

C/P element 4 as a new layer and re-size by 50%. Make sure "All Layers" is UN-checked. Place center bottom of tag. Duplicate and move it slightly over to the right.
C/P element 83 as a new layer and re-size by 50%. Duplicate and add drop shadows to both. Stagger their position and place them to the right hand side of canvas.
C/P element 26 as a new layer and re-size by 70%. Leave in center of tag bellow your tube. Add D/S.
C/P element 61 as a new layer and re-size by 70%. Move to right side and behind the shoes. Add D/S.
C/P element 25 as a new layer and re-size by 40%. Move to right upper side and in front of large black circle element. Add D/S.
C/P element 70 as a new layer. Position in front of large black circle element. Duplicate, merge and Add D/S. Move a little more to the right and a touch higher on your tag.
C/P element 59 as a new layer. Position in front of large black circle element. Move to the left side and add D/S.
Duplicate and free rotate by 90% and move to upper left hand side and move it below the black circle element.
Duplicate the original and move it to the right and make sure it's above the black circle.
C/P element 31 as a new layer and move to the top of tag and behind the black circle. Add D/S.
C/P element 55 as a new layer and move to the bottom of tag and in front of your tube on the left. Duplicate and drag over to the right side of tag and drag this layer below the shoes in the layers palette. Add D/S.
C/P element 24 as a new layer and place in front at bottom of tag.
C/P element 23 as a new layer and move this little kitty in front of your tube. Re-size to your liking. Add drop shadow.
C/P element 84 as a new layer and move this tiara on your kitty's head. Re-size to your liking. Add drop shadow.
Merge them together.
C/P element 60 as a new layer and re-size by 30% and move mid tag, over the bottom flowers. Add drop shadow.
C/P element 79 as a new layer and re-size by 30% and move to the top of one of the sexy shoes. Add drop shadow.
Merge visible.
Add artist copyright.
Add your name. I used font: Xiomara, size 72, color black and I applied the Gradient Glow effect from Eye Candy Plugin.
Merge down and save as a PNG.
Hope you enjoyed this tutorial,
Hugs Simone
Please, always direct people to my blog to download my animations.
Do not load to any other download site and don't claim as your own.
Tutorial written by SophisticatSimone aka Lorraine Halle on Monday, May 20, 2013.
Saturday, April 27, 2013

♥♥♥
Please click on TAG to see in full size.
••• Supplies needed to complete this tutorial. •••
________________________________________________________________________
Programs: Paint Shop Pro, I'm using version 10. Animation Shop 3.
Plugin : Filters Unlimited
Font used: Tube of choice: I'm using Manon by Marc Duval from SATC
Scrap Kit : I'm using "Dark Love Memories" by Disturbed Scraps from SATC
________________________________________________________________________
♥♥♥
Save your tag often. Nothing like working long and hard on a tag and PSP crashes.
♥♥♥
Open paper 003 and duplicate. Close original. Re-size by 85%. Promote background to layer.
This will be our working tag.
Go to effects, plugins, Filters Unlimited (ICNET filters), Edges, Square, Square Edge 16.
Apply.
Open paper 006, shift D to duplicate. Close original. Re-size by 60%. Copy and paste as a new layer on your 1st paper.
Leave in center of tag.
Duplicate and move this copy a little to the left and a little to the bottom. Don't pass the mask border.
Add small drop shadows to each.
Copy and paste the arch, element (043) as a new layer, re-size by 70%, dpi 72 and smart size checked and move to the right side of tag.
Add drop shadow.
Copy and paste the leaf, element (035) as a new layer and re-size by 60%. Using your mover tool position leaf in the upper left hand corner of tag.
Will readjust once our frame is on. Add drop shadow.
Copy and paste the pocket watch, element (018) as a new layer. Using your mover tool position clock in the lower left hand corner of tag.
We will readjust once our frame is on. Add drop shadow.
Copy and paste the post card, element (010) as a new layer. Leave it in the center. Duplicate layer.
On original layer, set blend mode to : Soft Light
On duplicate layer, set blend mode to : Soft Light
Copy and paste the frame, element (046) as a new layer and re-size by 60%. Leave this layer in the center. Duplicate.
Leave original as it. On duplicate layer change blend mode to : Hard light.
Duplicate this layer and change blend mode to : Multiply
Add drop shadow to the very bottom frame only.
In layers palette activate the top post card layer.
Now copy and paste element (040) as a new layer and position to the left a little and using your selection rectangle remove extra leaves from bottom of frame.
Using your lasso tool, feather set to zero. Select a portion of those leaves and promote to new layer.
Go to Selections, select none.
Using your mover tool, move to the left upper edge of your frame. Make sure this layer in above your frame layer.
You can rotate right or left if you want or you can mirror and flip and reposition so it's in the upper left hand side of tag.
Play around and see what you like best.
Add drop shadow to each layer.
Copy and paste element (005) as a new layer and mirror and flip.
Add drop shadow.
Grab your magic wand, feather set to 0, tolerance set to 15 and click inside your frame layer (the bottom one).
Go to Selections, Modify, Expand by 12.
Now copy and paste your tube as a new layer. Using your mover tool position your tube inside the frame.
Go to Selections, invert and delete extra from your tube layer.
Now duplicate this layer.
Go to selections and invert. Click on leaf layer and hit delete, click on all elements you don't want showing up within your frame.
Don't delete any of the paper layers or the post card layer.
Go to selections and select NONE.
Now on original tube layer, set blend mode to : Overlay
On duplicate tube layer, set blend mode to : Luminance (L) and decrease opacity to 59.
Copy and paste element (062) as a new layer and move below both tube layer. Using mover tool, position to the right upper hand side of frame/tag.
Activate your top tube layer.
Now copy and paste element (066) as a new layer and position the text in the upper right hand corner of frame. Using selection tool, remove any text outside the frame.
Activate your top frame layer in layers palette.
Copy and paste element (067) as a new layer.
Duplicate and mirror.
Copy and paste element (058) as a new layer and move to the left side of frame.
In layers palette, double click on this layer and the "Layers Properties" box will pop up.
Put a check mark beside "highlight in layers palette" and then select a color of choice.
Double click in the color box and you can choose the one you one.
Click ok.
Please click on TAG to see in full size.
••• Supplies needed to complete this tutorial. •••
________________________________________________________________________
Programs: Paint Shop Pro, I'm using version 10. Animation Shop 3.
Plugin : Filters Unlimited
Font used: Tube of choice: I'm using Manon by Marc Duval from SATC
Scrap Kit : I'm using "Dark Love Memories" by Disturbed Scraps from SATC
________________________________________________________________________
♥♥♥
Save your tag often. Nothing like working long and hard on a tag and PSP crashes.
♥♥♥
Open paper 003 and duplicate. Close original. Re-size by 85%. Promote background to layer.
This will be our working tag.
Go to effects, plugins, Filters Unlimited (ICNET filters), Edges, Square, Square Edge 16.
Apply.
Open paper 006, shift D to duplicate. Close original. Re-size by 60%. Copy and paste as a new layer on your 1st paper.
Leave in center of tag.
Duplicate and move this copy a little to the left and a little to the bottom. Don't pass the mask border.
Add small drop shadows to each.
Copy and paste the arch, element (043) as a new layer, re-size by 70%, dpi 72 and smart size checked and move to the right side of tag.
Add drop shadow.
Copy and paste the leaf, element (035) as a new layer and re-size by 60%. Using your mover tool position leaf in the upper left hand corner of tag.
Will readjust once our frame is on. Add drop shadow.
Copy and paste the pocket watch, element (018) as a new layer. Using your mover tool position clock in the lower left hand corner of tag.
We will readjust once our frame is on. Add drop shadow.
Copy and paste the post card, element (010) as a new layer. Leave it in the center. Duplicate layer.
On original layer, set blend mode to : Soft Light
On duplicate layer, set blend mode to : Soft Light
Copy and paste the frame, element (046) as a new layer and re-size by 60%. Leave this layer in the center. Duplicate.
Leave original as it. On duplicate layer change blend mode to : Hard light.
Duplicate this layer and change blend mode to : Multiply
Add drop shadow to the very bottom frame only.
In layers palette activate the top post card layer.
Now copy and paste element (040) as a new layer and position to the left a little and using your selection rectangle remove extra leaves from bottom of frame.
Using your lasso tool, feather set to zero. Select a portion of those leaves and promote to new layer.
Go to Selections, select none.
Using your mover tool, move to the left upper edge of your frame. Make sure this layer in above your frame layer.
You can rotate right or left if you want or you can mirror and flip and reposition so it's in the upper left hand side of tag.
Play around and see what you like best.
Add drop shadow to each layer.
Copy and paste element (005) as a new layer and mirror and flip.
Add drop shadow.
Grab your magic wand, feather set to 0, tolerance set to 15 and click inside your frame layer (the bottom one).
Go to Selections, Modify, Expand by 12.
Now copy and paste your tube as a new layer. Using your mover tool position your tube inside the frame.
Go to Selections, invert and delete extra from your tube layer.
Now duplicate this layer.
Go to selections and invert. Click on leaf layer and hit delete, click on all elements you don't want showing up within your frame.
Don't delete any of the paper layers or the post card layer.
Go to selections and select NONE.
Now on original tube layer, set blend mode to : Overlay
On duplicate tube layer, set blend mode to : Luminance (L) and decrease opacity to 59.
Copy and paste element (062) as a new layer and move below both tube layer. Using mover tool, position to the right upper hand side of frame/tag.
Activate your top tube layer.
Now copy and paste element (066) as a new layer and position the text in the upper right hand corner of frame. Using selection tool, remove any text outside the frame.
Activate your top frame layer in layers palette.
Copy and paste element (067) as a new layer.
Duplicate and mirror.
Copy and paste element (058) as a new layer and move to the left side of frame.
In layers palette, double click on this layer and the "Layers Properties" box will pop up.
Put a check mark beside "highlight in layers palette" and then select a color of choice.
Double click in the color box and you can choose the one you one.
Click ok.
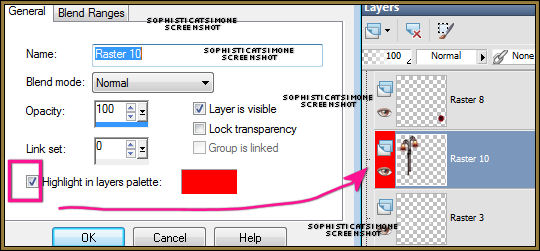
Close properties box.
Copy and paste the books, element (009) as a new layer and bring low in front of frame.
Duplicate layer and change blend mode to : Multiply
Copy and paste ribbon element (052) as a new layer and re-size by 75%.
Position low on tag and add drop shadow.
Copy and paste poppy flower element (031) as a new layer. Re-size by 25%.
Move down low in front of pocket watch. Make sure this layer is behind the ribbon.
Duplicate your flower and free rotate to the right by 90 degrees.
Move this layer above the ribbon and position slightly to the left.
Duplicate layer and move to the left side of tag on the frame about midway.
Add drop shadow to each flower.
In layers palette activate the bottom most flower layer.
Now copy and paste element (069) as a new layer and move to the right of the tag.
Copy and paste element (068) as a new layer and move to the right of the tag.
Copy and paste violin element (059) as a new layer and move to the right side of frame, over it.
Add drop shadow.
Copy and paste flower element (033) as a new layer. Re-size and position on books near the bottom of violin. Add drop shadow.
Copy and paste the mirror element (021) as a new layer and mirror and flip.
Position to the left side of frame. Add drop shadow.
Copy and paste shoes element (05) as a new layer. Duplicate and move slightly forward.
Add drop shadow to each.
Copy and paste element (022) as a new layer. Position so it looks draped over the frame.
Grab your selection tool set to : point to point, feather 0.
Click all around the top portion (the area you want to remove) and hit delete on your keyboard.
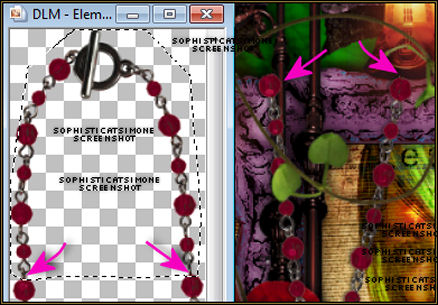
Add drop shadow to the necklace.
Copy and paste big silver ball element (003) as a new layer and position at the bottom of tag in front of books. Duplicate and re-size, move to the left a little bit. Add drop shadow to each.
Copy and paste element (002) as a new layer and re-size. Move to the right side of tag, next to poppy flower. Add drop shadow.
One by one, X-out all layers, all the way down to the high lighted layer, which is the double lantern. Skip the lantern layer. Click on the next layer below it and right click and select merge visible.
Now X-out that bottom layer and the lantern layer. UN-hide all your other layers and then merge visible. You should have 3 layers now.
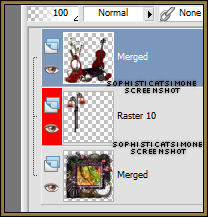
You can add your copyright layer now and merge it down to the top layer.
Activate your middle layer, the lantern layer.
Grab your magic wand, tolerance set to 12, feather set to 0 and match mode set to RGB Value and Mode set to Add (shift). Now click on the brightest part of the light on both lanterns.
Now go to Selections, modify and expand by 5.
Now go to Selections, modify, feather, by 15.
Now go to Adjust, Brightness and Contrast, Brightness/Contrast and enter the following:
B=6 C=0
Select all, and go to Edit and copy merged.
Go to Animation Shop, right click and paste as a new animation.
Come back to PSP.
Go to Edit and undo select all.
Go to Edit and undo Brightness and contrast.
Now repeat Brightness and contrast but change to:
B=12 C=0
Select all, and go to Edit and copy merged.
Go to Animation Shop, right click on frame 1 and paste after selected frame.
Come back to PSP.
Go to Edit and undo select all.
Go to Edit and undo Brightness and contrast.
Now repeat Brightness and contrast but change to:
B=18 C=0
Select all, and go to Edit and copy merged.
Go to Animation Shop, right click on the frame 2 and paste after selected frame.Come back to PSP.
Do it all again, with a Brightness of 24. Paste after frame 3 in AS.
Go to Edit, select all.
Go to Edit and copy.
Click on Frame 4. Go to Edit and paste after selected frame.
Go to Animation, select Reverse frames.
Go to View, and click on Animation.
You can add your name and save.
See Animating Your Name tutorial HERE
To save:
Go to File, Save as, enter the name of your file and select the folder to save to.
Now click on Customize:
Under COLORS TAB:
Number of colors: 255 Colors
Create palette by: OPTIMIZED OCTREE
Reduce colors by: Error Diffusion
Under OPTIMIZATIONS TAB:
set a check mark beside the second, third and forth choices. UN-check the 1st and last.
Under PARTIAL TRANSPARENCY:
check Convert pixels less than 92
Yes, blend with this color: change to white #FFFFFF
Click OK. Click Next, next, next, next.
Play your animation.
At times your animation may or will come out terrible. Optimization in Animation Shop is not the greatest.
You can play around will your settings, especially under the Tab: Optimization. I change this setting at times from anywhere between 70 and 100.
Some people add a white background. To add background, go to Animation: Animation Properties, select Opaque and change color to white.
Hope you enjoyed this tutorial,
Hugs Simone
Please, always direct people to my blog to download my animations.
Do not load to any other download site and don't claim as your own.
Tutorial written by SophisticatSimone aka Lorraine Halle on Saturday, April 27, 2013.
Monday, April 22, 2013

♥♥♥
Please click on TAG to see in full size.
••• Supplies needed to complete this tutorial. •••
________________________________________________________________________
Programs: Paint Shop Pro, I'm using version 10. Animation Shop 3.
Plugin :
Font used:
Tube of choice: I'm using Roxy by Diana Gali from SATC.
Scrap Kit : Roxy Rocks by Bibi's Collection found HERE
Mask: By me, Mask102SophisticatSimone HERE
Animations: By me, SimoneAni405 HERE
________________________________________________________________________
♥♥♥
Save your tag often. Nothing like working long and hard on a tag and PSP crashes.
Please click on TAG to see in full size.
••• Supplies needed to complete this tutorial. •••
________________________________________________________________________
Programs: Paint Shop Pro, I'm using version 10. Animation Shop 3.
Plugin :
Font used:
Tube of choice: I'm using Roxy by Diana Gali from SATC.
Scrap Kit : Roxy Rocks by Bibi's Collection found HERE
Mask: By me, Mask102SophisticatSimone HERE
Animations: By me, SimoneAni405 HERE
________________________________________________________________________
♥♥♥
Save your tag often. Nothing like working long and hard on a tag and PSP crashes.
♥♥♥
Let's begin!
Open Bibi Roxy Rocks Element (4). Copy and paste it as a new Image.
Close original. Re-size new image by 90% at 72dpi.
Copy and paste element (9) as a new layer and re-size by 70%. Re-position on your canvas as you like.
Select your crop tool and snap crop rectangle to Merged Opaque.
Go to Selections, Select all. Go to selections, Modify, contract by 10.
Go to Selections, Feather, 15.
Go to Selections, Invert and delete a couple of times by tapping delete key on your keyboard.
De-select.
Copy and paste element (75) as a new layer and re-size by 45% at 72dpi. Re-position on your canvas to the top.
Copy and paste element (79) as a new layer and re-size by 100% at 72dpi. Move to the left side of your canvas.
Duplicate layer and mirror.
Copy and paste element (82) as a new layer and re-size by 100% at 72dpi. Move to the left side of your canvas.
This layer should be below the speaker. So behind it.
Copy and paste element (5) as a new layer and re-size by 40% at 72dpi. Re-position on your canvas to the left side of tag, in front of speaker.
Copy and paste element (106) as a new layer and re-size by 100% at 72dpi. Move to the left side of your canvas at the top of tag and over the speaker.
Copy and paste element (48) as a new layer and re-size by 36% at 72dpi. Move to the right side of your canvas at the top of tag and over the speaker.
Copy and paste element (76) as a new layer and re-size by 57% at 72dpi. Move to the right side of your canvas at the bottom of tag and behind the speaker.
Copy and paste element (58) as a new layer and re-size by 55% at 72dpi. Move to the center of your canvas and behind the barrels.
Copy and paste element (6) as a new layer and re-size by 45% at 72dpi. Re-position on your canvas to the right side of tag, in front of speaker.
Copy and paste element (54) as a new layer and re-size by 45% at 72dpi. Re-position on your canvas to the left side of tag, in behind the speaker and glow.
Duplicate and mirror.
Continue this way with the following elements, 26, 33, 51, 56, 91. Don't forget to re-size them to your liking and position them around. Element 91, which is the
bow tie I placed on the dog.
Copy and paste your tube and re-size if needed.
Add drop shadow of choice to all elements.
Add background paper. I used paper 7.
Select your crop tool and snap crop rectangle to Merged Opaque.
Open Mask of choice and apply to background paper.
Merge group.
Add artist copyright and license number.
Add scrap kit maker credit.
Add your name and merge all visible and save as a PNG.
If animating please do the following.
Go to edit and UN-merge.
Go to Selections, select all.
Go to Edit and copy merged. Paste as a new animation in Animation Shop.
Hold your Ctrl key down and repeatedly hit letter L on your keyboard for a total of 18 frames.
You can watch the count on the lower right hand side of your screen in AS.
Open SimoneAni405
Go to Edit, select all.
Go to Edit, copy.
Activate your tag.
Go to Edit, select all.
Go to Edit, make sure Propagate Paste is selected.
Go to Edit, Paste, paste into selected frames.
Position on your tag and click into place.
Let's begin!
Open Bibi Roxy Rocks Element (4). Copy and paste it as a new Image.
Close original. Re-size new image by 90% at 72dpi.
Copy and paste element (9) as a new layer and re-size by 70%. Re-position on your canvas as you like.
Select your crop tool and snap crop rectangle to Merged Opaque.
Go to Selections, Select all. Go to selections, Modify, contract by 10.
Go to Selections, Feather, 15.
Go to Selections, Invert and delete a couple of times by tapping delete key on your keyboard.
De-select.
Copy and paste element (75) as a new layer and re-size by 45% at 72dpi. Re-position on your canvas to the top.
Copy and paste element (79) as a new layer and re-size by 100% at 72dpi. Move to the left side of your canvas.
Duplicate layer and mirror.
Copy and paste element (82) as a new layer and re-size by 100% at 72dpi. Move to the left side of your canvas.
This layer should be below the speaker. So behind it.
Copy and paste element (5) as a new layer and re-size by 40% at 72dpi. Re-position on your canvas to the left side of tag, in front of speaker.
Copy and paste element (106) as a new layer and re-size by 100% at 72dpi. Move to the left side of your canvas at the top of tag and over the speaker.
Copy and paste element (48) as a new layer and re-size by 36% at 72dpi. Move to the right side of your canvas at the top of tag and over the speaker.
Copy and paste element (76) as a new layer and re-size by 57% at 72dpi. Move to the right side of your canvas at the bottom of tag and behind the speaker.
Copy and paste element (58) as a new layer and re-size by 55% at 72dpi. Move to the center of your canvas and behind the barrels.
Copy and paste element (6) as a new layer and re-size by 45% at 72dpi. Re-position on your canvas to the right side of tag, in front of speaker.
Copy and paste element (54) as a new layer and re-size by 45% at 72dpi. Re-position on your canvas to the left side of tag, in behind the speaker and glow.
Duplicate and mirror.
Continue this way with the following elements, 26, 33, 51, 56, 91. Don't forget to re-size them to your liking and position them around. Element 91, which is the
bow tie I placed on the dog.
Copy and paste your tube and re-size if needed.
Add drop shadow of choice to all elements.
Add background paper. I used paper 7.
Select your crop tool and snap crop rectangle to Merged Opaque.
Open Mask of choice and apply to background paper.
Merge group.
Add artist copyright and license number.
Add scrap kit maker credit.
Add your name and merge all visible and save as a PNG.
If animating please do the following.
Go to edit and UN-merge.
Go to Selections, select all.
Go to Edit and copy merged. Paste as a new animation in Animation Shop.
Hold your Ctrl key down and repeatedly hit letter L on your keyboard for a total of 18 frames.
You can watch the count on the lower right hand side of your screen in AS.
Open SimoneAni405
Go to Edit, select all.
Go to Edit, copy.
Activate your tag.
Go to Edit, select all.
Go to Edit, make sure Propagate Paste is selected.
Go to Edit, Paste, paste into selected frames.
Position on your tag and click into place.

Play and save.
Don't forget to add your name.
You can see my name tutorial HERE.
To save:
Go to File, Save as, enter the name of your file and select the folder to save to.
Now click on Customize:
Under COLORS TAB:
Number of colors: 255 Colors
Create palette by: OPTIMIZED OCTREE
Reduce colors by: Error Diffusion
Under OPTIMIZATIONS TAB:
set a check mark beside the second, third and forth choices. UN-check the 1st and last.
Under PARTIAL TRANSPARENCY:
check Convert pixels less than 92
Yes, blend with this color: change to white #FFFFFF
Click OK. Click Next, next, next, next.
Play your animation.
At times your animation may or will come out terrible. Optimization in Animation Shop is not the greatest.
You can play around will your settings, especially under the Tab: Optimization. I change this setting at times from anywhere between 70 and 100.
Some people add a white background. To add background, go to Animation: Animation Properties, select Opaque and change color to white.
Hope you enjoyed this tutorial,
Hugs Simone
Please, always direct people to my blog to download my animations.
Do not load to any other download site and don't claim as your own.
Tutorial written by SophisticatSimone aka Lorraine Halle on Monday, April 22, 2013.
Hugs Simone
Please, always direct people to my blog to download my animations.
Do not load to any other download site and don't claim as your own.
Tutorial written by SophisticatSimone aka Lorraine Halle on Monday, April 22, 2013.
Sunday, April 21, 2013

♥♥♥
Please click on TAG to see in full size.
••• Supplies needed to complete this tutorial. •••
________________________________________________________________________
Programs: Paint Shop Pro, I'm using version 10. Animation Shop 3.
Plugin : none
Font used: Copperplate Gothic Bold
Tube of choice: I'm using Christie by Jose Cano
Scrap Kit : I'm using "Dangerous B!" by SkyScrap
Mask: By me, Mask102SophisticatSimone HERE
Animations: By me, SimoneAni-Dangerous Tutorial HERE
________________________________________________________________________
♥♥♥
Save your tag often. Nothing like working long and hard on a tag and PSP crashes.
♥♥♥
Open a new image 700 x 700.
Open element SS-E68 and copy. Paste as a new layer on your canvas.
Re-size by 65%. Center for now.
Copy and paste element SS-E53 as a new layer. Move to the upper right hand corner and under the photo frame.
Duplicate, go to Image, free rotate to the left by 90 degrees. Move this layer to the left upper hand side.
Duplicate, go to Image, free rotate to the left by 90 degrees. Move this layer to the left lower hand side.
Duplicate, go to Image, free rotate to the left by 90 degrees. Move this layer to the right lower hand side.
Hide your picture frame and merge visible.
Un-hide your picture.
Grab your magic wand, set to
Add(shift)
RGB Value
Tolerance: 12
Contiguous : checked
Feather : 0
Anti-alias : checked.
Click on the inside of the frame, the black area as well as the dark grey/black area.
Copy and paste your tube close up as a new layer.
Select your mover tool and position it side the selection.
Go to selections, invert and delete.
Go to selections, select all, go to Image, crop to selection.
Go to selections, select none.
In layers palette, change blend mode on your tube to overlay or screen.
X-out your splatter layer and merge visible.
Un-hide your splatter layer.
Add drop shadow to your picture frame.
Copy and paste your tube as a new layer. Re-size if needed. I re-sized mine by 75%.
Position and add drop shadow.
Copy and paste element SS-E61 as a new layer. Move to the right side of tag, below the frame picture and in layers palette move it down below your tube. Add
drop shadow.
Copy and paste element SS-E5 as a new layer. Move to the right side your tube and the bottom of tag and in layers palette move it as top layer. Add drop shadow.
Copy and paste element SS-E60 as a new layer. Re-size by 60%. Move to the left side your tube and in layers palette move it below tube layer. Add drop shadow.
Copy and paste element SS-E66 as a new layer. Re-size by 45%. Move to the left side your tube and in layers palette move it below tube layer and in front of gas
pump. Move this element to lower left hand side of tag. Add drop shadow.
Copy and paste element SS-E25 as a new layer. Re-size by 30%. Move to the right side your tag and in layers palette move it below the ghetto blaster. Add drop
shadow.
Copy and paste element SS-E65 as a new layer. Re-size by 20%. Move to the right side your tag and make it appear like the shoe is in the crate. Duplicate and move
this shoe a little to the left. Add drop shadow to each shoe.
Copy and paste element SS-E15 as a new layer. Re-size by 50%. Move to the right side your tag and make it appear like it's behind the car windshield. It should be
on the bottom of picture frame.
Copy and paste element SS-E72 as a new layer. Re-size by 30%. Move to the right side your tag and make it appear like it's sitting on top of the crate, add drop
shadow.
Copy and paste element SS-E62 as a new layer. Re-size by 30%. Move to the left side your tag and move to upper left hand side of tag and add drop shadow.
Copy and paste element SS-E21 as a new layer. Re-size by 55%. Move to the bottom left side your tag and move over the pump in layers palette. Duplicate and
mirror. Flip and position over your picture frame in upper right hand side corner. Merge these two layers.
Copy and paste it again and move behind your tube on the upper left hand side of tag. Behind the don't walk sign and in front of your picture frame.
Copy and paste the following elements: E74, E54, E44, E23, E55 and re-size and position on your tag where you like. Add drop shadow to each.
Copy and paste element SS-E31 as a new layer and move to the right side of your tag. Add drop shadow. Make it overlap your picture frame a little.
Copy and paste element SS-E33 as a new layer and move to the left side of your tag. Add drop shadow. Make it overlap the gas pump.
Copy and paste element SS-E48 as a new layer and re-size by 55%. Move to the left side of your tag. Add drop shadow. Move behind the don't walk sign and in
front of the black leaves. Add drop shadow. Duplicate and move to the right side of tag. Move behind the roses.
Open Mask0102SophisticatSimone.
Copy and paste paper 5 as a new layer on your tag and move to bottom. Crop merged Opaque.
Go to Layers, New Mask Layer, from Image. Find mask in drop down list. Apply.
In layers palette right click on mask and merge group.
Add artist copyright and scrap kit maker credit. Merge visible.
If you are not animating, add your name and save as PNG.
If animating, go to selections, select all and copy.
In Animation Shop, right click and paste as a new animation.
Hold your Ctrl key down and repeatedly hit letter L on your keyboard for a total of 11 frames.
You can watch the count on the lower right hand side of your screen in AS.
Open SimoneAni-Dangerous-001
Go to Edit, select all.
Go to Edit, copy.
Activate your tag.
Go to Edit, select all.
Go to Edit, make sure Propagate Paste is selected.
Go to Edit, Paste, paste into selected frames.
Position on your tag, I placed the money low on tag near her knee and click into place.
Open SimoneAni-Dangerous-002
Go to Edit, select all.
Go to Edit, copy.
Activate your tag.
Go to Edit, select all.
Go to Edit, Paste, paste into selected frames.
Position on your tag, I place the largest of the $ symbols on the speaker. Just move your cursor around you will see it and click into place.
I added another layer of animation.
Open SimoneAni-Dangerous-003, repeat the steps and make sure you place this one perfectly on the $ signs.
Play and save.
Don't forget to add your name.
You can see my name tutorial HERE.
To save:
Go to File, Save as, enter the name of your file and select the folder to save to.
Now click on Customize:
Under COLORS TAB:
Number of colors: 255 Colors
Create palette by: OPTIMIZED OCTREE
Reduce colors by: Error Diffusion
Under OPTIMIZATIONS TAB:
set a check mark beside the second, third and forth choices. UN-check the 1st and last.
Under PARTIAL TRANSPARENCY:
check Convert pixels less than 92
Yes, blend with this color: change to white #FFFFFF
Click OK. Click Next, next, next, next.
Play your animation.
At times your animation may or will come out terrible. Optimization in Animation Shop is not the greatest.
You can play around will your settings, especially under the Tab: Optimization. I change this setting at times from anywhere between 70 and 100.
Some people add a white background. To add background, go to Animation: Animation Properties, select Opaque and change color to white.
Hope you enjoyed this tutorial,
Hugs Simone
Please, always direct people to my blog to download my animations.
Do not load to any other download site and don't claim as your own.
Tutorial written by SophisticatSimone aka Lorraine Halle on Sunday, April 21, 2013.
Please click on TAG to see in full size.
••• Supplies needed to complete this tutorial. •••
________________________________________________________________________
Programs: Paint Shop Pro, I'm using version 10. Animation Shop 3.
Plugin : none
Font used: Copperplate Gothic Bold
Tube of choice: I'm using Christie by Jose Cano
Scrap Kit : I'm using "Dangerous B!" by SkyScrap
Mask: By me, Mask102SophisticatSimone HERE
Animations: By me, SimoneAni-Dangerous Tutorial HERE
________________________________________________________________________
♥♥♥
Save your tag often. Nothing like working long and hard on a tag and PSP crashes.
♥♥♥
Open a new image 700 x 700.
Open element SS-E68 and copy. Paste as a new layer on your canvas.
Re-size by 65%. Center for now.
Copy and paste element SS-E53 as a new layer. Move to the upper right hand corner and under the photo frame.
Duplicate, go to Image, free rotate to the left by 90 degrees. Move this layer to the left upper hand side.
Duplicate, go to Image, free rotate to the left by 90 degrees. Move this layer to the left lower hand side.
Duplicate, go to Image, free rotate to the left by 90 degrees. Move this layer to the right lower hand side.
Hide your picture frame and merge visible.
Un-hide your picture.
Grab your magic wand, set to
Add(shift)
RGB Value
Tolerance: 12
Contiguous : checked
Feather : 0
Anti-alias : checked.
Click on the inside of the frame, the black area as well as the dark grey/black area.
Copy and paste your tube close up as a new layer.
Select your mover tool and position it side the selection.
Go to selections, invert and delete.
Go to selections, select all, go to Image, crop to selection.
Go to selections, select none.
In layers palette, change blend mode on your tube to overlay or screen.
X-out your splatter layer and merge visible.
Un-hide your splatter layer.
Add drop shadow to your picture frame.
Copy and paste your tube as a new layer. Re-size if needed. I re-sized mine by 75%.
Position and add drop shadow.
Copy and paste element SS-E61 as a new layer. Move to the right side of tag, below the frame picture and in layers palette move it down below your tube. Add
drop shadow.
Copy and paste element SS-E5 as a new layer. Move to the right side your tube and the bottom of tag and in layers palette move it as top layer. Add drop shadow.
Copy and paste element SS-E60 as a new layer. Re-size by 60%. Move to the left side your tube and in layers palette move it below tube layer. Add drop shadow.
Copy and paste element SS-E66 as a new layer. Re-size by 45%. Move to the left side your tube and in layers palette move it below tube layer and in front of gas
pump. Move this element to lower left hand side of tag. Add drop shadow.
Copy and paste element SS-E25 as a new layer. Re-size by 30%. Move to the right side your tag and in layers palette move it below the ghetto blaster. Add drop
shadow.
Copy and paste element SS-E65 as a new layer. Re-size by 20%. Move to the right side your tag and make it appear like the shoe is in the crate. Duplicate and move
this shoe a little to the left. Add drop shadow to each shoe.
Copy and paste element SS-E15 as a new layer. Re-size by 50%. Move to the right side your tag and make it appear like it's behind the car windshield. It should be
on the bottom of picture frame.
Copy and paste element SS-E72 as a new layer. Re-size by 30%. Move to the right side your tag and make it appear like it's sitting on top of the crate, add drop
shadow.
Copy and paste element SS-E62 as a new layer. Re-size by 30%. Move to the left side your tag and move to upper left hand side of tag and add drop shadow.
Copy and paste element SS-E21 as a new layer. Re-size by 55%. Move to the bottom left side your tag and move over the pump in layers palette. Duplicate and
mirror. Flip and position over your picture frame in upper right hand side corner. Merge these two layers.
Copy and paste it again and move behind your tube on the upper left hand side of tag. Behind the don't walk sign and in front of your picture frame.
Copy and paste the following elements: E74, E54, E44, E23, E55 and re-size and position on your tag where you like. Add drop shadow to each.
Copy and paste element SS-E31 as a new layer and move to the right side of your tag. Add drop shadow. Make it overlap your picture frame a little.
Copy and paste element SS-E33 as a new layer and move to the left side of your tag. Add drop shadow. Make it overlap the gas pump.
Copy and paste element SS-E48 as a new layer and re-size by 55%. Move to the left side of your tag. Add drop shadow. Move behind the don't walk sign and in
front of the black leaves. Add drop shadow. Duplicate and move to the right side of tag. Move behind the roses.
Open Mask0102SophisticatSimone.
Copy and paste paper 5 as a new layer on your tag and move to bottom. Crop merged Opaque.
Go to Layers, New Mask Layer, from Image. Find mask in drop down list. Apply.
In layers palette right click on mask and merge group.
Add artist copyright and scrap kit maker credit. Merge visible.
If you are not animating, add your name and save as PNG.
If animating, go to selections, select all and copy.
In Animation Shop, right click and paste as a new animation.
Hold your Ctrl key down and repeatedly hit letter L on your keyboard for a total of 11 frames.
You can watch the count on the lower right hand side of your screen in AS.
Open SimoneAni-Dangerous-001
Go to Edit, select all.
Go to Edit, copy.
Activate your tag.
Go to Edit, select all.
Go to Edit, make sure Propagate Paste is selected.
Go to Edit, Paste, paste into selected frames.
Position on your tag, I placed the money low on tag near her knee and click into place.
Open SimoneAni-Dangerous-002
Go to Edit, select all.
Go to Edit, copy.
Activate your tag.
Go to Edit, select all.
Go to Edit, Paste, paste into selected frames.
Position on your tag, I place the largest of the $ symbols on the speaker. Just move your cursor around you will see it and click into place.
I added another layer of animation.
Open SimoneAni-Dangerous-003, repeat the steps and make sure you place this one perfectly on the $ signs.
Play and save.
Don't forget to add your name.
You can see my name tutorial HERE.
To save:
Go to File, Save as, enter the name of your file and select the folder to save to.
Now click on Customize:
Under COLORS TAB:
Number of colors: 255 Colors
Create palette by: OPTIMIZED OCTREE
Reduce colors by: Error Diffusion
Under OPTIMIZATIONS TAB:
set a check mark beside the second, third and forth choices. UN-check the 1st and last.
Under PARTIAL TRANSPARENCY:
check Convert pixels less than 92
Yes, blend with this color: change to white #FFFFFF
Click OK. Click Next, next, next, next.
Play your animation.
At times your animation may or will come out terrible. Optimization in Animation Shop is not the greatest.
You can play around will your settings, especially under the Tab: Optimization. I change this setting at times from anywhere between 70 and 100.
Some people add a white background. To add background, go to Animation: Animation Properties, select Opaque and change color to white.
Hope you enjoyed this tutorial,
Hugs Simone
Please, always direct people to my blog to download my animations.
Do not load to any other download site and don't claim as your own.
Tutorial written by SophisticatSimone aka Lorraine Halle on Sunday, April 21, 2013.
Saturday, April 20, 2013

♥♥♥
Please click on TAG to see in full size.
••• Supplies needed to complete this tutorial. •••
________________________________________________________________________
Programs: Paint Shop Pro, I'm using version 10. Animation Shop 3.
Plugin :Eye Candy 4000(gradient glow).
Font used: Strumpf Std Contour
Tube of choice: I'm using Roxy by Diana Gali from SATC.
Scrap Kit : Roxy Rocker by Disturbed Scraps from SATC.
Mask: By me, Mask99SophisticatSimone HERE
Animations: By me, SimoneAni-RoxyRocker HERE
Please click on TAG to see in full size.
••• Supplies needed to complete this tutorial. •••
________________________________________________________________________
Programs: Paint Shop Pro, I'm using version 10. Animation Shop 3.
Plugin :Eye Candy 4000(gradient glow).
Font used: Strumpf Std Contour
Tube of choice: I'm using Roxy by Diana Gali from SATC.
Scrap Kit : Roxy Rocker by Disturbed Scraps from SATC.
Mask: By me, Mask99SophisticatSimone HERE
Animations: By me, SimoneAni-RoxyRocker HERE
________________________________________________________________________
♥♥♥
Save your tag often. Nothing like working long and hard on a tag and PSP crashes.
♥♥♥
Open a new image 700 x 700.
Copy and paste your tube close up as a new layer.
Using your mover tool, move close up until you see the face. Position to the right of tag.
Duplicate and mirror.
Grab your lasso tool, feather set to 12, on each layer remove any obstructing feather.
With her, it's her hair. Look at my screen shot. On each layer I removed a portion of hair.
Once you've completed that, flood fill Raster 1 layer (bottom layer) with black.
Merge all visible.
Open Mask99SophisticatSimone.
Make sure your tag is active and go to Layers, New Mask Layer, From Image.
Find mask in drop down list and apply.
Merge group.
Copy and paste element 089 as a new layer on your tag and re-size by 80 %.
Make sure it's your top layer and you can move it down low on your tag.
Add drop shadow.
Copy and paste your tube as a new layer. Re-size if needed. I re-sized mine by 30%.
Copy and paste element 090 as a new layer and re-size by 62 %. Move below skyline layer.
Position at top of tag. Add drop shadow.
Copy and paste element 064 as a new layer and re-size by 74 %. Move onto the skyline layer at bottom.
Add drop shadow.
Copy and paste element 025 as a new layer and re-size by 84 %. Move onto the skyline layer at bottom.
Add drop shadow.
Copy and paste element 026 as a new layer and mirror. Move behind the skyline layer at top.
Add drop shadow.
Copy and paste element 082 as a new layer and re-size by 35%. Move to the top left hand side of tag. Add drop shadow.
Copy and paste element 065 as a new layer and re-size by 76%. Move behind your tube and in front of skyline. Add
drop shadow.
Copy and paste element 022 as a new layer and re-size by 90%. Move behind your fence and warning sign and in front
of skyline. Add drop shadow.
Copy and paste element 061 as a new layer and re-size by 51%. Move as the top layer and center at the bottom of tag.
Add drop shadow.
Copy and paste element 001 as a new layer and re-size by 80%. Move as the top layer and to the left of the tag. Add
drop shadow.
Copy and paste element 099 as a new layer and re-size. Move on top of your barrel and add drop shadow.
Copy and paste element 094 as a new layer and re-size by 28%. Move on top of your charm. Add drop shadow.
Copy and paste element 114 as a new layer. Move to the left of tag. Move it below the charm in the layers palette.
Add artist copyright and scrap kit maker credit.
Go to Selections, select all.
Go to Animation Shop and right click paste as a new animation.
Hold your Ctrl key down and repeatedly hit letter L on your keyboard for a total of 20 frames.
You can watch the count on the lower right hand side of your screen in AS.
Open SimoneAni-RoxyRockerTutorial
Go to Edit, select all.
Go to Edit, copy.
Activate your tag.
Go to Edit, select all.
Go to Edit, make sure Propagate Paste is selected.
Go to Edit, Paste, paste into selected frames.
Position on your tag and click into place. I placed it low on tag near speaker.
Cull animation, go to Animation, cull animation:
Remove 1 frame every 2 frames.
You should be left with 10 frames.
Play and save.
Don't forget to add your name.
You can see my name tutorial HERE.
You can either do it animated like in the tutorial or still.
To save:
Go to File, Save as, enter the name of your file and select the folder to save to.
Now click on Customize:
Under COLORS TAB:
Number of colors: 255 Colors
Create palette by: OPTIMIZED OCTREE
Reduce colors by: Error Diffusion
Under OPTIMIZATIONS TAB:
set a check mark beside the second, third and forth choices.
UN-check the 1st and last.
Under PARTIAL TRANSPARENCY:
check Convert pixels less than 92
Yes, blend with this color: change to white #FFFFFF
Click OK. Click Next, next, next, next.
Play your animation.
At times your animation may or will come out terrible.
Optimization in Animation Shop is not the greatest.
You can play around will your settings, especially under the Tab: Optimization.
I change this setting at times from anywhere between 70 and 100.
Some people add a white background. To add background, go to Animation:
Animation Properties, select Opaque and change color to white.
Hope you enjoyed this tutorial,
Hugs Simone
Please, always direct people to my blog to download my animations.
Do not load to any other download site and don't claim as your own.
Tutorial written by SophisticatSimone aka Lorraine Halle on Saturday, April 20, 2013.
Posted by Simone aka Lorraine 0 comments
♥♥♥
Save your tag often. Nothing like working long and hard on a tag and PSP crashes.
♥♥♥
Open a new image 700 x 700.
Copy and paste your tube close up as a new layer.
Using your mover tool, move close up until you see the face. Position to the right of tag.
Duplicate and mirror.
Grab your lasso tool, feather set to 12, on each layer remove any obstructing feather.
With her, it's her hair. Look at my screen shot. On each layer I removed a portion of hair.
Once you've completed that, flood fill Raster 1 layer (bottom layer) with black.
Merge all visible.
Open Mask99SophisticatSimone.
Make sure your tag is active and go to Layers, New Mask Layer, From Image.
Find mask in drop down list and apply.
Merge group.
Copy and paste element 089 as a new layer on your tag and re-size by 80 %.
Make sure it's your top layer and you can move it down low on your tag.
Add drop shadow.
Copy and paste your tube as a new layer. Re-size if needed. I re-sized mine by 30%.
Copy and paste element 090 as a new layer and re-size by 62 %. Move below skyline layer.
Position at top of tag. Add drop shadow.
Copy and paste element 064 as a new layer and re-size by 74 %. Move onto the skyline layer at bottom.
Add drop shadow.
Copy and paste element 025 as a new layer and re-size by 84 %. Move onto the skyline layer at bottom.
Add drop shadow.
Copy and paste element 026 as a new layer and mirror. Move behind the skyline layer at top.
Add drop shadow.
Copy and paste element 082 as a new layer and re-size by 35%. Move to the top left hand side of tag. Add drop shadow.
Copy and paste element 065 as a new layer and re-size by 76%. Move behind your tube and in front of skyline. Add
drop shadow.
Copy and paste element 022 as a new layer and re-size by 90%. Move behind your fence and warning sign and in front
of skyline. Add drop shadow.
Copy and paste element 061 as a new layer and re-size by 51%. Move as the top layer and center at the bottom of tag.
Add drop shadow.
Copy and paste element 001 as a new layer and re-size by 80%. Move as the top layer and to the left of the tag. Add
drop shadow.
Copy and paste element 099 as a new layer and re-size. Move on top of your barrel and add drop shadow.
Copy and paste element 094 as a new layer and re-size by 28%. Move on top of your charm. Add drop shadow.
Copy and paste element 114 as a new layer. Move to the left of tag. Move it below the charm in the layers palette.
Add artist copyright and scrap kit maker credit.
Go to Selections, select all.
Go to Animation Shop and right click paste as a new animation.
Hold your Ctrl key down and repeatedly hit letter L on your keyboard for a total of 20 frames.
You can watch the count on the lower right hand side of your screen in AS.
Open SimoneAni-RoxyRockerTutorial
Go to Edit, select all.
Go to Edit, copy.
Activate your tag.
Go to Edit, select all.
Go to Edit, make sure Propagate Paste is selected.
Go to Edit, Paste, paste into selected frames.
Position on your tag and click into place. I placed it low on tag near speaker.
Cull animation, go to Animation, cull animation:
Remove 1 frame every 2 frames.
You should be left with 10 frames.
Play and save.
Don't forget to add your name.
You can see my name tutorial HERE.
You can either do it animated like in the tutorial or still.
To save:
Go to File, Save as, enter the name of your file and select the folder to save to.
Now click on Customize:
Under COLORS TAB:
Number of colors: 255 Colors
Create palette by: OPTIMIZED OCTREE
Reduce colors by: Error Diffusion
Under OPTIMIZATIONS TAB:
set a check mark beside the second, third and forth choices.
UN-check the 1st and last.
Under PARTIAL TRANSPARENCY:
check Convert pixels less than 92
Yes, blend with this color: change to white #FFFFFF
Click OK. Click Next, next, next, next.
Play your animation.
At times your animation may or will come out terrible.
Optimization in Animation Shop is not the greatest.
You can play around will your settings, especially under the Tab: Optimization.
I change this setting at times from anywhere between 70 and 100.
Some people add a white background. To add background, go to Animation:
Animation Properties, select Opaque and change color to white.
Hope you enjoyed this tutorial,
Hugs Simone
Please, always direct people to my blog to download my animations.
Do not load to any other download site and don't claim as your own.
Tutorial written by SophisticatSimone aka Lorraine Halle on Saturday, April 20, 2013.
Posted by Simone aka Lorraine 0 comments
Subscribe to:
Posts
(Atom)
CT TEAM