My Blinkie

Showing posts with label Jose Cano Tubes. Show all posts
Showing posts with label Jose Cano Tubes. Show all posts
Sunday, October 27, 2013

♥♥♥
Please click on TAG to see in full size.
••• Supplies needed to complete this tutorial. •••
________________________________________________________________________
Programs: Paint Shop Pro, I'm using version 10. Animation Shop 3.
Plugin : Eye Candy: Gradient Glow for name.
Font used: Computerfont
Tube of choice: I'm using "Space Girl" by José Cano
Please click on TAG to see in full size.
••• Supplies needed to complete this tutorial. •••
________________________________________________________________________
Programs: Paint Shop Pro, I'm using version 10. Animation Shop 3.
Plugin : Eye Candy: Gradient Glow for name.
Font used: Computerfont
Tube of choice: I'm using "Space Girl" by José Cano
Scrap Kit : I'm using "Space Girl" by LizquisScraps(no longer available) alternative by Monti found at CDO HERE
Animation: SimoneAni-Rocket
Mask: SSMask0180
________________________________________________________________________
♥♥♥
Save your tag often. Nothing like working long and hard on a tag and PSP crashes.
♥♥♥
Open a new image 650 x 650. Select all. Copy and paste paper 6 into the selection.
De-select. Duplicate layer and change blend mode to multiply. Merge down.
Apply Mask 180 to layer and merge group.
C/P planet 2 as a new layer and re-size by 52%. Position in upper right hand side.
Add drop shadow.
C/P monster 3 as a new layer and re-size by 76%. Position in lower right hand side of tag.
Add drop shadow.
C/P tube, re-size by 76%. Center in tag and add drop shadow.
C/P monster 1 as a new layer and re-size by 70%. Position in lower left hand side of tag.
Add drop shadow.
C/P planet 1 and re-size by 30%. Place in upper left hand side of tag. Add drop shadow.
C/P decor and position behind space girl tube and duplicate, mirror. Add drop shadow.
Move one to the left side and one to the right side.
C/P costume and re-size by 38%. Free rotate to the right by 35 degrees. Position on the left side below earth planet.
Add drop shadow.
C/P Venus flower and re-size by 64%. Position bottom right side, near your tube. Add drop shadow.
C/P sparkles2 over your tube layer. Center.
C/P butterfly and re-size by 20% and place in upper left hand side of tag. Add drop shadow.
Add artist copyright. Merge visible.
Select all and copy. Paste in Animation Shop.
Hold your Ctrl key down and repeatedly hit letter L on your keyboard for a total of 16 frames.
You can watch the count on the lower right hand side of your screen in AS.
Open SimoneAni-Rocket
Go to Edit, select all.
Go to Edit, copy.
Activate your tag.
Go to Edit, select all.
Go to Edit, make sure Propagate Paste is selected.
Go to Edit, Paste, paste into selected frames.
Position on your tag and click into place. I placed mine in the lower left hand side of tag.
Play and save.
Don't forget to add your name.
To save:
Go to File, Save as, enter the name of your file and select the folder to save to.
Now click on Customize:
Under COLORS TAB:
Number of colors: 255 Colors
Create palette by: OPTIMIZED OCTREE
Reduce colors by: Error Diffusion
Under OPTIMIZATIONS TAB:
set a check mark beside the second, third and forth choices. UN-check the 1st and last.
Under PARTIAL TRANSPARENCY:
check Convert pixels less than 92
Yes, blend with this color: change to white #FFFFFF
Click OK. Click Next, next, next, next.
Play your animation.
At times your animation may or will come out terrible. Optimization in Animation Shop is not the greatest.
You can play around will your settings, especially under the Tab: Optimization. I change this setting at times from anywhere between 70 and 100.
Some people add a white background. To add background, go to Animation: Animation Properties, select Opaque and change color to white.
Hope you enjoyed this tutorial,
Hugs Simone
Please, always direct people to my blog to download my animations. Or SATC where I sell.
Do not load to any other download site and don't claim as your own.
Tutorial written by SophisticatSimone aka Lorraine Halle on Sunday October 27, 2013.
Animation: SimoneAni-Rocket
Mask: SSMask0180
________________________________________________________________________
♥♥♥
Save your tag often. Nothing like working long and hard on a tag and PSP crashes.
♥♥♥
Open a new image 650 x 650. Select all. Copy and paste paper 6 into the selection.
De-select. Duplicate layer and change blend mode to multiply. Merge down.
Apply Mask 180 to layer and merge group.
C/P planet 2 as a new layer and re-size by 52%. Position in upper right hand side.
Add drop shadow.
C/P monster 3 as a new layer and re-size by 76%. Position in lower right hand side of tag.
Add drop shadow.
C/P tube, re-size by 76%. Center in tag and add drop shadow.
C/P monster 1 as a new layer and re-size by 70%. Position in lower left hand side of tag.
Add drop shadow.
C/P planet 1 and re-size by 30%. Place in upper left hand side of tag. Add drop shadow.
C/P decor and position behind space girl tube and duplicate, mirror. Add drop shadow.
Move one to the left side and one to the right side.
C/P costume and re-size by 38%. Free rotate to the right by 35 degrees. Position on the left side below earth planet.
Add drop shadow.
C/P Venus flower and re-size by 64%. Position bottom right side, near your tube. Add drop shadow.
C/P sparkles2 over your tube layer. Center.
C/P butterfly and re-size by 20% and place in upper left hand side of tag. Add drop shadow.
Add artist copyright. Merge visible.
Select all and copy. Paste in Animation Shop.
Hold your Ctrl key down and repeatedly hit letter L on your keyboard for a total of 16 frames.
You can watch the count on the lower right hand side of your screen in AS.
Open SimoneAni-Rocket
Go to Edit, select all.
Go to Edit, copy.
Activate your tag.
Go to Edit, select all.
Go to Edit, make sure Propagate Paste is selected.
Go to Edit, Paste, paste into selected frames.
Position on your tag and click into place. I placed mine in the lower left hand side of tag.
Play and save.
Don't forget to add your name.
To save:
Go to File, Save as, enter the name of your file and select the folder to save to.
Now click on Customize:
Under COLORS TAB:
Number of colors: 255 Colors
Create palette by: OPTIMIZED OCTREE
Reduce colors by: Error Diffusion
Under OPTIMIZATIONS TAB:
set a check mark beside the second, third and forth choices. UN-check the 1st and last.
Under PARTIAL TRANSPARENCY:
check Convert pixels less than 92
Yes, blend with this color: change to white #FFFFFF
Click OK. Click Next, next, next, next.
Play your animation.
At times your animation may or will come out terrible. Optimization in Animation Shop is not the greatest.
You can play around will your settings, especially under the Tab: Optimization. I change this setting at times from anywhere between 70 and 100.
Some people add a white background. To add background, go to Animation: Animation Properties, select Opaque and change color to white.
Hope you enjoyed this tutorial,
Hugs Simone
Please, always direct people to my blog to download my animations. Or SATC where I sell.
Do not load to any other download site and don't claim as your own.
Tutorial written by SophisticatSimone aka Lorraine Halle on Sunday October 27, 2013.

♥♥♥
Please click on TAG to see in full size.
••• Supplies needed to complete this tutorial. •••
________________________________________________________________________
Programs: Paint Shop Pro, I'm using version 10. Animation Shop 3.
Plugin : Eye Candy: Gradient Glow for name.
Font used: Brother Tattoo
Tube of choice: I'm using "Rose" by José Cano
Please click on TAG to see in full size.
••• Supplies needed to complete this tutorial. •••
________________________________________________________________________
Programs: Paint Shop Pro, I'm using version 10. Animation Shop 3.
Plugin : Eye Candy: Gradient Glow for name.
Font used: Brother Tattoo
Tube of choice: I'm using "Rose" by José Cano
Scrap Kit : I'm using "Rosso" by Bibi's Collection from SATC
Animation: SimoneAni-Sparkle Roses
Mask: none
________________________________________________________________________
♥♥♥
Save your tag often. Nothing like working long and hard on a tag and PSP crashes.
♥♥♥
Open a new image 650W x 550H, transparent background, 72 resolution.
Select all.
Open paper 4 and copy. Paste INTO selection on your tag. Deselect.
C/P element 22 as a new layer.
Copy and paste your tube as a new layer .Re-size by 68%. Position to the right side of tag. Add drop shadow.
Copy and paste element 19 and position behind your tube and in center of tag.
Add drop shadow.
Copy and paste 46 and position behind your tube and in front of petals. Add drop shadow.
Copy and paste 29 and re-size by 45%. Position in upper left hand side of tag. Add drop shadow.
Copy and paste element 4 as a new layer and mirror. Position in lower left hand side.
Add drop shadow.
Add artist copyright. Merge all visible.
Copy and paste into Animation Shop as a new animation.
Hold Ctrl key down and hit letter L repeatedly until you have 20 frames.
Open SimoneAni-SparkleRoses. Go to Edit>Select all.
Go to Edit>Copy.
Activate your tag. Go to Edit>Select All.
Go to Edit>Propagate Paste.
Go to Edit>Paste>Paste into Selected Frames.
Click into place.
Add your name and save.
To add a border, go back into PSP.
Select all, go to selection, modify, contract by 10.
Go to selection, invert. Add a new raster layer.
Using your flood fill tool, add a color from your tube.
Go to selection>invert.
Add a new raster layer. Add drop shadow. Deselect.
Ok now hide the tag layer. You should only have the frame and the drop shadow.
Activate your frame layer and go to Adjust and add noise. Gaussian, 60%.
Go to Edit, copy merged.
In AS, right click and paste as a new animation.
Back in PSP, undo noise.
Add noise of 66%. Copy merged.
In AS, right click on frame layer and paste after selected frame.
Back in PSP, undo noise.
Add noise of 72%. Copy merged.
In AS, right click on the last frame and paste after selected frame.
Go to Edit and select all.
Go to Edit and copy.
Activate your tag.
Go to Edit and select all.
Go to Edit and paste>paste into selected frames.
You may have to slightly adjust the position with your cursor. Before you click border
frame into place, make sure all four corners are covered, lined up perfectly.
Click play.
Add your name and save.
To save:
Go to File, Save as, enter the name of your file and select the folder to save to.
Now click on Customize:
Under COLORS TAB:
Number of colors: 255 Colors
Create palette by: OPTIMIZED OCTREE
Reduce colors by: Error Diffusion
Under OPTIMIZATIONS TAB:
set a check mark beside the second, third and forth choices. UN-check the 1st and last.
Under PARTIAL TRANSPARENCY:
check Convert pixels less than 92
Yes, blend with this color: change to white #FFFFFF
Click OK. Click Next, next, next, next.
Play your animation.
At times your animation may or will come out terrible. Optimization in Animation Shop is not the greatest.
You can play around will your settings, especially under the Tab: Optimization. I change this setting at times from anywhere between 70 and 100.
Some people add a white background. To add background, go to Animation: Animation Properties, select Opaque and change color to white.
Hope you enjoyed this tutorial,
Hugs Simone
Please, always direct people to my blog to download my animations.
Do not load to any other download site and don't claim as your own.
Tutorial written by SophisticatSimone aka Lorraine Halle on Sunday October 27, 2013.
Animation: SimoneAni-Sparkle Roses
Mask: none
________________________________________________________________________
♥♥♥
Save your tag often. Nothing like working long and hard on a tag and PSP crashes.
♥♥♥
Open a new image 650W x 550H, transparent background, 72 resolution.
Select all.
Open paper 4 and copy. Paste INTO selection on your tag. Deselect.
C/P element 22 as a new layer.
Copy and paste your tube as a new layer .Re-size by 68%. Position to the right side of tag. Add drop shadow.
Copy and paste element 19 and position behind your tube and in center of tag.
Add drop shadow.
Copy and paste 46 and position behind your tube and in front of petals. Add drop shadow.
Copy and paste 29 and re-size by 45%. Position in upper left hand side of tag. Add drop shadow.
Copy and paste element 4 as a new layer and mirror. Position in lower left hand side.
Add drop shadow.
Add artist copyright. Merge all visible.
Copy and paste into Animation Shop as a new animation.
Hold Ctrl key down and hit letter L repeatedly until you have 20 frames.
Open SimoneAni-SparkleRoses. Go to Edit>Select all.
Go to Edit>Copy.
Activate your tag. Go to Edit>Select All.
Go to Edit>Propagate Paste.
Go to Edit>Paste>Paste into Selected Frames.
Click into place.
Add your name and save.
To add a border, go back into PSP.
Select all, go to selection, modify, contract by 10.
Go to selection, invert. Add a new raster layer.
Using your flood fill tool, add a color from your tube.
Go to selection>invert.
Add a new raster layer. Add drop shadow. Deselect.
Ok now hide the tag layer. You should only have the frame and the drop shadow.
Activate your frame layer and go to Adjust and add noise. Gaussian, 60%.
Go to Edit, copy merged.
In AS, right click and paste as a new animation.
Back in PSP, undo noise.
Add noise of 66%. Copy merged.
In AS, right click on frame layer and paste after selected frame.
Back in PSP, undo noise.
Add noise of 72%. Copy merged.
In AS, right click on the last frame and paste after selected frame.
Go to Edit and select all.
Go to Edit and copy.
Activate your tag.
Go to Edit and select all.
Go to Edit and paste>paste into selected frames.
You may have to slightly adjust the position with your cursor. Before you click border
frame into place, make sure all four corners are covered, lined up perfectly.
Click play.
Add your name and save.
To save:
Go to File, Save as, enter the name of your file and select the folder to save to.
Now click on Customize:
Under COLORS TAB:
Number of colors: 255 Colors
Create palette by: OPTIMIZED OCTREE
Reduce colors by: Error Diffusion
Under OPTIMIZATIONS TAB:
set a check mark beside the second, third and forth choices. UN-check the 1st and last.
Under PARTIAL TRANSPARENCY:
check Convert pixels less than 92
Yes, blend with this color: change to white #FFFFFF
Click OK. Click Next, next, next, next.
Play your animation.
At times your animation may or will come out terrible. Optimization in Animation Shop is not the greatest.
You can play around will your settings, especially under the Tab: Optimization. I change this setting at times from anywhere between 70 and 100.
Some people add a white background. To add background, go to Animation: Animation Properties, select Opaque and change color to white.
Hope you enjoyed this tutorial,
Hugs Simone
Please, always direct people to my blog to download my animations.
Do not load to any other download site and don't claim as your own.
Tutorial written by SophisticatSimone aka Lorraine Halle on Sunday October 27, 2013.
Friday, October 11, 2013


S E X Y W I T C H
♥♥♥
Please click on TAG to see in full size.
••• Supplies needed to complete this tutorial. •••
________________________________________________________________________
Programs: Paint Shop Pro, I'm using version 10. Animation Shop 3.
Plugin : None
Font used: Feathergraphy Decoration
Tube of choice: I'm using "Sexy Witch" by José Cano
Scrap Kit : I'm using "Demona" by Bibi's Collection from SATC
Animation: SimoneAni-SexyWitch
Mask: none
________________________________________________________________________
♥♥♥
Save your tag often. Nothing like working long and hard on a tag and PSP crashes.
♥♥♥
Open a new image 600 x 250.
Copy and paste paper of choice as background.
Crop merged opaque.
Copy and paste element 45 as a new layer and position in the center, change blend mode to soft light and your opacity to 59.
Copy and paste close up of your tube and position to the right side of tag.
Copy and paste element 21 as a new layer, move slightly to the left. Add drop shadow. Cover the skeletal man a bit, but make sure you see his head in the background.
Copy and paste element 23 as a new layer behind the tree line and in front of skeletal man. Using your mover tool, adjust so make sure it's not covering too much of the skeletal man.
Copy and paste element 57 as a new layer and re-size by 45% and position behind the close up layer and a little to the right of center line. Add drop shadow.
Copy and paste element 1 as a new layer and re-size by 45%. Move to the left side of tag.
Crop your tag.
Now select all and contract selection by 3. Add a new layer. Make sure it's your top layer.
Add a color from your tube. De-select and add drop shadow.
X-out this layer.
Highlight any of the other layers.
Go to Edit, copy merged.
In Animation Shop, right click and paste as a new animation.
Hold your Ctrl key and hit the L key 20 times. You should have a total of 21 frames.
Open SimoneAni-SexyWitch.
Go to Edit, select all.
Go to Edit, copy.
Activate your tag.
Go to Edit, select all.
Go to Edit and activate Propagate Paste.
Go to Edit and Paste, paste into selected frames.
I pasted it 3 different times, 1 in the center, 1 lower on tag near her hat and 1 time to the left of tag, on the phatom tombstone.
In PSP, select your layer with the banner. Copy.
In AS, right click anywhere on workspace and paste as new animation.
Go to Edit and Copy.
Activate your tag again and go to Edit, Paste into selected frames. It should line up perfectly. Click into place.
You can now add your copyright info and your license number.
Add your name.
Repeat for the avatar.
To save:
Go to File, Save as, enter the name of your file and select the folder to save to.
Now click on Customize:
Under COLORS TAB:
Number of colors: 255 Colors
Create palette by: OPTIMIZED OCTREE
Reduce colors by: Error Diffusion
Under OPTIMIZATIONS TAB:
set a check mark beside the second, third and forth choices. UN-check the 1st and last.
Under PARTIAL TRANSPARENCY:
check Convert pixels less than 92
Yes, blend with this color: change to white #FFFFFF
Click OK. Click Next, next, next, next.
Play your animation.
At times your animation may or will come out terrible. Optimization in Animation Shop is not the greatest.
You can play around will your settings, especially under the Tab: Optimization. I change this setting at times from anywhere between 70 and 100.
Some people add a white background. To add background, go to Animation: Animation Properties, select Opaque and change color to white.
Hope you enjoyed this tutorial,
Hugs Simone
Please, always direct people to my blog to download my animations.
Do not load to any other download site and don't claim as your own.
Tutorial written by SophisticatSimone aka Lorraine Halle on Friday October 11, 2013
♥♥♥
Please click on TAG to see in full size.
••• Supplies needed to complete this tutorial. •••
________________________________________________________________________
Programs: Paint Shop Pro, I'm using version 10. Animation Shop 3.
Plugin : None
Font used: Feathergraphy Decoration
Tube of choice: I'm using "Sexy Witch" by José Cano
Scrap Kit : I'm using "Demona" by Bibi's Collection from SATC
Animation: SimoneAni-SexyWitch
Mask: none
________________________________________________________________________
♥♥♥
Save your tag often. Nothing like working long and hard on a tag and PSP crashes.
♥♥♥
Open a new image 600 x 250.
Copy and paste paper of choice as background.
Crop merged opaque.
Copy and paste element 45 as a new layer and position in the center, change blend mode to soft light and your opacity to 59.
Copy and paste close up of your tube and position to the right side of tag.
Copy and paste element 21 as a new layer, move slightly to the left. Add drop shadow. Cover the skeletal man a bit, but make sure you see his head in the background.
Copy and paste element 23 as a new layer behind the tree line and in front of skeletal man. Using your mover tool, adjust so make sure it's not covering too much of the skeletal man.
Copy and paste element 57 as a new layer and re-size by 45% and position behind the close up layer and a little to the right of center line. Add drop shadow.
Copy and paste element 1 as a new layer and re-size by 45%. Move to the left side of tag.
Crop your tag.
Now select all and contract selection by 3. Add a new layer. Make sure it's your top layer.
Add a color from your tube. De-select and add drop shadow.
X-out this layer.
Highlight any of the other layers.
Go to Edit, copy merged.
In Animation Shop, right click and paste as a new animation.
Hold your Ctrl key and hit the L key 20 times. You should have a total of 21 frames.
Open SimoneAni-SexyWitch.
Go to Edit, select all.
Go to Edit, copy.
Activate your tag.
Go to Edit, select all.
Go to Edit and activate Propagate Paste.
Go to Edit and Paste, paste into selected frames.
I pasted it 3 different times, 1 in the center, 1 lower on tag near her hat and 1 time to the left of tag, on the phatom tombstone.
In PSP, select your layer with the banner. Copy.
In AS, right click anywhere on workspace and paste as new animation.
Go to Edit and Copy.
Activate your tag again and go to Edit, Paste into selected frames. It should line up perfectly. Click into place.
You can now add your copyright info and your license number.
Add your name.
Repeat for the avatar.
To save:
Go to File, Save as, enter the name of your file and select the folder to save to.
Now click on Customize:
Under COLORS TAB:
Number of colors: 255 Colors
Create palette by: OPTIMIZED OCTREE
Reduce colors by: Error Diffusion
Under OPTIMIZATIONS TAB:
set a check mark beside the second, third and forth choices. UN-check the 1st and last.
Under PARTIAL TRANSPARENCY:
check Convert pixels less than 92
Yes, blend with this color: change to white #FFFFFF
Click OK. Click Next, next, next, next.
Play your animation.
At times your animation may or will come out terrible. Optimization in Animation Shop is not the greatest.
You can play around will your settings, especially under the Tab: Optimization. I change this setting at times from anywhere between 70 and 100.
Some people add a white background. To add background, go to Animation: Animation Properties, select Opaque and change color to white.
Hope you enjoyed this tutorial,
Hugs Simone
Please, always direct people to my blog to download my animations.
Do not load to any other download site and don't claim as your own.
Tutorial written by SophisticatSimone aka Lorraine Halle on Friday October 11, 2013
Wednesday, September 18, 2013

♥♥♥
Please click on TAG to see in full size.
••• Supplies needed to complete this tutorial. •••
________________________________________________________________________
Programs: Paint Shop Pro, I'm using version 10. Animation Shop 3.
Plugin : none
Font used: Alice in Wonderland
Tube of choice: I'm using "Zombie" by Jose Cano.
Scrap Kit : I'm using "Zombie Zone"
Please click on TAG to see in full size.
••• Supplies needed to complete this tutorial. •••
________________________________________________________________________
Programs: Paint Shop Pro, I'm using version 10. Animation Shop 3.
Plugin : none
Font used: Alice in Wonderland
Tube of choice: I'm using "Zombie" by Jose Cano.
Scrap Kit : I'm using "Zombie Zone"
Animation: SimoneAni-486-491
Mask: 0176 HERE
________________________________________________________________________
♥♥♥
Save your tag often. Nothing like working long and hard on a tag and PSP crashes.
♥♥♥
Open a new image 700 x 700, transparent.
Copy and paste element 19 as a new layer. Re-size for fit if it's to big.
Duplicate and mirror. Adjust so you cover the majority of your background from side to side and merge them
together.
Copy and paste again and re-size by 50%.
Duplicate. Position these two on either side of the canvas.
Copy and paste element 26 as a new layer and re-size. Position to the left.
Duplicate one of the bush layers and drag it up above the cross tombstone and place it a little to the right of it.
Copy and paste element 12 as a new layer. Using your magic wand tool, set to Point to point, select the chain portion
and delete.
Re-size if you need to make it fit and position at the top of the tag.
Copy and paste element 14 as a new layer and re-size to fit. Position to the right side of canvas.
Copy and paste element 32 as a new layer and position to the right side.
Copy and paste element 31 as a new layer. Re-size and move over towards the center, away from the white flowers.
Copy and paste element 13 as a new layer and re-size. Position to the right side.
Copy and paste element 11 as a new layer and position mid tag in center.
Copy and paste element 5 as a new layer, move to the top.
Copy and paste element 67 as a new layer and re-size. Move to top center of tag.
Copy and paste your tube of choice and re-size to fit. Move to the left side of tag.
Copy and paste element 21 as new layer and re-size. Position in right lower hand side of tag.
Copy and paste element 20 as a new layer and re-size. Position on the cauldron.
Copy and paste element 6 as a new layer and re-size. Position beside cauldron.
Copy and paste element 9 as a new layer and re-size. Position high above cauldron.
Copy and paste element 4 as a new layer and re-size. Position in lower right hand side.
Add drop shadow to all layers except the webbing layer.
Merge all layers.
Crop tag and re-size if to large.
Add copyright.
Add a new raster layer and drag down to bottom.
Selections> select all.
Copy and paste paper of choice.
I used paper2. Paste it into the selection.
Apply Mask to layer and merge group. I used Mask 176. Duplicate and merge.
Merge all visible.
Add your name and save as PNG.
Go to Selections, select all.
Go to Edit and copy merged. Paste as a new animation in Animation Shop.
Hold your Ctrl key down and repeatedly hit letter L on your keyboard for a total of 16 frames.
You can watch the count on the lower right hand side of your screen in AS.
Open SimoneAni487
Go to Edit, select all.
Go to Edit, copy.
Activate your tag.
Go to Edit, select all.
Go to Edit, make sure Propagate Paste is selected.
Go to Edit, Paste, paste into selected frames.
Position on your tag and click into place. I placed mine just above and within the cauldron.
Play and save.
Don't forget to add your name.
To save:
Go to File, Save as, enter the name of your file and select the folder to save to.
Now click on Customize:
Under COLORS TAB:
Number of colors: 255 Colors
Create palette by: OPTIMIZED OCTREE
Reduce colors by: Error Diffusion
Under OPTIMIZATIONS TAB:
set a check mark beside the second, third and forth choices. UN-check the 1st and last.
Under PARTIAL TRANSPARENCY:
check Convert pixels less than 92
Yes, blend with this color: change to white #FFFFFF
Click OK. Click Next, next, next, next.
Play your animation.
At times your animation may or will come out terrible. Optimization in Animation Shop is not the greatest.
You can play around will your settings, especially under the Tab: Optimization. I change this setting at times from
anywhere between 70 and 100.
Some people add a white background. To add background, go to Animation: Animation Properties, select Opaque
and change color to white.
Hope you enjoyed this tutorial,
Hugs Simone
Please, always direct people to my blog to download my animations.
Do not load to any other download site and don't claim as your own.
Tutorial written by SophisticatSimone aka Lorraine Halle on Wednesday September 18, 2013.
Mask: 0176 HERE
________________________________________________________________________
♥♥♥
Save your tag often. Nothing like working long and hard on a tag and PSP crashes.
♥♥♥
Open a new image 700 x 700, transparent.
Copy and paste element 19 as a new layer. Re-size for fit if it's to big.
Duplicate and mirror. Adjust so you cover the majority of your background from side to side and merge them
together.
Copy and paste again and re-size by 50%.
Duplicate. Position these two on either side of the canvas.
Copy and paste element 26 as a new layer and re-size. Position to the left.
Duplicate one of the bush layers and drag it up above the cross tombstone and place it a little to the right of it.
Copy and paste element 12 as a new layer. Using your magic wand tool, set to Point to point, select the chain portion
and delete.
Re-size if you need to make it fit and position at the top of the tag.
Copy and paste element 14 as a new layer and re-size to fit. Position to the right side of canvas.
Copy and paste element 32 as a new layer and position to the right side.
Copy and paste element 31 as a new layer. Re-size and move over towards the center, away from the white flowers.
Copy and paste element 13 as a new layer and re-size. Position to the right side.
Copy and paste element 11 as a new layer and position mid tag in center.
Copy and paste element 5 as a new layer, move to the top.
Copy and paste element 67 as a new layer and re-size. Move to top center of tag.
Copy and paste your tube of choice and re-size to fit. Move to the left side of tag.
Copy and paste element 21 as new layer and re-size. Position in right lower hand side of tag.
Copy and paste element 20 as a new layer and re-size. Position on the cauldron.
Copy and paste element 6 as a new layer and re-size. Position beside cauldron.
Copy and paste element 9 as a new layer and re-size. Position high above cauldron.
Copy and paste element 4 as a new layer and re-size. Position in lower right hand side.
Add drop shadow to all layers except the webbing layer.
Merge all layers.
Crop tag and re-size if to large.
Add copyright.
Add a new raster layer and drag down to bottom.
Selections> select all.
Copy and paste paper of choice.
I used paper2. Paste it into the selection.
Apply Mask to layer and merge group. I used Mask 176. Duplicate and merge.
Merge all visible.
Add your name and save as PNG.
Go to Selections, select all.
Go to Edit and copy merged. Paste as a new animation in Animation Shop.
Hold your Ctrl key down and repeatedly hit letter L on your keyboard for a total of 16 frames.
You can watch the count on the lower right hand side of your screen in AS.
Open SimoneAni487
Go to Edit, select all.
Go to Edit, copy.
Activate your tag.
Go to Edit, select all.
Go to Edit, make sure Propagate Paste is selected.
Go to Edit, Paste, paste into selected frames.
Position on your tag and click into place. I placed mine just above and within the cauldron.
Play and save.
Don't forget to add your name.
To save:
Go to File, Save as, enter the name of your file and select the folder to save to.
Now click on Customize:
Under COLORS TAB:
Number of colors: 255 Colors
Create palette by: OPTIMIZED OCTREE
Reduce colors by: Error Diffusion
Under OPTIMIZATIONS TAB:
set a check mark beside the second, third and forth choices. UN-check the 1st and last.
Under PARTIAL TRANSPARENCY:
check Convert pixels less than 92
Yes, blend with this color: change to white #FFFFFF
Click OK. Click Next, next, next, next.
Play your animation.
At times your animation may or will come out terrible. Optimization in Animation Shop is not the greatest.
You can play around will your settings, especially under the Tab: Optimization. I change this setting at times from
anywhere between 70 and 100.
Some people add a white background. To add background, go to Animation: Animation Properties, select Opaque
and change color to white.
Hope you enjoyed this tutorial,
Hugs Simone
Please, always direct people to my blog to download my animations.
Do not load to any other download site and don't claim as your own.
Tutorial written by SophisticatSimone aka Lorraine Halle on Wednesday September 18, 2013.
Monday, September 2, 2013

♥♥♥
Please click on TAG to see in full size.
••• Supplies needed to complete this tutorial. •••
________________________________________________________________________
Programs: Paint Shop Pro, I'm using version 10. Animation Shop 3.
Plugin : none
Font used: Sweetly Broken
Tube of choice: I'm using "Lucky 13" by José Cano.
Scrap Kit : I'm using "Lucky 13" by Bibi's Collection from S&Co
Animation: SimoneAni-Lucky13
Mask: 0164 HERE
________________________________________________________________________
♥♥♥
Save your tag often. Nothing like working long and hard on a tag and PSP crashes.
♥♥♥
Open a new image 700 x 700, resolution 72 dpi, transparent background.
Copy and paste your tube as a new layer and re-size by 75%.
C/P element 82 as a new layer and re-size by 58%. Move this element behind the tube. Sharpen. Duplicate and merge together.
C/P element 81 (car) as a new layer and re-size by 40%. Mirror and position lower left hand side behind your tube layer.
C/P element 80 (leaf) as a new layer and position behind car layer in the left upper hand side of tag.
C/P element 15 (branch) as a new layer and re-size by 40%. Position behind red curtain layer in the left upper hand side of tag. Duplicate, free rotate to the right by 90 degrees. Flip and position mid center and on right side of tag.
C/P element 1 (cat) as a new layer and re-size by 75%. Position as top layer in the lower right hand side of tag.
Highlight Raster 1 layer in layers palette. It should be blank. If not, add a new raster layer and send to bottom.
Go to Selections, select all.
Copy element 30 (clocks). Paste INTO selection. Select none.
Re-size by 92%. Duplicate and merge together. Add drop shadow {V and H =5, Opacity=37, Blur=3, Color=black}and move this layer up to above the car layer.
C/P element 49 (cards) as a new layer and position on right side. Should be below the clocks.
C/P element 43 (checkered tile) as a new layer and position in lower right hand side of tag.
This should be your bottom layer.
Activate your top layer in layers palette.
C/P element 56 (skull) as a new layer and re-size by 45%. Mirror. Position bottom center of tag. Covering a portion of your tubes legs.
C/P element 89 (flowers) as a new layer and re-size by 30%. Position beside the skull (make sure skill is still above this layer). Duplicate flowers layer and move it to the other side of the skull. Move cat a bit if you need to. Line them up perfectly at the bottom.
C/P element 27 (card) as a new layer and mirror. Position to the right side of tag. Make sure this layer is behind the flower layer.
C/P element 31 (button) as a new layer and position behind the flowers on the lower right hand side of tag.
Add a new Raster layer and send to bottom.
Selection, select all.
Copy paper 9 and paste INTO selection. Select none.
Apply Mask of choice or mine Masks0164. Merge group. Duplicate. On top layer change blend mode to Multiply.
Add artist copyright.
Mask sure all your elements and your tube have a drop shadow.
Starting with your top layer, merge down one by one until you reach the tube. Include the tube in this merged layer.
X-out this layer now, highlight a bottom layer and merge visible all layers.
Ok now make sure your bottom layer is highlighted in layers palette.
Go to Selections, select all.
Go to Edit and copy. Paste as a new animation in Animation Shop.
Hold your Ctrl key down and repeatedly hit letter L on your keyboard for a total of 20 frames.
You can watch the count on the lower right hand side of your screen in AS.
Open SimoneAni-Lucky13
Go to Edit, select all.
Go to Edit, copy.
Activate your tag.
Go to Edit, select all.
Go to Edit, make sure Propagate Paste is selected.
Go to Edit, Paste, paste into selected frames.
Position on your tag and click into place. I placed mine in the center of the tag.
Go back to PSP now and highlight (activate) your tube layer and copy.
Paste as a NEW animation in AS.
Go to Edit, copy.
Activate your tag.
Go to Edit, Paste, paste into selected frames.
Try to position it as centered as possible. Click into place.
Play and save.
Don't forget to add your name.
To save:
Go to File, Save as, enter the name of your file and select the folder to save to.
Now click on Customize:
Under COLORS TAB:
Number of colors: 255 Colors
Create palette by: OPTIMIZED OCTREE
Reduce colors by: Error Diffusion
Under OPTIMIZATIONS TAB:
set a check mark beside the second, third and forth choices. UN-check the 1st and last.
Under PARTIAL TRANSPARENCY:
check Convert pixels less than 92
Yes, blend with this color: change to white #FFFFFF
Click OK. Click Next, next, next, next.
Play your animation.
At times your animation may or will come out terrible. Optimization in Animation Shop is not the greatest.
You can play around will your settings, especially under the Tab: Optimization. I change this setting at times from anywhere between 70 and 100.
Some people add a white background. To add background, go to Animation: Animation Properties, select Opaque and change color to white.
Hope you enjoyed this tutorial,
Hugs Simone
Please, always direct people to my blog to download my animations.
Do not load to any other download site and don't claim as your own.
Tutorial written by SophisticatSimone aka Lorraine Halle on Monday September 2, 2013
Please click on TAG to see in full size.
••• Supplies needed to complete this tutorial. •••
________________________________________________________________________
Programs: Paint Shop Pro, I'm using version 10. Animation Shop 3.
Plugin : none
Font used: Sweetly Broken
Tube of choice: I'm using "Lucky 13" by José Cano.
Scrap Kit : I'm using "Lucky 13" by Bibi's Collection from S&Co
Animation: SimoneAni-Lucky13
Mask: 0164 HERE
________________________________________________________________________
♥♥♥
Save your tag often. Nothing like working long and hard on a tag and PSP crashes.
♥♥♥
Open a new image 700 x 700, resolution 72 dpi, transparent background.
Copy and paste your tube as a new layer and re-size by 75%.
C/P element 82 as a new layer and re-size by 58%. Move this element behind the tube. Sharpen. Duplicate and merge together.
C/P element 81 (car) as a new layer and re-size by 40%. Mirror and position lower left hand side behind your tube layer.
C/P element 80 (leaf) as a new layer and position behind car layer in the left upper hand side of tag.
C/P element 15 (branch) as a new layer and re-size by 40%. Position behind red curtain layer in the left upper hand side of tag. Duplicate, free rotate to the right by 90 degrees. Flip and position mid center and on right side of tag.
C/P element 1 (cat) as a new layer and re-size by 75%. Position as top layer in the lower right hand side of tag.
Highlight Raster 1 layer in layers palette. It should be blank. If not, add a new raster layer and send to bottom.
Go to Selections, select all.
Copy element 30 (clocks). Paste INTO selection. Select none.
Re-size by 92%. Duplicate and merge together. Add drop shadow {V and H =5, Opacity=37, Blur=3, Color=black}and move this layer up to above the car layer.
C/P element 49 (cards) as a new layer and position on right side. Should be below the clocks.
C/P element 43 (checkered tile) as a new layer and position in lower right hand side of tag.
This should be your bottom layer.
Activate your top layer in layers palette.
C/P element 56 (skull) as a new layer and re-size by 45%. Mirror. Position bottom center of tag. Covering a portion of your tubes legs.
C/P element 89 (flowers) as a new layer and re-size by 30%. Position beside the skull (make sure skill is still above this layer). Duplicate flowers layer and move it to the other side of the skull. Move cat a bit if you need to. Line them up perfectly at the bottom.
C/P element 27 (card) as a new layer and mirror. Position to the right side of tag. Make sure this layer is behind the flower layer.
C/P element 31 (button) as a new layer and position behind the flowers on the lower right hand side of tag.
Add a new Raster layer and send to bottom.
Selection, select all.
Copy paper 9 and paste INTO selection. Select none.
Apply Mask of choice or mine Masks0164. Merge group. Duplicate. On top layer change blend mode to Multiply.
Add artist copyright.
Mask sure all your elements and your tube have a drop shadow.
Starting with your top layer, merge down one by one until you reach the tube. Include the tube in this merged layer.
X-out this layer now, highlight a bottom layer and merge visible all layers.
Ok now make sure your bottom layer is highlighted in layers palette.
Go to Selections, select all.
Go to Edit and copy. Paste as a new animation in Animation Shop.
Hold your Ctrl key down and repeatedly hit letter L on your keyboard for a total of 20 frames.
You can watch the count on the lower right hand side of your screen in AS.
Open SimoneAni-Lucky13
Go to Edit, select all.
Go to Edit, copy.
Activate your tag.
Go to Edit, select all.
Go to Edit, make sure Propagate Paste is selected.
Go to Edit, Paste, paste into selected frames.
Position on your tag and click into place. I placed mine in the center of the tag.
Go back to PSP now and highlight (activate) your tube layer and copy.
Paste as a NEW animation in AS.
Go to Edit, copy.
Activate your tag.
Go to Edit, Paste, paste into selected frames.
Try to position it as centered as possible. Click into place.
Play and save.
Don't forget to add your name.
To save:
Go to File, Save as, enter the name of your file and select the folder to save to.
Now click on Customize:
Under COLORS TAB:
Number of colors: 255 Colors
Create palette by: OPTIMIZED OCTREE
Reduce colors by: Error Diffusion
Under OPTIMIZATIONS TAB:
set a check mark beside the second, third and forth choices. UN-check the 1st and last.
Under PARTIAL TRANSPARENCY:
check Convert pixels less than 92
Yes, blend with this color: change to white #FFFFFF
Click OK. Click Next, next, next, next.
Play your animation.
At times your animation may or will come out terrible. Optimization in Animation Shop is not the greatest.
You can play around will your settings, especially under the Tab: Optimization. I change this setting at times from anywhere between 70 and 100.
Some people add a white background. To add background, go to Animation: Animation Properties, select Opaque and change color to white.
Hope you enjoyed this tutorial,
Hugs Simone
Please, always direct people to my blog to download my animations.
Do not load to any other download site and don't claim as your own.
Tutorial written by SophisticatSimone aka Lorraine Halle on Monday September 2, 2013
Sunday, September 1, 2013

♥♥♥
Please click on TAG to see in full size.
••• Supplies needed to complete this tutorial. •••
________________________________________________________________________
Programs: Paint Shop Pro, I'm using version 10. Animation Shop 3.
Plugin : none
Font used: Ornatique
Tube of choice: I'm using "Sasha Redux" by Jose A Cano.
Scrap Kit : I'm using "Born Free" by Angelica No longer available.
Please click on TAG to see in full size.
••• Supplies needed to complete this tutorial. •••
________________________________________________________________________
Programs: Paint Shop Pro, I'm using version 10. Animation Shop 3.
Plugin : none
Font used: Ornatique
Tube of choice: I'm using "Sasha Redux" by Jose A Cano.
Scrap Kit : I'm using "Born Free" by Angelica No longer available.
Animation: none
Mask: 0170 HERE
________________________________________________________________________
♥♥♥
Save your tag often. Nothing like working long and hard on a tag and PSP crashes.
♥♥♥
Open a new image 700 x 700, transparent.
Copy and paste element 6 (frame) as a new layer.
Select the inside and paste paper of choice as a new layer. Move it below.
Add drop shadow to frame.
Copy and paste element 13 (teepee) as a new layer. Re-size by 75%. Mirror and position on left side of tag.
Copy and paste element 44 (horse) as a new layer. Re-size by 60%. Mirror and position on right side of tag.
Copy and paste element 49 (branch) as a new layer. Re-size by 60%. Position upper left hand side of tag behind teepee and within the frame. Should be behind frame. Remove any extra using your selection tool.
Copy and paste your tube as a new layer and re-size by 50%. Make sure this tube is your top layer in layers palette.
Copy and paste element 12 (eagle) as a new layer. Re-size by 50%. Position on upper left hand side of tag. Add drop shadow.
Copy and paste element 18 (little man) as a new layer. Re-size by 22% and place on the frame.
Copy and paste element 29 (features) as a new layer and re-size. Duplicate and free rotate one of them to the left by 40
degrees. Add drop shadow to each and add element 23 (re-sized) as the pivot point between the two. Merge them
together and move to the right hand side of tag.
Copy and paste element 26 as a new layer. Re-size and position in lower left hand side.
Copy and paste element 24 as a new layer and center at bottom of tag. Covering the lower portion of your tube.
Add drop shadow.
Add element 15 (hand) re-sized and positioned on the teepee.
Add any other elements you like.
Make sure you've added drop shadow to all your layers.
Merge visible.
Add paper of choice to bottom and apply Mask 0170 and merge group.
Add artist copyright and your name.
Merge all visible and save as PNG.
Hope you enjoyed this tutorial,
Hugs Simone
Please, always direct people to my blog to download my animations.
Do not load to any other download site and don't claim as your own.
Tutorial written by SophisticatSimone aka Lorraine Halle on Sunday September 1, 2013
Mask: 0170 HERE
________________________________________________________________________
♥♥♥
Save your tag often. Nothing like working long and hard on a tag and PSP crashes.
♥♥♥
Open a new image 700 x 700, transparent.
Copy and paste element 6 (frame) as a new layer.
Select the inside and paste paper of choice as a new layer. Move it below.
Add drop shadow to frame.
Copy and paste element 13 (teepee) as a new layer. Re-size by 75%. Mirror and position on left side of tag.
Copy and paste element 44 (horse) as a new layer. Re-size by 60%. Mirror and position on right side of tag.
Copy and paste element 49 (branch) as a new layer. Re-size by 60%. Position upper left hand side of tag behind teepee and within the frame. Should be behind frame. Remove any extra using your selection tool.
Copy and paste your tube as a new layer and re-size by 50%. Make sure this tube is your top layer in layers palette.
Copy and paste element 12 (eagle) as a new layer. Re-size by 50%. Position on upper left hand side of tag. Add drop shadow.
Copy and paste element 18 (little man) as a new layer. Re-size by 22% and place on the frame.
Copy and paste element 29 (features) as a new layer and re-size. Duplicate and free rotate one of them to the left by 40
degrees. Add drop shadow to each and add element 23 (re-sized) as the pivot point between the two. Merge them
together and move to the right hand side of tag.
Copy and paste element 26 as a new layer. Re-size and position in lower left hand side.
Copy and paste element 24 as a new layer and center at bottom of tag. Covering the lower portion of your tube.
Add drop shadow.
Add element 15 (hand) re-sized and positioned on the teepee.
Add any other elements you like.
Make sure you've added drop shadow to all your layers.
Merge visible.
Add paper of choice to bottom and apply Mask 0170 and merge group.
Add artist copyright and your name.
Merge all visible and save as PNG.
Hope you enjoyed this tutorial,
Hugs Simone
Please, always direct people to my blog to download my animations.
Do not load to any other download site and don't claim as your own.
Tutorial written by SophisticatSimone aka Lorraine Halle on Sunday September 1, 2013
Thursday, August 15, 2013

♥♥♥
Please click on TAG to see in full size.
••• Supplies needed to complete this tutorial. •••
________________________________________________________________________
Programs: Paint Shop Pro, I'm using version 10. Animation Shop 3.
Plugin : Eye Candy 4: Gradient Glow
Font used: CellosScript_PersonalUse
Tube of choice: I'm using "School Girl" by Jose Cano.
Scrap Kit : I'm using "School Girl" by Lizquis Scraps from S&Co
Animation: SimoneAni-551
Mask: 0114 HERE
________________________________________________________________________
♥♥♥
Save your tag often. Nothing like working long and hard on a tag and PSP crashes.
♥♥♥
Open a new image 700 x 700 transparent.
Copy and paste lockers on the left side of tag.
Copy and paste your tube as a new layer and re-size by 70%.
Position in center of tag.
Copy and paste desk1 as a new layer and re-size by 85%. Mirror and position mid tag on the right side.
Copy and paste books as a new layer and re-size by 40%. Position in front of lockers at the bottom of tag.
Copy and paste sneakers as a new layer and re-size by 40%. Position in lower left hand side of tag.
Copy and paste board as a new layer and position in the upper right hand side of tag.
Move this layer down to bottom.
Copy and paste world globe element as a new layer and re-size by 55%. Position on the desk.
Copy and paste bag element as a new layer and re-size by 55%. Position at bottom of tag on the right side.
Copy and paste paper 6 as a new layer and send to bottom.
On your blank Raster layer ( should be the very bottom layer) go to Selections, select all.
Go to Image, Crop to Selection.
Activate your paper layer again. Apply Mask 114. Go to Layers, New Mask Layer, from Image.
Merge mask group in the layers palette.
Activate your tube layer in the layers palette.
Copy and paste ribbon1 as a new layer and re-size by 55%. Move to lower right hand side of tag.
Copy and paste ribbon2 as a new layer and re-size by 60%. Move to lower left hand side of tag.
On the board element, using your Selection tool, set to rectangle and feather of zero, surround the white portion.
Copy and paste the tube close-up. Go to Selections, invert and delete.
Duplicate the close up.
On bottom layer add gaussian blur of 3 and change blend mode to Multiply.
On top layer change blend mode to either screen or soft light, whichever you like best.
Activate your top layer.
Copy and paste sparkles2 as a new layer and position on bottom half of tag.
Add any other elements you like.
Add drop shadow to all layers.
Re-size your canvas (all layers checked) by 85%.
Merge all top layers down up to and including your tube. So all the elements including the desk, books, globe, ribbons, etc.
That will be your top layer.
You bottom layer will be the mask, the lockers, the board and the close-up layers. So merge those together.
To animate:
Making sure your bottom merged layer is selected,
Go to Selections, select all.
Go to Edit and copy. Paste as a new animation in Animation Shop.
Hold your Ctrl key down and repeatedly hit letter L on your keyboard for a total of 21 frames.
You can watch the count on the lower right hand side of your screen in AS.
Open SimoneAni551
Go to Edit, select all.
Go to Edit, copy.
Activate your tag.
Go to Edit, select all.
Go to Edit, make sure Propagate Paste is selected.
Go to Edit, Paste, paste into selected frames.
Position on your tag and click into place. Place in center of tag.
Go back to PSP now and highlight (activate) your tube (top) layer and copy.
Paste as a NEW animation in AS.
Go to Edit, copy.
Activate your tag.
Go to Edit, Paste, paste into selected frames.
Play and save.
Don't forget to add your name.
To save:
Go to File, Save as, enter the name of your file and select the folder to save to.
Now click on Customize:
Under COLORS TAB:
Number of colors: 255 Colors
Create palette by: OPTIMIZED OCTREE
Reduce colors by: Error Diffusion
Under OPTIMIZATIONS TAB:
set a check mark beside the second, third and forth choices. UN-check the 1st and last.
Under PARTIAL TRANSPARENCY:
check Convert pixels less than 92
Yes, blend with this color: change to white #FFFFFF
Click OK. Click Next, next, next, next.
Play your animation.
At times your animation may or will come out terrible. Optimization in Animation Shop is not the greatest.
You can play around will your settings, especially under the Tab: Optimization. I change this setting at times from anywhere between 70 and 100.
Some people add a white background. To add background, go to Animation: Animation Properties, select Opaque and change color to white.
Hope you enjoyed this tutorial,
Hugs Simone
Please, always direct people to my blog to download my animations.
Do not load to any other download site and don't claim as your own.
Tutorial written by SophisticatSimone aka Lorraine Halle on Thursday August 15, 2013.
Please click on TAG to see in full size.
••• Supplies needed to complete this tutorial. •••
________________________________________________________________________
Programs: Paint Shop Pro, I'm using version 10. Animation Shop 3.
Plugin : Eye Candy 4: Gradient Glow
Font used: CellosScript_PersonalUse
Tube of choice: I'm using "School Girl" by Jose Cano.
Scrap Kit : I'm using "School Girl" by Lizquis Scraps from S&Co
Animation: SimoneAni-551
Mask: 0114 HERE
________________________________________________________________________
♥♥♥
Save your tag often. Nothing like working long and hard on a tag and PSP crashes.
♥♥♥
Open a new image 700 x 700 transparent.
Copy and paste lockers on the left side of tag.
Copy and paste your tube as a new layer and re-size by 70%.
Position in center of tag.
Copy and paste desk1 as a new layer and re-size by 85%. Mirror and position mid tag on the right side.
Copy and paste books as a new layer and re-size by 40%. Position in front of lockers at the bottom of tag.
Copy and paste sneakers as a new layer and re-size by 40%. Position in lower left hand side of tag.
Copy and paste board as a new layer and position in the upper right hand side of tag.
Move this layer down to bottom.
Copy and paste world globe element as a new layer and re-size by 55%. Position on the desk.
Copy and paste bag element as a new layer and re-size by 55%. Position at bottom of tag on the right side.
Copy and paste paper 6 as a new layer and send to bottom.
On your blank Raster layer ( should be the very bottom layer) go to Selections, select all.
Go to Image, Crop to Selection.
Activate your paper layer again. Apply Mask 114. Go to Layers, New Mask Layer, from Image.
Merge mask group in the layers palette.
Activate your tube layer in the layers palette.
Copy and paste ribbon1 as a new layer and re-size by 55%. Move to lower right hand side of tag.
Copy and paste ribbon2 as a new layer and re-size by 60%. Move to lower left hand side of tag.
On the board element, using your Selection tool, set to rectangle and feather of zero, surround the white portion.
Copy and paste the tube close-up. Go to Selections, invert and delete.
Duplicate the close up.
On bottom layer add gaussian blur of 3 and change blend mode to Multiply.
On top layer change blend mode to either screen or soft light, whichever you like best.
Activate your top layer.
Copy and paste sparkles2 as a new layer and position on bottom half of tag.
Add any other elements you like.
Add drop shadow to all layers.
Re-size your canvas (all layers checked) by 85%.
Merge all top layers down up to and including your tube. So all the elements including the desk, books, globe, ribbons, etc.
That will be your top layer.
You bottom layer will be the mask, the lockers, the board and the close-up layers. So merge those together.
To animate:
Making sure your bottom merged layer is selected,
Go to Selections, select all.
Go to Edit and copy. Paste as a new animation in Animation Shop.
Hold your Ctrl key down and repeatedly hit letter L on your keyboard for a total of 21 frames.
You can watch the count on the lower right hand side of your screen in AS.
Open SimoneAni551
Go to Edit, select all.
Go to Edit, copy.
Activate your tag.
Go to Edit, select all.
Go to Edit, make sure Propagate Paste is selected.
Go to Edit, Paste, paste into selected frames.
Position on your tag and click into place. Place in center of tag.
Go back to PSP now and highlight (activate) your tube (top) layer and copy.
Paste as a NEW animation in AS.
Go to Edit, copy.
Activate your tag.
Go to Edit, Paste, paste into selected frames.
Play and save.
Don't forget to add your name.
To save:
Go to File, Save as, enter the name of your file and select the folder to save to.
Now click on Customize:
Under COLORS TAB:
Number of colors: 255 Colors
Create palette by: OPTIMIZED OCTREE
Reduce colors by: Error Diffusion
Under OPTIMIZATIONS TAB:
set a check mark beside the second, third and forth choices. UN-check the 1st and last.
Under PARTIAL TRANSPARENCY:
check Convert pixels less than 92
Yes, blend with this color: change to white #FFFFFF
Click OK. Click Next, next, next, next.
Play your animation.
At times your animation may or will come out terrible. Optimization in Animation Shop is not the greatest.
You can play around will your settings, especially under the Tab: Optimization. I change this setting at times from anywhere between 70 and 100.
Some people add a white background. To add background, go to Animation: Animation Properties, select Opaque and change color to white.
Hope you enjoyed this tutorial,
Hugs Simone
Please, always direct people to my blog to download my animations.
Do not load to any other download site and don't claim as your own.
Tutorial written by SophisticatSimone aka Lorraine Halle on Thursday August 15, 2013.
Monday, August 5, 2013

♥♥♥
Please click on TAG to see in full size.
••• Supplies needed to complete this tutorial. •••
________________________________________________________________________
Programs: Paint Shop Pro, I'm using version 10. Animation Shop 3.
Plugin : none
Font used: Praying Angel
Tube of choice: I'm using "Lady Vampire" by Jose A Cano
Please click on TAG to see in full size.
••• Supplies needed to complete this tutorial. •••
________________________________________________________________________
Programs: Paint Shop Pro, I'm using version 10. Animation Shop 3.
Plugin : none
Font used: Praying Angel
Tube of choice: I'm using "Lady Vampire" by Jose A Cano
Scrap Kit : I'm using "Lady Vampire" by SkyScraps(no longer in business)
Animation: SimoneAni-LadyVampire
Mask: 0149 HERE
________________________________________________________________________
♥♥♥
Save your tag often. Nothing like working long and hard on a tag and PSP crashes.
♥♥♥
Let's start.
Open element 50 and duplicate. Close original. Re-size the duplicate by 80% and 72 dpi.
Go to image> canvas size> enter 700x700.
Using your lasso tool, set to Point to point, mode: add shift, feather : 0, smoothing: 0 and anti-alias checked.
Mask: 0149 HERE
________________________________________________________________________
♥♥♥
Save your tag often. Nothing like working long and hard on a tag and PSP crashes.
♥♥♥
Let's start.
Open element 50 and duplicate. Close original. Re-size the duplicate by 80% and 72 dpi.
Go to image> canvas size> enter 700x700.
Using your lasso tool, set to Point to point, mode: add shift, feather : 0, smoothing: 0 and anti-alias checked.

Click on the thickest portion of the branch (frame), so you need to make little movements with clicks every bend in the branch.
See my screenshot.
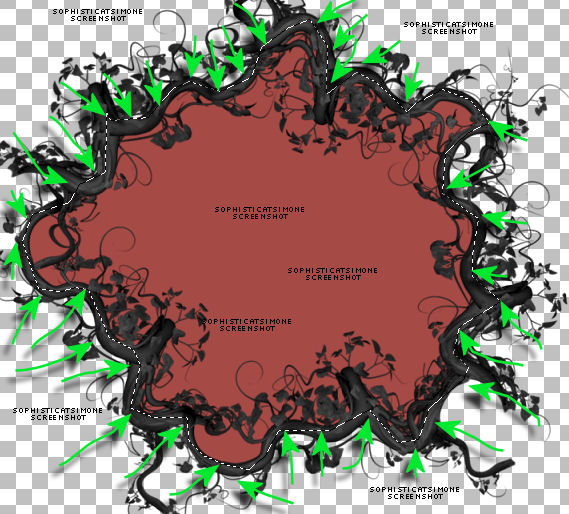
Add a new raster layer and send to bottom. Flood fill the selection with this color : #a74945 or a color from your tube.
Copy the close up of your tube and paste as a new layer.
Using your mover tool, position the face within the selection.
Go to Selections > invert > hit delete on your keyboard.
Selections > select none.
Duplicate the close up. On the original go to Adjust > Blur > Gaussian Blur > 5.
Go to Effects, Photo Effects, Black and White Film, filter color: blue, strength: 0
On the duplicate close up, change blend mode to : soft light.
Select Manual Color Correction:
Source should be black and target should be : #dc403b
Add drop shadow to the branch frame. Merge layers together.
C/P element 58 as a new layer and position behind the frame layer and to the left side of tag.
Add drop shadow.
C/P element 57 as a new layer and triplicate.
1st layer re-size by 60% and move to left side of frame and colorize red. Add d/s.
2nd layer re-size by 45% and move to lower right side of frame. Add d/s.
3rd layer re-size by 45% and mirror. Move to left side of tag and behind the tombstone. Add d/s.
C/P the regular sized tube. I had to re-size by 50%. Position to the right side of tag. Add d/s.
C/P element 61 and re-size by 35% and move down below in front of your tube on the right hand side of tag.
C/P element 6 and re-size by 50% and move to upper left hand side of tag. Add d/s.
C/P element 32 and re-size by 50%. Position lower center of tag/frame. Add d/s. Should be close to your tube. This is the flower cluster.
See my tag for reference.
C/P again. This time re-size by 40% and flip. Move to upper center right. Duplicate and mirror. Add drop shadow to each. These should be at top of
frame and at center of tag.
C/P element 2 and re-size by 35%. Move to lower right hand side. In front of your tube layer and the black grassy layer. Add d/s.
C/P element 1 and re-size by 35%. Move to lower right hand side. In front of red bottle layer. Colorize red. Add d/s.
C/P element 74 as a new layer and re-size by 50%. Move to the left side of tag in front of tombstone and frame. Add drop shadow.
C/P element 53 as a new layer and re-size by 60%. Move to the left side of tag and in front of carriage. Add d/s.
C/P element 64 and re-size by 50%. Place behind the carriage front section and duplicate. Move duplicated layer over to the left behind the read
portion of carriage. Merge these two layers together.
Duplicate this merged layer and move to the upper right hand side of tag and behind the merged frame layer.
C/P element 47 and re-size by 50%, mirror and add small drop shadow. Move to left side of tag over the carriage.
C/P element 23 as a new layer and re-size by 35%. Duplicate and mirror.
Position one left in front of book, add d/s.
Position the other right climbing the bottle, add d/s.
C/P element 8 as a new layer and re-size by 50%. Move in front of your tube, at the bottom of tag. Add drop shadow.
Crop merged opaque. Add paper to bottom and apply Mask of choice or the one I used Masks0149.
Add artist copyright and your license number.
Merge visible.
To animate:
Go to selections, select all and copy.
In animation shop, right click and paste as a new animation.
Hold your Ctrl key down and repeatedly hit letter L on your keyboard for a total of 16 frames.
You can watch the count on the lower right hand side of your screen in AS.
Open SimoneAni-LadyVampire-01
Go to Edit, select all.
Go to Edit, copy.
Activate your tag.
Go to Edit, select all.
Go to Edit, make sure Propagate Paste is selected.
Go to Edit, Paste, paste into selected frames.
Position on the skull's forehead, click into place.
Now open SimoneAni-LadyVampire-02 and repeat.
Position just a bit above the current animation.
For third animation, open SimoneAni-LadyVampire-06
Position this one on the little bottle at bottom right of tag.
To save:
Go to File, Save as, enter the name of your file and select the folder to save to.
Now click on Customize:
Under COLORS TAB:
Number of colors: 255 Colors
Create palette by: OPTIMIZED OCTREE
Reduce colors by: Error Diffusion
Under OPTIMIZATIONS TAB:
set a check mark beside the second, third and forth choices. UN-check the 1st and last.
Under PARTIAL TRANSPARENCY:
check Convert pixels less than 96
Yes, blend with this color: change to white #FFFFFF
Click OK. Click Next, next, next, next.
Play your animation.
At times your animation may or will come out terrible. Optimization in Animation Shop is not the greatest.
You can play around will your settings, especially under the Tab: Optimization. I change this setting at times from anywhere between 70 and 100.
Some people add a white background. To add background, go to Animation: Animation Properties, select Opaque and change color to white.
Hope you enjoyed this tutorial,
Hugs Simone
Please, always direct people to my blog to download my animations.
Do not load to any other download site and don't claim as your own.
Tutorial written by SophisticatSimone aka Lorraine Hallé on Sunday August 4, 2013
Wednesday, July 31, 2013

`♥♥♥
Please click on TAG to see in full size.
••• Supplies needed to complete this tutorial. •••
________________________________________________________________________
Programs: Paint Shop Pro, I'm using version 10. Animation Shop 3.
Plugin : none
Font used: A&S Rhino
Tube of choice: I'm using "HOT 911" by Jose A Cano.
Scrap Kit : I'm using "HOT 911" by SkyScraps
Please click on TAG to see in full size.
••• Supplies needed to complete this tutorial. •••
________________________________________________________________________
Programs: Paint Shop Pro, I'm using version 10. Animation Shop 3.
Plugin : none
Font used: A&S Rhino
Tube of choice: I'm using "HOT 911" by Jose A Cano.
Scrap Kit : I'm using "HOT 911" by SkyScraps
Animation: SimoneAni-Fire911
Mask: 0156 HERE
________________________________________________________________________
♥♥♥
Save your tag often. Nothing like working long and hard on a tag and PSP crashes.
♥♥♥
Open a new image 694 x 694, transparent background.
Flood fill black.
Open Masks0156 in PSP and minimize.
Go to Layers, new mask layer, from image.
In drop down box find the mask and apply.
In layers palette, right click on mask and merge group.
Duplicate layer and mirror, then flip. Merge them together.
Add noise of 7%. Go to Adjust, add noise, random checked and enter 7.
Copy and paste element e44 as a new layer and re-size by 65%, smart size, 72 dpi.
Duplicate layer and merge down.
Using your magic wand tool, set to add shift, RGB Value, tolerance of 18, and feather of 0, anti-alias checked, click inside the circle frame.
Go to Selections, modify, expand, enter : 4.
In layers palette, click on Mask layer to highlight and make active.
Go to Layers, add new Raster Layer.
Open paper PP6 and copy. Close that paper.
On your tag, go to Edit and Paste INTO selection.
Go to Adjust, sharpeness, sharpen.
Do it again, but choose sharpen more.
Now copy your close-up tube and paste as a new layer.
Using your mover tool, position your tube in center of selection.
Go to Selections, invert and hit delete on your keyboard or go to Edit and cut.
Go to Selections, select all. Go to Image, crop to selection.
On the close up layer, change the blend mode to Luminance (L) and decrease Opacity to 51.
Merge it down.
Go to Adjust, Brightness and Contrast, Brightness/Contrast and enter :
Brightness : -4
Contrast : 42
OK
Click on your frame (circle) layer.
Go to Effect, drop shadow and enter:
V= 3, H= 4, Opacity= 75, Blur= 10, Color= black.
Check : shadow on a new layer.
Click on your frame (circle) layer again.
This time change the V & H to -3 and -4.
Now merge the drop shadow layers only.
Go to Adjust, Blur, Gaussian Blur, enter 10.
OK you can merge your frame layer down with the shadow layer.
Copy and paste element e43 as a new layer. Re-size by 65%.
Move this element below your frame layer, including the closeup layer. Position at upper left hand side of the frame.
Duplicate and free rotate to the right by 45 degrees and move this layer at top of circle. Sharpen.
Duplicate and flip and mirror.
Now duplicate the very first one again (left upper hand side) and mirror.
Duplicate that one and flip.
Duplicate that one and mirror.
Add a single drop shadow to each of these flower layers.
REMOVE the check mark on the shadow layer.
Use the very fist shadow settings only.
Copy and paste element e20 as a new layer and re-size by 40%. Position in right upper hand side of tag.
Add same drop shadow.
Now merge all visible and save your tag as .pspimage.
Go to Selections, select all and copy your layer and paste as a new animation in Animation Shop.
Hold Ctrl key down on keyboard and repeatedly hit the L letter until you have 21 frames.
Back in PSP, select none.
C/P element e19 as a new layer and position in left lower hand side of tag.
Add same drop shadow.
C/P element e7 as a new layer and free rotate to the right by 90 degrees.
Position at top of frame. Add same drop shadow. Don't block the wording on your sign.
Copy and paste your regular sized tube as a new layer and re-size by 80%.
Move her to the right side of tag.
Grab your selection tool, set to rectangle, MODE: add shift, Feather: 25, Anti-alias: checked.
Select the bottom portion of her pants/legs and delete. Don't remove too much, but just enough to eliminate the sharp edge.
De-select and add same drop shadow to your tube.
Copy element e12 and paste as a new layer. Re-size by 65% and move to lower left hand side in front of grass. Add drop shadow.
Copy element e6 and paste as a new layer. Re-size by 75% and move to lower left hand side leaning on the hydrant. Add drop shadow.
Move axe layer below the hydrant layer.
Copy element e1 and paste as a new layer. Re-size by 55% and move to lower center of tag. Add drop shadow.
Copy element e8 and paste as a new layer. Re-size by 55% and move to lower right hand side of tag. Add drop shadow.
C/P element e34 and paste as a new layer. Free rotate to the right by 90 degrees. Position at bottom of tag.
This layer should be just above the tube layer and below all the elements.
Duplicate and re-size by 55% and move that layer lower on tag and in front of tube.
Add drop shadow to each layer.
Now X-out your bottom layer, (the merged one).
Highlight any other layer to make active and merge all visible.
Add artist copyright and license info. Merge down to your top layer.
Go to selections, select all and copy.
In animation shop, right click and paste as a new animation.
Hold your Ctrl key down and repeatedly hit letter L on your keyboard for a total of 21 frames.
You can watch the count on the lower right hand side of your screen in AS.
Open SimoneAni-Fire911.
Go to Edit, select all.
Go to Edit, copy.
Activate your tag.
Go to Edit, select all.
Go to Edit, make sure Propagate Paste is selected.
Go to Edit, Paste, paste into selected frames.
Position in center.
Now copy the top layer and paste as a new layer. Try to position as best as you can.
You can maximize PSP again to verify where you need to align things.
Click into place.
Now open SimoneAni-Fire911_02 and repeat.
For the name animation.
In PSP create the name you want, adding drop shadow and any pattern or color of choice.
I also free rotated my name 45 degrees to the left.
I used font : A&S Rhino.
Copy and paste as a new animation in AS.
Go to Effects, Insert Image Effect.
Select : Start with animation frame.
Effect length : 1.7 secs
Frames per second : 8 fps
Effect contains a total of 13 frames.
Select UNDERWATER and click on the Customize button.
Enter the following:
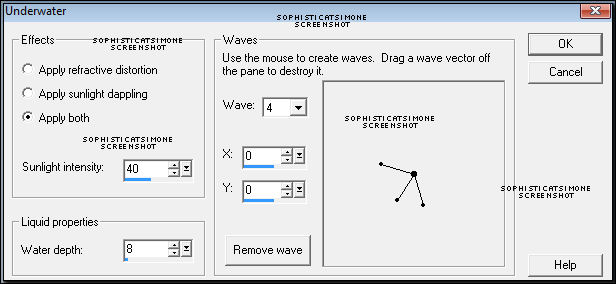
OK now delete frame 1.
Go to Edit, select all.
Go to Edit, copy.
Activate your tag.
Go to Edit, select all.
Go to Edit, Paste, paste into selected frames.
Position in the frame in the upper left hand section of it.
Play and save.
To save:
Go to File, Save as, enter the name of your file and select the folder to save to.
Now click on Customize:
Under COLORS TAB:
Number of colors: 255 Colors
Create palette by: OPTIMIZED OCTREE
Reduce colors by: Error Diffusion
Under OPTIMIZATIONS TAB:
set a check mark beside the second, third and forth choices. UN-check the 1st and last.
Under PARTIAL TRANSPARENCY:
check Convert pixels less than 96
Yes, blend with this color: change to white #FFFFFF
Click OK. Click Next, next, next, next.
Play your animation.
At times your animation may or will come out terrible. Optimization in Animation Shop is not the greatest.
You can play around will your settings, especially under the Tab: Optimization. I change this setting at times from anywhere between 70 and 100.
Some people add a white background. To add background, go to Animation: Animation Properties, select Opaque and change color to white.
Hope you enjoyed this tutorial,
Hugs Simone
Please, always direct people to my blog to download my animations.
Do not load to any other download site and don't claim as your own.
Tutorial written by SophisticatSimone aka Lorraine Halle on Wednesday July 31, 2013
Mask: 0156 HERE
________________________________________________________________________
♥♥♥
Save your tag often. Nothing like working long and hard on a tag and PSP crashes.
♥♥♥
Open a new image 694 x 694, transparent background.
Flood fill black.
Open Masks0156 in PSP and minimize.
Go to Layers, new mask layer, from image.
In drop down box find the mask and apply.
In layers palette, right click on mask and merge group.
Duplicate layer and mirror, then flip. Merge them together.
Add noise of 7%. Go to Adjust, add noise, random checked and enter 7.
Copy and paste element e44 as a new layer and re-size by 65%, smart size, 72 dpi.
Duplicate layer and merge down.
Using your magic wand tool, set to add shift, RGB Value, tolerance of 18, and feather of 0, anti-alias checked, click inside the circle frame.
Go to Selections, modify, expand, enter : 4.
In layers palette, click on Mask layer to highlight and make active.
Go to Layers, add new Raster Layer.
Open paper PP6 and copy. Close that paper.
On your tag, go to Edit and Paste INTO selection.
Go to Adjust, sharpeness, sharpen.
Do it again, but choose sharpen more.
Now copy your close-up tube and paste as a new layer.
Using your mover tool, position your tube in center of selection.
Go to Selections, invert and hit delete on your keyboard or go to Edit and cut.
Go to Selections, select all. Go to Image, crop to selection.
On the close up layer, change the blend mode to Luminance (L) and decrease Opacity to 51.
Merge it down.
Go to Adjust, Brightness and Contrast, Brightness/Contrast and enter :
Brightness : -4
Contrast : 42
OK
Click on your frame (circle) layer.
Go to Effect, drop shadow and enter:
V= 3, H= 4, Opacity= 75, Blur= 10, Color= black.
Check : shadow on a new layer.
Click on your frame (circle) layer again.
This time change the V & H to -3 and -4.
Now merge the drop shadow layers only.
Go to Adjust, Blur, Gaussian Blur, enter 10.
OK you can merge your frame layer down with the shadow layer.
Copy and paste element e43 as a new layer. Re-size by 65%.
Move this element below your frame layer, including the closeup layer. Position at upper left hand side of the frame.
Duplicate and free rotate to the right by 45 degrees and move this layer at top of circle. Sharpen.
Duplicate and flip and mirror.
Now duplicate the very first one again (left upper hand side) and mirror.
Duplicate that one and flip.
Duplicate that one and mirror.
Add a single drop shadow to each of these flower layers.
REMOVE the check mark on the shadow layer.
Use the very fist shadow settings only.
Copy and paste element e20 as a new layer and re-size by 40%. Position in right upper hand side of tag.
Add same drop shadow.
Now merge all visible and save your tag as .pspimage.
Go to Selections, select all and copy your layer and paste as a new animation in Animation Shop.
Hold Ctrl key down on keyboard and repeatedly hit the L letter until you have 21 frames.
Back in PSP, select none.
C/P element e19 as a new layer and position in left lower hand side of tag.
Add same drop shadow.
C/P element e7 as a new layer and free rotate to the right by 90 degrees.
Position at top of frame. Add same drop shadow. Don't block the wording on your sign.
Copy and paste your regular sized tube as a new layer and re-size by 80%.
Move her to the right side of tag.
Grab your selection tool, set to rectangle, MODE: add shift, Feather: 25, Anti-alias: checked.
Select the bottom portion of her pants/legs and delete. Don't remove too much, but just enough to eliminate the sharp edge.
De-select and add same drop shadow to your tube.
Copy element e12 and paste as a new layer. Re-size by 65% and move to lower left hand side in front of grass. Add drop shadow.
Copy element e6 and paste as a new layer. Re-size by 75% and move to lower left hand side leaning on the hydrant. Add drop shadow.
Move axe layer below the hydrant layer.
Copy element e1 and paste as a new layer. Re-size by 55% and move to lower center of tag. Add drop shadow.
Copy element e8 and paste as a new layer. Re-size by 55% and move to lower right hand side of tag. Add drop shadow.
C/P element e34 and paste as a new layer. Free rotate to the right by 90 degrees. Position at bottom of tag.
This layer should be just above the tube layer and below all the elements.
Duplicate and re-size by 55% and move that layer lower on tag and in front of tube.
Add drop shadow to each layer.
Now X-out your bottom layer, (the merged one).
Highlight any other layer to make active and merge all visible.
Add artist copyright and license info. Merge down to your top layer.
Go to selections, select all and copy.
In animation shop, right click and paste as a new animation.
Hold your Ctrl key down and repeatedly hit letter L on your keyboard for a total of 21 frames.
You can watch the count on the lower right hand side of your screen in AS.
Open SimoneAni-Fire911.
Go to Edit, select all.
Go to Edit, copy.
Activate your tag.
Go to Edit, select all.
Go to Edit, make sure Propagate Paste is selected.
Go to Edit, Paste, paste into selected frames.
Position in center.
Now copy the top layer and paste as a new layer. Try to position as best as you can.
You can maximize PSP again to verify where you need to align things.
Click into place.
Now open SimoneAni-Fire911_02 and repeat.
For the name animation.
In PSP create the name you want, adding drop shadow and any pattern or color of choice.
I also free rotated my name 45 degrees to the left.
I used font : A&S Rhino.
Copy and paste as a new animation in AS.
Go to Effects, Insert Image Effect.
Select : Start with animation frame.
Effect length : 1.7 secs
Frames per second : 8 fps
Effect contains a total of 13 frames.
Select UNDERWATER and click on the Customize button.
Enter the following:
OK now delete frame 1.
Go to Edit, select all.
Go to Edit, copy.
Activate your tag.
Go to Edit, select all.
Go to Edit, Paste, paste into selected frames.
Position in the frame in the upper left hand section of it.
Play and save.
To save:
Go to File, Save as, enter the name of your file and select the folder to save to.
Now click on Customize:
Under COLORS TAB:
Number of colors: 255 Colors
Create palette by: OPTIMIZED OCTREE
Reduce colors by: Error Diffusion
Under OPTIMIZATIONS TAB:
set a check mark beside the second, third and forth choices. UN-check the 1st and last.
Under PARTIAL TRANSPARENCY:
check Convert pixels less than 96
Yes, blend with this color: change to white #FFFFFF
Click OK. Click Next, next, next, next.
Play your animation.
At times your animation may or will come out terrible. Optimization in Animation Shop is not the greatest.
You can play around will your settings, especially under the Tab: Optimization. I change this setting at times from anywhere between 70 and 100.
Some people add a white background. To add background, go to Animation: Animation Properties, select Opaque and change color to white.
Hope you enjoyed this tutorial,
Hugs Simone
Please, always direct people to my blog to download my animations.
Do not load to any other download site and don't claim as your own.
Tutorial written by SophisticatSimone aka Lorraine Halle on Wednesday July 31, 2013
Saturday, July 20, 2013


♥♥♥
Please click on TAG to see in full size.
••• Supplies needed to complete this tutorial. •••
________________________________________________________________________
Programs: Paint Shop Pro, I'm using version 10. Animation Shop 3.
Plugin : Eye Candy 4: Gradient Glow for the name. VM Extravaganza, AAA Frame
Font used: P22 OhLey
Tube of choice: I'm using "Anouk" by Jose Cano
Please click on TAG to see in full size.
••• Supplies needed to complete this tutorial. •••
________________________________________________________________________
Programs: Paint Shop Pro, I'm using version 10. Animation Shop 3.
Plugin : Eye Candy 4: Gradient Glow for the name. VM Extravaganza, AAA Frame
Font used: P22 OhLey
Tube of choice: I'm using "Anouk" by Jose Cano
Scrap Kit : I'm using "Anouk" by LizquisScraps from S&Co
Animation: none
Mask: none
________________________________________________________________________
♥♥♥
Save your tag often. Nothing like working long and hard on a tag and PSP crashes.
♥♥♥
Making timeline banner.
Open a new image 851 x 315, resolution: 72, raster background, transparent.
Open two papers of choice. I used paper 6 and paper 11.
Copy your 1st paper and paste as a new layer. Move to the right side of template.
Copy your 2nd paper and paste as a new layer. Move to the left. My top paper, the one that touches the left side, takes up the majority of my timeline banner. Play around and see what you like.
Copy and paste your tube as a new layer and drag her over the seem between the papers to hide it.
Copy and paste Anouk_label element as a new layer. Center and add drop shadow.
Copy and paste Anouk_speakers element as a new layer. Move to bottom and center. Add drop shadow.
Copy and paste Anouk_music lights element as a new layer. Should be your second layer from top, your tube being the first layer.
Position so it looks like it's coming out of the speakers.
Copy and paste Anouk_light3 element as a new layer and move behind your tube and cover some of the yellow paper on the right side.
Copy and paste Anouk_bombox element as a new layer and move low and to the left hand side of banner. Add drop shadow.
Copy and paste Anouk_bear element as a new layer, re-size by 55% and mirror. Position on the speaker. Add drop shadow.
Merge your two papers layers together.
Using your selection tool, set to rectangle, Mode set to Add, feather to 0. Select a portion behind your tube.
Promote your selection to layer.
Go to Effects>Plugins>VM Extravaganza>Transmission. Enter default settings.
Go to Selection>Select none. Now go to Image>Mirror>Image>Flip.
Back onto your paper layer. Using your selection tool again, select a small portion of the right side and the left side. Promote selection to layer.
Add noise. Got to Adjust>Add/Remove Noise>Add Noise>Check Gaussian, noise 83%, monochrome checked.
Merge those down to paper layer.
If you've put a drop shadow on all your elements and you are happy with your placement, save your tag as .pspimage.
Now duplicate and minimize original. I always save one tag in layers, just in case I want to add something or make changes.
Ok on duplicate tag(timeline), merge all visible.
Go to Effects>Plugins>AAA Frames>Foto Frame and enter the following:
In drop down box at bottom I selected: Black with Yellow Shadows and then I entered:
Width : 5
Brightness : -255
Stroke : 255
Matte : 5
Red : -160
Green : -180
Blue : -70
Opacity : 15
OK now for the avatar.
Open a new canvas 180 x 178, transparent.
Copy and paste your close up tube as a new layer.
Centre using your mover tool.
Merge all flatten. Repeat the border frame using AAA Frames.
For the copyright, you can't add the artist URL according to Facebook rules.
So just the add the copyright symbol © and artist name and your license number.
To get copyright symbol, hold down the Alt key on your keyboard and using your Numeric Keypad enter 0169.
Add your name using font of choice. I used P22 OhLey.
Hope you enjoyed this tutorial,
Hugs Simone
Please, always direct people to my blog to download my animations.
Do not load to any other download site and don't claim as your own.
Tutorial written by SophisticatSimone aka Lorraine Halle on Saturday July 20, 2013.
Animation: none
Mask: none
________________________________________________________________________
♥♥♥
Save your tag often. Nothing like working long and hard on a tag and PSP crashes.
♥♥♥
Making timeline banner.
Open a new image 851 x 315, resolution: 72, raster background, transparent.
Open two papers of choice. I used paper 6 and paper 11.
Copy your 1st paper and paste as a new layer. Move to the right side of template.
Copy your 2nd paper and paste as a new layer. Move to the left. My top paper, the one that touches the left side, takes up the majority of my timeline banner. Play around and see what you like.
Copy and paste your tube as a new layer and drag her over the seem between the papers to hide it.
Copy and paste Anouk_label element as a new layer. Center and add drop shadow.
Copy and paste Anouk_speakers element as a new layer. Move to bottom and center. Add drop shadow.
Copy and paste Anouk_music lights element as a new layer. Should be your second layer from top, your tube being the first layer.
Position so it looks like it's coming out of the speakers.
Copy and paste Anouk_light3 element as a new layer and move behind your tube and cover some of the yellow paper on the right side.
Copy and paste Anouk_bombox element as a new layer and move low and to the left hand side of banner. Add drop shadow.
Copy and paste Anouk_bear element as a new layer, re-size by 55% and mirror. Position on the speaker. Add drop shadow.
Merge your two papers layers together.
Using your selection tool, set to rectangle, Mode set to Add, feather to 0. Select a portion behind your tube.
Promote your selection to layer.
Go to Effects>Plugins>VM Extravaganza>Transmission. Enter default settings.
Go to Selection>Select none. Now go to Image>Mirror>Image>Flip.
Back onto your paper layer. Using your selection tool again, select a small portion of the right side and the left side. Promote selection to layer.
Add noise. Got to Adjust>Add/Remove Noise>Add Noise>Check Gaussian, noise 83%, monochrome checked.
Merge those down to paper layer.
If you've put a drop shadow on all your elements and you are happy with your placement, save your tag as .pspimage.
Now duplicate and minimize original. I always save one tag in layers, just in case I want to add something or make changes.
Ok on duplicate tag(timeline), merge all visible.
Go to Effects>Plugins>AAA Frames>Foto Frame and enter the following:
In drop down box at bottom I selected: Black with Yellow Shadows and then I entered:
Width : 5
Brightness : -255
Stroke : 255
Matte : 5
Red : -160
Green : -180
Blue : -70
Opacity : 15
OK now for the avatar.
Open a new canvas 180 x 178, transparent.
Copy and paste your close up tube as a new layer.
Centre using your mover tool.
Merge all flatten. Repeat the border frame using AAA Frames.
For the copyright, you can't add the artist URL according to Facebook rules.
So just the add the copyright symbol © and artist name and your license number.
To get copyright symbol, hold down the Alt key on your keyboard and using your Numeric Keypad enter 0169.
Add your name using font of choice. I used P22 OhLey.
Hope you enjoyed this tutorial,
Hugs Simone
Please, always direct people to my blog to download my animations.
Do not load to any other download site and don't claim as your own.
Tutorial written by SophisticatSimone aka Lorraine Halle on Saturday July 20, 2013.
Monday, July 8, 2013

♥♥♥
Please click on TAG to see in full size.
••• Supplies needed to complete this tutorial. •••
________________________________________________________________________
Programs: Paint Shop Pro, I'm using version 10. Animation Shop 3.
Plugin : Eye Candy Gradient Glow for name
Font used: Quickier Demo
Tube of choice: I'm using "Cowgirl 2" by Jose Cano from SATC.
Scrap Kit : I'm using "Cowgirl" by Disturbed ScrapsAnimation: none
Mask: 0146
________________________________________________________________________
♥♥♥
Save your tag often. Nothing like working long and hard on a tag and PSP crashes.
♥♥♥
Open Paper 1 and duplicate. Close original and re-size the duplicate by 87%, make sure it's set to 72 dpi.
Apply mask of choice or the one I made for this tutorial, Mask0146. Merge group. Close Mask.
Copy and paste element 68 as a new layer and move to top of tag.
Copy and paste your tube of choice. I used the close-up tube. Move to the left of tag.
Copy and paste element 41 as a new layer, re-size by 65% and mirror.
Copy and paste element 16 as a new layer, re-size by 65% and move behind the truck.
Make sure you don't see any of the fence below the bottom of the truck.
Copy and paste element 72 (directional sign) as a new layer. Position to the right of your tube.
Copy and paste element 23 (crow on skull) as a new layer. Position bottom center in front of tube layer. Re-size by 55%.
Copy and paste element 30 (boots) as a new layer. Position bottom left hand side in front of tube layer. Re-size by 55%.
Copy and paste element 20 (c0w) as a new layer. Re-size by 75% and position behind fence.
Copy and paste element 145 (cactus) as a new layer. Move this element behind your tube ont the left side.
Duplicate and re-size by 65% and position behind fence and on the right hand side of tag.
Copy and paste element 19 (rooster) as a new layer. Re-size by 40% and position in front and to the right hand side of tag.
Copy and paste element 34 (bag of money) as a new layer. Re-size by 55% and position in front of direction post, near the rooster.
Copy and paste element 53 (cactus trio) as a new layer. Re-size by 80% and position as layer above Mask layer.
Copy and paste element 107 (burnt newspaper) as a new layer. Position one layer above the truck layer. Position so it's at bottom of truck.
Add cowboy hat (32), bow (125) and scorpion (17). I placed them at bottom front of tag.
Make sure all your layers have a nice drop shadow.
Open element 38 and duplicate. Close original. Copy and paste your tube close-up as a new layer onto this poster.
Center and remove any portion of the tube that is blocking the wording, using your selection tool.
Change blend mode to Overlay and duplicate. Merge all visible. Re-size by 25%. Copy and paste as a new layer on your tag.
Position in upper right hand side of tag. Free rotate to the left by 28 degree. Add drop shadow.
Merge all visible. Add artist copyright, merge down.
Add your name and save as PNG.
Hope you enjoyed this tutorial,
Hugs Simone
Please, always direct people to my blog to download my animations.
Do not load to any other download site and don't claim as your own.
Tutorial written by SophisticatSimone aka Lorraine Halle on Tuesday July 9, 2013.
Please click on TAG to see in full size.
••• Supplies needed to complete this tutorial. •••
________________________________________________________________________
Programs: Paint Shop Pro, I'm using version 10. Animation Shop 3.
Plugin : Eye Candy Gradient Glow for name
Font used: Quickier Demo
Tube of choice: I'm using "Cowgirl 2" by Jose Cano from SATC.
Scrap Kit : I'm using "Cowgirl" by Disturbed ScrapsAnimation: none
Mask: 0146
________________________________________________________________________
♥♥♥
Save your tag often. Nothing like working long and hard on a tag and PSP crashes.
♥♥♥
Open Paper 1 and duplicate. Close original and re-size the duplicate by 87%, make sure it's set to 72 dpi.
Apply mask of choice or the one I made for this tutorial, Mask0146. Merge group. Close Mask.
Copy and paste element 68 as a new layer and move to top of tag.
Copy and paste your tube of choice. I used the close-up tube. Move to the left of tag.
Copy and paste element 41 as a new layer, re-size by 65% and mirror.
Copy and paste element 16 as a new layer, re-size by 65% and move behind the truck.
Make sure you don't see any of the fence below the bottom of the truck.
Copy and paste element 72 (directional sign) as a new layer. Position to the right of your tube.
Copy and paste element 23 (crow on skull) as a new layer. Position bottom center in front of tube layer. Re-size by 55%.
Copy and paste element 30 (boots) as a new layer. Position bottom left hand side in front of tube layer. Re-size by 55%.
Copy and paste element 20 (c0w) as a new layer. Re-size by 75% and position behind fence.
Copy and paste element 145 (cactus) as a new layer. Move this element behind your tube ont the left side.
Duplicate and re-size by 65% and position behind fence and on the right hand side of tag.
Copy and paste element 19 (rooster) as a new layer. Re-size by 40% and position in front and to the right hand side of tag.
Copy and paste element 34 (bag of money) as a new layer. Re-size by 55% and position in front of direction post, near the rooster.
Copy and paste element 53 (cactus trio) as a new layer. Re-size by 80% and position as layer above Mask layer.
Copy and paste element 107 (burnt newspaper) as a new layer. Position one layer above the truck layer. Position so it's at bottom of truck.
Add cowboy hat (32), bow (125) and scorpion (17). I placed them at bottom front of tag.
Make sure all your layers have a nice drop shadow.
Open element 38 and duplicate. Close original. Copy and paste your tube close-up as a new layer onto this poster.
Center and remove any portion of the tube that is blocking the wording, using your selection tool.
Change blend mode to Overlay and duplicate. Merge all visible. Re-size by 25%. Copy and paste as a new layer on your tag.
Position in upper right hand side of tag. Free rotate to the left by 28 degree. Add drop shadow.
Merge all visible. Add artist copyright, merge down.
Add your name and save as PNG.
Hope you enjoyed this tutorial,
Hugs Simone
Please, always direct people to my blog to download my animations.
Do not load to any other download site and don't claim as your own.
Tutorial written by SophisticatSimone aka Lorraine Halle on Tuesday July 9, 2013.
Friday, July 5, 2013

♥♥♥
Please click on TAG to see in full size.
••• Supplies needed to complete this tutorial. •••
________________________________________________________________________
Programs: Paint Shop Pro, I'm using version 10. Animation Shop 3.
Plugin : Eye Candy: Gradient Glow for name.
Font used: BadaBoom
Tube of choice: I'm using "Bikini3" by Jose A Cano.
Scrap Kit : I'm using "Super Hero Girls" by Bibi's Collection.
Animation: SimoneAni-Kaplow!
Mask: by me 0145
________________________________________________________________________
♥♥♥
Save your tag often. Nothing like working long and hard on a tag and PSP crashes.
♥♥♥
Open a new image 700 x 700, transparent background.
Go to Selections, select all.
Open Paper 12 and copy.
On your new image, right click on top border and select Paste INTO selection.
De-select.
Close original paper to save for later.
Open your mask of choice and apply or use the one I made Mask0145.
Merge group.
Save this file now in case of crash or loss of power. This happened to me earlier today and I've had to redo the whole tag. Sad story.
Copy and paste element 65 as a new layer and re-size by 40%. Duplicate layer and mirror. Merge them together.
Save your tag.
Copy and paste element 82 as a new layer and re-size by 48%. Add drop shadow.
Copy and paste element 11 as a new layer. Add drop shadow.
Save your tag.
C/P element 67 as a new layer. Drag this layer to the top. Add drop shadow.
C/P element 5 as a new layer and re-size by 80%. This should be your top layer now.
Save your tag.
C/P element 71 as a new layer and re-size by 25%. Move this "Boom" to the upper left hand side of tag. Add drop shadow.
At this time, copy and paste your tube of choice as a new layer. I re-sized mine by 75%. Add drop shadow.
C/P element 70 as a new layer and re-size by 40%. Place in the lower right hand side of tag. Add drop shadow.
Save your tag.
C/P element 77 as a new layer and re-size by 15%. Position over scuffle cloud on the lower right hand side of tag.
Add drop shadow.
C/P element 83 as a new layer and re-size by 23%. Position over the "Boom" word near bottom edge. Add drop shadow.
C/P element 38 as a new layer and move to right upper hand side of tag.
C/P element 133 as a new layer and re-size by 75%. Drag this layer down in the palette until it's just above the big WOW word/element. Position to the left of your character/tube. Add drop shadow.
C/P element 132 as a new layer, mirror and re-size by 70%. Position behind your tube. Add drop shadow.
C/P element 109 as a new layer and re-size by 60%. Move to lower right hand side and add drop shadow. Save tag.
C/P element 66 as a new layer and re-size by 31%. Mirror and move behind your tube on her right side. Duplicate and mirror. Make sure this layer in behind your car. Add drop shadow to each.
C/P element 78 as a new layer and re-size by 16%. Move to left hand side and add drop shadow.
Make sure all your layers have a drop shadow. Add your artist copyright and license number. Place where it will be
visible. Merge this layer down on your tube layer.
Hide your tube, X out the layer.
Activate your Mask layer and right click Merge all visible.
Un hide your tube.
Now to animate.
Making sure your merged layer is selected,
Go to Selections, select all.
Go to Edit and copy merged. Paste as a new animation in Animation Shop.
Hold your Ctrl key down and repeatedly hit letter L on your keyboard for a total of 14 frames.
You can watch the count on the lower right hand side of your screen in AS.
Open SimoneAni-Kaplow!-01
Go to Edit, select all.
Go to Edit, copy.
Activate your tag.
Go to Edit, select all.
Go to Edit, make sure Propagate Paste is selected.
Go to Edit, Paste, paste into selected frames.
Position on your tag and click into place. I placed mine about 3/4 of the way up the tag, so head level in reference to your tube position.
Go back to PSP now and highlight (activate) your tube layer and copy.
Paste as a NEW animation in AS.
Go to Edit, copy.
Activate your tag.
Go to Edit, Paste, paste into selected frames.
I also added SimoneAni-Kaplow!-04 to the center of my tube's chest area.
Play and save.
Don't forget to add your name.
To save:
Go to File, Save as, enter the name of your file and select the folder to save to.
Now click on Customize:
Under COLORS TAB:
Number of colors: 255 Colors
Create palette by: OPTIMIZED OCTREE
Reduce colors by: Error Diffusion
Under OPTIMIZATIONS TAB:
set a check mark beside the second, third and forth choices. UN-check the 1st and last.
Under PARTIAL TRANSPARENCY:
check Convert pixels less than 92
Yes, blend with this color: change to white #FFFFFF
Click OK. Click Next, next, next, next.
Play your animation.
At times your animation may or will come out terrible. Optimization in Animation Shop is not the greatest.
You can play around will your settings, especially under the Tab: Optimization. I change this setting at times from anywhere between 70 and 100.
Some people add a white background. To add background, go to Animation: Animation Properties, select Opaque and change color to white.
Hope you enjoyed this tutorial,
Hugs Simone
Please, always direct people to my blog to download my animations.
Do not load to any other download site and don't claim as your own.
Tutorial written by SophisticatSimone aka Lorraine Halle on Thursday July 4, 2013.
Please click on TAG to see in full size.
••• Supplies needed to complete this tutorial. •••
________________________________________________________________________
Programs: Paint Shop Pro, I'm using version 10. Animation Shop 3.
Plugin : Eye Candy: Gradient Glow for name.
Font used: BadaBoom
Tube of choice: I'm using "Bikini3" by Jose A Cano.
Scrap Kit : I'm using "Super Hero Girls" by Bibi's Collection.
Animation: SimoneAni-Kaplow!
Mask: by me 0145
________________________________________________________________________
♥♥♥
Save your tag often. Nothing like working long and hard on a tag and PSP crashes.
♥♥♥
Open a new image 700 x 700, transparent background.
Go to Selections, select all.
Open Paper 12 and copy.
On your new image, right click on top border and select Paste INTO selection.
De-select.
Close original paper to save for later.
Open your mask of choice and apply or use the one I made Mask0145.
Merge group.
Save this file now in case of crash or loss of power. This happened to me earlier today and I've had to redo the whole tag. Sad story.
Copy and paste element 65 as a new layer and re-size by 40%. Duplicate layer and mirror. Merge them together.
Save your tag.
Copy and paste element 82 as a new layer and re-size by 48%. Add drop shadow.
Copy and paste element 11 as a new layer. Add drop shadow.
Save your tag.
C/P element 67 as a new layer. Drag this layer to the top. Add drop shadow.
C/P element 5 as a new layer and re-size by 80%. This should be your top layer now.
Save your tag.
C/P element 71 as a new layer and re-size by 25%. Move this "Boom" to the upper left hand side of tag. Add drop shadow.
At this time, copy and paste your tube of choice as a new layer. I re-sized mine by 75%. Add drop shadow.
C/P element 70 as a new layer and re-size by 40%. Place in the lower right hand side of tag. Add drop shadow.
Save your tag.
C/P element 77 as a new layer and re-size by 15%. Position over scuffle cloud on the lower right hand side of tag.
Add drop shadow.
C/P element 83 as a new layer and re-size by 23%. Position over the "Boom" word near bottom edge. Add drop shadow.
C/P element 38 as a new layer and move to right upper hand side of tag.
C/P element 133 as a new layer and re-size by 75%. Drag this layer down in the palette until it's just above the big WOW word/element. Position to the left of your character/tube. Add drop shadow.
C/P element 132 as a new layer, mirror and re-size by 70%. Position behind your tube. Add drop shadow.
C/P element 109 as a new layer and re-size by 60%. Move to lower right hand side and add drop shadow. Save tag.
C/P element 66 as a new layer and re-size by 31%. Mirror and move behind your tube on her right side. Duplicate and mirror. Make sure this layer in behind your car. Add drop shadow to each.
C/P element 78 as a new layer and re-size by 16%. Move to left hand side and add drop shadow.
Make sure all your layers have a drop shadow. Add your artist copyright and license number. Place where it will be
visible. Merge this layer down on your tube layer.
Hide your tube, X out the layer.
Activate your Mask layer and right click Merge all visible.
Un hide your tube.
Now to animate.
Making sure your merged layer is selected,
Go to Selections, select all.
Go to Edit and copy merged. Paste as a new animation in Animation Shop.
Hold your Ctrl key down and repeatedly hit letter L on your keyboard for a total of 14 frames.
You can watch the count on the lower right hand side of your screen in AS.
Open SimoneAni-Kaplow!-01
Go to Edit, select all.
Go to Edit, copy.
Activate your tag.
Go to Edit, select all.
Go to Edit, make sure Propagate Paste is selected.
Go to Edit, Paste, paste into selected frames.
Position on your tag and click into place. I placed mine about 3/4 of the way up the tag, so head level in reference to your tube position.
Go back to PSP now and highlight (activate) your tube layer and copy.
Paste as a NEW animation in AS.
Go to Edit, copy.
Activate your tag.
Go to Edit, Paste, paste into selected frames.
I also added SimoneAni-Kaplow!-04 to the center of my tube's chest area.
Play and save.
Don't forget to add your name.
To save:
Go to File, Save as, enter the name of your file and select the folder to save to.
Now click on Customize:
Under COLORS TAB:
Number of colors: 255 Colors
Create palette by: OPTIMIZED OCTREE
Reduce colors by: Error Diffusion
Under OPTIMIZATIONS TAB:
set a check mark beside the second, third and forth choices. UN-check the 1st and last.
Under PARTIAL TRANSPARENCY:
check Convert pixels less than 92
Yes, blend with this color: change to white #FFFFFF
Click OK. Click Next, next, next, next.
Play your animation.
At times your animation may or will come out terrible. Optimization in Animation Shop is not the greatest.
You can play around will your settings, especially under the Tab: Optimization. I change this setting at times from anywhere between 70 and 100.
Some people add a white background. To add background, go to Animation: Animation Properties, select Opaque and change color to white.
Hope you enjoyed this tutorial,
Hugs Simone
Please, always direct people to my blog to download my animations.
Do not load to any other download site and don't claim as your own.
Tutorial written by SophisticatSimone aka Lorraine Halle on Thursday July 4, 2013.
Sunday, June 23, 2013

♥♥♥
Please click on TAG to see in full size.
••• Supplies needed to complete this tutorial. •••
________________________________________________________________________
Programs: Paint Shop Pro, I'm using version 10. Animation Shop 3.
Plugin : Eye Candy 4000 and Lokas Software/3D Shadow
Please click on TAG to see in full size.
••• Supplies needed to complete this tutorial. •••
________________________________________________________________________
Programs: Paint Shop Pro, I'm using version 10. Animation Shop 3.
Plugin : Eye Candy 4000 and Lokas Software/3D Shadow
Font used: Qwigley
Tube of choice: I'm using "Goth" by Jose A Cano from SATC.
Scrap Kit : I'm using "BoomBoom" by Bibi's Collection.
Animation: SimoneAni-BoomBoom-Tutorial
Mask: 0137 HERE
________________________________________________________________________
♥♥♥
Save your tag often. Nothing like working long and hard on a tag and PSP crashes.
♥♥♥
Scrap Kit : I'm using "BoomBoom" by Bibi's Collection.
Animation: SimoneAni-BoomBoom-Tutorial
Mask: 0137 HERE

________________________________________________________________________
♥♥♥
Save your tag often. Nothing like working long and hard on a tag and PSP crashes.
♥♥♥
Open element 31 and duplicate. Close original.
C/P your tube as a new layer. Re-size by 70%. Add drop shadow.
C/P element 55 as a new layer and send layer to bottom. Position in the right upper left hand side, behind the buildings.
Duplicate element and mirror. Add drop shadow to each layer.
C/P element 39 as a new layer and re-size by 45%. Move to left lower hand side, as your top layer. Add drop shadow.
C/P element 14 as a new layer and free rotate to the left by 90 degrees. Position in front of your tube. Add drop shadow.
C/P element 10 as a new layer and re-size by 45%. Move to right lower hand side, as your top layer. Add drop shadow.
C/P element 5 as a new layer and re-size by 50%. Position bottom center. Add drop shadow.
C/P element 23 as a new layer and re-size by 50%. Position behind the building on the lower left hand side.
Duplicate and mirror. Duplicate and move this left up and behind your purple leaves. Duplciate and mirror. Add drop shadow to each.
C/P element 43 as a new layer and re-size by 50%. Move to bottom right hand side behind the barrel. Add drop shadow.
C/P element 40 as a new layer and re-size by 50%. Move to left hand side of tag. Duplicate and mirror. Add drop shadow to each.
C/P element 37 as a new layer and re-size by 50%. Move to left hand side of tag. Duplicate and move to the right side. Add drop shadow to each.
C/P element 12 as a new layer and re-size by 90%. Move to left upper hand side of tag. Add drop shadow.
C/P element 25 and 4 as a new layer and re-size by 50% each. Move to left hand side of tag. Duplicate and mirror. Add drop shadow to each. Position as you like on your tag. This is the flower and purple leaf.
Open paper 4, duplicate, close original and change canvas size to : 700 x 650
Apply Mask of choice or mine(Masks0137). Merge group and copy.
Paste on your tag and send layer to bottom.
C/P element 57 as a new layer. Position this layer just above your mask layer. Position in upper left hand corner of tag.
Duplicate, mirror and flip. Move a bit more to the lower right hand side. Merge these two together.
Add noise, 100%, gaussian, twice.
Add drop shadow.
Make sure all your layers have a drop shadow.
Save your tag as pspimage file.
Add artist copyright.
Save again.
I always keep a copy of my finished original tag without a name on it, so duplicate this one and close it.
Merge visible the copied one.
Add your name, merge visible and save as PNG.
If animating, merge all layers one at a time down to and including your tube.
X-out this layer now. Click on Mask layer and merge all visible.
UN hide top layer.
Make sure your bottom layer is active. Go to Selections, select all and copy.
Paste as a new Animation in Animation Shop.
Hold your Ctrl key down and repeatedly hit letter L on your keyboard for a total of 10 frames.
You can watch the count on the lower right hand side of your screen in AS.
Open SimoneAni-BoomBoom
Go to Edit, select all.
Go to Edit, copy.
Activate your tag.
Go to Edit, select all.
Go to Edit, make sure Propagate Paste is selected.
Go to Edit, Paste, paste into selected frames.
Position on your tag and click into place. Center of tag and buildings.
Go back in PSP and activate the top layer. Copy and paste in AS as a new animation.
Go Edit and Copy.
Activate your tag.
Go to Edit, Paste, paste into selected frames.
Position as best as you can, the way it looked on your tag in PSP. Click into place.
Play and save.
To save:
Go to File, Save as, enter the name of your file and select the folder to save to.
Now click on Customize:
Under COLORS TAB:
Number of colors: 255 Colors
Create palette by: OPTIMIZED OCTREE
Reduce colors by: Error Diffusion
Under OPTIMIZATIONS TAB:
set a check mark beside the second, third and forth choices. UN-check the 1st and last.
Under PARTIAL TRANSPARENCY:
check Convert pixels less than 92
Yes, blend with this color: change to white #FFFFFF
Click OK. Click Next, next, next, next.
Play your animation.
At times your animation may or will come out terrible. Optimization in Animation Shop is not the greatest.
You can play around will your settings, especially under the Tab: Optimization. I change this setting at times from anywhere between 70 and 100.
Some people add a white background. To add background, go to Animation: Animation Properties, select Opaque and change color to white.
C/P your tube as a new layer. Re-size by 70%. Add drop shadow.
C/P element 55 as a new layer and send layer to bottom. Position in the right upper left hand side, behind the buildings.
Duplicate element and mirror. Add drop shadow to each layer.
C/P element 39 as a new layer and re-size by 45%. Move to left lower hand side, as your top layer. Add drop shadow.
C/P element 14 as a new layer and free rotate to the left by 90 degrees. Position in front of your tube. Add drop shadow.
C/P element 10 as a new layer and re-size by 45%. Move to right lower hand side, as your top layer. Add drop shadow.
C/P element 5 as a new layer and re-size by 50%. Position bottom center. Add drop shadow.
C/P element 23 as a new layer and re-size by 50%. Position behind the building on the lower left hand side.
Duplicate and mirror. Duplicate and move this left up and behind your purple leaves. Duplciate and mirror. Add drop shadow to each.
C/P element 43 as a new layer and re-size by 50%. Move to bottom right hand side behind the barrel. Add drop shadow.
C/P element 40 as a new layer and re-size by 50%. Move to left hand side of tag. Duplicate and mirror. Add drop shadow to each.
C/P element 37 as a new layer and re-size by 50%. Move to left hand side of tag. Duplicate and move to the right side. Add drop shadow to each.
C/P element 12 as a new layer and re-size by 90%. Move to left upper hand side of tag. Add drop shadow.
C/P element 25 and 4 as a new layer and re-size by 50% each. Move to left hand side of tag. Duplicate and mirror. Add drop shadow to each. Position as you like on your tag. This is the flower and purple leaf.
Open paper 4, duplicate, close original and change canvas size to : 700 x 650
Apply Mask of choice or mine(Masks0137). Merge group and copy.
Paste on your tag and send layer to bottom.
C/P element 57 as a new layer. Position this layer just above your mask layer. Position in upper left hand corner of tag.
Duplicate, mirror and flip. Move a bit more to the lower right hand side. Merge these two together.
Add noise, 100%, gaussian, twice.
Add drop shadow.
Make sure all your layers have a drop shadow.
Save your tag as pspimage file.
Add artist copyright.
Save again.
I always keep a copy of my finished original tag without a name on it, so duplicate this one and close it.
Merge visible the copied one.
Add your name, merge visible and save as PNG.
If animating, merge all layers one at a time down to and including your tube.
X-out this layer now. Click on Mask layer and merge all visible.
UN hide top layer.
Make sure your bottom layer is active. Go to Selections, select all and copy.
Paste as a new Animation in Animation Shop.
Hold your Ctrl key down and repeatedly hit letter L on your keyboard for a total of 10 frames.
You can watch the count on the lower right hand side of your screen in AS.
Open SimoneAni-BoomBoom
Go to Edit, select all.
Go to Edit, copy.
Activate your tag.
Go to Edit, select all.
Go to Edit, make sure Propagate Paste is selected.
Go to Edit, Paste, paste into selected frames.
Position on your tag and click into place. Center of tag and buildings.
Go back in PSP and activate the top layer. Copy and paste in AS as a new animation.
Go Edit and Copy.
Activate your tag.
Go to Edit, Paste, paste into selected frames.
Position as best as you can, the way it looked on your tag in PSP. Click into place.
Play and save.
To save:
Go to File, Save as, enter the name of your file and select the folder to save to.
Now click on Customize:
Under COLORS TAB:
Number of colors: 255 Colors
Create palette by: OPTIMIZED OCTREE
Reduce colors by: Error Diffusion
Under OPTIMIZATIONS TAB:
set a check mark beside the second, third and forth choices. UN-check the 1st and last.
Under PARTIAL TRANSPARENCY:
check Convert pixels less than 92
Yes, blend with this color: change to white #FFFFFF
Click OK. Click Next, next, next, next.
Play your animation.
At times your animation may or will come out terrible. Optimization in Animation Shop is not the greatest.
You can play around will your settings, especially under the Tab: Optimization. I change this setting at times from anywhere between 70 and 100.
Some people add a white background. To add background, go to Animation: Animation Properties, select Opaque and change color to white.
To create the same name as I did in this tag, please go to this tutorial HERE
Hope you enjoyed this tutorial,
Hugs Simone
Please, always direct people to my blog to download my animations.
Do not load to any other download site and don't claim as your own.
Tutorial written by SophisticatSimone aka Lorraine Halle on Sunday June 23, 2013
Tuesday, June 18, 2013

♥♥♥
Please click on TAG to see in full size.
••• Supplies needed to complete this tutorial. •••
________________________________________________________________________
Programs: Paint Shop Pro, I'm using version 10. Animation Shop 3.
Plugin : none
Font used: Carpenter
Tube of choice: I'm using "Courtney" by Jose A Cano.
Scrap Kit : I'm using "Courtney" by Lizquis Scraps.
Animation: SimoneAni469
Mask: 0139 HERE
________________________________________________________________________
♥♥♥
Save your tag often. Nothing like working long and hard on a tag and PSP crashes.
♥♥♥
Open Courtney_frame2. Duplicate and close original. Re-size by 80%, all layers UN-checked.
Now change your canvas size to 700 x 700.
Using your magic wand, feather set to 0, click inside your frame. Go to Selections, expand, by 10.
Copy and paste a close up of your tube as a new layer. Move down below the frame.
Go to Selections, Invert and hit delete on your keyboard.
If there's any space showing behind your close-up, copy and paste a paper, move it below your close-up and delete.
You can De-select.
Duplicate your close up. On the original close up layer, apply blur, Gaussian Blur of 3. On duplicate layer, change blend mode to soft light. Merge these two together. Now change blend mode to Multiply.
Duplicate your frame. Top frame layer, change blend mode to Multiply.
Add drop shadow to this frame:
V: 2
H: 5
Opacity: 64
Blur: 13
Color: black
Merge all visible.
Copy and paste Courtney_Grass as a new layer. Move to the left and bottom of frame layer.
Copy and paste Courtney_radio as a new layer. Re-size by 50% and move to the left side.
Copy and paste Courtney_Tree as a new layer. Place to the right of frame and behind the car.
C/P sparkles1 as a new layer. Place more to the left and over the frame.
C/P tube as a new layer. Mirror and re-size by 80%. Delete extra at the bottom of tube using your selection tool set to rectangle and feather set to 25. Select area from crotch to below. Delete.
Copy and paste Courtney_dog as a new layer. Re-size by 50% and move to the right side.
Copy and paste Courtney_bag as a new layer. Re-size by 50% and move to the right side beside dog.
Add drop shadow to every layer.
C/P Paper 1 as a new layer. Send to bottom.
Click on any other element to activate that layer. Go to Selections, select all. Activate your paper layer again.
Go to Image, crop to selection. Apply Mask 0139, merge group. Duplicate layer. Add drop shadow.
Merge all visible.
Add artist copyright.
Save as PNG.
To animate:
Go to Selections, select all.
Go to Edit and copy merged. Paste as a new animation in Animation Shop.
Hold your Ctrl key down and repeatedly hit letter L on your keyboard for a total of 21 frames.
You can watch the count on the lower right hand side of your screen in AS.
Open SimoneAni469
Go to Edit, select all.
Go to Edit, copy.
Activate your tag.
Go to Edit, select all.
Go to Edit, make sure Propagate Paste is selected.
Go to Edit, Paste, paste into selected frames.
Position on your tag and click into place.
Play and save.
Don't forget to add your name.
To save:
Go to File, Save as, enter the name of your file and select the folder to save to.
Now click on Customize:
Under COLORS TAB:
Number of colors: 255 Colors
Create palette by: OPTIMIZED OCTREE
Reduce colors by: Error Diffusion
Under OPTIMIZATIONS TAB:
set a check mark beside the second, third and forth choices. UN-check the 1st and last.
Under PARTIAL TRANSPARENCY:
check Convert pixels less than 92
Yes, blend with this color: change to white #FFFFFF
Click OK. Click Next, next, next, next.
Play your animation.
At times your animation may or will come out terrible. Optimization in Animation Shop is not the greatest.
You can play around will your settings, especially under the Tab: Optimization. I change this setting at times from anywhere
between 80 and 100.
Some people add a white background. To add background, go to Animation: Animation Properties, select Opaque and change color to white.
Hope you enjoyed this tutorial,
Hugs Simone
Please, always direct people to my blog to download my animations.
Do not load to any other download site and don't claim as your own.
Tutorial written by SophisticatSimone aka Lorraine Halle on Wednesday, June 18 2013.
Sunday, June 2, 2013

♥♥♥
Please click on TAG to see in full size.
••• Supplies needed to complete this tutorial. •••
________________________________________________________________________
Programs: Paint Shop Pro, I'm using version 10. Animation Shop 3.
Plugin : Eye Candy: Gradient Glow for name, Xenofex constellation for name.
Font used: Variex
Tube of choice: I'm using "Liberty" by Jose Cano from SATC.
Scrap Kit : I'm using "Liberty" by Bibi's Collection.
Animation: 4TH OF July HERE
Mask: 0121 HERE
________________________________________________________________________
♥♥♥
Save your tag often. Nothing like working long and hard on a tag and PSP crashes.
♥♥♥
Please click on TAG to see in full size.
••• Supplies needed to complete this tutorial. •••
________________________________________________________________________
Programs: Paint Shop Pro, I'm using version 10. Animation Shop 3.
Plugin : Eye Candy: Gradient Glow for name, Xenofex constellation for name.
Font used: Variex
Tube of choice: I'm using "Liberty" by Jose Cano from SATC.
Scrap Kit : I'm using "Liberty" by Bibi's Collection.
Animation: 4TH OF July HERE
Mask: 0121 HERE
________________________________________________________________________
♥♥♥
Save your tag often. Nothing like working long and hard on a tag and PSP crashes.
♥♥♥
Open Paper of choice or paper13, which is what I used.
Duplicate and close original. Re-size paper to 60%, Resolution is 72 pixels/inch.
Re-sample using: Smart Size.
This is what I use the majority of the time.
Apply Mask of choice or my mask 0121.
Merge group, duplicate and change blend mode to Multiply. Duplicate this layer.
Merge visible.
Close your Mask.
Add noise, random check, noise of 14% and monochrome checked.
Copy and paste element 102 as a new layer and move to the left hand side of tag. Add drop shadow.
Copy and paste your tube and re-size if you need to. I re-sized mine by 85%. Move a little to the right of center. Add drop shadow.
Copy and paste element 31 as a new layer and re-size by 34%. Move behind your tube and add drop shadow.
Copy and paste element 59 as a new layer. Add drop shadow. Move behind statue of Liberty.
C/P element 100 and re-size by 86%. Move behind statue and to the left side of tag. Add D/S.
C/P element 101 and re-size by 90%. Move behind your tube and to the right side of tag. Add D/S.
Copy and paste the tree elements, 4, 5 and 53. Add them to the background of tag and add drop shadow to each.
Add Artist's copyright and URL and your license number.
X-out (hide) your tube layer, building on the right and the large red, white and blue star.
Click on your mask layer and merge visible.
Hide this merged layer and un-hide the other 3. Now merge those together.
You should have two layers.
Now to animate.
Go to Selections, select all.
Go to Edit and copy merged. Paste as a new animation in Animation Shop.
Hold your Ctrl key down and repeatedly hit letter L on your keyboard for a total of 19frames.
You can watch the count on the lower right hand side of your screen in AS.
Open SimoneAni482
Go to Edit, select all.
Go to Edit, copy.
Activate your tag.
Go to Edit, select all.
Go to Edit, make sure Propagate Paste is selected.
Go to Edit, Paste, paste into selected frames.
Position on your tag and click into place.
Go back to PSP and select your top layer (tube), X-out the bottom layer and copy.
Paste in AS as a new animation.
Go to Edit, copy.
Go to Edit, make sure Propagate Paste is selected.
Activate your main tag.
Go to Edit, Paste, paste into selected frames.
I added another animation to the tag. Repeat and add animation SimoneAni481.
I culled animation by half.
Go to Animation/Cull Animation, every 2 frames, click OK.
Duplicate and close original. Re-size paper to 60%, Resolution is 72 pixels/inch.
Re-sample using: Smart Size.
This is what I use the majority of the time.
Apply Mask of choice or my mask 0121.
Merge group, duplicate and change blend mode to Multiply. Duplicate this layer.
Merge visible.
Close your Mask.
Add noise, random check, noise of 14% and monochrome checked.
Copy and paste element 102 as a new layer and move to the left hand side of tag. Add drop shadow.
Copy and paste your tube and re-size if you need to. I re-sized mine by 85%. Move a little to the right of center. Add drop shadow.
Copy and paste element 31 as a new layer and re-size by 34%. Move behind your tube and add drop shadow.
Copy and paste element 59 as a new layer. Add drop shadow. Move behind statue of Liberty.
C/P element 100 and re-size by 86%. Move behind statue and to the left side of tag. Add D/S.
C/P element 101 and re-size by 90%. Move behind your tube and to the right side of tag. Add D/S.
Copy and paste the tree elements, 4, 5 and 53. Add them to the background of tag and add drop shadow to each.
Add Artist's copyright and URL and your license number.
X-out (hide) your tube layer, building on the right and the large red, white and blue star.
Click on your mask layer and merge visible.
Hide this merged layer and un-hide the other 3. Now merge those together.
You should have two layers.
Now to animate.
Go to Selections, select all.
Go to Edit and copy merged. Paste as a new animation in Animation Shop.
Hold your Ctrl key down and repeatedly hit letter L on your keyboard for a total of 19frames.
You can watch the count on the lower right hand side of your screen in AS.
Open SimoneAni482
Go to Edit, select all.
Go to Edit, copy.
Activate your tag.
Go to Edit, select all.
Go to Edit, make sure Propagate Paste is selected.
Go to Edit, Paste, paste into selected frames.
Position on your tag and click into place.
Go back to PSP and select your top layer (tube), X-out the bottom layer and copy.
Paste in AS as a new animation.
Go to Edit, copy.
Go to Edit, make sure Propagate Paste is selected.
Activate your main tag.
Go to Edit, Paste, paste into selected frames.
I added another animation to the tag. Repeat and add animation SimoneAni481.
I culled animation by half.
Go to Animation/Cull Animation, every 2 frames, click OK.
Play and save.
Don't forget to add your name.
You can see my name tutorial HERE.
To save:
Go to File, Save as, enter the name of your file and select the folder to save to.
Now click on Customize:
Under COLORS TAB:
Number of colors: 255 Colors
Create palette by: OPTIMIZED OCTREE
Reduce colors by: Error Diffusion
Under OPTIMIZATIONS TAB:
set a check mark beside the second, third and forth choices. UN-check the 1st and last.
Under PARTIAL TRANSPARENCY:
check Convert pixels less than 92
Yes, blend with this color: change to white #FFFFFF
Click OK. Click Next, next, next, next.
Play your animation.
At times your animation may or will come out terrible. Optimization in Animation Shop is not the greatest.
You can play around will your settings, especially under the Tab: Optimization. I change this setting at times from anywhere between 70 and 100.
Some people add a white background. To add background, go to Animation: Animation Properties, select Opaque and change color to white.
Hope you enjoyed this tutorial,
Hugs Simone
Please, always direct people to my blog to download my animations.
Do not load to any other download site and don't claim as your own.
Tutorial written by SophisticatSimone aka Lorraine Halle on Saturday, June 2, 2013.
Don't forget to add your name.
You can see my name tutorial HERE.
To save:
Go to File, Save as, enter the name of your file and select the folder to save to.
Now click on Customize:
Under COLORS TAB:
Number of colors: 255 Colors
Create palette by: OPTIMIZED OCTREE
Reduce colors by: Error Diffusion
Under OPTIMIZATIONS TAB:
set a check mark beside the second, third and forth choices. UN-check the 1st and last.
Under PARTIAL TRANSPARENCY:
check Convert pixels less than 92
Yes, blend with this color: change to white #FFFFFF
Click OK. Click Next, next, next, next.
Play your animation.
At times your animation may or will come out terrible. Optimization in Animation Shop is not the greatest.
You can play around will your settings, especially under the Tab: Optimization. I change this setting at times from anywhere between 70 and 100.
Some people add a white background. To add background, go to Animation: Animation Properties, select Opaque and change color to white.
Hope you enjoyed this tutorial,
Hugs Simone
Please, always direct people to my blog to download my animations.
Do not load to any other download site and don't claim as your own.
Tutorial written by SophisticatSimone aka Lorraine Halle on Saturday, June 2, 2013.
Subscribe to:
Posts
(Atom)
CT TEAM