My Blinkie

Showing posts with label P-O Concept Kits. Show all posts
Showing posts with label P-O Concept Kits. Show all posts
Sunday, June 23, 2013

♥♥♥
Please click on TAG to see in full size.
••• Supplies needed to complete this tutorial. •••
________________________________________________________________________
Programs: Paint Shop Pro, I'm using version 10. Animation Shop 3.
Plugin : Eye Candy: Gradient Glow for name.
Font used: Jenna Sue
Tube of choice: I'm using "The double trouble makers" by aLDoDarK from SATC.
Scrap Kit : I'm using "Zen Legend" by P-O Concept from SATC
Animation: none
Mask: 140
________________________________________________________________________
♥♥♥
Save your tag often. Nothing like working long and hard on a tag and PSP crashes.
♥♥♥
Open a new image 600 x 600
Copy and paste tube of choice on your banner. Re-size by 80% and remove the bottom portion of your tube with your selection tool.
Position tube over on the left side. Add drop shadow.
Open paper 10 and duplicate. Close original.
Apply Mask 140. Merge group. Copy and paste as a new layer on your tag.
Send this layer to bottom. Duplicate and merge. If you need to re-size your canvas, do so now.
C/P element 31 as a new layer and move to the left side of tag. Duplicate and merge together.
Duplicate and move this one to the right side.
C/P element 68 as a new layer and move to the right side of tag. Re-size by 70% and add drop shadow.
C/P element 38 as a new layer. Position in center of tag and behind your tube. Duplicate and free rotate by 40 degrees to the left.
Move this layer to the left of your tube. Add drop shadow to each.
C/P element 71 as a new layer. Move to left side. Position this layer behind the rotate feathers layer.
C/P element 29 as a new layer. Move to far right side of tag. Add drop shadow.
C/P element 21 as a new layer and re-size by 45%. Duplicate. Position flowers in front of eggs.
C/P element 61 as a new layer. Move a little to the right of your tube. Duplicate and merge together.
C/P element 32 as a new layer. Mirror your dragon and position on the eggs on the right side of tag. Add drop shadow.
C/P element 69 as a new layer. Move to the right side, add drop shadow.
C/P element 20 as a new layer and re-size by 40%. Move to the bottom left hand side of tag. Add drop shadow.
Merge all visible.
Add artist copyright.
Add name.
I used Jenna Sue as my font.
Used Eye Candy gradient glow and added a drop shadow.
Save as PNG.
Hope you enjoyed this tutorial,
Hugs Simone
Please, always direct people to my blog to download my animations.
Do not load to any other download site and don't claim as your own.
Tutorial written by SophisticatSimone aka Lorraine Halle on Sunday June 23, 2013.
Please click on TAG to see in full size.
••• Supplies needed to complete this tutorial. •••
________________________________________________________________________
Programs: Paint Shop Pro, I'm using version 10. Animation Shop 3.
Plugin : Eye Candy: Gradient Glow for name.
Font used: Jenna Sue
Tube of choice: I'm using "The double trouble makers" by aLDoDarK from SATC.
Scrap Kit : I'm using "Zen Legend" by P-O Concept from SATC
Animation: none
Mask: 140
________________________________________________________________________
♥♥♥
Save your tag often. Nothing like working long and hard on a tag and PSP crashes.
♥♥♥
Open a new image 600 x 600
Copy and paste tube of choice on your banner. Re-size by 80% and remove the bottom portion of your tube with your selection tool.
Position tube over on the left side. Add drop shadow.
Open paper 10 and duplicate. Close original.
Apply Mask 140. Merge group. Copy and paste as a new layer on your tag.
Send this layer to bottom. Duplicate and merge. If you need to re-size your canvas, do so now.
C/P element 31 as a new layer and move to the left side of tag. Duplicate and merge together.
Duplicate and move this one to the right side.
C/P element 68 as a new layer and move to the right side of tag. Re-size by 70% and add drop shadow.
C/P element 38 as a new layer. Position in center of tag and behind your tube. Duplicate and free rotate by 40 degrees to the left.
Move this layer to the left of your tube. Add drop shadow to each.
C/P element 71 as a new layer. Move to left side. Position this layer behind the rotate feathers layer.
C/P element 29 as a new layer. Move to far right side of tag. Add drop shadow.
C/P element 21 as a new layer and re-size by 45%. Duplicate. Position flowers in front of eggs.
C/P element 61 as a new layer. Move a little to the right of your tube. Duplicate and merge together.
C/P element 32 as a new layer. Mirror your dragon and position on the eggs on the right side of tag. Add drop shadow.
C/P element 69 as a new layer. Move to the right side, add drop shadow.
C/P element 20 as a new layer and re-size by 40%. Move to the bottom left hand side of tag. Add drop shadow.
Merge all visible.
Add artist copyright.
Add name.
I used Jenna Sue as my font.
Used Eye Candy gradient glow and added a drop shadow.
Save as PNG.
Hope you enjoyed this tutorial,
Hugs Simone
Please, always direct people to my blog to download my animations.
Do not load to any other download site and don't claim as your own.
Tutorial written by SophisticatSimone aka Lorraine Halle on Sunday June 23, 2013.

Sunday, June 9, 2013

♥♥♥
Please click on TAG to see in full size.
••• Supplies needed to complete this tutorial. •••
________________________________________________________________________
Programs: Paint Shop Pro, I'm using version 10. Animation Shop 3.
Plugin : Eye Candy: Gradient Glow for name
Font used: A&S Motherlode
Tube of choice: I'm using "Megan" by Alexander McMillan from SATC.
Scrap Kit : I'm using "Brown Sugar" by P-O Concept from SATC
Animation: none
Mask: 0137SS
________________________________________________________________________
♥♥♥
Save your tag often. Nothing like working long and hard on a tag and PSP crashes.
♥♥♥
Open element 57 and copy.
Create a new image 700 x 700. You can re-size at the end.
Paste element as a new layer and sharpen.
Add small drop shadow
V=0
H=-2
Opacity=60
Blur=4
Color=black.
Go to Effect, Mura's Copies and enter the following:
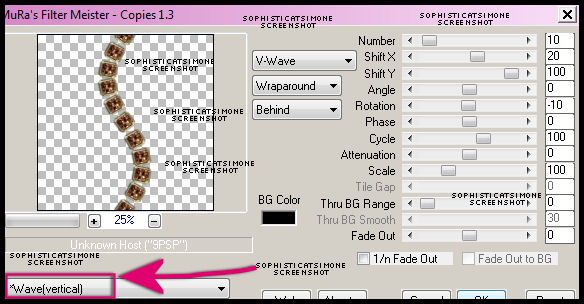
Now, using your selection tool set to Freehand selection, enter the following and then click around the jewel leaving behind the two jewels that
are being cut off.
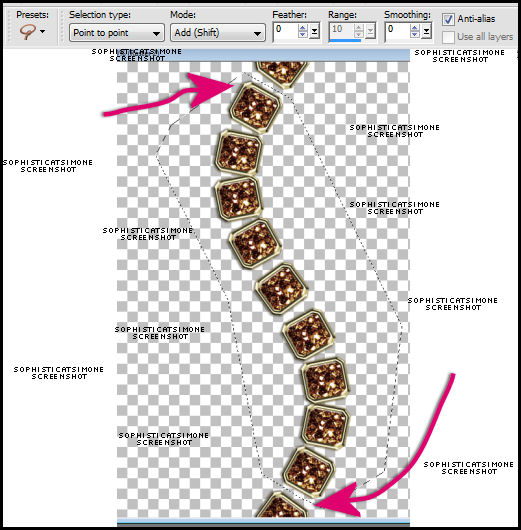
Now go to Selections, Invert and hit delete on keyboard.
Go to Selections, select none.
Copy and paste your tube as a new layer and re-size by 80%. Move behind the jewel wave. Add drop shadow of choice.
Copy and paste paper 10 as a new layer and re-size by 92%. Send paper to bottom and sharpen.
Add noise of 27%, Gaussian checked. Monochrome checked.
Apply mask of choice or mine: masks0137.
Go to Layers, New Mask Layer, From Image. Select mask in drop down box and apply.
Merge group. Duplicate and merge down.
Copy and paste element 39 as a new layer and re-size by 70%. Add drop shadow. Position more to the left of mid line.
Copy and paste element 70 as a new layer and position behind your tube at the bottom and more to the right side of tag. Duplicate and move this layer up and over to the left hand side.
Add drop shadow to each:
V=-3
H=-3
Opacity=77
Blur=10.14
Color=black.
Copy and paste element 75 as a new layer and move it to the far left side and free rotate to the left by 25 degrees. Duplicate and mirror.
Drag this element behind yellow fan and move up high on tag, behind your tube's head. Add drop shadow to each layer decreasing the opacity of shadow to 50.
Add the phone element (80) and add drop shadow.
Duplicate the jewel wave and mirror. Drag this layer behind your tube layer and over to the right side of tag.
Make sure all your layers have shadows
Add artist copyright and your name and save as PNG.
Hope you enjoyed this tutorial,
Hugs Simone
Please, always direct people to my blog to download my animations.
Do not load to any other download site and don't claim as your own.
Tutorial written by SophisticatSimone aka Lorraine Halle on Sunday June 9, 2013.
Please click on TAG to see in full size.
••• Supplies needed to complete this tutorial. •••
________________________________________________________________________
Programs: Paint Shop Pro, I'm using version 10. Animation Shop 3.
Plugin : Eye Candy: Gradient Glow for name
Font used: A&S Motherlode
Tube of choice: I'm using "Megan" by Alexander McMillan from SATC.
Scrap Kit : I'm using "Brown Sugar" by P-O Concept from SATC
Animation: none
Mask: 0137SS
________________________________________________________________________
♥♥♥
Save your tag often. Nothing like working long and hard on a tag and PSP crashes.
♥♥♥
Open element 57 and copy.
Create a new image 700 x 700. You can re-size at the end.
Paste element as a new layer and sharpen.
Add small drop shadow
V=0
H=-2
Opacity=60
Blur=4
Color=black.
Go to Effect, Mura's Copies and enter the following:
Now, using your selection tool set to Freehand selection, enter the following and then click around the jewel leaving behind the two jewels that
are being cut off.
Now go to Selections, Invert and hit delete on keyboard.
Go to Selections, select none.
Copy and paste your tube as a new layer and re-size by 80%. Move behind the jewel wave. Add drop shadow of choice.
Copy and paste paper 10 as a new layer and re-size by 92%. Send paper to bottom and sharpen.
Add noise of 27%, Gaussian checked. Monochrome checked.
Apply mask of choice or mine: masks0137.
Go to Layers, New Mask Layer, From Image. Select mask in drop down box and apply.
Merge group. Duplicate and merge down.
Copy and paste element 39 as a new layer and re-size by 70%. Add drop shadow. Position more to the left of mid line.
Copy and paste element 70 as a new layer and position behind your tube at the bottom and more to the right side of tag. Duplicate and move this layer up and over to the left hand side.
Add drop shadow to each:
V=-3
H=-3
Opacity=77
Blur=10.14
Color=black.
Copy and paste element 75 as a new layer and move it to the far left side and free rotate to the left by 25 degrees. Duplicate and mirror.
Drag this element behind yellow fan and move up high on tag, behind your tube's head. Add drop shadow to each layer decreasing the opacity of shadow to 50.
Add the phone element (80) and add drop shadow.
Duplicate the jewel wave and mirror. Drag this layer behind your tube layer and over to the right side of tag.
Make sure all your layers have shadows
Add artist copyright and your name and save as PNG.
Hope you enjoyed this tutorial,
Hugs Simone
Please, always direct people to my blog to download my animations.
Do not load to any other download site and don't claim as your own.
Tutorial written by SophisticatSimone aka Lorraine Halle on Sunday June 9, 2013.
Sunday, May 26, 2013

♥♥♥
Please click on TAG to see in full size.
••• Supplies needed to complete this tutorial. •••
________________________________________________________________________
Programs: Paint Shop Pro, I'm using version 10. Animation Shop 3.
Plugin : Gradient Glow by Eye Candy 4000 (for name)
Font used: Miss Le Gatees
Tube of choice: I'm using "Jenna" by Jose Cano
Scrap Kit : I'm using "Aloha Fly The World" by P-O Concept
Please click on TAG to see in full size.
••• Supplies needed to complete this tutorial. •••
________________________________________________________________________
Programs: Paint Shop Pro, I'm using version 10. Animation Shop 3.
Plugin : Gradient Glow by Eye Candy 4000 (for name)
Font used: Miss Le Gatees
Tube of choice: I'm using "Jenna" by Jose Cano
Scrap Kit : I'm using "Aloha Fly The World" by P-O Concept
Mask: Masks0119
________________________________________________________________________
♥♥♥
Save your tag often. Nothing like working long and hard on a tag and PSP crashes.
♥♥♥
Open Mask 0119 in PSP and minimize.
Open Paper 1 in PSP and duplicate. Close original.
Re-size paper by 75%, smart size checked and 72 dpi.
Go to Layers, New Mask Layer, from Image and apply your Mask.
Merge group.
Go to Image, canvas size and enter the following:
700 x 655.
Copy and paste your tube as a new layer. Add drop shadow.
Copy and paste element 103 as a new layer and move behind your tube on the left hand side. Add drop shadow.
Copy and paste element 26 as a new layer. Re-size by 55% and move to the lower right hand side. Add drop shadow.
Copy and paste element 44 as a new layer. Re-size by 60% and move to the lower right hand side. Add drop shadow.
Copy and paste element 43 as a new layer. Re-size by 60% and move behind car seat and to the left side of tag. Add drop shadow.
Copy and paste element 41as a new layer. Re-size by 60% and move to upper right hand side of tag. Add drop shadow.
Copy and paste element 42 as a new layer. Move to the left and add drop shadow. Should be behind all other layers and above your mask layer.
Copy and paste element 13 as a new layer, move this layer to the top. Re-size by 25%. Add drop shadow. Place on luggage.
Copy and paste element 27 as a new layer and re-size by 50%. Position to the upper left hand side. Add drop shadow.
Copy and paste element 38 as a new layer and move behind tube. Position in between the couch and the log post. Add drop shadow.
Copy and paste element 90 as a new layer and move behind fish bottle and in front of blue life preserver. Add drop shadow.
Merge visible.
Crop to size.
Add artist copyright and URL. Add scrap kit maker credit.
Add your name as save as PNG.
________________________________________________________________________
♥♥♥
Save your tag often. Nothing like working long and hard on a tag and PSP crashes.
♥♥♥
Open Mask 0119 in PSP and minimize.
Open Paper 1 in PSP and duplicate. Close original.
Re-size paper by 75%, smart size checked and 72 dpi.
Go to Layers, New Mask Layer, from Image and apply your Mask.
Merge group.
Go to Image, canvas size and enter the following:
700 x 655.
Copy and paste your tube as a new layer. Add drop shadow.
Copy and paste element 103 as a new layer and move behind your tube on the left hand side. Add drop shadow.
Copy and paste element 26 as a new layer. Re-size by 55% and move to the lower right hand side. Add drop shadow.
Copy and paste element 44 as a new layer. Re-size by 60% and move to the lower right hand side. Add drop shadow.
Copy and paste element 43 as a new layer. Re-size by 60% and move behind car seat and to the left side of tag. Add drop shadow.
Copy and paste element 41as a new layer. Re-size by 60% and move to upper right hand side of tag. Add drop shadow.
Copy and paste element 42 as a new layer. Move to the left and add drop shadow. Should be behind all other layers and above your mask layer.
Copy and paste element 13 as a new layer, move this layer to the top. Re-size by 25%. Add drop shadow. Place on luggage.
Copy and paste element 27 as a new layer and re-size by 50%. Position to the upper left hand side. Add drop shadow.
Copy and paste element 38 as a new layer and move behind tube. Position in between the couch and the log post. Add drop shadow.
Copy and paste element 90 as a new layer and move behind fish bottle and in front of blue life preserver. Add drop shadow.
Merge visible.
Crop to size.
Add artist copyright and URL. Add scrap kit maker credit.
Add your name as save as PNG.
Animated name tutorial HERE if you choose to add animation to your tag/name.
Hope you enjoyed this tutorial,
Hugs Simone
Please, always direct people to my blog to download my animations.
Do not load to any other download site and don't claim as your own.
Tutorial written by SophisticatSimone aka Lorraine Halle on Sunday, May 26, 2013.
Hope you enjoyed this tutorial,
Hugs Simone
Please, always direct people to my blog to download my animations.
Do not load to any other download site and don't claim as your own.
Tutorial written by SophisticatSimone aka Lorraine Halle on Sunday, May 26, 2013.
Saturday, May 11, 2013

♥♥♥
Please click on TAG to see in full size.
••• Supplies needed to complete this tutorial. •••
________________________________________________________________________
Programs: Paint Shop Pro, I'm using version 10. Animation Shop 3.
Plugin : AAA Filters/ Blot and Smudge and Xero_Fritillary
Font used: Saginaw
Tube of choice: I'm using "Jana 2" by Jose A Cano from SATC.
Scrap Kit : I'm using "Dazzling Escapade" by P-O Concept from SATC
Mask: Masks-119-SophisticatSimone
________________________________________________________________________
♥♥♥
Save your tag often. Nothing like working long and hard on a tag and PSP crashes.
♥♥♥
Open Masks0119-SophisticatSimone and minimize.
Open Paper 11, duplicate and close original.
Select your crop tool and enter the following
Width: 650 Height: 595

Move the crop box in the center of tag and double click.
Go to Layers, New Mask Layer, From Image.
Find mask in drop down list and apply.
Merge group.
Copy and paste element 57 as a new layer. Move to right and add drop shadow.
Copy and paste element 72 as a new layer and re-size by 18%. Move to left and add drop shadow.
Copy and paste element 70 as a new layer and re-size by 82%. Move to the right side and add drop shadow.
Copy and paste your tube and re-size if necessary and add drop shadow.
Copy and paste element 51 as a new layer. Leave as is and add drop shadow.
Copy and paste element 3 as a new layer. Center. Duplicate and merge down.
Copy and paste element 58 as a new layer. Move to the left and remove any extra down at the bottom. Use your selection tool. Add drop shadow.
Copy and paste element 26 as a new layer. Move to the right side of tag and behind your gazebo. Add drop shadow.
Open element 73. Using your lasso tool, set to the following:

Remove the green stem.


Copy and paste the pink flower as a new layer and re-size by 13% and move to the far left side and position on the green lily pad. Add drop shadow.
Copy and paste element 25 as a new layer and re-size by 38%, place on lily pad and add drop shadow.
Repeat, but re-size by 20% and move to the right near your tube. Add drop shadow.
Copy and paste element 76 as a new layer and re-size by 35%. Move to bottom center, near lily pad and in front of gazebo. Add drop shadow.
Copy and paste element 23 as a new layer and re-size by 24%. Move to bottom center, over the coral rocks and add drop shadow.
Copy and paste element 78 as a new layer and re-size by 30%. Move to the bottom right side of tag in front of gazebo and add drop shadow.
Add any other embellishment you feel would enhance your tag. I added a couple of butterflies (element 7).
Add copyright and add your name.
Merge visible and save as a PNG.
Hope you enjoyed this tutorial,
Hugs Simone
Please, always direct people to my blog to download my animations.
Do not load to any other download site and don't claim as your own.
Tutorial written by SophisticatSimone aka Lorraine Halle on Saturday, May 11, 2013.
Copy and paste element 25 as a new layer and re-size by 38%, place on lily pad and add drop shadow.
Repeat, but re-size by 20% and move to the right near your tube. Add drop shadow.
Copy and paste element 76 as a new layer and re-size by 35%. Move to bottom center, near lily pad and in front of gazebo. Add drop shadow.
Copy and paste element 23 as a new layer and re-size by 24%. Move to bottom center, over the coral rocks and add drop shadow.
Copy and paste element 78 as a new layer and re-size by 30%. Move to the bottom right side of tag in front of gazebo and add drop shadow.
Add any other embellishment you feel would enhance your tag. I added a couple of butterflies (element 7).
Add copyright and add your name.
Merge visible and save as a PNG.
Hope you enjoyed this tutorial,
Hugs Simone
Please, always direct people to my blog to download my animations.
Do not load to any other download site and don't claim as your own.
Tutorial written by SophisticatSimone aka Lorraine Halle on Saturday, May 11, 2013.
Subscribe to:
Posts
(Atom)
CT TEAM