My Blinkie

Showing posts with label AmyMarie Kits. Show all posts
Showing posts with label AmyMarie Kits. Show all posts
Sunday, May 12, 2013

♥♥♥
Please click on TAG to see in full size.
••• Supplies needed to complete this tutorial. •••
________________________________________________________________________
Programs: Paint Shop Pro, I'm using version 10. Animation Shop 3.
Plugin : none
Font used: LD Edward
Tube of choice: I'm using "Amber" by Zlata from SATC.
Scrap Kit : I'm using "Purple Dreams" by Amy Marie Kits from SATC
Mask: SophisticatSimone-Mask61
Animation: SimoneAni-DreamNightGlitter
________________________________________________________________________
♥♥♥
Save your tag often. Nothing like working long and hard on a tag and PSP crashes.
♥♥♥
Open Mask61 in PSP and minimize.
Open a new image 700 x 650. Copy and paste paper 12 as a new layer on your canvas.
Close original.
Click on Raster 1. Go to Selections, select all.
Click on Raster 2. Go to Image, crop to Selection.
Copy and paste your tube as a new layer.
Copy and paste close up of tube as a new layer.
Move down to your paper and change Blend Mode to Luminance (L) and Opacity to 42.
Click on Raster 1. Go to Selections, select all.
Click on Raster 2. Go to Image, crop to Selection.
X-out your tube and Raster 1.
Click on Raster 2 and merge visible.
UN-hide your tube and Raster 1.
Copy and paste element 99 as a new layer and re-size by 65%. Position behind your tube low on your canvas. Leave in center of tag.
Copy and paste element 98 as a new layer. Position to the left on your canvas.
Copy and paste element 85 as a new layer and position in front of Eiffel Tower at bottom of tag.
Copy and paste element 1 as a new layer and position behind the Eiffel Tower on the left side of tag. Duplicate leaves, free rotate by 90 degrees and flip. Move the leaves to the right side of tag behind your tube. Using your lasso tool, remove the branch portion of this element.
Copy and paste element 56 as a new layer. Position behind your tube low on your canvas and in front of flower.
Copy and paste element 10 as a new layer. Position behind your tube high on canvas at top and at center.
Copy and paste element 2 as a new layer, free rotate right by 90 degrees and position to the left side of tag, behind Tower.
Copy and paste element 40 as a new layer and re-size by 50%. Position in front of your tube on the lower right hand side of tag.
Copy and paste element 43 as a new layer and re-size by 50%. Position in front of your tube on the lower right hand side of tag.
Copy and paste element 104 as a new layer and re-size by 50%. Position in front of Eiffel Tower lower left hand side of tag.
Copy and paste element 61 as a new layer. Position in background, near your tube.
Keep adding elements. Flowers, telephone, mask, ribbons and vase.
Add the glitter swirl, element 90 and 89 as new layer.
Add copyright and scrap kit maker credit.
Add your name and save.
Now to animate.
Go to Selections, select all.
Go to Edit and copy merged. Paste as a new animation in Animation Shop.
Hold your Ctrl key down and repeatedly hit letter L on your keyboard for a total of 18 frames.
You can watch the count on the lower right hand side of your screen in AS.
Open SimoneAni-DreamNightGlitter-MNG
Go to Edit, select all.
Go to Edit, copy.
Activate your tag.
Go to Edit, select all.
Go to Edit, make sure Propagate Paste is selected.
Go to Edit, Paste, paste into selected frames.
Position on your tag and click into place.
Play and save.
Don't forget to add your name.
You can see my name tutorial HERE.
To save:
Go to File, Save as, enter the name of your file and select the folder to save to.
Now click on Customize:
Under COLORS TAB:
Number of colors: 255 Colors
Create palette by: OPTIMIZED OCTREE
Reduce colors by: Error Diffusion
Under OPTIMIZATIONS TAB:
set a check mark beside the second, third and forth choices. UN-check the 1st and last.
Under PARTIAL TRANSPARENCY:
check Convert pixels less than 92
Yes, blend with this color: change to white #FFFFFF
Click OK. Click Next, next, next, next.
Play your animation.
At times your animation may or will come out terrible. Optimization in Animation Shop is not the greatest.
You can play around will your settings, especially under the Tab: Optimization. I change this setting at times from anywhere between 70 and 100.
Some people add a white background. To add background, go to Animation: Animation Properties, select Opaque and change color to white.
Hope you enjoyed this tutorial,
Hugs Simone
Please, always direct people to my blog to download my animations.
Do not load to any other download site and don't claim as your own.
Tutorial written by SophisticatSimone aka Lorraine Halle on Sunday, May 12, 2013.
Please click on TAG to see in full size.
••• Supplies needed to complete this tutorial. •••
________________________________________________________________________
Programs: Paint Shop Pro, I'm using version 10. Animation Shop 3.
Plugin : none
Font used: LD Edward
Tube of choice: I'm using "Amber" by Zlata from SATC.
Scrap Kit : I'm using "Purple Dreams" by Amy Marie Kits from SATC
Mask: SophisticatSimone-Mask61
Animation: SimoneAni-DreamNightGlitter
________________________________________________________________________
♥♥♥
Save your tag often. Nothing like working long and hard on a tag and PSP crashes.
♥♥♥
Open Mask61 in PSP and minimize.
Open a new image 700 x 650. Copy and paste paper 12 as a new layer on your canvas.
Close original.
Click on Raster 1. Go to Selections, select all.
Click on Raster 2. Go to Image, crop to Selection.
Copy and paste your tube as a new layer.
Copy and paste close up of tube as a new layer.
Move down to your paper and change Blend Mode to Luminance (L) and Opacity to 42.
Click on Raster 1. Go to Selections, select all.
Click on Raster 2. Go to Image, crop to Selection.
X-out your tube and Raster 1.
Click on Raster 2 and merge visible.
UN-hide your tube and Raster 1.
Copy and paste element 99 as a new layer and re-size by 65%. Position behind your tube low on your canvas. Leave in center of tag.
Copy and paste element 98 as a new layer. Position to the left on your canvas.
Copy and paste element 85 as a new layer and position in front of Eiffel Tower at bottom of tag.
Copy and paste element 1 as a new layer and position behind the Eiffel Tower on the left side of tag. Duplicate leaves, free rotate by 90 degrees and flip. Move the leaves to the right side of tag behind your tube. Using your lasso tool, remove the branch portion of this element.
Copy and paste element 56 as a new layer. Position behind your tube low on your canvas and in front of flower.
Copy and paste element 10 as a new layer. Position behind your tube high on canvas at top and at center.
Copy and paste element 2 as a new layer, free rotate right by 90 degrees and position to the left side of tag, behind Tower.
Copy and paste element 40 as a new layer and re-size by 50%. Position in front of your tube on the lower right hand side of tag.
Copy and paste element 43 as a new layer and re-size by 50%. Position in front of your tube on the lower right hand side of tag.
Copy and paste element 104 as a new layer and re-size by 50%. Position in front of Eiffel Tower lower left hand side of tag.
Copy and paste element 61 as a new layer. Position in background, near your tube.
Keep adding elements. Flowers, telephone, mask, ribbons and vase.
Add the glitter swirl, element 90 and 89 as new layer.
Add copyright and scrap kit maker credit.
Add your name and save.
Now to animate.
Go to Selections, select all.
Go to Edit and copy merged. Paste as a new animation in Animation Shop.
Hold your Ctrl key down and repeatedly hit letter L on your keyboard for a total of 18 frames.
You can watch the count on the lower right hand side of your screen in AS.
Open SimoneAni-DreamNightGlitter-MNG
Go to Edit, select all.
Go to Edit, copy.
Activate your tag.
Go to Edit, select all.
Go to Edit, make sure Propagate Paste is selected.
Go to Edit, Paste, paste into selected frames.
Position on your tag and click into place.
Play and save.
Don't forget to add your name.
You can see my name tutorial HERE.
To save:
Go to File, Save as, enter the name of your file and select the folder to save to.
Now click on Customize:
Under COLORS TAB:
Number of colors: 255 Colors
Create palette by: OPTIMIZED OCTREE
Reduce colors by: Error Diffusion
Under OPTIMIZATIONS TAB:
set a check mark beside the second, third and forth choices. UN-check the 1st and last.
Under PARTIAL TRANSPARENCY:
check Convert pixels less than 92
Yes, blend with this color: change to white #FFFFFF
Click OK. Click Next, next, next, next.
Play your animation.
At times your animation may or will come out terrible. Optimization in Animation Shop is not the greatest.
You can play around will your settings, especially under the Tab: Optimization. I change this setting at times from anywhere between 70 and 100.
Some people add a white background. To add background, go to Animation: Animation Properties, select Opaque and change color to white.
Hope you enjoyed this tutorial,
Hugs Simone
Please, always direct people to my blog to download my animations.
Do not load to any other download site and don't claim as your own.
Tutorial written by SophisticatSimone aka Lorraine Halle on Sunday, May 12, 2013.

Monday, May 6, 2013

♥♥♥
Please click on TAG to see in full size.
••• Supplies needed to complete this tutorial. •••
________________________________________________________________________
Programs: Paint Shop Pro, I'm using version 10. Animation Shop 3.
Plugin : none
Font used: Croissant
Tube of choice: I'm using "Spring Girl" by VeryMany from SATC.
Scrap Kit : I'm using "Once Upon A Time" by Amy Marie's Kits from SATC
Animation: I'm using my own, SimoneAni441-443
________________________________________________________________________
♥♥♥
Save your tag often. Nothing like working long and hard on a tag and PSP crashes.
♥♥♥
Open element 95 and duplicate. Close original. Please make sure to always close your originals without altering them.
Re-size by 80%.
Copy and paste your tube as a new layer and re-size if you need too. Add drop shadow.
Copy and paste element 125 as a new layer, duplicate and merge down. You may need to crop this layer as it's too large to fit the canvas.
Copy and paste element 124 as a new layer, move to the left and behind your tube.
Copy and paste element 123 as a new layer, free rotate by 90 degrees to the left and move to the left and behind your tube. Re-size by 70%.
Copy and paste element 122 as a new layer, duplicate and merge down. This layer should be just above your background layer.
Copy and paste element 90 as a new layer, duplicate and merge down. This layer should be above the glitter layer you just added.
Add drop shadow.
Do same for element 90.
Copy and paste element 126 as a new layer and re-size by 43%, move to the right and tuck in behind the green leaves.
Activate background layer. Copy and paste element 14 as a new layer and re-size by 86%. Add drop shadow, tuck the castle in behind the leaves.
Copay and paste element 136 as a new layer. Mirror and re-size by 57%. This layer should be just above the castle layer.
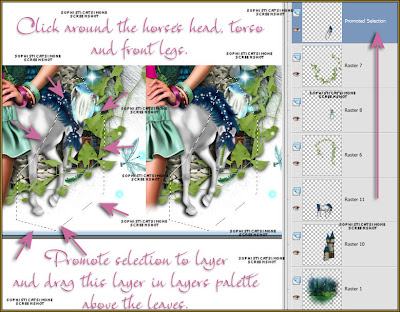
Add drop shadow. Now using your lasso tool, set to Point to Point, feather 0, click around the area of the horse that you want to appear above the leaves, like he's stepping over them. Now promote that layer and in your layers palette, drag that layer up above the leaves. De-select.
Please click on TAG to see in full size.
••• Supplies needed to complete this tutorial. •••
________________________________________________________________________
Programs: Paint Shop Pro, I'm using version 10. Animation Shop 3.
Plugin : none
Font used: Croissant
Tube of choice: I'm using "Spring Girl" by VeryMany from SATC.
Scrap Kit : I'm using "Once Upon A Time" by Amy Marie's Kits from SATC
Animation: I'm using my own, SimoneAni441-443
________________________________________________________________________
♥♥♥
Save your tag often. Nothing like working long and hard on a tag and PSP crashes.
♥♥♥
Open element 95 and duplicate. Close original. Please make sure to always close your originals without altering them.
Re-size by 80%.
Copy and paste your tube as a new layer and re-size if you need too. Add drop shadow.
Copy and paste element 125 as a new layer, duplicate and merge down. You may need to crop this layer as it's too large to fit the canvas.
Copy and paste element 124 as a new layer, move to the left and behind your tube.
Copy and paste element 123 as a new layer, free rotate by 90 degrees to the left and move to the left and behind your tube. Re-size by 70%.
Copy and paste element 122 as a new layer, duplicate and merge down. This layer should be just above your background layer.
Copy and paste element 90 as a new layer, duplicate and merge down. This layer should be above the glitter layer you just added.
Add drop shadow.
Do same for element 90.
Copy and paste element 126 as a new layer and re-size by 43%, move to the right and tuck in behind the green leaves.
Activate background layer. Copy and paste element 14 as a new layer and re-size by 86%. Add drop shadow, tuck the castle in behind the leaves.
Copay and paste element 136 as a new layer. Mirror and re-size by 57%. This layer should be just above the castle layer.
Add drop shadow. Now using your lasso tool, set to Point to Point, feather 0, click around the area of the horse that you want to appear above the leaves, like he's stepping over them. Now promote that layer and in your layers palette, drag that layer up above the leaves. De-select.
CLICK TO ENLARGE
Copy and paste element 137 as a new layer and re-size by 56%, move to the left and at bottom of tag.
Repeat, but this time after you've re-sized, free rotate 90 degrees to the right. Move this layer under the white flowers that are on the left side of tag and place at the top of the tag.
Copy and paste element 130 as a new layer, move to the left and keep behind the white flower, but the grass peek out. Add drop shadow.
Copy and paste element 80 as a new layer and position at bottom of tag in front of your tube. If you need to bring your promoted "horse legs" layer higher up in layers, do so now.
TO ANIMATE:
Go to Selections, select all.
Go to Edit and copy.
Paste as a new animation in Animation Shop.
Hold your Ctrl key down and repeatedly hit letter L on your keyboard for a total of 20 frames.
You can watch the count on the lower right hand side of your screen in AS.
Open SimoneAni444
Go to Edit, select all.
Go to Edit, copy.
Activate your tag.
Go to Edit, select all.
Go to Edit, make sure Propagate Paste is selected.
Go to Edit, Paste, paste into selected frames.
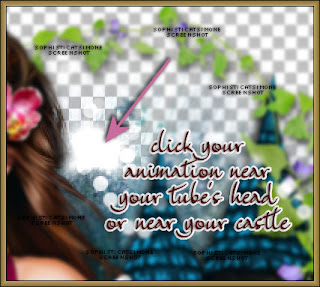
Position on your tag NEAR your tubes head or near the castle, click into place.
Play and save.
Don't forget to add your name.
You can see my name tutorial HERE.
To save:
Go to File, Save as, enter the name of your file and select the folder to save to.
Now click on Customize:
Under COLORS TAB:
Number of colors: 255 Colors
Create palette by: OPTIMIZED OCTREE
Reduce colors by: Error Diffusion
Under OPTIMIZATIONS TAB:
set a check mark beside the second, third and forth choices. UN-check the 1st and last.
Under PARTIAL TRANSPARENCY:
check Convert pixels less than 92
Yes, blend with this color: change to white #FFFFFF
Click OK. Click Next, next, next, next.
Play your animation.
At times your animation may or will come out terrible. Optimization in Animation Shop is not the greatest.
You can play around will your settings, especially under the Tab: Optimization. I change this setting at times from anywhere between 70 and 100.
Some people add a white background. To add background, go to Animation: Animation Properties, select Opaque and change color to white.
Hope you enjoyed this tutorial,
Hugs Simone
Please, always direct people to my blog to download my animations.
Do not load to any other download site and don't claim as your own.
Tutorial written by SophisticatSimone aka Lorraine Halle on Monday, May 6, 2013.

Copy and paste element 137 as a new layer and re-size by 56%, move to the left and at bottom of tag.
Repeat, but this time after you've re-sized, free rotate 90 degrees to the right. Move this layer under the white flowers that are on the left side of tag and place at the top of the tag.
Copy and paste element 130 as a new layer, move to the left and keep behind the white flower, but the grass peek out. Add drop shadow.
Copy and paste element 80 as a new layer and position at bottom of tag in front of your tube. If you need to bring your promoted "horse legs" layer higher up in layers, do so now.
TO ANIMATE:
Go to Selections, select all.
Go to Edit and copy.
Paste as a new animation in Animation Shop.
Hold your Ctrl key down and repeatedly hit letter L on your keyboard for a total of 20 frames.
You can watch the count on the lower right hand side of your screen in AS.
Open SimoneAni444
Go to Edit, select all.
Go to Edit, copy.
Activate your tag.
Go to Edit, select all.
Go to Edit, make sure Propagate Paste is selected.
Go to Edit, Paste, paste into selected frames.
Position on your tag NEAR your tubes head or near the castle, click into place.

Play and save.
Don't forget to add your name.
You can see my name tutorial HERE.
To save:
Go to File, Save as, enter the name of your file and select the folder to save to.
Now click on Customize:
Under COLORS TAB:
Number of colors: 255 Colors
Create palette by: OPTIMIZED OCTREE
Reduce colors by: Error Diffusion
Under OPTIMIZATIONS TAB:
set a check mark beside the second, third and forth choices. UN-check the 1st and last.
Under PARTIAL TRANSPARENCY:
check Convert pixels less than 92
Yes, blend with this color: change to white #FFFFFF
Click OK. Click Next, next, next, next.
Play your animation.
At times your animation may or will come out terrible. Optimization in Animation Shop is not the greatest.
You can play around will your settings, especially under the Tab: Optimization. I change this setting at times from anywhere between 70 and 100.
Some people add a white background. To add background, go to Animation: Animation Properties, select Opaque and change color to white.
Hope you enjoyed this tutorial,
Hugs Simone
Please, always direct people to my blog to download my animations.
Do not load to any other download site and don't claim as your own.
Tutorial written by SophisticatSimone aka Lorraine Halle on Monday, May 6, 2013.
Subscribe to:
Posts
(Atom)
CT TEAM