My Blinkie

Showing posts with label Goth. Show all posts
Showing posts with label Goth. Show all posts
Sunday, June 23, 2013

♥♥♥
Please click on TAG to see in full size.
••• Supplies needed to complete this tutorial. •••
________________________________________________________________________
Programs: Paint Shop Pro, I'm using version 10. Animation Shop 3.
Plugin : Eye Candy 4: Gradient Glow
Font used: Genial Black Regular
Tube of choice: I'm using "Gatana" by Mistycheskaya.
Scrap Kit : I'm using "Cruelina" by SkyScraps.
Animation: SimoneAni320
Mask: 0107 HERE
________________________________________________________________________
♥♥♥
Save your tag often. Nothing like working long and hard on a tag and PSP crashes.
♥♥♥
Open a new image 700 x 650.
Copy and paste your tube as a new layer. Re-size by 80% and add drop shadow. Move low towards bottom of tag.
C/P element 65 as a new layer and re-size by 65%. Position behind tube and on right side. Add drop shadow.
C/P element 37 as a new layer and re-size by 65%. Position behind tube and on left side. Add drop shadow.
C/P element 1 as a new layer and re-size by 40%. Position puppy on crate. Duplicate and mirror. Position in front of tube and
by her arm. Add drop shadow to each puppy.
C/P element 11 as a new layer and re-size by 40%. Position facing her face, on the left side of tag. Add drop shadow.
C/P element 31 as a new layer. Position behind the other tree on it's left side.
If you need to increase your canvas size at this time, go ahead. I made mine 900 x 900.
This is temporary until we re-size at the end.
C/P element 61 as a new layer and re-size by 60%. Move behind your tube's feet/legs on the right side of tag.
Duplicate and move to middle of tag and behind the crate.
Duplicate and mirror. Move to the edge of crate on the left side of tag.
Add drop shadow to each layer.
C/P element 64 as a new layer and re-size by 70%. Mirror and position above the puppy on the crate. Add drop shadow.
C/P element 63 as a new layer and re-size by 50%. Move to left side of tag and place on edge of crate. Add drop shadow.
C/P element 75 as a new layer. Move to bottom of tag behind the crate. Duplicate and move this layer in front of crate. Add drop shadow to each.
C/P element 49 as a new layer and move behind crate and in front of the evergreen tree. Duplicate and merge together.
C/P element 93 as a new layer and re-size by 22%. Duplicate and merge down. Move to right lower hand side. Add drop shadow.
C/P element 7 as a new layer and re-size by 50%. Move to lower right hand side. Add drop shadow.
C/P element 29 as a new layer. Move to top of canvas. In layers palette send to bottom.
C/P element 3 as a new layer and re-size by 70%. Move to right side of tag. This should be your last layer.
Activate your crate layer and duplicate. Re-size by 70% and mirror. Position it so it covers the bottom area of your castle.
Add drop shadow.
C/P element 45 as a new layer. This should be your top layer. Position sparkles so they don't cover tube's face.
C/P paper 1 as a new layer and move to bottom. Crop merged opaque.
Apply mask 0107 to the paper. Merge group. Duplicate and merge down.
Starting from your top layer, merge all elements down one at a time until you get to the tube. Include the tube in this layer.
X-out.
Merge all visible.
Crop your tag and re-size by 80%.
Add artist copyright and merge down.
Add your name and save as PNG.
If animating, go to Selections, select ALL.
Activate the bottom layer and copy.
Paste as a new Animation in Animation Shop.
Hold your Ctrl key down and repeatedly hit letter L on your keyboard for a total of 16frames.
You can watch the count on the lower right hand side of your screen in AS.
Open SimoneAni320
Go to Edit, select all.
Go to Edit, copy.
Activate your tag.
Go to Edit, select all.
Go to Edit, make sure Propagate Paste is selected.
Go to Edit, Paste, paste into selected frames.
Position on your tag and click into place. I pasted this animation 3 times. Once in between the black crow and puppy on crate.
Again near tree and castle and then lower down by her buttocks.
Go back in PSP and activate the top layer. Copy and paste in AS as a new animation.
Go Edit and Copy.
Activate your tag.
Go to Edit, Paste, paste into selected frames.
Position as best as you can, the way it looked on your tag in PSP. Click into place.
Play and save.
To save:
Go to File, Save as, enter the name of your file and select the folder to save to.
Now click on Customize:
Under COLORS TAB:
Number of colors: 255 Colors
Create palette by: OPTIMIZED OCTREE
Reduce colors by: Error Diffusion
Under OPTIMIZATIONS TAB:
set a check mark beside the second, third and forth choices. UN-check the 1st and last.
Under PARTIAL TRANSPARENCY:
check Convert pixels less than 92
Yes, blend with this color: change to white #FFFFFF
Click OK. Click Next, next, next, next.
Play your animation.
At times your animation may or will come out terrible. Optimization in Animation Shop is not the greatest.
You can play around will your settings, especially under the Tab: Optimization. I change this setting at times from anywhere between 70 and 100.
Some people add a white background. To add background, go to Animation: Animation Properties, select Opaque and change color to white.
Hope you enjoyed this tutorial,
Hugs Simone
Please, always direct people to my blog to download my animations.
Do not load to any other download site and don't claim as your own.
Tutorial written by SophisticatSimone aka Lorraine Halle on Sunday June 23, 2013
Please click on TAG to see in full size.
••• Supplies needed to complete this tutorial. •••
________________________________________________________________________
Programs: Paint Shop Pro, I'm using version 10. Animation Shop 3.
Plugin : Eye Candy 4: Gradient Glow
Font used: Genial Black Regular
Tube of choice: I'm using "Gatana" by Mistycheskaya.
Scrap Kit : I'm using "Cruelina" by SkyScraps.
Animation: SimoneAni320
Mask: 0107 HERE
________________________________________________________________________
♥♥♥
Save your tag often. Nothing like working long and hard on a tag and PSP crashes.
♥♥♥
Open a new image 700 x 650.
Copy and paste your tube as a new layer. Re-size by 80% and add drop shadow. Move low towards bottom of tag.
C/P element 65 as a new layer and re-size by 65%. Position behind tube and on right side. Add drop shadow.
C/P element 37 as a new layer and re-size by 65%. Position behind tube and on left side. Add drop shadow.
C/P element 1 as a new layer and re-size by 40%. Position puppy on crate. Duplicate and mirror. Position in front of tube and
by her arm. Add drop shadow to each puppy.
C/P element 11 as a new layer and re-size by 40%. Position facing her face, on the left side of tag. Add drop shadow.
C/P element 31 as a new layer. Position behind the other tree on it's left side.
If you need to increase your canvas size at this time, go ahead. I made mine 900 x 900.
This is temporary until we re-size at the end.
C/P element 61 as a new layer and re-size by 60%. Move behind your tube's feet/legs on the right side of tag.
Duplicate and move to middle of tag and behind the crate.
Duplicate and mirror. Move to the edge of crate on the left side of tag.
Add drop shadow to each layer.
C/P element 64 as a new layer and re-size by 70%. Mirror and position above the puppy on the crate. Add drop shadow.
C/P element 63 as a new layer and re-size by 50%. Move to left side of tag and place on edge of crate. Add drop shadow.
C/P element 75 as a new layer. Move to bottom of tag behind the crate. Duplicate and move this layer in front of crate. Add drop shadow to each.
C/P element 49 as a new layer and move behind crate and in front of the evergreen tree. Duplicate and merge together.
C/P element 93 as a new layer and re-size by 22%. Duplicate and merge down. Move to right lower hand side. Add drop shadow.
C/P element 7 as a new layer and re-size by 50%. Move to lower right hand side. Add drop shadow.
C/P element 29 as a new layer. Move to top of canvas. In layers palette send to bottom.
C/P element 3 as a new layer and re-size by 70%. Move to right side of tag. This should be your last layer.
Activate your crate layer and duplicate. Re-size by 70% and mirror. Position it so it covers the bottom area of your castle.
Add drop shadow.
C/P element 45 as a new layer. This should be your top layer. Position sparkles so they don't cover tube's face.
C/P paper 1 as a new layer and move to bottom. Crop merged opaque.
Apply mask 0107 to the paper. Merge group. Duplicate and merge down.
Starting from your top layer, merge all elements down one at a time until you get to the tube. Include the tube in this layer.
X-out.
Merge all visible.
Crop your tag and re-size by 80%.
Add artist copyright and merge down.
Add your name and save as PNG.
If animating, go to Selections, select ALL.
Activate the bottom layer and copy.
Paste as a new Animation in Animation Shop.
Hold your Ctrl key down and repeatedly hit letter L on your keyboard for a total of 16frames.
You can watch the count on the lower right hand side of your screen in AS.
Open SimoneAni320
Go to Edit, select all.
Go to Edit, copy.
Activate your tag.
Go to Edit, select all.
Go to Edit, make sure Propagate Paste is selected.
Go to Edit, Paste, paste into selected frames.
Position on your tag and click into place. I pasted this animation 3 times. Once in between the black crow and puppy on crate.
Again near tree and castle and then lower down by her buttocks.
Go back in PSP and activate the top layer. Copy and paste in AS as a new animation.
Go Edit and Copy.
Activate your tag.
Go to Edit, Paste, paste into selected frames.
Position as best as you can, the way it looked on your tag in PSP. Click into place.
Play and save.
To save:
Go to File, Save as, enter the name of your file and select the folder to save to.
Now click on Customize:
Under COLORS TAB:
Number of colors: 255 Colors
Create palette by: OPTIMIZED OCTREE
Reduce colors by: Error Diffusion
Under OPTIMIZATIONS TAB:
set a check mark beside the second, third and forth choices. UN-check the 1st and last.
Under PARTIAL TRANSPARENCY:
check Convert pixels less than 92
Yes, blend with this color: change to white #FFFFFF
Click OK. Click Next, next, next, next.
Play your animation.
At times your animation may or will come out terrible. Optimization in Animation Shop is not the greatest.
You can play around will your settings, especially under the Tab: Optimization. I change this setting at times from anywhere between 70 and 100.
Some people add a white background. To add background, go to Animation: Animation Properties, select Opaque and change color to white.
Hope you enjoyed this tutorial,
Hugs Simone
Please, always direct people to my blog to download my animations.
Do not load to any other download site and don't claim as your own.
Tutorial written by SophisticatSimone aka Lorraine Halle on Sunday June 23, 2013


♥♥♥
Please click on TAG to see in full size.
••• Supplies needed to complete this tutorial. •••
________________________________________________________________________
Programs: Paint Shop Pro, I'm using version 10. Animation Shop 3.
Plugin : Eye Candy 4000 and Lokas Software/3D Shadow
Please click on TAG to see in full size.
••• Supplies needed to complete this tutorial. •••
________________________________________________________________________
Programs: Paint Shop Pro, I'm using version 10. Animation Shop 3.
Plugin : Eye Candy 4000 and Lokas Software/3D Shadow
Font used: Qwigley
Tube of choice: I'm using "Goth" by Jose A Cano from SATC.
Scrap Kit : I'm using "BoomBoom" by Bibi's Collection.
Animation: SimoneAni-BoomBoom-Tutorial
Mask: 0137 HERE
________________________________________________________________________
♥♥♥
Save your tag often. Nothing like working long and hard on a tag and PSP crashes.
♥♥♥
Scrap Kit : I'm using "BoomBoom" by Bibi's Collection.
Animation: SimoneAni-BoomBoom-Tutorial
Mask: 0137 HERE

________________________________________________________________________
♥♥♥
Save your tag often. Nothing like working long and hard on a tag and PSP crashes.
♥♥♥
Open element 31 and duplicate. Close original.
C/P your tube as a new layer. Re-size by 70%. Add drop shadow.
C/P element 55 as a new layer and send layer to bottom. Position in the right upper left hand side, behind the buildings.
Duplicate element and mirror. Add drop shadow to each layer.
C/P element 39 as a new layer and re-size by 45%. Move to left lower hand side, as your top layer. Add drop shadow.
C/P element 14 as a new layer and free rotate to the left by 90 degrees. Position in front of your tube. Add drop shadow.
C/P element 10 as a new layer and re-size by 45%. Move to right lower hand side, as your top layer. Add drop shadow.
C/P element 5 as a new layer and re-size by 50%. Position bottom center. Add drop shadow.
C/P element 23 as a new layer and re-size by 50%. Position behind the building on the lower left hand side.
Duplicate and mirror. Duplicate and move this left up and behind your purple leaves. Duplciate and mirror. Add drop shadow to each.
C/P element 43 as a new layer and re-size by 50%. Move to bottom right hand side behind the barrel. Add drop shadow.
C/P element 40 as a new layer and re-size by 50%. Move to left hand side of tag. Duplicate and mirror. Add drop shadow to each.
C/P element 37 as a new layer and re-size by 50%. Move to left hand side of tag. Duplicate and move to the right side. Add drop shadow to each.
C/P element 12 as a new layer and re-size by 90%. Move to left upper hand side of tag. Add drop shadow.
C/P element 25 and 4 as a new layer and re-size by 50% each. Move to left hand side of tag. Duplicate and mirror. Add drop shadow to each. Position as you like on your tag. This is the flower and purple leaf.
Open paper 4, duplicate, close original and change canvas size to : 700 x 650
Apply Mask of choice or mine(Masks0137). Merge group and copy.
Paste on your tag and send layer to bottom.
C/P element 57 as a new layer. Position this layer just above your mask layer. Position in upper left hand corner of tag.
Duplicate, mirror and flip. Move a bit more to the lower right hand side. Merge these two together.
Add noise, 100%, gaussian, twice.
Add drop shadow.
Make sure all your layers have a drop shadow.
Save your tag as pspimage file.
Add artist copyright.
Save again.
I always keep a copy of my finished original tag without a name on it, so duplicate this one and close it.
Merge visible the copied one.
Add your name, merge visible and save as PNG.
If animating, merge all layers one at a time down to and including your tube.
X-out this layer now. Click on Mask layer and merge all visible.
UN hide top layer.
Make sure your bottom layer is active. Go to Selections, select all and copy.
Paste as a new Animation in Animation Shop.
Hold your Ctrl key down and repeatedly hit letter L on your keyboard for a total of 10 frames.
You can watch the count on the lower right hand side of your screen in AS.
Open SimoneAni-BoomBoom
Go to Edit, select all.
Go to Edit, copy.
Activate your tag.
Go to Edit, select all.
Go to Edit, make sure Propagate Paste is selected.
Go to Edit, Paste, paste into selected frames.
Position on your tag and click into place. Center of tag and buildings.
Go back in PSP and activate the top layer. Copy and paste in AS as a new animation.
Go Edit and Copy.
Activate your tag.
Go to Edit, Paste, paste into selected frames.
Position as best as you can, the way it looked on your tag in PSP. Click into place.
Play and save.
To save:
Go to File, Save as, enter the name of your file and select the folder to save to.
Now click on Customize:
Under COLORS TAB:
Number of colors: 255 Colors
Create palette by: OPTIMIZED OCTREE
Reduce colors by: Error Diffusion
Under OPTIMIZATIONS TAB:
set a check mark beside the second, third and forth choices. UN-check the 1st and last.
Under PARTIAL TRANSPARENCY:
check Convert pixels less than 92
Yes, blend with this color: change to white #FFFFFF
Click OK. Click Next, next, next, next.
Play your animation.
At times your animation may or will come out terrible. Optimization in Animation Shop is not the greatest.
You can play around will your settings, especially under the Tab: Optimization. I change this setting at times from anywhere between 70 and 100.
Some people add a white background. To add background, go to Animation: Animation Properties, select Opaque and change color to white.
C/P your tube as a new layer. Re-size by 70%. Add drop shadow.
C/P element 55 as a new layer and send layer to bottom. Position in the right upper left hand side, behind the buildings.
Duplicate element and mirror. Add drop shadow to each layer.
C/P element 39 as a new layer and re-size by 45%. Move to left lower hand side, as your top layer. Add drop shadow.
C/P element 14 as a new layer and free rotate to the left by 90 degrees. Position in front of your tube. Add drop shadow.
C/P element 10 as a new layer and re-size by 45%. Move to right lower hand side, as your top layer. Add drop shadow.
C/P element 5 as a new layer and re-size by 50%. Position bottom center. Add drop shadow.
C/P element 23 as a new layer and re-size by 50%. Position behind the building on the lower left hand side.
Duplicate and mirror. Duplicate and move this left up and behind your purple leaves. Duplciate and mirror. Add drop shadow to each.
C/P element 43 as a new layer and re-size by 50%. Move to bottom right hand side behind the barrel. Add drop shadow.
C/P element 40 as a new layer and re-size by 50%. Move to left hand side of tag. Duplicate and mirror. Add drop shadow to each.
C/P element 37 as a new layer and re-size by 50%. Move to left hand side of tag. Duplicate and move to the right side. Add drop shadow to each.
C/P element 12 as a new layer and re-size by 90%. Move to left upper hand side of tag. Add drop shadow.
C/P element 25 and 4 as a new layer and re-size by 50% each. Move to left hand side of tag. Duplicate and mirror. Add drop shadow to each. Position as you like on your tag. This is the flower and purple leaf.
Open paper 4, duplicate, close original and change canvas size to : 700 x 650
Apply Mask of choice or mine(Masks0137). Merge group and copy.
Paste on your tag and send layer to bottom.
C/P element 57 as a new layer. Position this layer just above your mask layer. Position in upper left hand corner of tag.
Duplicate, mirror and flip. Move a bit more to the lower right hand side. Merge these two together.
Add noise, 100%, gaussian, twice.
Add drop shadow.
Make sure all your layers have a drop shadow.
Save your tag as pspimage file.
Add artist copyright.
Save again.
I always keep a copy of my finished original tag without a name on it, so duplicate this one and close it.
Merge visible the copied one.
Add your name, merge visible and save as PNG.
If animating, merge all layers one at a time down to and including your tube.
X-out this layer now. Click on Mask layer and merge all visible.
UN hide top layer.
Make sure your bottom layer is active. Go to Selections, select all and copy.
Paste as a new Animation in Animation Shop.
Hold your Ctrl key down and repeatedly hit letter L on your keyboard for a total of 10 frames.
You can watch the count on the lower right hand side of your screen in AS.
Open SimoneAni-BoomBoom
Go to Edit, select all.
Go to Edit, copy.
Activate your tag.
Go to Edit, select all.
Go to Edit, make sure Propagate Paste is selected.
Go to Edit, Paste, paste into selected frames.
Position on your tag and click into place. Center of tag and buildings.
Go back in PSP and activate the top layer. Copy and paste in AS as a new animation.
Go Edit and Copy.
Activate your tag.
Go to Edit, Paste, paste into selected frames.
Position as best as you can, the way it looked on your tag in PSP. Click into place.
Play and save.
To save:
Go to File, Save as, enter the name of your file and select the folder to save to.
Now click on Customize:
Under COLORS TAB:
Number of colors: 255 Colors
Create palette by: OPTIMIZED OCTREE
Reduce colors by: Error Diffusion
Under OPTIMIZATIONS TAB:
set a check mark beside the second, third and forth choices. UN-check the 1st and last.
Under PARTIAL TRANSPARENCY:
check Convert pixels less than 92
Yes, blend with this color: change to white #FFFFFF
Click OK. Click Next, next, next, next.
Play your animation.
At times your animation may or will come out terrible. Optimization in Animation Shop is not the greatest.
You can play around will your settings, especially under the Tab: Optimization. I change this setting at times from anywhere between 70 and 100.
Some people add a white background. To add background, go to Animation: Animation Properties, select Opaque and change color to white.
To create the same name as I did in this tag, please go to this tutorial HERE
Hope you enjoyed this tutorial,
Hugs Simone
Please, always direct people to my blog to download my animations.
Do not load to any other download site and don't claim as your own.
Tutorial written by SophisticatSimone aka Lorraine Halle on Sunday June 23, 2013
Monday, June 10, 2013

♥♥♥
Please click on TAG to see in full size.
••• Supplies needed to complete this tutorial. •••
________________________________________________________________________
Programs: Paint Shop Pro, I'm using version 10. Animation Shop 3.
Plugin : Eye Candy: Gradient Glow for name.
Font used: Ornatique
Tube of choice: I'm using "Christina Marie" by SkyScraps from SATC.
Scrap Kit : I'm using "Christina Marie" by Tiny Turtle Designs from SATC
Animation: none
Mask: 0131HERE
________________________________________________________________________
♥♥♥
Save your tag often. Nothing like working long and hard on a tag and PSP crashes.
♥♥♥
Open a new image 700 x 650, transparent background.
Open a paper of choice and use Mask 01031. Merge group and copy. Paste on your canvas.
Copy and paste element 32 as a new layer.
Copy and paste your tube. Using your selection tool set to rectangle and feather set to 20, remove her legs from the knees down.
That way she'll fit on your canvas without having to re-size her.
Add drop shadow:
V=2
H=-6
Opacity=77
Blur=3
Color=Black
Check mark next to : Shadow on new layer.
OK
Grab your pick tool and holding down the shift key on your keyboard, click on the left upper hand node and pull up and over to the left. Release.
Go to Adjust, blur, gaussian blur, 6.
OK so next time remember to remove the check-mark, otherwise you'll have many layers.
Copy and paste element 8 as a new layer.
Re-size by 70 % and flip.
Free rotate to the right by 90 degrees. Re-size again by 70%.
Move to the lower left hand side, covering her knees.
Add drop shadow.
C/P element 121 as a new layer and re-size by 50%. Move down by the flowers and add drop shadow.
C/P element 81 as a new layer and re-size by 25%. Move down by the flowers and add drop shadow.
C/P element 73 as a new layer and re-size by 25%. Move over to the right side of tag and add drop shadow.
Repeat for element 53. Place on her lap.
Repeat for element 49. Move down at bottom to the left of other flowers.
C/P element 60 and re-size by 35%. Move down in front of other cat. Add drop shadow.
C/P element 55 and re-size by 35%. Move to lower left hand side. Add drop shadow.
C/P element 7 as a new layer and re-size by 75%. Send to bottom and position to upper left hand side. Sharpen and add noise.
Add element 40, re-size by 20%. Add on top of the flower bundle down by her knees. Add drop shadow.
Add a few leaf elements, such as 78 and 36. Re-size them and stick them here and there. Merge visible.
Add artist copyright. Merge down.
Save.
Add your name and save as PNG.
Hope you enjoyed this tutorial,
Hugs Simone
Please, always direct people to my blog to download my animations.
Do not load to any other download site and don't claim as your own.
Tutorial written by SophisticatSimone aka Lorraine Halle on Monday June 10, 2013.
Please click on TAG to see in full size.
••• Supplies needed to complete this tutorial. •••
________________________________________________________________________
Programs: Paint Shop Pro, I'm using version 10. Animation Shop 3.
Plugin : Eye Candy: Gradient Glow for name.
Font used: Ornatique
Tube of choice: I'm using "Christina Marie" by SkyScraps from SATC.
Scrap Kit : I'm using "Christina Marie" by Tiny Turtle Designs from SATC
Animation: none
Mask: 0131HERE
________________________________________________________________________
♥♥♥
Save your tag often. Nothing like working long and hard on a tag and PSP crashes.
♥♥♥
Open a new image 700 x 650, transparent background.
Open a paper of choice and use Mask 01031. Merge group and copy. Paste on your canvas.
Copy and paste element 32 as a new layer.
Copy and paste your tube. Using your selection tool set to rectangle and feather set to 20, remove her legs from the knees down.
That way she'll fit on your canvas without having to re-size her.
Add drop shadow:
V=2
H=-6
Opacity=77
Blur=3
Color=Black
Check mark next to : Shadow on new layer.
OK
Grab your pick tool and holding down the shift key on your keyboard, click on the left upper hand node and pull up and over to the left. Release.
Go to Adjust, blur, gaussian blur, 6.
OK so next time remember to remove the check-mark, otherwise you'll have many layers.
Copy and paste element 8 as a new layer.
Re-size by 70 % and flip.
Free rotate to the right by 90 degrees. Re-size again by 70%.
Move to the lower left hand side, covering her knees.
Add drop shadow.
C/P element 121 as a new layer and re-size by 50%. Move down by the flowers and add drop shadow.
C/P element 81 as a new layer and re-size by 25%. Move down by the flowers and add drop shadow.
C/P element 73 as a new layer and re-size by 25%. Move over to the right side of tag and add drop shadow.
Repeat for element 53. Place on her lap.
Repeat for element 49. Move down at bottom to the left of other flowers.
C/P element 60 and re-size by 35%. Move down in front of other cat. Add drop shadow.
C/P element 55 and re-size by 35%. Move to lower left hand side. Add drop shadow.
C/P element 7 as a new layer and re-size by 75%. Send to bottom and position to upper left hand side. Sharpen and add noise.
Add element 40, re-size by 20%. Add on top of the flower bundle down by her knees. Add drop shadow.
Add a few leaf elements, such as 78 and 36. Re-size them and stick them here and there. Merge visible.
Add artist copyright. Merge down.
Save.
Add your name and save as PNG.
Hope you enjoyed this tutorial,
Hugs Simone
Please, always direct people to my blog to download my animations.
Do not load to any other download site and don't claim as your own.
Tutorial written by SophisticatSimone aka Lorraine Halle on Monday June 10, 2013.
Sunday, May 26, 2013

♥♥♥
Please click on TAG to see in full size.
••• Supplies needed to complete this tutorial. •••
________________________________________________________________________
Programs: Paint Shop Pro, I'm using version 10. Animation Shop 3.
Plugin : Gradient Glow by Eye Candy 4000 (for name)
Font used: Miss Le Gatees
Tube of choice: I'm using "Suzanne" by Diana Gali
Please click on TAG to see in full size.
••• Supplies needed to complete this tutorial. •••
________________________________________________________________________
Programs: Paint Shop Pro, I'm using version 10. Animation Shop 3.
Plugin : Gradient Glow by Eye Candy 4000 (for name)
Font used: Miss Le Gatees
Tube of choice: I'm using "Suzanne" by Diana Gali
Animation: SimoneAni-PinkFlames
Mask: Masks0122 (one of mine)
________________________________________________________________________
♥♥♥
Save your tag often. Nothing like working long and hard on a tag and PSP crashes.
♥♥♥
Open mask of choice or mine in PSP and minimize.
Open paper 1 and duplicate. Close original. Re-size by 80%.
Apply mask to the paper.
Merge group. Duplicate and merge down.
Copy and paste element 5 as a new layer, re-size by 80% and move to the lower left hand side. Add drop shadow.
Copy and paste element 15 and mirror. Re-size by 69% and move to the right side of tag. Add drop shadow.
Copy and paste element 25 as a new layer. Leave in center. Add drop shadow.
Copy and paste element 95 as a new layer. Re-size by 50%. Move to the left side of tag and add drop shadow.
Copy and paste element 71 as a new layer. Re-size by 30%. Move to the upper right hand side of tag behind the big black box. Duplicate and move down lower.
Duplicate and mirror. Drop shadow each.
Copy and paste element 15 and re-size by 40%. Move to the left side of tag. Add drop shadow.
Copy and paste element 72 and re-size by 45%. Move to the left side over the black box and add drop shadow.
Copy and paste element 93 and move to the left side of tag. Add drop shadow.
Merge visible.
Save tag.
Copy and paste tube as a new layer and move a little to the right. Add drop shadow.
Copy and paste element 10 and move to the right side of tag. Duplicate and mirror.
Add drop shadow to each layer.
Copy and paste element 23 and re-size by 80%. Move to the right side and add drop shadow.
Duplicate and move to the left. Using selection tool remove the bottom portion from about midway down. Move candles down low about half way down left hand side of tag. Add drop shadow.
Copy and paste element 22 as a new layer and re-size by 50% and move to the right of car. Add drop shadow.
Copy and paste element 17 as a new layer. Mirror and re-size by 75% and add drop shadow. Move to the lower Right hand side of tag.
Merge all layers.
Add artist copyright. Merge down.
Now to animate.
Go to Selections, select all.
Go to Edit and copy merged. Paste as a new animation in Animation Shop.
Hold your Ctrl key down and repeatedly hit letter L on your keyboard for a total of 12 frames.
You can watch the count on the lower right hand side of your screen in AS.
Open SimoneAni-PinkFlame-04
Go to Edit, select all.
Go to Edit, copy.
Activate your tag.
Go to Edit, select all.
Go to Edit, make sure Propagate Paste is selected.
Go to Edit, Paste, paste into selected frames.
Position on your tag and click into place over the largest candle. Right lower hand side of tag.
Repeat this process using any of the other flames.
I did mirror
Play and save.
Don't forget to add your name.
You can see my name tutorial HERE.
To save:
Go to File, Save as, enter the name of your file and select the folder to save to.
Now click on Customize:
Under COLORS TAB:
Number of colors: 255 Colors
Create palette by: OPTIMIZED OCTREE
Reduce colors by: Error Diffusion
Under OPTIMIZATIONS TAB:
set a check mark beside the second, third and forth choices. UN-check the 1st and last.
Under PARTIAL TRANSPARENCY:
check Convert pixels less than 92
Yes, blend with this color: change to white #FFFFFF
Click OK. Click Next, next, next, next.
Play your animation.
At times your animation may or will come out terrible. Optimization in Animation Shop is not the greatest.
You can play around will your settings, especially under the Tab: Optimization. I change this setting at times from anywhere between 70 and 100.
Some people add a white background. To add background, go to Animation: Animation Properties, select Opaque and change color to white.
Hope you enjoyed this tutorial,
Hugs Simone
Please, always direct people to my blog to download my animations.
Do not load to any other download site and don't claim as your own.
Tutorial written by SophisticatSimone aka Lorraine Halle on Sunday May26, 2013.
Mask: Masks0122 (one of mine)
________________________________________________________________________
♥♥♥
Save your tag often. Nothing like working long and hard on a tag and PSP crashes.
♥♥♥
Open mask of choice or mine in PSP and minimize.
Open paper 1 and duplicate. Close original. Re-size by 80%.
Apply mask to the paper.
Merge group. Duplicate and merge down.
Copy and paste element 5 as a new layer, re-size by 80% and move to the lower left hand side. Add drop shadow.
Copy and paste element 15 and mirror. Re-size by 69% and move to the right side of tag. Add drop shadow.
Copy and paste element 25 as a new layer. Leave in center. Add drop shadow.
Copy and paste element 95 as a new layer. Re-size by 50%. Move to the left side of tag and add drop shadow.
Copy and paste element 71 as a new layer. Re-size by 30%. Move to the upper right hand side of tag behind the big black box. Duplicate and move down lower.
Duplicate and mirror. Drop shadow each.
Copy and paste element 15 and re-size by 40%. Move to the left side of tag. Add drop shadow.
Copy and paste element 72 and re-size by 45%. Move to the left side over the black box and add drop shadow.
Copy and paste element 93 and move to the left side of tag. Add drop shadow.
Merge visible.
Save tag.
Copy and paste tube as a new layer and move a little to the right. Add drop shadow.
Copy and paste element 10 and move to the right side of tag. Duplicate and mirror.
Add drop shadow to each layer.
Copy and paste element 23 and re-size by 80%. Move to the right side and add drop shadow.
Duplicate and move to the left. Using selection tool remove the bottom portion from about midway down. Move candles down low about half way down left hand side of tag. Add drop shadow.
Copy and paste element 22 as a new layer and re-size by 50% and move to the right of car. Add drop shadow.
Copy and paste element 17 as a new layer. Mirror and re-size by 75% and add drop shadow. Move to the lower Right hand side of tag.
Merge all layers.
Add artist copyright. Merge down.
Now to animate.
Go to Selections, select all.
Go to Edit and copy merged. Paste as a new animation in Animation Shop.
Hold your Ctrl key down and repeatedly hit letter L on your keyboard for a total of 12 frames.
You can watch the count on the lower right hand side of your screen in AS.
Open SimoneAni-PinkFlame-04
Go to Edit, select all.
Go to Edit, copy.
Activate your tag.
Go to Edit, select all.
Go to Edit, make sure Propagate Paste is selected.
Go to Edit, Paste, paste into selected frames.
Position on your tag and click into place over the largest candle. Right lower hand side of tag.
Repeat this process using any of the other flames.
I did mirror
Play and save.
Don't forget to add your name.
You can see my name tutorial HERE.
To save:
Go to File, Save as, enter the name of your file and select the folder to save to.
Now click on Customize:
Under COLORS TAB:
Number of colors: 255 Colors
Create palette by: OPTIMIZED OCTREE
Reduce colors by: Error Diffusion
Under OPTIMIZATIONS TAB:
set a check mark beside the second, third and forth choices. UN-check the 1st and last.
Under PARTIAL TRANSPARENCY:
check Convert pixels less than 92
Yes, blend with this color: change to white #FFFFFF
Click OK. Click Next, next, next, next.
Play your animation.
At times your animation may or will come out terrible. Optimization in Animation Shop is not the greatest.
You can play around will your settings, especially under the Tab: Optimization. I change this setting at times from anywhere between 70 and 100.
Some people add a white background. To add background, go to Animation: Animation Properties, select Opaque and change color to white.
Hope you enjoyed this tutorial,
Hugs Simone
Please, always direct people to my blog to download my animations.
Do not load to any other download site and don't claim as your own.
Tutorial written by SophisticatSimone aka Lorraine Halle on Sunday May26, 2013.
♥♥♥
Please click on TAG to see in full size.
••• Supplies needed to complete this tutorial. •••
________________________________________________________________________
Programs: Paint Shop Pro, I'm using version 10. Animation Shop 3.
Plugin : Gradient Glow by Eye Candy 4000 (for name)
Font used:
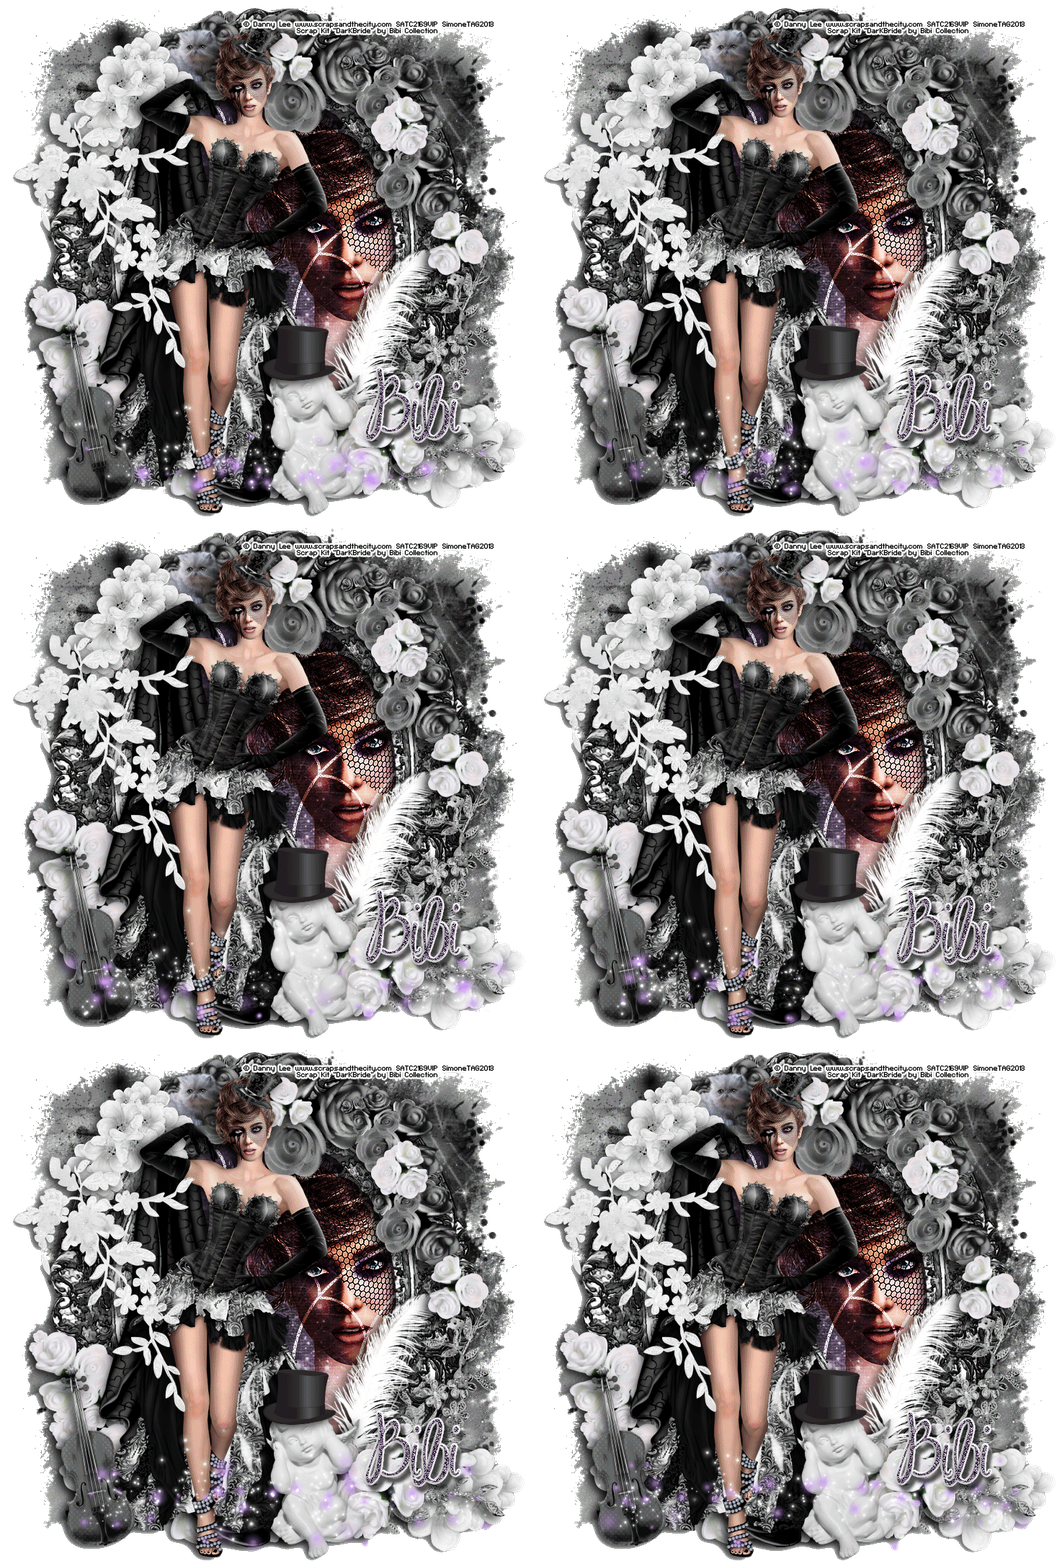
Tube of choice: I'm using "Dark Bride" by Danny Lee from SATC.
Scrap Kit : I'm using "Dark Bride"by Bibi's Collection from SATC
Animation: SimoneAni-453
Mask: Masks0114
________________________________________________________________________
♥♥♥
Save your tag often. Nothing like working long and hard on a tag and PSP crashes.
♥♥♥
Open your mask of choice in PSP and minimize. I used Mask 0114.
Open Paper 2 and duplicate. Re-size by 90%, 72 dpi, smart size.
Apply mask to the paper. Merge group.
Copy and paste your tube as a new layer. I had to re-size mine by 70%.
Move tube a little to the left. Add drop shadow.
Copy and paste element 1 as a new layer. Move up just a little bit. Move this frame below your tube layer.
Select your magic wand feather set to 0. Click inside the frame. Go to selections, modify and expand by 10.
Copy and paste a close up of your tube. Move it to the right a bit.
Go to Selections and invert. Hit delete on your keyboard.
Open Paper 5 and duplicate. Re-size by 70%.
Copy and paste as a new layer and drag down below your tube close up.
Hit delete on your keyboard.
On this paper layer, change the blend mode to Overlay.
On your close up layer, change blend mode to Hard Light.
Copy and paste element 88 as a now layer, position so larger portion of web is over close up. This web element should be above the close up layer. Hit delete on your keyboard.
Copy and paste element 26 as a new layer and move down to right lower hand side of tag. Drag down below all layers except the mask/background layer. Add drop shadow.
OK you can now de-select. Go to Selections, select none.
Duplicate spider web element. On the bottom layer add a drop shadow. On the top layer add noise.
Go to Adjust, Add/Remove Noise, Add Noise. Check : Gaussian and set to 73%, monochrome checked.
Merge all visible.
Copy and paste element 84 as a new layer. Re-size by 34% and move to the right side of frame, down near bottom. Add drop shadow.
Copy and paste element 61as a new layer and flip it. Move to the right side of frame, down near bottom. Add drop shadow.
Copy and paste element 68 as a new layer. Flip it and mirror it. Move to the left bottom side of frame. Duplicate and move it in towards the center of frame. Add drop shadow to each.
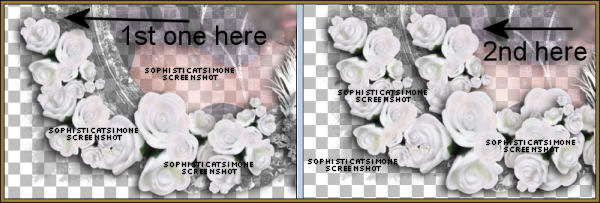
Copy and paste element 19 as a new layer and re-size by 50%. Add drop shadow and position behind your tube.
Copy and paste element 69 as move to the upper right hand side of the frame. Add drop shadow.
Copy and paste element 26 as a new layer and move to upper left hand side and re-size by 60%. Free rotate by 90 degrees to the right. Add drop shadow.
Copy and paste element 80 as a new layer. Move to the left side of frame/tag and position near your tube's shoulder. See my tag for reference. Add drop shadow. This element should be above your tube layer.
Copy and paste element 57 as a new layer. Re-size by 35% and triplicate. Position a few along the black flower cluster on the upper right hand side. Rotate a few of them and drop shadow each.
Do the same for the following elements: 5, 41 and 99. That's the top hat, cherub and violin. I positioned them all along the front bottom of tag.
Add anything else you would like or merge all visible.
Save your tag.
To animate.
Go to Selections, select all.
Go to Edit and copy merged. Paste as a new animation in Animation Shop.
Hold your Ctrl key down and repeatedly hit letter L on your keyboard for a total of 16 frames.
You can watch the count on the lower right hand side of your screen in AS.
Open SimoneAni-453
Go to Edit, select all.
Go to Edit, copy.
Activate your tag.
Go to Edit, select all.
Go to Edit, make sure Propagate Paste is selected.
Go to Edit, Paste, paste into selected frames.
Position on your tag and click into place.
Play and save.
Don't forget to add your name.
You can see my name tutorial HERE.
To save:
Go to File, Save as, enter the name of your file and select the folder to save to.
Now click on Customize:
Under COLORS TAB:
Number of colors: 255 Colors
Create palette by: OPTIMIZED OCTREE
Reduce colors by: Error Diffusion
Under OPTIMIZATIONS TAB:
set a check mark beside the second, third and forth choices. UN-check the 1st and last.
Under PARTIAL TRANSPARENCY:
check Convert pixels less than 92
Yes, blend with this color: change to white #FFFFFF
Click OK. Click Next, next, next, next.
Play your animation.
At times your animation may or will come out terrible. Optimization in Animation Shop is not the greatest.
You can play around will your settings, especially under the Tab: Optimization. I change this setting at times from anywhere between 70 and 100.
Some people add a white background. To add background, go to Animation: Animation Properties, select Opaque and change color to white.
Hope you enjoyed this tutorial,
Hugs Simone
Please, always direct people to my blog to download my animations.
Do not load to any other download site and don't claim as your own.
Tutorial written by SophisticatSimone aka Lorraine Halle on Sunday, May 26, 2013.
Please click on TAG to see in full size.
••• Supplies needed to complete this tutorial. •••
________________________________________________________________________
Programs: Paint Shop Pro, I'm using version 10. Animation Shop 3.
Plugin : Gradient Glow by Eye Candy 4000 (for name)
Font used:
Tube of choice: I'm using "Dark Bride" by Danny Lee from SATC.
Scrap Kit : I'm using "Dark Bride"by Bibi's Collection from SATC
Animation: SimoneAni-453
Mask: Masks0114
________________________________________________________________________
♥♥♥
Save your tag often. Nothing like working long and hard on a tag and PSP crashes.
♥♥♥
Open your mask of choice in PSP and minimize. I used Mask 0114.
Open Paper 2 and duplicate. Re-size by 90%, 72 dpi, smart size.
Apply mask to the paper. Merge group.
Copy and paste your tube as a new layer. I had to re-size mine by 70%.
Move tube a little to the left. Add drop shadow.
Copy and paste element 1 as a new layer. Move up just a little bit. Move this frame below your tube layer.
Select your magic wand feather set to 0. Click inside the frame. Go to selections, modify and expand by 10.
Copy and paste a close up of your tube. Move it to the right a bit.
Go to Selections and invert. Hit delete on your keyboard.
Open Paper 5 and duplicate. Re-size by 70%.
Copy and paste as a new layer and drag down below your tube close up.
Hit delete on your keyboard.
On this paper layer, change the blend mode to Overlay.
On your close up layer, change blend mode to Hard Light.
Copy and paste element 88 as a now layer, position so larger portion of web is over close up. This web element should be above the close up layer. Hit delete on your keyboard.
Copy and paste element 26 as a new layer and move down to right lower hand side of tag. Drag down below all layers except the mask/background layer. Add drop shadow.
OK you can now de-select. Go to Selections, select none.
Duplicate spider web element. On the bottom layer add a drop shadow. On the top layer add noise.
Go to Adjust, Add/Remove Noise, Add Noise. Check : Gaussian and set to 73%, monochrome checked.
Merge all visible.
Copy and paste element 84 as a new layer. Re-size by 34% and move to the right side of frame, down near bottom. Add drop shadow.
Copy and paste element 61as a new layer and flip it. Move to the right side of frame, down near bottom. Add drop shadow.
Copy and paste element 68 as a new layer. Flip it and mirror it. Move to the left bottom side of frame. Duplicate and move it in towards the center of frame. Add drop shadow to each.
Copy and paste element 19 as a new layer and re-size by 50%. Add drop shadow and position behind your tube.
Copy and paste element 69 as move to the upper right hand side of the frame. Add drop shadow.
Copy and paste element 26 as a new layer and move to upper left hand side and re-size by 60%. Free rotate by 90 degrees to the right. Add drop shadow.
Copy and paste element 80 as a new layer. Move to the left side of frame/tag and position near your tube's shoulder. See my tag for reference. Add drop shadow. This element should be above your tube layer.
Copy and paste element 57 as a new layer. Re-size by 35% and triplicate. Position a few along the black flower cluster on the upper right hand side. Rotate a few of them and drop shadow each.
Do the same for the following elements: 5, 41 and 99. That's the top hat, cherub and violin. I positioned them all along the front bottom of tag.
Add anything else you would like or merge all visible.
Save your tag.
To animate.
Go to Selections, select all.
Go to Edit and copy merged. Paste as a new animation in Animation Shop.
Hold your Ctrl key down and repeatedly hit letter L on your keyboard for a total of 16 frames.
You can watch the count on the lower right hand side of your screen in AS.
Open SimoneAni-453
Go to Edit, select all.
Go to Edit, copy.
Activate your tag.
Go to Edit, select all.
Go to Edit, make sure Propagate Paste is selected.
Go to Edit, Paste, paste into selected frames.
Position on your tag and click into place.
Play and save.
Don't forget to add your name.
You can see my name tutorial HERE.
To save:
Go to File, Save as, enter the name of your file and select the folder to save to.
Now click on Customize:
Under COLORS TAB:
Number of colors: 255 Colors
Create palette by: OPTIMIZED OCTREE
Reduce colors by: Error Diffusion
Under OPTIMIZATIONS TAB:
set a check mark beside the second, third and forth choices. UN-check the 1st and last.
Under PARTIAL TRANSPARENCY:
check Convert pixels less than 92
Yes, blend with this color: change to white #FFFFFF
Click OK. Click Next, next, next, next.
Play your animation.
At times your animation may or will come out terrible. Optimization in Animation Shop is not the greatest.
You can play around will your settings, especially under the Tab: Optimization. I change this setting at times from anywhere between 70 and 100.
Some people add a white background. To add background, go to Animation: Animation Properties, select Opaque and change color to white.
Hope you enjoyed this tutorial,
Hugs Simone
Please, always direct people to my blog to download my animations.
Do not load to any other download site and don't claim as your own.
Tutorial written by SophisticatSimone aka Lorraine Halle on Sunday, May 26, 2013.
Friday, May 24, 2013

♥♥♥
Please click on TAG to see in full size.
••• Supplies needed to complete this tutorial. •••
________________________________________________________________________
Programs: Paint Shop Pro, I'm using version 10. Animation Shop 3.
Plugin : Eye Candy: Gradient Glow for name.
Font used: Brahn Mufun
Tube of choice: I'm using "Billy" by Christine Marie Kotlark
Please click on TAG to see in full size.
••• Supplies needed to complete this tutorial. •••
________________________________________________________________________
Programs: Paint Shop Pro, I'm using version 10. Animation Shop 3.
Plugin : Eye Candy: Gradient Glow for name.
Font used: Brahn Mufun
Tube of choice: I'm using "Billy" by Christine Marie Kotlark
Scrap Kit : I'm using "Hallows Eve" by SkyScrap no longer in business
Animation: I'm using my own, SimoneAni-Where's Billy Tutorial
________________________________________________________________________
♥♥♥
Save your tag often. Nothing like working long and hard on a tag and PSP crashes.
♥♥♥
Open a new image size 750 x 685. We can re-size at the end.
Copy and paste element 83 as a new layer on your canvas. Activate your selection tool, set to Freehand Select.
Type: Point to point
Mode: Add(shift)
Feather: 5
Smoothing: 0
Anti-alias: checked.
Just remove the extra little dots at the top of this element.
See screenshot.
Animation: I'm using my own, SimoneAni-Where's Billy Tutorial
________________________________________________________________________
♥♥♥
Save your tag often. Nothing like working long and hard on a tag and PSP crashes.
♥♥♥
Open a new image size 750 x 685. We can re-size at the end.
Copy and paste element 83 as a new layer on your canvas. Activate your selection tool, set to Freehand Select.
Type: Point to point
Mode: Add(shift)
Feather: 5
Smoothing: 0
Anti-alias: checked.
Just remove the extra little dots at the top of this element.
See screenshot.

Once I selected my area I hit delete twice on keyboard.
Go to selections, select none.
Using your mover tool, drag this element to the upper right hand side of tag.
Duplicate and mirror. Merge them together.
Duplicate and flip. Merge them together.
This will be our background.

Now re-size it by 94% and move it up a little bit. Merge down.
Go to Adjust and sharpen.
Copy and paste your tube Billy. If you are using the same tube as new re-size and drag him down till his chopped off feet/ankles are about flush with the lower edge of your background.
See Screenshot.

Now grab your selection tool, set to rectangle, same feather. Drag out a rectangle starting below his hands/knees and down past his non existing feet.
Add a new layer. Drag this layer below him in layers palette.
Select your flood fill tool and set background color to black.
Fill the layer. This is his little mat.
Go to Selections, select none.
Copy and paste element 52 as a new layer and re-size by 90%. Move higher up on your canvas. Add drop shadow.
V=-2 H=2 Opacity=90 Blur=5 Color=black
Open element 34 and using your selection tool set to rectangle again, select only the top portion of this element.
Go to Edit and copy.
Activate your tag and paste as a new layer. Re-size by 90% and move to left side of tag. Duplicate and re-size by 80% and move this to the right side. Add drop shadow to each and merge them together.
Copy and paste element 30 as a new layer and re-size by 80%. Should be over the black wiggly swirls and behind Billy. Add drop shadow.
Copy and paste element 54 as a new layer and re-size by 80%. Position lower behind your tube so it appears like his elbows are resting on the trunk and crate. Add drop shadow.
Copy and paste element 28 as a new layer and re-size by 80%. Position so the white skull on right side is at bottom corner of crate element.
Add drop shadow. Duplicate and drag over to the left, having some of the grass over the trunk. You can merge these together.
Copy and paste image 42 as a new layer and re-size by 36%. Position to the right side of tag. Place him on the edge of crate. Add drop shadow. I added a bigger blur to him and H=3.
Copy and paste element 2 as a new layer. Move this layer to the top. Re-size by 86%. Move it over to the left. Add drop shadow.
Grab your selection tool set to rectangle again, feather 0. You are going to select a portion of your tube and move up above a few of the branches. So make sure you get his head and his upper right shoulder and chest area. See my screen shot.

Promote selection to layer. In layers palette, drag the promoted layer above the tree element.
Your layers should appear like this:

Lock your layers. So on the tube layer click the the lock icon in the layers palette and make sure it says 1. On the promoted Selection (his head) click on lock and make sure it's set to 1 as well. That way if you happen to move them around they will always stay together. If you need to unlock just click on the lock until it goes to "none".
Copy and paste element 50 as a new layer and re-size by 70%. Position to the left and in front of the tree. Add drop shadow.
Copy and paste element 55 as a new layer and re-size by 45%. Position to the right of the bucket and in front of your tube. Add drop shadow.
Copy and paste element 56 as a new layer and re-size by 35%. Position to the right side of tag and in front of Billy's left foot. Add drop shadow.
Copy and paste element 80 as a new layer and re-size by 50%. Mirror and position to the right side of tag. Should be next to his leg. This layer should be below the other rat layer, so it appears behind it on the tag. Add drop shadow.
Copy and paste element 38 as a new layer and re-size by 40%. Move these grey leaves to the left side of the tag, down in front. Place this layer between the vase layer and the bucket layer.
Duplicate layer and mirror. Move this layer behind the bucket layer.
Duplicate this layer now and mirror. It should appear to the right side of tag, behind the rat and books layer.
Duplicate layer and drag to center in front of Billy.
Duplicate that layer and re-size by 50% and move this in front of rat with books. Just as a filler. It seemed a little empty to me in that area.
Make sure you add drop shadow to each of these layers.
Activate your crop tool and under Snap Crop Rectangle to: select Merged Opaque.
Merge visible.
Add artist copyright and scrap kit maker credit.
If not animating, add your name and save as PNG.
If animating
Go to Selections, select all.
Go to Edit and copy merged. Paste as a new animation in Animation Shop.
Hold your Ctrl key down and repeatedly hit letter L on your keyboard for a total of 20 frames.
You can watch the count on the lower right hand side of your screen in AS.
Open SimoneAni-Where's Billy Tutorial
Go to Edit, select all.
Go to Edit, copy.
Activate your tag.
Go to Edit, select all.
Go to Edit, make sure Propagate Paste is selected.
Go to Edit, Paste, paste into selected frames.
Position on your tag and click into place.
Play and save.
Don't forget to add your name.
You can see my name tutorial HERE.
To save:
Go to File, Save as, enter the name of your file and select the folder to save to.
Now click on Customize:
Under COLORS TAB:
Number of colors: 255 Colors
Create palette by: OPTIMIZED OCTREE
Reduce colors by: Error Diffusion
Under OPTIMIZATIONS TAB:
set a check mark beside the second, third and forth choices. UN-check the 1st and last.
Under PARTIAL TRANSPARENCY:
check Convert pixels less than 92
Yes, blend with this color: change to white #FFFFFF
Click OK. Click Next, next, next, next.
Play your animation.
At times your animation may or will come out terrible. Optimization in Animation Shop is not the greatest.
You can play around will your settings, especially under the Tab: Optimization. I change this setting at times from anywhere between 70 and 100.
Some people add a white background. To add background, go to Animation: Animation Properties, select Opaque and change color to white.
Hope you enjoyed this tutorial,
Hugs Simone
Please, always direct people to my blog to download my animations.
Do not load to any other download site and don't claim as your own.
Tutorial written by SophisticatSimone aka Lorraine Halle on Friday, May 24, 2013.
Copy and paste element 50 as a new layer and re-size by 70%. Position to the left and in front of the tree. Add drop shadow.
Copy and paste element 55 as a new layer and re-size by 45%. Position to the right of the bucket and in front of your tube. Add drop shadow.
Copy and paste element 56 as a new layer and re-size by 35%. Position to the right side of tag and in front of Billy's left foot. Add drop shadow.
Copy and paste element 80 as a new layer and re-size by 50%. Mirror and position to the right side of tag. Should be next to his leg. This layer should be below the other rat layer, so it appears behind it on the tag. Add drop shadow.
Copy and paste element 38 as a new layer and re-size by 40%. Move these grey leaves to the left side of the tag, down in front. Place this layer between the vase layer and the bucket layer.
Duplicate layer and mirror. Move this layer behind the bucket layer.
Duplicate this layer now and mirror. It should appear to the right side of tag, behind the rat and books layer.
Duplicate layer and drag to center in front of Billy.
Duplicate that layer and re-size by 50% and move this in front of rat with books. Just as a filler. It seemed a little empty to me in that area.
Make sure you add drop shadow to each of these layers.
Activate your crop tool and under Snap Crop Rectangle to: select Merged Opaque.
Merge visible.
Add artist copyright and scrap kit maker credit.
If not animating, add your name and save as PNG.
If animating
Go to Selections, select all.
Go to Edit and copy merged. Paste as a new animation in Animation Shop.
Hold your Ctrl key down and repeatedly hit letter L on your keyboard for a total of 20 frames.
You can watch the count on the lower right hand side of your screen in AS.
Open SimoneAni-Where's Billy Tutorial
Go to Edit, select all.
Go to Edit, copy.
Activate your tag.
Go to Edit, select all.
Go to Edit, make sure Propagate Paste is selected.
Go to Edit, Paste, paste into selected frames.
Position on your tag and click into place.
Play and save.
Don't forget to add your name.
You can see my name tutorial HERE.
To save:
Go to File, Save as, enter the name of your file and select the folder to save to.
Now click on Customize:
Under COLORS TAB:
Number of colors: 255 Colors
Create palette by: OPTIMIZED OCTREE
Reduce colors by: Error Diffusion
Under OPTIMIZATIONS TAB:
set a check mark beside the second, third and forth choices. UN-check the 1st and last.
Under PARTIAL TRANSPARENCY:
check Convert pixels less than 92
Yes, blend with this color: change to white #FFFFFF
Click OK. Click Next, next, next, next.
Play your animation.
At times your animation may or will come out terrible. Optimization in Animation Shop is not the greatest.
You can play around will your settings, especially under the Tab: Optimization. I change this setting at times from anywhere between 70 and 100.
Some people add a white background. To add background, go to Animation: Animation Properties, select Opaque and change color to white.
Hope you enjoyed this tutorial,
Hugs Simone
Please, always direct people to my blog to download my animations.
Do not load to any other download site and don't claim as your own.
Tutorial written by SophisticatSimone aka Lorraine Halle on Friday, May 24, 2013.
Monday, May 20, 2013

♥♥♥
Please click on TAG to see in full size.
••• Supplies needed to complete this tutorial. •••
________________________________________________________________________
Programs: Paint Shop Pro, I'm using version 10. Animation Shop 3.
Plugin : Gradient Glow by Eye Candy 4000 (for name)
Font used: Carpenter
Tube of choice: I'm using "Zip It" by Barbara Jensen found in Package 32.
Scrap Kit : I'm using "Nina 2" by SkyScrap
Animation: SimoneAni-HOT
Mask: Masks0120
________________________________________________________________________
♥♥♥
Save your tag often. Nothing like working long and hard on a tag and PSP crashes.
♥♥♥
Open a new image 700 x 700.
C/P element 33 as a new layer.
Copy and paste your tube as a new layer and add drop shadow. Activate your frame layer.
Grab your selection tool and set your feather to 0. Selection type: rectangle, MODE: add shift, anti-alias checked.
Select the lower portion of your frame, (the portion covering your tube) and select it. Now promote selection to layer.
Drag this layer above your tube.
De-select.
If you have a close up of your tube, copy and paste it on your canvas. Move it to bottom in layers palette.
Activate your frame layer. Select your magic wand tool, tolerance 12, feather 0, match mode, RGB Value.
Click inside the frame. Go to Selections, Modify, expand by 10.
Go to Selections, Invert.
Activate your close up. Hit delete on your keyboard.
Copy and paste paper8 as a new layer and move to bottom.
Hit delete on your keyboard to remove extra.
Now activate your frame.
Go to Selections, Select all.
Go to Edit and Crop to Selection. This will remove any extra paper that we don't see on canvas.
C/P element 59 and move to the left, duplicate and mirror. Merge them and move down as last layer.
Click on frame layer.
C/P element 83 and paste as new layer. Re-size by 75%. If you need to enlarge your canvas, do so now, we can crop and re-size later.
Position castle at center and behind your frame. Make sure nothing is poking out anywhere.
Add drop shadow.
You can crop your tag now.
C/P element 7 and paste as new layer. Re-size by 50%. Move to the right side and over frame edge. Add drop shadow.
C/P element 13 and paste as new layer. Re-size by 25%. Move to the right side and over flower. Add drop shadow.
C/P element 35 and paste as new layer. Re-size by 55%. Move to the left side and at bottom of frame. Add drop shadow.
C/P element 65 and paste as new layer. Re-size by 60%. Move to the left side and at bottom of frame. In front of candle. Add drop shadow.
C/P element 88 and paste as new layer. Re-size by 80%. Move to the left side upper hand side and behind the frame. Duplicate and mirror. Add
drop shadow to both. Merge them together.
C/P element 10 and paste as new layer. Re-size by 80%. Position above frame layer and below the deep fushia flower layer. Add drop shadow.
Should be on the right hand side of frame.
C/P element 60 as a new layer. Re-size by 66%. Move to the right lower hand side of tag.
Open Paper 7 and duplicate. Re-size by 21% at 72 dpi.
Apply Mask 0120 and merge group.
Copy and paste as a new layer on your tag and send to bottom.
Merge visible.
Add your Artist Copyright.
Add your name and save as png.
If animating.
Go to Selections, select all.
Go to Edit and copy merged. Paste as a new animation in Animation Shop.
Hold your Ctrl key down and repeatedly hit letter L on your keyboard for a total of 22 frames you can cull animation afterwards.
You can watch the count on the lower right hand side of your screen in AS.
Open SimoneAni-HOT
Go to Edit, select all.
Go to Edit, copy.
Activate your tag.
Go to Edit, select all.
Go to Edit, make sure Propagate Paste is selected.
Go to Edit, Paste, paste into selected frames.
Position on your tag and click into place.
Play and save.
Don't forget to add your name.
You can see my name tutorial HERE.
To save:
Go to File, Save as, enter the name of your file and select the folder to save to.
Now click on Customize:
Under COLORS TAB:
Number of colors: 255 Colors
Create palette by: OPTIMIZED OCTREE
Reduce colors by: Error Diffusion
Under OPTIMIZATIONS TAB:
set a check mark beside the second, third and forth choices. UN-check the 1st and last.
Under PARTIAL TRANSPARENCY:
check Convert pixels less than 92
Yes, blend with this color: change to white #FFFFFF
Click OK. Click Next, next, next, next.
Play your animation.
At times your animation may or will come out terrible. Optimization in Animation Shop is not the greatest.
You can play around will your settings, especially under the Tab: Optimization. I change this setting at times from anywhere between 70 and 100.
Some people add a white background. To add background, go to Animation: Animation Properties, select Opaque and change color to white.
Hope you enjoyed this tutorial,
Hugs Simone
Please, always direct people to my blog to download my animations.
Do not load to any other download site and don't claim as your own.
Tutorial written by SophisticatSimone aka Lorraine Halle on Monday, May 20, 2013.
Please click on TAG to see in full size.
••• Supplies needed to complete this tutorial. •••
________________________________________________________________________
Programs: Paint Shop Pro, I'm using version 10. Animation Shop 3.
Plugin : Gradient Glow by Eye Candy 4000 (for name)
Font used: Carpenter
Tube of choice: I'm using "Zip It" by Barbara Jensen found in Package 32.
Scrap Kit : I'm using "Nina 2" by SkyScrap
Animation: SimoneAni-HOT
Mask: Masks0120
________________________________________________________________________
♥♥♥
Save your tag often. Nothing like working long and hard on a tag and PSP crashes.
♥♥♥
Open a new image 700 x 700.
C/P element 33 as a new layer.
Copy and paste your tube as a new layer and add drop shadow. Activate your frame layer.
Grab your selection tool and set your feather to 0. Selection type: rectangle, MODE: add shift, anti-alias checked.
Select the lower portion of your frame, (the portion covering your tube) and select it. Now promote selection to layer.
Drag this layer above your tube.
De-select.
If you have a close up of your tube, copy and paste it on your canvas. Move it to bottom in layers palette.
Activate your frame layer. Select your magic wand tool, tolerance 12, feather 0, match mode, RGB Value.
Click inside the frame. Go to Selections, Modify, expand by 10.
Go to Selections, Invert.
Activate your close up. Hit delete on your keyboard.
Copy and paste paper8 as a new layer and move to bottom.
Hit delete on your keyboard to remove extra.
Now activate your frame.
Go to Selections, Select all.
Go to Edit and Crop to Selection. This will remove any extra paper that we don't see on canvas.
C/P element 59 and move to the left, duplicate and mirror. Merge them and move down as last layer.
Click on frame layer.
C/P element 83 and paste as new layer. Re-size by 75%. If you need to enlarge your canvas, do so now, we can crop and re-size later.
Position castle at center and behind your frame. Make sure nothing is poking out anywhere.
Add drop shadow.
You can crop your tag now.
C/P element 7 and paste as new layer. Re-size by 50%. Move to the right side and over frame edge. Add drop shadow.
C/P element 13 and paste as new layer. Re-size by 25%. Move to the right side and over flower. Add drop shadow.
C/P element 35 and paste as new layer. Re-size by 55%. Move to the left side and at bottom of frame. Add drop shadow.
C/P element 65 and paste as new layer. Re-size by 60%. Move to the left side and at bottom of frame. In front of candle. Add drop shadow.
C/P element 88 and paste as new layer. Re-size by 80%. Move to the left side upper hand side and behind the frame. Duplicate and mirror. Add
drop shadow to both. Merge them together.
C/P element 10 and paste as new layer. Re-size by 80%. Position above frame layer and below the deep fushia flower layer. Add drop shadow.
Should be on the right hand side of frame.
C/P element 60 as a new layer. Re-size by 66%. Move to the right lower hand side of tag.
Open Paper 7 and duplicate. Re-size by 21% at 72 dpi.
Apply Mask 0120 and merge group.
Copy and paste as a new layer on your tag and send to bottom.
Merge visible.
Add your Artist Copyright.
Add your name and save as png.
If animating.
Go to Selections, select all.
Go to Edit and copy merged. Paste as a new animation in Animation Shop.
Hold your Ctrl key down and repeatedly hit letter L on your keyboard for a total of 22 frames you can cull animation afterwards.
You can watch the count on the lower right hand side of your screen in AS.
Open SimoneAni-HOT
Go to Edit, select all.
Go to Edit, copy.
Activate your tag.
Go to Edit, select all.
Go to Edit, make sure Propagate Paste is selected.
Go to Edit, Paste, paste into selected frames.
Position on your tag and click into place.
Play and save.
Don't forget to add your name.
You can see my name tutorial HERE.
To save:
Go to File, Save as, enter the name of your file and select the folder to save to.
Now click on Customize:
Under COLORS TAB:
Number of colors: 255 Colors
Create palette by: OPTIMIZED OCTREE
Reduce colors by: Error Diffusion
Under OPTIMIZATIONS TAB:
set a check mark beside the second, third and forth choices. UN-check the 1st and last.
Under PARTIAL TRANSPARENCY:
check Convert pixels less than 92
Yes, blend with this color: change to white #FFFFFF
Click OK. Click Next, next, next, next.
Play your animation.
At times your animation may or will come out terrible. Optimization in Animation Shop is not the greatest.
You can play around will your settings, especially under the Tab: Optimization. I change this setting at times from anywhere between 70 and 100.
Some people add a white background. To add background, go to Animation: Animation Properties, select Opaque and change color to white.
Hope you enjoyed this tutorial,
Hugs Simone
Please, always direct people to my blog to download my animations.
Do not load to any other download site and don't claim as your own.
Tutorial written by SophisticatSimone aka Lorraine Halle on Monday, May 20, 2013.

♥♥♥
Please click on TAG to see in full size.
••• Supplies needed to complete this tutorial. •••
________________________________________________________________________
Programs: Paint Shop Pro, I'm using version 10. Animation Shop 3.
Plugin : Gradient Glow by Eye Candy 4000 (for name)
Font used: Xiomara
Tube of choice: I'm using "Nina 2" by SkyScraps Pin Ups from SATC.
Scrap Kit : I'm using "Nina Terror" by Bibi's Collection from SATC
Animation: none
Mask: Masks0120 (one of mine)
________________________________________________________________________
♥♥♥
Save your tag often. Nothing like working long and hard on a tag and PSP crashes.
♥♥♥
Open Masks0120 in PSP and minimize. Open Paper 1 and duplicate. Close original.
Re-size by 90%. Make sure resolution is set to 72 dpi. Re-sample using: Smart Size and all layers checked.
Promote background to layer.
Go to Layers and select New Mask Layer/From Image. Find mask in drop down layer and apply.
Merge group. Triplicate this layer and merge them together.
Copy and paste your tube as a new layer. Add drop shadow. Move to left side of tag.
Click on your mask layer and go to Selections, select all.
Go to Edit, Crop to Selection.
Activate your tube layer.
Grab your selection tool and set your feather to 14. Selection type: rectangle, MODE: add shift, anti-alias checked.
Select the lower portion of your tubes thighs and delete. I usually hit delete twice. De-select.
C/P element 4 as a new layer and re-size by 50%. Make sure "All Layers" is UN-checked. Place center bottom of tag. Duplicate and move it slightly over to the right.
C/P element 83 as a new layer and re-size by 50%. Duplicate and add drop shadows to both. Stagger their position and place them to the right hand side of canvas.
C/P element 26 as a new layer and re-size by 70%. Leave in center of tag bellow your tube. Add D/S.
C/P element 61 as a new layer and re-size by 70%. Move to right side and behind the shoes. Add D/S.
C/P element 25 as a new layer and re-size by 40%. Move to right upper side and in front of large black circle element. Add D/S.
C/P element 70 as a new layer. Position in front of large black circle element. Duplicate, merge and Add D/S. Move a little more to the right and a touch higher on your tag.
C/P element 59 as a new layer. Position in front of large black circle element. Move to the left side and add D/S.
Duplicate and free rotate by 90% and move to upper left hand side and move it below the black circle element.
Duplicate the original and move it to the right and make sure it's above the black circle.
C/P element 31 as a new layer and move to the top of tag and behind the black circle. Add D/S.
C/P element 55 as a new layer and move to the bottom of tag and in front of your tube on the left. Duplicate and drag over to the right side of tag and drag this layer below the shoes in the layers palette. Add D/S.
C/P element 24 as a new layer and place in front at bottom of tag.
C/P element 23 as a new layer and move this little kitty in front of your tube. Re-size to your liking. Add drop shadow.
C/P element 84 as a new layer and move this tiara on your kitty's head. Re-size to your liking. Add drop shadow.
Merge them together.
C/P element 60 as a new layer and re-size by 30% and move mid tag, over the bottom flowers. Add drop shadow.
C/P element 79 as a new layer and re-size by 30% and move to the top of one of the sexy shoes. Add drop shadow.
Merge visible.
Add artist copyright.
Add your name. I used font: Xiomara, size 72, color black and I applied the Gradient Glow effect from Eye Candy Plugin.
Merge down and save as a PNG.
Hope you enjoyed this tutorial,
Hugs Simone
Please, always direct people to my blog to download my animations.
Do not load to any other download site and don't claim as your own.
Tutorial written by SophisticatSimone aka Lorraine Halle on Monday, May 20, 2013.
Please click on TAG to see in full size.
••• Supplies needed to complete this tutorial. •••
________________________________________________________________________
Programs: Paint Shop Pro, I'm using version 10. Animation Shop 3.
Plugin : Gradient Glow by Eye Candy 4000 (for name)
Font used: Xiomara
Tube of choice: I'm using "Nina 2" by SkyScraps Pin Ups from SATC.
Scrap Kit : I'm using "Nina Terror" by Bibi's Collection from SATC
Animation: none
Mask: Masks0120 (one of mine)
________________________________________________________________________
♥♥♥
Save your tag often. Nothing like working long and hard on a tag and PSP crashes.
♥♥♥
Open Masks0120 in PSP and minimize. Open Paper 1 and duplicate. Close original.
Re-size by 90%. Make sure resolution is set to 72 dpi. Re-sample using: Smart Size and all layers checked.
Promote background to layer.
Go to Layers and select New Mask Layer/From Image. Find mask in drop down layer and apply.
Merge group. Triplicate this layer and merge them together.
Copy and paste your tube as a new layer. Add drop shadow. Move to left side of tag.
Click on your mask layer and go to Selections, select all.
Go to Edit, Crop to Selection.
Activate your tube layer.
Grab your selection tool and set your feather to 14. Selection type: rectangle, MODE: add shift, anti-alias checked.
Select the lower portion of your tubes thighs and delete. I usually hit delete twice. De-select.

C/P element 4 as a new layer and re-size by 50%. Make sure "All Layers" is UN-checked. Place center bottom of tag. Duplicate and move it slightly over to the right.
C/P element 83 as a new layer and re-size by 50%. Duplicate and add drop shadows to both. Stagger their position and place them to the right hand side of canvas.
C/P element 26 as a new layer and re-size by 70%. Leave in center of tag bellow your tube. Add D/S.
C/P element 61 as a new layer and re-size by 70%. Move to right side and behind the shoes. Add D/S.
C/P element 25 as a new layer and re-size by 40%. Move to right upper side and in front of large black circle element. Add D/S.
C/P element 70 as a new layer. Position in front of large black circle element. Duplicate, merge and Add D/S. Move a little more to the right and a touch higher on your tag.
C/P element 59 as a new layer. Position in front of large black circle element. Move to the left side and add D/S.
Duplicate and free rotate by 90% and move to upper left hand side and move it below the black circle element.
Duplicate the original and move it to the right and make sure it's above the black circle.
C/P element 31 as a new layer and move to the top of tag and behind the black circle. Add D/S.
C/P element 55 as a new layer and move to the bottom of tag and in front of your tube on the left. Duplicate and drag over to the right side of tag and drag this layer below the shoes in the layers palette. Add D/S.
C/P element 24 as a new layer and place in front at bottom of tag.
C/P element 23 as a new layer and move this little kitty in front of your tube. Re-size to your liking. Add drop shadow.
C/P element 84 as a new layer and move this tiara on your kitty's head. Re-size to your liking. Add drop shadow.
Merge them together.
C/P element 60 as a new layer and re-size by 30% and move mid tag, over the bottom flowers. Add drop shadow.
C/P element 79 as a new layer and re-size by 30% and move to the top of one of the sexy shoes. Add drop shadow.
Merge visible.
Add artist copyright.
Add your name. I used font: Xiomara, size 72, color black and I applied the Gradient Glow effect from Eye Candy Plugin.
Merge down and save as a PNG.
Hope you enjoyed this tutorial,
Hugs Simone
Please, always direct people to my blog to download my animations.
Do not load to any other download site and don't claim as your own.
Tutorial written by SophisticatSimone aka Lorraine Halle on Monday, May 20, 2013.
Saturday, May 11, 2013

♥♥♥
Please click on TAG to see in full size.
••• Supplies needed to complete this tutorial. •••
________________________________________________________________________
Programs: Paint Shop Pro, I'm using version 10. Animation Shop 3.
Plugin : none
Font used: Feathergraphy Decoration
Tube of choice: I'm using "Heartbroken" by Spazz from SATC.
Scrap Kit : I'm using "Heartbroken" by LizquisScraps from SATC
Mask: mine Mask0111
________________________________________________________________________
♥♥♥
Save your tag often. Nothing like working long and hard on a tag and PSP crashes.
♥♥♥
Open Mask0111 and Minimize in PSP.
Open Paper 4, duplicate and close original. Promote background to layer.
Go to Image/Canvas size and enter: 675 x 600.
Apply your mask. Merge group.
Duplicate and merge down.
Copy and paste branch2 as a new layer. Move it to the right side of tag.
Duplicate and re-size by 75%. Free rotate to the left by 90 degrees.
Add drop shadow:
V= -3 H= -3 Opacity=70 Blur=7.25 Color=Black
Copy and paste cross1 as a new layer. Move to the left side of tag. Add same drop shadow.
Copy and paste grass as a new layer. Move to bottom center of tag. Duplicate and re-size by 75% and add drop shadow to each layer. Move to the left side. Duplicate the re-sized layer and mirror so it's on the right side of tag.
Copy and paste hat as a new layer. Mirror and move to the upper right side of tag. Add same drop shadow.
Copy and paste beads as a new layer. Re-size by 75% and move to the right side of tag. Add same drop shadow.
Copy and paste a close up tube or tube of choice. Add drop shadow. Grab your selection tool, set to rectangle, feather 0.
Select the section of tube that is below the grass line. Hit delete on your keyboard.
Now anywhere that your tube's head is hidden under the leaves at the top, select that and promote selection to layer. Move that layer to the top. On original tube layer, hit delete.
Select your crop tool and enter 675 x 600. Double click on your tag.
Copy and paste bird and re-size by 45%. Move to lower right hand side and add drop shadow.
Copy and paste decor2 as a new layer. Duplicate and re-size by 80%. Move both the left and leave a gap between them. Add drop shadow to each.
Copy and paste cross2 as a new layer. Re-size by 45% and move it to bottom of tag and in between the grass layers. Add drop shadow.
Merge all visible and add artist copyright. Scrap kit credit and add your name.
Merge visible and save as PNG.
Hope you enjoyed this tutorial,
Hugs Simone
Please, always direct people to my blog to download my animations.
Do not load to any other download site and don't claim as your own.
Tutorial written by SophisticatSimone aka Lorraine Halle on Saturday, May 11, 2013.
Please click on TAG to see in full size.
••• Supplies needed to complete this tutorial. •••
________________________________________________________________________
Programs: Paint Shop Pro, I'm using version 10. Animation Shop 3.
Plugin : none
Font used: Feathergraphy Decoration
Tube of choice: I'm using "Heartbroken" by Spazz from SATC.
Scrap Kit : I'm using "Heartbroken" by LizquisScraps from SATC
Mask: mine Mask0111
________________________________________________________________________
♥♥♥
Save your tag often. Nothing like working long and hard on a tag and PSP crashes.
♥♥♥
Open Mask0111 and Minimize in PSP.
Open Paper 4, duplicate and close original. Promote background to layer.
Go to Image/Canvas size and enter: 675 x 600.
Apply your mask. Merge group.
Duplicate and merge down.
Copy and paste branch2 as a new layer. Move it to the right side of tag.
Duplicate and re-size by 75%. Free rotate to the left by 90 degrees.
Add drop shadow:
V= -3 H= -3 Opacity=70 Blur=7.25 Color=Black
Copy and paste cross1 as a new layer. Move to the left side of tag. Add same drop shadow.
Copy and paste grass as a new layer. Move to bottom center of tag. Duplicate and re-size by 75% and add drop shadow to each layer. Move to the left side. Duplicate the re-sized layer and mirror so it's on the right side of tag.
Copy and paste hat as a new layer. Mirror and move to the upper right side of tag. Add same drop shadow.
Copy and paste beads as a new layer. Re-size by 75% and move to the right side of tag. Add same drop shadow.
Copy and paste a close up tube or tube of choice. Add drop shadow. Grab your selection tool, set to rectangle, feather 0.
Select the section of tube that is below the grass line. Hit delete on your keyboard.
Now anywhere that your tube's head is hidden under the leaves at the top, select that and promote selection to layer. Move that layer to the top. On original tube layer, hit delete.
Select your crop tool and enter 675 x 600. Double click on your tag.
Copy and paste bird and re-size by 45%. Move to lower right hand side and add drop shadow.
Copy and paste decor2 as a new layer. Duplicate and re-size by 80%. Move both the left and leave a gap between them. Add drop shadow to each.
Copy and paste cross2 as a new layer. Re-size by 45% and move it to bottom of tag and in between the grass layers. Add drop shadow.
Merge all visible and add artist copyright. Scrap kit credit and add your name.
Merge visible and save as PNG.
Hope you enjoyed this tutorial,
Hugs Simone
Please, always direct people to my blog to download my animations.
Do not load to any other download site and don't claim as your own.
Tutorial written by SophisticatSimone aka Lorraine Halle on Saturday, May 11, 2013.
Subscribe to:
Posts
(Atom)
CT TEAM