My Blinkie

Showing posts with label Alex McMillan. Show all posts
Showing posts with label Alex McMillan. Show all posts
Thursday, June 20, 2013

♥♥♥
Please click on TAG to see in full size.
••• Supplies needed to complete this tutorial. •••
________________________________________________________________________
Programs: Paint Shop Pro, I'm using version 10. Animation Shop 3.
Plugin : Gradient Glow for name.
Font used: 2Peas Cocoa
Tube of choice: I'm using "Sailor Girl" by Alexander McMillan from SATC.
Scrap Kit : I'm using "Sailor Beach" by Bibi's Collection from SATC
Animation: none
Mask: 0108 HERE
________________________________________________________________________
♥♥♥
Save your tag often. Nothing like working long and hard on a tag and PSP crashes.
♥♥♥
Open a new image, transparent, 650 x 650.
C/P element 37 as a new layer. Move to left upper hand side of tag. Add Drop shadow.
C/P your tube as a new layer and re-size by 75%. Move to right side of tag.
Open Paper 2. Duplicate and close original.
Re-size by 54%, 72 dpi and smart size checked. Apply mask of choice, or mine mask 0108.
Merge group and duplicate. Merge visible. Copy and paste as a new layer on your tag.
Move to bottom.
C/P element 11 as a new layer. Using your selection tool, remove the trunk portion of the tree.
This element should be just above your mask layer.
Add drop shadow.
C/P element 26 as a new layer and move to the lower left hand side of tag. This layer should be your top layer (above tube).
C/P element 99 as a new layer and move to the lower right hand side of tag. This layer is above grass layer.
C/P element 39 as a new layer and move to the lower right hand side of tag. Re-size by 54%. Add drop shadow.
C/P element 27 as a new layer and move to the lower left hand side of tag. Place over the grass element.
Merge all visible. Add artist copyright.
Add your name and save as PNG.
Hope you enjoyed this tutorial,
Hugs Simone
Please, always direct people to my blog to download my animations.
Do not load to any other download site and don't claim as your own.
Tutorial written by SophisticatSimone aka Lorraine Halle on Thursday, June 20 2013.
Please click on TAG to see in full size.
••• Supplies needed to complete this tutorial. •••
________________________________________________________________________
Programs: Paint Shop Pro, I'm using version 10. Animation Shop 3.
Plugin : Gradient Glow for name.
Font used: 2Peas Cocoa
Tube of choice: I'm using "Sailor Girl" by Alexander McMillan from SATC.
Scrap Kit : I'm using "Sailor Beach" by Bibi's Collection from SATC
Animation: none
Mask: 0108 HERE
________________________________________________________________________
♥♥♥
Save your tag often. Nothing like working long and hard on a tag and PSP crashes.
♥♥♥
Open a new image, transparent, 650 x 650.
C/P element 37 as a new layer. Move to left upper hand side of tag. Add Drop shadow.
C/P your tube as a new layer and re-size by 75%. Move to right side of tag.
Open Paper 2. Duplicate and close original.
Re-size by 54%, 72 dpi and smart size checked. Apply mask of choice, or mine mask 0108.
Merge group and duplicate. Merge visible. Copy and paste as a new layer on your tag.
Move to bottom.
C/P element 11 as a new layer. Using your selection tool, remove the trunk portion of the tree.
This element should be just above your mask layer.
Add drop shadow.
C/P element 26 as a new layer and move to the lower left hand side of tag. This layer should be your top layer (above tube).
C/P element 99 as a new layer and move to the lower right hand side of tag. This layer is above grass layer.
C/P element 39 as a new layer and move to the lower right hand side of tag. Re-size by 54%. Add drop shadow.
C/P element 27 as a new layer and move to the lower left hand side of tag. Place over the grass element.
Merge all visible. Add artist copyright.
Add your name and save as PNG.
Hope you enjoyed this tutorial,
Hugs Simone
Please, always direct people to my blog to download my animations.
Do not load to any other download site and don't claim as your own.
Tutorial written by SophisticatSimone aka Lorraine Halle on Thursday, June 20 2013.

Monday, June 10, 2013

???
Please click on TAG to see in full size.
••• Supplies needed to complete this tutorial. •••
________________________________________________________________________
Programs: Paint Shop Pro, I'm using version 10. Animation Shop 3.
Plugin : none
Please click on TAG to see in full size.
••• Supplies needed to complete this tutorial. •••
________________________________________________________________________
Programs: Paint Shop Pro, I'm using version 10. Animation Shop 3.
Plugin : none
Font used: Ornatique
Tube of choice: I'm using "Celina" by Alexander McMillan from SATC.
Scrap Kit : I'm using "SteamPunk" by Bibi's Collection from SATC
Animation: SimoneAni-Steamy HERE
Mask: 0136 HERE
________________________________________________________________________
???
Save your tag often. Nothing like working long and hard on a tag and PSP crashes.
???
Open paper 8 and duplicate. Apply Mask and merge group. I used mask 0136 by me.
Copy and paste your tube as a new layer. I remove some of the bottom off my tube with my selection tool set to rectangle and feather of 30.
Move tube to the right side of tag.
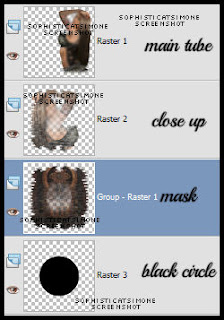
If you have a large close up image of your tube, copy and paste it as a new layer. Mirror and position over your mask.
Click on your bottom mask layer.
Go to Selections, select all. Go to Selections, float. Go to Selections, invert. Hit delete on your keyboard. Go to Selections, select none.
Grab your preset shapes tool, set to Ellipse. Background color black, foreground color null.
Make a circle that is smaller then your mask. Convert to raster layer and send to bottom, below your mask layer. You should have something like this:
Copy and paste element 14 as a new layer. In layers palette this should be below your tube close up.
Click on your your tube close up now to activate that layer.
Copy and paste element 44 as a new layer. Re-size by 75%. Free rotate the element to the right by 50 degrees.
Add following drop shadow:
V=10
H=7
Opacity=73
Blur=13
Color=black
OK now we are going to add a layer to prepare for our coming animation placement.
Using your preset shapes set to rectangle, choose a color for your background and foreground is null.
My square is 244 x 266. You can always open a new image with those dimensions and flood fill with a bright color.
Copy and paste it on your tag and place at bottom, in between element 44 and your tube. Our animation will be going there, so the color will remind us to not place any elements over this area. Double click on this layer in your palette. Properties box will pop up. Place a check mark beside "Highlight in layers palette" and choose a color of choice.
Tube of choice: I'm using "Celina" by Alexander McMillan from SATC.
Scrap Kit : I'm using "SteamPunk" by Bibi's Collection from SATC
Animation: SimoneAni-Steamy HERE
Mask: 0136 HERE
________________________________________________________________________
???
Save your tag often. Nothing like working long and hard on a tag and PSP crashes.
???
Open paper 8 and duplicate. Apply Mask and merge group. I used mask 0136 by me.
Copy and paste your tube as a new layer. I remove some of the bottom off my tube with my selection tool set to rectangle and feather of 30.
Move tube to the right side of tag.
If you have a large close up image of your tube, copy and paste it as a new layer. Mirror and position over your mask.
Click on your bottom mask layer.
Go to Selections, select all. Go to Selections, float. Go to Selections, invert. Hit delete on your keyboard. Go to Selections, select none.
Grab your preset shapes tool, set to Ellipse. Background color black, foreground color null.
Make a circle that is smaller then your mask. Convert to raster layer and send to bottom, below your mask layer. You should have something like this:

Copy and paste element 14 as a new layer. In layers palette this should be below your tube close up.
Click on your your tube close up now to activate that layer.
Copy and paste element 44 as a new layer. Re-size by 75%. Free rotate the element to the right by 50 degrees.
Add following drop shadow:
V=10
H=7
Opacity=73
Blur=13
Color=black
OK now we are going to add a layer to prepare for our coming animation placement.
Using your preset shapes set to rectangle, choose a color for your background and foreground is null.
My square is 244 x 266. You can always open a new image with those dimensions and flood fill with a bright color.
Copy and paste it on your tag and place at bottom, in between element 44 and your tube. Our animation will be going there, so the color will remind us to not place any elements over this area. Double click on this layer in your palette. Properties box will pop up. Place a check mark beside "Highlight in layers palette" and choose a color of choice.

Click OK to close. You should have something like this:

When the time comes to animate we will be referencing to this layer.
Copy and paste element 109 as a new layer and re-size by 40%. Position this over the box you just created and convert to raster layer.
Add drop shadow and drag below the box layer.
Copy and paste element 126 as a new layer. Re-size by 40% and position to the left side behind the box layer you just made.
Duplicate and free rotate by 45 degrees. Position at top of tag and to the right, behind your tube.
Add drop shadow to each.
Duplicate original branch at move this layer above your tube layer near right lower hand side.
Copy and paste elment 130 as a new layer and re-size by 64%. Move to the lower right hand side and add drop shadow.
Copy and paste element 118 as a new layer and re-size by 70%. Position over the leafy branch down on lower right hand side and beside the bomb.
Add drop shadow.
Copy and paste element 83 as a new layer and re-size by 35%, add drop shadow and move to the left side. This layer should be just above the box layer you created earlier.
Repeat for element 101. Position at bottom of tag in center.
Copy and paste element 113 as a new layer and re-size by 25%, add drop shadow and move to the bottom left hand side of tag, under the wing like element.
Copy and paste again and re-size by 15%. Triplicate. Position one at top of tag, one near wing like element (below it in the layers, but above it on the
tag) and place the other one middle top of your box. Drop shadow each.
C/P element 106 and re-size by 15% and duplicate. Place one at bottom of tag by the googles and one mid tag on the left side. Add D/S to both layers.
C/P element 114 as a new layer and re-size by 20%. Place along your box on the left side. Duplicate and free rotate by 90 degrees to the right.
Position along the top of your box, and below the other pipe layer. Add drop shadow to both layers.
Add anything else you want on your tag at this time.
I added element 42, 10, 5 and 15.
Activate your top layer and using your text tool, add your artist copyright.
Go to Selections, select all.
Go to Image, crop to selection.
Activate the layer below your box layer/colored layer and merge them down till you get to the bottom.
Go to Selections, select all. Go to Image and copy.
In animation shop, right click and paste as a new animation.
Hold your Ctrl key down and repeatedly hit letter L on your keyboard for a total of 11 frames.
You can watch the count on the lower right hand side of your screen in AS.
Open SimoneAni-Steamy-002
Go to Edit, select all.
Go to Edit, copy.
Activate your tag.
Go to Edit, select all.
Go to Edit, make sure Propagate Paste is selected.
Go to Edit, Paste, paste into selected frames.
Position on your tag and click into place over the grill square.
Go back to PSP and X-out your bottom layer and the square layer.
Click on any of the other layers, make sure you still have your tag selected (Selection All).
Go to Edit, Copy Merged.
In AS right click and paste as a new animation.
Go to Edit, copy.
Activate your tag. Go to Edit, Paste, paste into selected frames. You may have to move it slightly with your cursor. Once happy just click on your tag.
Now I added another animation called SimoneAni-Steamy-006withShadow-PSD.
Open this animation, go to Edit and select all. Go to Edit and copy.
Activate the very last frame on this animation so your frame becomes blue.
Right click in that frame and select, Paste after current frame.
Now scroll the animation out so you see all 16 frames.
Delete frames 2, 7 and 12 using your Ctrl button on keyboard.

Go to Edit, select all.
Go to Edit, copy.
Activate your tag.
Go to Edit, select all.
Go to Edit, Paste, paste into selected frames.
I placed that one at the top.
Next on Steamy-006withShadow animation, I mirrored it.
Go to animation/mirror.
Go to Edit, select all.
Go to Edit, copy.
Activate your tag.
Go to Edit, select all.
Go to Edit, Paste, paste into selected frames.
I placed that one on top of winged element in bottom left hand side of tag.
Re-size your tag by 85%, Smart Size checked.
Add your name and save!
I used the font Ornatique by designstation.
For glitter look I put 100% noise. To animate it, I changed the noise to 100, 99 and 98.
Hope you enjoyed this tutorial,
Hugs Simone
Please, always direct people to my blog to download my animations.
Do not load to any other download site and don't claim as your own.
Tutorial written by SophisticatSimone aka Lorraine Halle on Monday June 10, 2013.
Sunday, June 9, 2013

♥♥♥
Please click on TAG to see in full size.
••• Supplies needed to complete this tutorial. •••
________________________________________________________________________
Programs: Paint Shop Pro, I'm using version 10. Animation Shop 3.
Plugin : Eye Candy: Gradient Glow for name
Font used: A&S Motherlode
Tube of choice: I'm using "Megan" by Alexander McMillan from SATC.
Scrap Kit : I'm using "Brown Sugar" by P-O Concept from SATC
Animation: none
Mask: 0137SS
________________________________________________________________________
♥♥♥
Save your tag often. Nothing like working long and hard on a tag and PSP crashes.
♥♥♥
Open element 57 and copy.
Create a new image 700 x 700. You can re-size at the end.
Paste element as a new layer and sharpen.
Add small drop shadow
V=0
H=-2
Opacity=60
Blur=4
Color=black.
Go to Effect, Mura's Copies and enter the following:
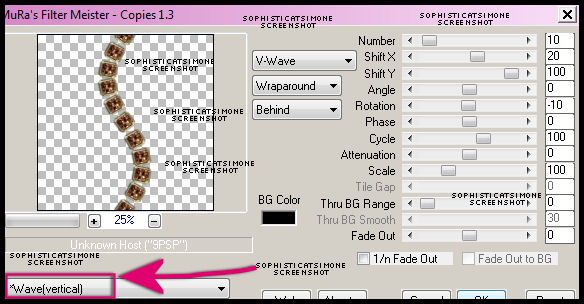
Now, using your selection tool set to Freehand selection, enter the following and then click around the jewel leaving behind the two jewels that
are being cut off.
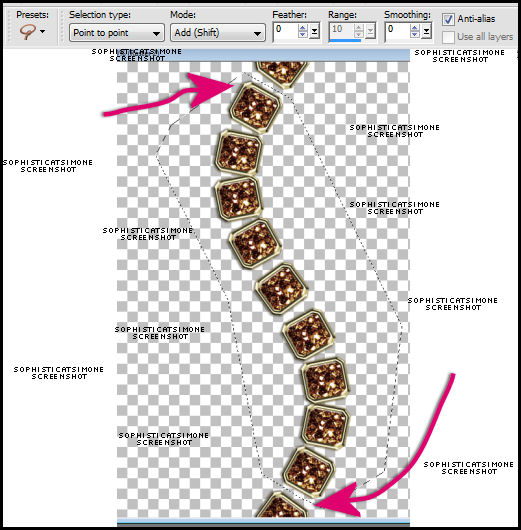
Now go to Selections, Invert and hit delete on keyboard.
Go to Selections, select none.
Copy and paste your tube as a new layer and re-size by 80%. Move behind the jewel wave. Add drop shadow of choice.
Copy and paste paper 10 as a new layer and re-size by 92%. Send paper to bottom and sharpen.
Add noise of 27%, Gaussian checked. Monochrome checked.
Apply mask of choice or mine: masks0137.
Go to Layers, New Mask Layer, From Image. Select mask in drop down box and apply.
Merge group. Duplicate and merge down.
Copy and paste element 39 as a new layer and re-size by 70%. Add drop shadow. Position more to the left of mid line.
Copy and paste element 70 as a new layer and position behind your tube at the bottom and more to the right side of tag. Duplicate and move this layer up and over to the left hand side.
Add drop shadow to each:
V=-3
H=-3
Opacity=77
Blur=10.14
Color=black.
Copy and paste element 75 as a new layer and move it to the far left side and free rotate to the left by 25 degrees. Duplicate and mirror.
Drag this element behind yellow fan and move up high on tag, behind your tube's head. Add drop shadow to each layer decreasing the opacity of shadow to 50.
Add the phone element (80) and add drop shadow.
Duplicate the jewel wave and mirror. Drag this layer behind your tube layer and over to the right side of tag.
Make sure all your layers have shadows
Add artist copyright and your name and save as PNG.
Hope you enjoyed this tutorial,
Hugs Simone
Please, always direct people to my blog to download my animations.
Do not load to any other download site and don't claim as your own.
Tutorial written by SophisticatSimone aka Lorraine Halle on Sunday June 9, 2013.
Please click on TAG to see in full size.
••• Supplies needed to complete this tutorial. •••
________________________________________________________________________
Programs: Paint Shop Pro, I'm using version 10. Animation Shop 3.
Plugin : Eye Candy: Gradient Glow for name
Font used: A&S Motherlode
Tube of choice: I'm using "Megan" by Alexander McMillan from SATC.
Scrap Kit : I'm using "Brown Sugar" by P-O Concept from SATC
Animation: none
Mask: 0137SS
________________________________________________________________________
♥♥♥
Save your tag often. Nothing like working long and hard on a tag and PSP crashes.
♥♥♥
Open element 57 and copy.
Create a new image 700 x 700. You can re-size at the end.
Paste element as a new layer and sharpen.
Add small drop shadow
V=0
H=-2
Opacity=60
Blur=4
Color=black.
Go to Effect, Mura's Copies and enter the following:
Now, using your selection tool set to Freehand selection, enter the following and then click around the jewel leaving behind the two jewels that
are being cut off.
Now go to Selections, Invert and hit delete on keyboard.
Go to Selections, select none.
Copy and paste your tube as a new layer and re-size by 80%. Move behind the jewel wave. Add drop shadow of choice.
Copy and paste paper 10 as a new layer and re-size by 92%. Send paper to bottom and sharpen.
Add noise of 27%, Gaussian checked. Monochrome checked.
Apply mask of choice or mine: masks0137.
Go to Layers, New Mask Layer, From Image. Select mask in drop down box and apply.
Merge group. Duplicate and merge down.
Copy and paste element 39 as a new layer and re-size by 70%. Add drop shadow. Position more to the left of mid line.
Copy and paste element 70 as a new layer and position behind your tube at the bottom and more to the right side of tag. Duplicate and move this layer up and over to the left hand side.
Add drop shadow to each:
V=-3
H=-3
Opacity=77
Blur=10.14
Color=black.
Copy and paste element 75 as a new layer and move it to the far left side and free rotate to the left by 25 degrees. Duplicate and mirror.
Drag this element behind yellow fan and move up high on tag, behind your tube's head. Add drop shadow to each layer decreasing the opacity of shadow to 50.
Add the phone element (80) and add drop shadow.
Duplicate the jewel wave and mirror. Drag this layer behind your tube layer and over to the right side of tag.
Make sure all your layers have shadows
Add artist copyright and your name and save as PNG.
Hope you enjoyed this tutorial,
Hugs Simone
Please, always direct people to my blog to download my animations.
Do not load to any other download site and don't claim as your own.
Tutorial written by SophisticatSimone aka Lorraine Halle on Sunday June 9, 2013.
Saturday, April 20, 2013

♥♥♥
Please click on TAG to see in full size.
••• Supplies needed to complete this tutorial. •••
________________________________________________________________________
Programs : Paint Shop Pro, I'm using version 10. Animation Shop 3.
Plugin : MuRa Copies, Redfield(seamless workshop), Eye Candy 4000(gradient glow).
Font used: Do I like Stripes?
Tube of choice : I'm using the sweet angelic tube Maria by Alexander McMillan from SATC.
Scrap Kit : Matching scrap kit Marie by Bibi's Collection found HERE
Animations : by me, Pixie Dust set 395-400 download HERE in the tag I'm using 396
________________________________________________________________________
♥♥♥
Save your tag often. Nothing like working long and hard on a tag and PSP crashes.
♥♥♥
Let's make a tile first.
Open a new image 500x500.
Copy and paste your tube as a new image on this canvas.
Go to Effects, Plugins, MuRa Copies.
Select : Wallpaper/rotate. Default settings.
Merge down.
Select your crop tool and select Merged Opaque.
Go to Adjust, blur, gaussian blur, 25.
Go to Adjust, add/remove noise, add noise:
Check: Gaussian
Noise: 23%
Monochrome: checked
Go to Effects, Reflection effects, Kaleidoscope.
Enter the following:
Horizontal offset : -74
Vertical offset : -30
Rotation angle : 245
Scale factor : -37
Number of petals : 7
Number of orbits : 1
Radial suction : 70
Edge Mode: Wrap.
If you don't like this look, you can play around with your settings till you find something you like. This worked for me =)
Go to Effects/Plugins/Redfield/ Seamless Workshop
Click Preset 1 in the drop down box.
Click on the green check make.
You will empty space on your canvas, so copy this tile and paste as a new layer.
Minimize and close the other one, we are done with it.
Open a new image 700 x 700.
Double click on your background material palette,
Select pattern, and find the tile you just created.
Scale : 100 Angle : 0
Activate your food fill tool and fill your image canvas with your pattern.
Open BIBIMARIE ELEMS (8) from the kit.
Go to Layers, New Mask Layer, from image.
In drop down box, find BIBIMARIE ELEMS (8)
Apply mask.
In layers palette, right click and merge group.
Now copy and paste BIBIMARIE ELEMS (8) as a new layer on your mask layer.
You should have this:
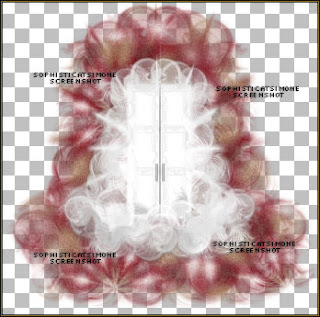
Copy and paste BIBIMARIE ELEMS (56) as a new layer on your tag.
Re-size by 70%.
Add drop shadow:
V : 12
H : 7
Opacity : 50
Blur : 20.29
Color : black
Copy and paste your tube as a new layer and re-size if you need to.
I re-sized mine by 68%.
Add drop shadow of choice.
Copy and paste element 54 as a new layer and re-size by 45%.
Move to the left side of tube. Add drop shadow of choice.
Copy and paste element 55 as a new layer and re-size by 45%.
Have this bear sit on the chair. Add drop shadow of choice.
Copy and paste element 34 as a new layer and re-size by 70%.
Move this layer below all other layers but above the mask layer. Have it peek out on the right hand side.
Duplicate and mirror.
Add drop shadow of choice.
Copy and paste element 36 as a new layer and re-size by 70%.
This layer should be above the brown leaves. Free rotate to the right by 90 degrees.
Have it peek out on the right hand side.
Duplicate and mirror.
Add drop shadow of choice.
Copy and paste element 16 as a new layer.
Move to the right side of tube and as top layer. Add drop shadow of choice.
Copy and paste element 59 as a new layer and re-size by 25%.
Have this bird sit on bear's head. Add drop shadow of choice.
Copy and paste element 3 as a new layer and re-size by 25%.
Move as top layer and position to the left side of tag.
Duplicate, free rotate by 90 degrees and move over a little bit.
Duplicate, free rotate by 90 degrees and move over a little bit.
Duplicate, free rotate by 90 degrees and move over a little bit.
Line them up and add drop shadow to each one.
Copy and paste element 22 and re-size. Move to the upper right hand side.
Place above Mask layer and below the white element that was used as mask.
Add drop shadow.
Copy and paste element 25. Move to the upper right hand side.
Place above the double frame layer. Add drop shadow.
Copy and paste element 58 and re-size. Move to the left hand side of tag and place between the brown leaves and the white element.
Select your text tool.
Using font : Do I like Stripes?
Font size : 120 and your background material palette still set to your pattern.
Type your name out.
Add a very small drop shadow: V=0, H=-1, Opacity=60, Bur=1, Color=black
Add gradient glow using Eye Candy 4000.
See my name tutorial HERE.
Add large drop shadow: V=2, H=8, Opacity=50, Bur=10, Color=black.
Add artist copyright and scrap kit maker credit.
Save as PNG.
Please click on TAG to see in full size.
••• Supplies needed to complete this tutorial. •••
________________________________________________________________________
Programs : Paint Shop Pro, I'm using version 10. Animation Shop 3.
Plugin : MuRa Copies, Redfield(seamless workshop), Eye Candy 4000(gradient glow).
Font used: Do I like Stripes?
Tube of choice : I'm using the sweet angelic tube Maria by Alexander McMillan from SATC.
Scrap Kit : Matching scrap kit Marie by Bibi's Collection found HERE
Animations : by me, Pixie Dust set 395-400 download HERE in the tag I'm using 396
________________________________________________________________________
♥♥♥
Save your tag often. Nothing like working long and hard on a tag and PSP crashes.
♥♥♥
Let's make a tile first.
Open a new image 500x500.
Copy and paste your tube as a new image on this canvas.
Go to Effects, Plugins, MuRa Copies.
Select : Wallpaper/rotate. Default settings.
Merge down.
Select your crop tool and select Merged Opaque.
Go to Adjust, blur, gaussian blur, 25.
Go to Adjust, add/remove noise, add noise:
Check: Gaussian
Noise: 23%
Monochrome: checked
Go to Effects, Reflection effects, Kaleidoscope.
Enter the following:
Horizontal offset : -74
Vertical offset : -30
Rotation angle : 245
Scale factor : -37
Number of petals : 7
Number of orbits : 1
Radial suction : 70
Edge Mode: Wrap.
If you don't like this look, you can play around with your settings till you find something you like. This worked for me =)
Go to Effects/Plugins/Redfield/ Seamless Workshop
Click Preset 1 in the drop down box.
Click on the green check make.
You will empty space on your canvas, so copy this tile and paste as a new layer.
Minimize and close the other one, we are done with it.
Open a new image 700 x 700.
Double click on your background material palette,
Select pattern, and find the tile you just created.
Scale : 100 Angle : 0
Activate your food fill tool and fill your image canvas with your pattern.
Open BIBIMARIE ELEMS (8) from the kit.
Go to Layers, New Mask Layer, from image.
In drop down box, find BIBIMARIE ELEMS (8)
Apply mask.
In layers palette, right click and merge group.
Now copy and paste BIBIMARIE ELEMS (8) as a new layer on your mask layer.
You should have this:

Copy and paste BIBIMARIE ELEMS (56) as a new layer on your tag.
Re-size by 70%.
Add drop shadow:
V : 12
H : 7
Opacity : 50
Blur : 20.29
Color : black
Copy and paste your tube as a new layer and re-size if you need to.
I re-sized mine by 68%.
Add drop shadow of choice.
Copy and paste element 54 as a new layer and re-size by 45%.
Move to the left side of tube. Add drop shadow of choice.
Copy and paste element 55 as a new layer and re-size by 45%.
Have this bear sit on the chair. Add drop shadow of choice.
Copy and paste element 34 as a new layer and re-size by 70%.
Move this layer below all other layers but above the mask layer. Have it peek out on the right hand side.
Duplicate and mirror.
Add drop shadow of choice.
Copy and paste element 36 as a new layer and re-size by 70%.
This layer should be above the brown leaves. Free rotate to the right by 90 degrees.
Have it peek out on the right hand side.
Duplicate and mirror.
Add drop shadow of choice.
Copy and paste element 16 as a new layer.
Move to the right side of tube and as top layer. Add drop shadow of choice.
Copy and paste element 59 as a new layer and re-size by 25%.
Have this bird sit on bear's head. Add drop shadow of choice.
Copy and paste element 3 as a new layer and re-size by 25%.
Move as top layer and position to the left side of tag.
Duplicate, free rotate by 90 degrees and move over a little bit.
Duplicate, free rotate by 90 degrees and move over a little bit.
Duplicate, free rotate by 90 degrees and move over a little bit.
Line them up and add drop shadow to each one.
Copy and paste element 22 and re-size. Move to the upper right hand side.
Place above Mask layer and below the white element that was used as mask.
Add drop shadow.
Copy and paste element 25. Move to the upper right hand side.
Place above the double frame layer. Add drop shadow.
Copy and paste element 58 and re-size. Move to the left hand side of tag and place between the brown leaves and the white element.
Select your text tool.
Using font : Do I like Stripes?
Font size : 120 and your background material palette still set to your pattern.
Type your name out.
Add a very small drop shadow: V=0, H=-1, Opacity=60, Bur=1, Color=black
Add gradient glow using Eye Candy 4000.
See my name tutorial HERE.
Add large drop shadow: V=2, H=8, Opacity=50, Bur=10, Color=black.
Add artist copyright and scrap kit maker credit.
Save as PNG.
If you are animating please see any of my other animation tutorials and follow insturctions.
I used SimoneAni396 for this tag.
SAVE.
Hope you enjoyed this tutorial,
Hugs Simone
Please, always direct people to my blog to download my animations.
Do not load to any other download site and don't claim as your own.
Tutorial written by SophisticatSimone aka Lorraine Halle on Saturday, April 20, 2013.
Hugs Simone
Please, always direct people to my blog to download my animations.
Do not load to any other download site and don't claim as your own.
Tutorial written by SophisticatSimone aka Lorraine Halle on Saturday, April 20, 2013.
Subscribe to:
Posts
(Atom)
CT TEAM