My Blinkie

Showing posts with label Lady Mishka Tubes. Show all posts
Showing posts with label Lady Mishka Tubes. Show all posts
Saturday, April 13, 2013

♥♥♥
Please click on TAG to see in full size.
••• Supplies needed to complete this tutorial. •••
____________________________________________________________________________
••• Supplies needed to complete this tutorial. •••
____________________________________________________________________________
Programs: Paint Shop Pro, I'm using version 10. Animation Shop 3.
Plugin : Eye Candy 4000 : gradient glow, dbs flux : bright noise, VM Natural : Sparkle
Font used: A&S Motherload
Tube of choice: I'm using the beautiful tube Nina by Lady Mishka which can only be found at SATC
To use the same tube I did you need to add the tube to your cart and spend just $10.00 to get it as a free gift.
Scrap Kit : "Amanda" by Bibi's Collection
Mask: by me (Mask98) download HERE
______________________________________________________________________________
Plugin : Eye Candy 4000 : gradient glow, dbs flux : bright noise, VM Natural : Sparkle
Font used: A&S Motherload
Tube of choice: I'm using the beautiful tube Nina by Lady Mishka which can only be found at SATC
To use the same tube I did you need to add the tube to your cart and spend just $10.00 to get it as a free gift.
Scrap Kit : "Amanda" by Bibi's Collection
Mask: by me (Mask98) download HERE
______________________________________________________________________________
♥♥♥
Save your tag often. Nothing like working long and hard on a tag and PSP crashes.
♥♥♥
I used Mask98SophisticatSimone on paper 3. I had to duplicate 4 time to get it to the opacity I liked. I also added noise to 30 on it.
Go to File, New Image, 700 x 700. Add the paper you just used your mask on.
C/P element 106 (window frame) as a new layer onto your canvas. Close original.
C/P element 091 (horse) as a new layer onto your canvas. Close original. Re-size by 60%, 72 dpi.
C/P element 032 (buckets with tap water) as a new layer onto your canvas. Close original. Re-size by 80%, 72 dpi.
C/P element 076 (large rock) as a new layer onto your canvas. Close original. Re-size by 80%, 72 dpi.
C/P element 090 (pink cap mushrooms) as a new layer onto your canvas. Close original. Re-size by 46%, 72 dpi.
C/P element 092 (pink foliage) as a new layer onto your canvas. Close original. Re-size by 25%, 72 dpi.
Cluster your mushrooms and foliage on the right hand side of the pond.
C/P element 002 (green foliage) as a new layer onto your canvas. Close original. Re-size by 25%, 72 dpi.
C/P element 109 (bouquet of flowers) as a new layer onto your canvas. Close original. Re-size by 25%, 72 dpi. Add to your mushroom and foliage cluster on the right side of pond.
C/P element 093 (purple hill) as a new layer onto your canvas. Close original. Position behind the fountain and the water pond.
Duplicate and re-size by 40% and position in front of pond.
C/P a few the rocks and re-size them differently and just scatter them around the pond.
Ok now we are going to promote a portion of the rock that's a part of the pond.
Grab your selection tool, set to Freehand selection, point to point, add (shift), feather 0, smoothing 0, anti-alias checked.
Zoom in a lot on the area and reduce opacity on any layer that is above that rock, so you can see it well.
Click around the rock, very close to edge. Once you get back to the start point, right click to join the ends.
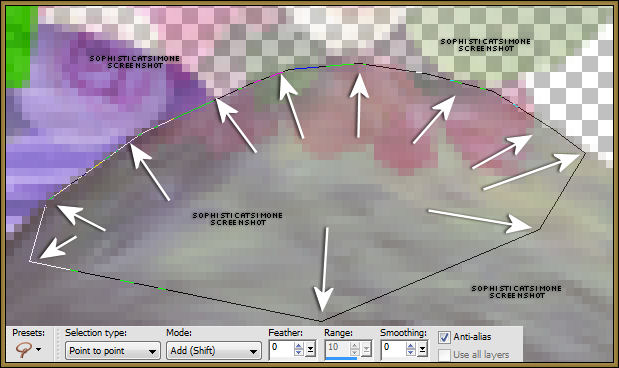
On your pond layer in layers palette, right click and promote selection to layer. Move this layer above any foliage or flower you have on the edge of the pond. De-select.
C/P element 095 (pink tree) as a new layer onto your canvas. Close original. Re-size by 80%, 72 dpi. Re-size again by 80%.
Move to the back behind the fountain and in front of purple hill.
C/P element 045 (branch with dragonflies) as a new layer onto your canvas. Close original. Move over window frame at the bottom edge.
C/P element 046 (flowers) as a new layer onto your canvas. Close original. Re-size by 31%. Move to the bottom edge of the pond.
C/P element 108 (pink flower) as a new layer onto your canvas. Close original. Re-size by 31%. Move to left hand side of tag. If you placed rocks in front of the purple hill, just place the flower on top to them.
C/P element 098 (berries on foliage) as a new layer onto your canvas. Close original. Re-size by 36%. Move this layer between your
fountain layer and your pond layer. Position near the right side edge of pond.
OK now what you need to do is just add a bunch of little flowers, branches, leaves, etc. Rotate them, mirror them, flip them, etc.
Remember to add drop shadows to all your layers.
Be creative and make this your own.
The rabbit is a tube that comes with the special commission by Lady Mishka. You can get this tube at SATC when you make a purchase of $10 or more. You just add it to your basket and you can download right away.
Select the inside of your window frame and add paper of choice. Delete extra.
Now paste your tube of choice and position where you would like. Delete extra.
Add drop shadow.
Add copyright info and scrap kit credit.
You can save this as a png or you can move on to the animation part.You will need your lasso tool, set to point to point, Mode:
Add(shift), feather of 0 and smoothing of 0. Anti-alias checked.
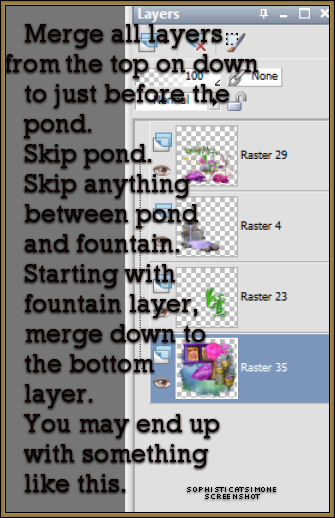
You will need to x-out all layers in front of your pond and fountain just to be able to see. What I did is, starting with your top layer,
right click on it in the layers palette and merge down. Keep merging down till you get to the pond. Then you can x-out that layer.
On your pond layer, select all the water. You will need to zoom in and click nice and close to the edges. Try your best not to include any of the grey rock. Do quick and short clicks. Once your finished with the pond, select your fountain in the layers palette and do the same.

OK so now you will need to add the effect/plugin filter to each of these layers.
You will be doing a lot of back and forth because you're applying two different filters to two different layers.
So go to Effects, plugins, dsb flux, bright noise, Intensity 35, Mix checked.
In layers palette activate the next layer. It should be your pond, but not a big deal if it's the opposite.
Apply the same settings.
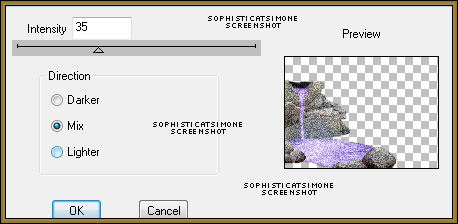
Now go to Effects, plugins, VM Nature, Sparkle.
Enter Max Size 5-10 (always)
All other settings leave at 255 except the Random Seed is 52.
Click OK, repeat again on the same layer and change random seed to 62.
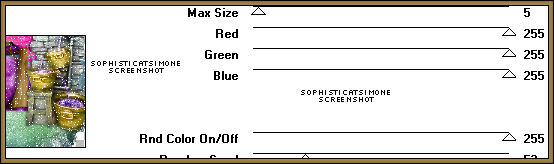
In layers Palette activate the next layer and do the same thing.
Un-hide all layers.
Go to Selections, Select All.
Go to Edit, Copy Merged.
Paste as a new animation in Animation Shop.
Back in PSP, go to Edit, and Undo until you get through the Sparkle effect and the noise effect.
Repeat the steps.
When applying the dsb flux noise, just click twice on the checked MAX, it will scramble the noise.
When applying the sparkle effect, change the random seed to 55 and 65 (because you're doing it twice remember).
Go to Selections, select all, unhide all and copy merged.
In AS, right click on the current frame and paste, paste behind current frame.
Back in PSP, undo all effects (sparkle and noise).
Now repeat again.
Make sure you always do the noise effect before you do the sparkle effect otherwise you won't see the sparkle.
Go back in AS and on the last frame, (you may need to move the slider bar at bottom of animation), right click and paste after
current frame. Now you have 3 frames. Play. If you are happy with the effect, save your tag.
Add name. I used Paper 19 as background fill for the name.
Font : A&S Motherlode
Size : 120
Add gradient glow and drop shadow.
Add to your tag in AS.
Save your tag.
Hope you enjoyed this tutorial,
Hugs Simone
Please, always direct people to my blog to download my animations.
Do not load to any other download site and don't claim as your own.
Tutorial written by SophisticatSimone aka Lorraine Halle on Saturday, April 13, 2013.
Hugs Simone
Please, always direct people to my blog to download my animations.
Do not load to any other download site and don't claim as your own.
Tutorial written by SophisticatSimone aka Lorraine Halle on Saturday, April 13, 2013.

Sunday, March 10, 2013

What you will need for this tutorial:
Tube of choice, I'm using Nina by Lady Mishka found at SATC.
This tube is an exclusive commission for SATC, but if you are a member of Facebook Fan Page
there is a way to get this little cutie.
Facebook HERE
Scrap Kit "Early Spring" by Disturbed Scraps at SATC
Paint Shop Pro, I'm using version 10 and Animation Shop
My two animations SimoneAni299-Fairy and SimoneAni343
Scrap Kit "Early Spring" by Disturbed Scraps at SATC
Paint Shop Pro, I'm using version 10 and Animation Shop
My two animations SimoneAni299-Fairy and SimoneAni343
The font I used is A&S Christmas Script
Please DO NOT share these supplies or use in other tutorials.
Thank you.
Thank you.
Open paper: DS -Early Spring - Paper04. Duplicate and close original.
Promote background layer.
Open element: DS -Early Spring - 011
Activate your your paper and go to Layers/New Mask Layer/From Image.
Find element: DS -Early Spring - 011 in drop down box and select.
Click : Create mask from "Source luminance" and make sure there is NO check mark beside "Invert mask data"
Click OK.
In layers palette, right click and merge group.
Duplicate layer as many times as you like to get the look you want.
I duplicated it twice and merged layers.
Let's re-size this layer now.
Go to Image/Re-size
Make sure your Print Size Resolution is 72 dpi
Now enter dimensions as 84% or 672x672
Re-sample using: Smart Size.
NO check mark beside : Re-size all layers.
Click OK
NB: all elements in this kit are 300 dpi. Make sure to save as 72 dpi as you are doing your tag.
This is only for your tag. Don't alter the original elements in your kit.
Copy and paste the element: DS -Early Spring - 011 as a new layer on your mask.
Re-size by 82% (make sure your dpi is set to 72)
Add drop shadow: V=2, H=0, Opacity=73, Blur=5, Color=Black
Copy and paste your tube. Re-size is needed. I had to re-size mine by 75%.
Add same drop shadow.
Open element: DS -Early Spring - 032, copy and paste as a new layer, close original.
Re-size to 45% and add same drop shadow.
Open element: DS -Early Spring - 053, copy and paste as a new layer, close original.
Re-size to 85% and duplicate layer. Merge down. I placed this element to the right of my tag.
I added a small drop shadow.
V=3, H=0, Opacity=20, Blur=7, Color=Black
Open element: DS -Early Spring - 004, copy and paste as a new layer, close original.
Move this element to the lower left hand side slightly and duplicate layer.
Mirror duplicated element.
Merge down and position layer behind your tube.
Add drop shadow: V=2, H=0, Opacity=73, Blur=5, Color=Black
Open element: DS -Early Spring - 021, copy and paste as a new layer, close original.
Re-size by 65% (make sure your dpi is set to 72)
Add drop shadow: V=2, H=0, Opacity=73, Blur=5, Color=Black
Open element: DS -Early Spring - 020, copy and paste as a new layer, close original.
Re-size by 100% (make sure your dpi is set to 72)
Add drop shadow: V=2, H=0, Opacity=73, Blur=5, Color=Black
Open elements: DS -Early Spring - 025 and 026, copy and paste as a new layer, close original.
Re-size element 026 by 30% (make sure your dpi is set to 72)
Add drop shadow: V=2, H=0, Opacity=73, Blur=5, Color=Black
Open element: DS -Early Spring - 071, copy and paste as a new layer, close original.
Re-size by 100% (make sure your dpi is set to 72)
Add drop shadow: V=2, H=0, Opacity=73, Blur=5, Color=Black
Position behind tube, to the right.
Open element: DS -Early Spring - 076, copy and paste as a new layer, close original.
Re-size by 40% (make sure your dpi is set to 72)
Add drop shadow: V=2, H=0, Opacity=73, Blur=5, Color=Black
I duplicated twice and positioned them:
- 1-by her head, behind
- 2-left side of tag
- 3-lower right side by her leg
Open element: DS -Early Spring - 067, copy and paste as a new layer, close original.
Drop layer down to below the tube and above the foliage.
Duplicate layer twice. On the very bottom one, blur it.
Go to Adjust/ Blur/ Gaussian Blur; enter 2.
Open element: DS -Early Spring - 079, copy and paste as a new layer, close original.
Re-size by 25% (make sure your dpi is set to 72). Position to the left lower hand side of tag.
Duplicate layer and mirror.
Add drop shadow: V=2, H=0, Opacity=73, Blur=5, Color=Black to both flowers.
Merging layers.
Starting below the horse layer, one by one, merge your layers down till you've merged down to the mask layer.
Don't include the horse in this portion.

Copy and paste in Animation shop.
Holding down the Ctrl key, tap the letter "L" until you have a total of 20 frames.
You can count as you tap or you can look at the bottom right hand area of AS and you will see the frame number increasing.

Open SimoneAni343.
Go to Edit/Select All.
Go to Edit/Copy.
Go to Edit, make sure Propagate Paste is depressed (turned on).
Activate your tag.
Go to Edit/Select All.
Go to Edit/ Paste into Selected Frames.
Center as best as you can.
Back in PSP, merge down all other layers.
Don't include the other merged layer. We don't need that one anymore.
Go to Edit and Copy.
Back in AS, right click on work space and paste as new animation.
Go to Edit/Copy.
Activate your main tag.
Go to Edit/Select All.
Go to Edit/ Paste into Selected Frames.
Position as well as possible. You can look back at your main tag in PSP and gauge where it should go.
Click into place.
Open SimoneAni299-FairySprinkle.
Go to Edit/Select All.
Go to Edit/Copy.
Activate your main tag.
Go to Edit/Select All.
Go to Edit/ Paste into Selected Frames.
Using your cursor move the little mini-fairy so it appears just over her hand.
See my image below for accuracy.
Click into place.

Play your animation. If you like it, you need to add your copyright information and add your name.
Save your animation.
Go to File, Save as, enter the name of your file and select the folder to save to.
Now click on Customize:
Under COLORS TAB:
Number of colors: 255 Colors
Create palette by: OPTIMIZED OCTREE
Reduce colors by: Error Diffusion
Under OPTIMIZATIONS TAB:
set a check mark beside the second, third and forth choices. Uncheck the 1st and last.
Under PARTIAL TRANSPARENCY:
check Convert pixels less than 92
Yes, blend with this color: change to white #FFFFFF
Click OK. Click Next, next, next, next.
Play your animation.
At times your animation may or will come out terrible. Optimization in Animation Shop is not the greatest.
You can play around will your settings, especially under the Tab: Optimization. I change this setting at times from anywhere between 50 and 110.
Some people add a white background. I don't. I prefer not seeing a white background if I'm posting it in a forum that has a colored background.
For this tag I did indeed add a white background. It helped with the optimization.
Hope you enjoyed this tutorial,
Hugs Simone
Please, always direct people to my blog to download my animations.
Do not load to any other download site and don't claim as your own.
This tutorial was written by SophisticatSimone aka Lorraine Halle
March 10, 2013
Subscribe to:
Posts
(Atom)
CT TEAM