My Blinkie

Showing posts with label SkyScraps Kits. Show all posts
Showing posts with label SkyScraps Kits. Show all posts
Wednesday, September 18, 2013

♥♥♥
Please click on TAG to see in full size.
••• Supplies needed to complete this tutorial. •••
________________________________________________________________________
Programs: Paint Shop Pro, I'm using version 10. Animation Shop 3.
Plugin : none
Font used: Alice in Wonderland
Tube of choice: I'm using "Zombie" by Jose Cano.
Scrap Kit : I'm using "Zombie Zone"
Please click on TAG to see in full size.
••• Supplies needed to complete this tutorial. •••
________________________________________________________________________
Programs: Paint Shop Pro, I'm using version 10. Animation Shop 3.
Plugin : none
Font used: Alice in Wonderland
Tube of choice: I'm using "Zombie" by Jose Cano.
Scrap Kit : I'm using "Zombie Zone"
Animation: SimoneAni-486-491
Mask: 0176 HERE
________________________________________________________________________
♥♥♥
Save your tag often. Nothing like working long and hard on a tag and PSP crashes.
♥♥♥
Open a new image 700 x 700, transparent.
Copy and paste element 19 as a new layer. Re-size for fit if it's to big.
Duplicate and mirror. Adjust so you cover the majority of your background from side to side and merge them
together.
Copy and paste again and re-size by 50%.
Duplicate. Position these two on either side of the canvas.
Copy and paste element 26 as a new layer and re-size. Position to the left.
Duplicate one of the bush layers and drag it up above the cross tombstone and place it a little to the right of it.
Copy and paste element 12 as a new layer. Using your magic wand tool, set to Point to point, select the chain portion
and delete.
Re-size if you need to make it fit and position at the top of the tag.
Copy and paste element 14 as a new layer and re-size to fit. Position to the right side of canvas.
Copy and paste element 32 as a new layer and position to the right side.
Copy and paste element 31 as a new layer. Re-size and move over towards the center, away from the white flowers.
Copy and paste element 13 as a new layer and re-size. Position to the right side.
Copy and paste element 11 as a new layer and position mid tag in center.
Copy and paste element 5 as a new layer, move to the top.
Copy and paste element 67 as a new layer and re-size. Move to top center of tag.
Copy and paste your tube of choice and re-size to fit. Move to the left side of tag.
Copy and paste element 21 as new layer and re-size. Position in right lower hand side of tag.
Copy and paste element 20 as a new layer and re-size. Position on the cauldron.
Copy and paste element 6 as a new layer and re-size. Position beside cauldron.
Copy and paste element 9 as a new layer and re-size. Position high above cauldron.
Copy and paste element 4 as a new layer and re-size. Position in lower right hand side.
Add drop shadow to all layers except the webbing layer.
Merge all layers.
Crop tag and re-size if to large.
Add copyright.
Add a new raster layer and drag down to bottom.
Selections> select all.
Copy and paste paper of choice.
I used paper2. Paste it into the selection.
Apply Mask to layer and merge group. I used Mask 176. Duplicate and merge.
Merge all visible.
Add your name and save as PNG.
Go to Selections, select all.
Go to Edit and copy merged. Paste as a new animation in Animation Shop.
Hold your Ctrl key down and repeatedly hit letter L on your keyboard for a total of 16 frames.
You can watch the count on the lower right hand side of your screen in AS.
Open SimoneAni487
Go to Edit, select all.
Go to Edit, copy.
Activate your tag.
Go to Edit, select all.
Go to Edit, make sure Propagate Paste is selected.
Go to Edit, Paste, paste into selected frames.
Position on your tag and click into place. I placed mine just above and within the cauldron.
Play and save.
Don't forget to add your name.
To save:
Go to File, Save as, enter the name of your file and select the folder to save to.
Now click on Customize:
Under COLORS TAB:
Number of colors: 255 Colors
Create palette by: OPTIMIZED OCTREE
Reduce colors by: Error Diffusion
Under OPTIMIZATIONS TAB:
set a check mark beside the second, third and forth choices. UN-check the 1st and last.
Under PARTIAL TRANSPARENCY:
check Convert pixels less than 92
Yes, blend with this color: change to white #FFFFFF
Click OK. Click Next, next, next, next.
Play your animation.
At times your animation may or will come out terrible. Optimization in Animation Shop is not the greatest.
You can play around will your settings, especially under the Tab: Optimization. I change this setting at times from
anywhere between 70 and 100.
Some people add a white background. To add background, go to Animation: Animation Properties, select Opaque
and change color to white.
Hope you enjoyed this tutorial,
Hugs Simone
Please, always direct people to my blog to download my animations.
Do not load to any other download site and don't claim as your own.
Tutorial written by SophisticatSimone aka Lorraine Halle on Wednesday September 18, 2013.
Mask: 0176 HERE
________________________________________________________________________
♥♥♥
Save your tag often. Nothing like working long and hard on a tag and PSP crashes.
♥♥♥
Open a new image 700 x 700, transparent.
Copy and paste element 19 as a new layer. Re-size for fit if it's to big.
Duplicate and mirror. Adjust so you cover the majority of your background from side to side and merge them
together.
Copy and paste again and re-size by 50%.
Duplicate. Position these two on either side of the canvas.
Copy and paste element 26 as a new layer and re-size. Position to the left.
Duplicate one of the bush layers and drag it up above the cross tombstone and place it a little to the right of it.
Copy and paste element 12 as a new layer. Using your magic wand tool, set to Point to point, select the chain portion
and delete.
Re-size if you need to make it fit and position at the top of the tag.
Copy and paste element 14 as a new layer and re-size to fit. Position to the right side of canvas.
Copy and paste element 32 as a new layer and position to the right side.
Copy and paste element 31 as a new layer. Re-size and move over towards the center, away from the white flowers.
Copy and paste element 13 as a new layer and re-size. Position to the right side.
Copy and paste element 11 as a new layer and position mid tag in center.
Copy and paste element 5 as a new layer, move to the top.
Copy and paste element 67 as a new layer and re-size. Move to top center of tag.
Copy and paste your tube of choice and re-size to fit. Move to the left side of tag.
Copy and paste element 21 as new layer and re-size. Position in right lower hand side of tag.
Copy and paste element 20 as a new layer and re-size. Position on the cauldron.
Copy and paste element 6 as a new layer and re-size. Position beside cauldron.
Copy and paste element 9 as a new layer and re-size. Position high above cauldron.
Copy and paste element 4 as a new layer and re-size. Position in lower right hand side.
Add drop shadow to all layers except the webbing layer.
Merge all layers.
Crop tag and re-size if to large.
Add copyright.
Add a new raster layer and drag down to bottom.
Selections> select all.
Copy and paste paper of choice.
I used paper2. Paste it into the selection.
Apply Mask to layer and merge group. I used Mask 176. Duplicate and merge.
Merge all visible.
Add your name and save as PNG.
Go to Selections, select all.
Go to Edit and copy merged. Paste as a new animation in Animation Shop.
Hold your Ctrl key down and repeatedly hit letter L on your keyboard for a total of 16 frames.
You can watch the count on the lower right hand side of your screen in AS.
Open SimoneAni487
Go to Edit, select all.
Go to Edit, copy.
Activate your tag.
Go to Edit, select all.
Go to Edit, make sure Propagate Paste is selected.
Go to Edit, Paste, paste into selected frames.
Position on your tag and click into place. I placed mine just above and within the cauldron.
Play and save.
Don't forget to add your name.
To save:
Go to File, Save as, enter the name of your file and select the folder to save to.
Now click on Customize:
Under COLORS TAB:
Number of colors: 255 Colors
Create palette by: OPTIMIZED OCTREE
Reduce colors by: Error Diffusion
Under OPTIMIZATIONS TAB:
set a check mark beside the second, third and forth choices. UN-check the 1st and last.
Under PARTIAL TRANSPARENCY:
check Convert pixels less than 92
Yes, blend with this color: change to white #FFFFFF
Click OK. Click Next, next, next, next.
Play your animation.
At times your animation may or will come out terrible. Optimization in Animation Shop is not the greatest.
You can play around will your settings, especially under the Tab: Optimization. I change this setting at times from
anywhere between 70 and 100.
Some people add a white background. To add background, go to Animation: Animation Properties, select Opaque
and change color to white.
Hope you enjoyed this tutorial,
Hugs Simone
Please, always direct people to my blog to download my animations.
Do not load to any other download site and don't claim as your own.
Tutorial written by SophisticatSimone aka Lorraine Halle on Wednesday September 18, 2013.

Monday, August 26, 2013

♥♥♥
Please click on TAG to see in full size.
••• Supplies needed to complete this tutorial. •••
________________________________________________________________________
Programs: Paint Shop Pro, I'm using version 10. Animation Shop 3.
Plugin : Eye Candy 4: Gradient Glow for name
Font used: Phraell
Tube of choice: I'm using "Julia" by Verymany.
Scrap Kit : I'm using "Poker Face" by SkyScrap No longer in busines
Please click on TAG to see in full size.
••• Supplies needed to complete this tutorial. •••
________________________________________________________________________
Programs: Paint Shop Pro, I'm using version 10. Animation Shop 3.
Plugin : Eye Candy 4: Gradient Glow for name
Font used: Phraell
Tube of choice: I'm using "Julia" by Verymany.
Scrap Kit : I'm using "Poker Face" by SkyScrap No longer in busines
Animation: none
Mask: 0167 HERE
________________________________________________________________________
♥♥♥
Save your tag often. Nothing like working long and hard on a tag and PSP crashes.
♥♥♥
Open a new image 700 x 650 transparent.
Copy and paste element 23 as a new layer.
Position in upper left hand side of tag. Duplicate and free rotate to right by 90 degrees. Repeat until you've covered all 3
corners. Using your mover tool, reposition them a bit so they aren't over lapping too much.
C/P tube as a new layer. I had to re-size my tube by 62% and delete the bottom portion.
C/P element 12 and re-size by 62%. Position in front of tube in lower right hand side of tag.
C/P element 44 and mirror. Position behind tube in the upper right hand side of tag.
C/P element 13 as a new layer and re-size by 60%. Position upper left hand side.
C/P element 6 as a new layer and re-size by 45%. Position bottom center in front of tube.
C/P element 9 as a new layer and position behind tube and behind element 6.
C/P element 66 as a new layer and position behind the car. Re-size by 45%.
C/P element 41 as a new layer and re-size by 75%. Position ahead of all the red swirlies and behind the flowers.
Duplicate and merge down and sharpen.
Using your magic wand, feather set to 0, mode add shift. Click inside the frame.
Go to selection, modify, expand by 6.
Copy and paste paper of choice, I used paper 2.
Make sure paper in below the frame layer in the layers palette.
Go to selections, invert. Hit delete on your keyboard.
Go to selections, invert.
Go to selections, modify, contract by 6.
Add a new Raster layer.
Go to Effects, 3D effects, cutout.
Offset : 10
Horizontal : 5
Opacity : 100
Blur : 32
Shadow color : black
UN check the fill interior with color box.
Move this layer below the frame layer.
Add drop shadow to all layer.
Add artist copyright and license number.
Merge all visible layers.
Add your name and save as PNG.
Hope you enjoyed this tutorial,
Hugs Simone
Please, always direct people to my blog to download my animations.
Do not load to any other download site and don't claim as your own.
Tutorial written by SophisticatSimone aka Lorraine Halle on Monday August 26, 2013
Mask: 0167 HERE
________________________________________________________________________
♥♥♥
Save your tag often. Nothing like working long and hard on a tag and PSP crashes.
♥♥♥
Open a new image 700 x 650 transparent.
Copy and paste element 23 as a new layer.
Position in upper left hand side of tag. Duplicate and free rotate to right by 90 degrees. Repeat until you've covered all 3
corners. Using your mover tool, reposition them a bit so they aren't over lapping too much.
C/P tube as a new layer. I had to re-size my tube by 62% and delete the bottom portion.
C/P element 12 and re-size by 62%. Position in front of tube in lower right hand side of tag.
C/P element 44 and mirror. Position behind tube in the upper right hand side of tag.
C/P element 13 as a new layer and re-size by 60%. Position upper left hand side.
C/P element 6 as a new layer and re-size by 45%. Position bottom center in front of tube.
C/P element 9 as a new layer and position behind tube and behind element 6.
C/P element 66 as a new layer and position behind the car. Re-size by 45%.
C/P element 41 as a new layer and re-size by 75%. Position ahead of all the red swirlies and behind the flowers.
Duplicate and merge down and sharpen.
Using your magic wand, feather set to 0, mode add shift. Click inside the frame.
Go to selection, modify, expand by 6.
Copy and paste paper of choice, I used paper 2.
Make sure paper in below the frame layer in the layers palette.
Go to selections, invert. Hit delete on your keyboard.
Go to selections, invert.
Go to selections, modify, contract by 6.
Add a new Raster layer.
Go to Effects, 3D effects, cutout.
Offset : 10
Horizontal : 5
Opacity : 100
Blur : 32
Shadow color : black
UN check the fill interior with color box.
Move this layer below the frame layer.
Add drop shadow to all layer.
Add artist copyright and license number.
Merge all visible layers.
Add your name and save as PNG.
Hope you enjoyed this tutorial,
Hugs Simone
Please, always direct people to my blog to download my animations.
Do not load to any other download site and don't claim as your own.
Tutorial written by SophisticatSimone aka Lorraine Halle on Monday August 26, 2013
Sunday, August 11, 2013

♥♥♥
Please click on TAG to see in full size.
••• Supplies needed to complete this tutorial. •••
________________________________________________________________________
Programs: Paint Shop Pro, I'm using version 10. Animation Shop 3.
Plugin : Eye Candy 4: Gradient Glow
Font used: Fontasia
Tube of choice: I'm using "Geisha" by Zlata.
Scrap Kit : I'm using "Me Geisha" by SkyScraps from SATC, no longer in business.
Animation: SimoneAni-Geisha
Mask: 0159 HERE
________________________________________________________________________
♥♥♥
Save your tag often. Nothing like working long and hard on a tag and PSP crashes.
♥♥♥
Create a new image 700 x 700, transparent and 72dpi.
Copy and paste element 20 as a new layer. Re-size by 80%. Position on the left side of tag and about 2/3 of the way down.
Copy and paste a close up image of your tube. Position on the right side of tag.
Using your lasso tool, set to Point to point, mode: add shift, feather 28 and anti-alias checked, surround the bottom portion of your tube
and delete.
Copy and paste element 39 as a new layer and position in the upper left hand side of tag.
Copy and paste element 10 as a new layer and position at top of tag.
Copy and paste element 49 as a new layer and position in bottom left hand side of tag. This layer should be your top layer.
Copy and paste element 57 as a new layer and position left hand side of tag. This layer should be behind the rock/leaf element.
Copy and paste element 23 as a new layer and position in right hand side of tag. This layer should be on top of the geisha.
Copy and paste element 63 as a new layer (re-size by 50%) and position in right hand side of tag. This layer should be behind the geisha.
Apply mask of choice (or mine Masks0159) to paper 6, merge group. Copy and paste as a new layer on your tag and send to bottom.
Re-size to make fit if you need to.
Add artist copyright layer as your top layer.
Merge all visible.
To animate:
Go to Selections, select all.
Go to Edit and copy merged. Paste as a new animation in Animation Shop.
Hold your Ctrl key down and repeatedly hit letter L on your keyboard for a total of 15 frames.
You can watch the count on the lower right hand side of your screen in AS.
Open SimoneAni-Geisha
Go to Edit, select all.
Go to Edit, copy.
Activate your tag.
Go to Edit, select all.
Go to Edit, make sure Propagate Paste is selected.
Go to Edit, Paste, paste into selected frames.
Position on your tag and click into place. I placed mine more to the left side of tag.
Play and save.
Don't forget to add your name.
To save:
Go to File, Save as, enter the name of your file and select the folder to save to.
Now click on Customize:
Under COLORS TAB:
Number of colors: 255 Colors
Create palette by: OPTIMIZED OCTREE
Reduce colors by: Error Diffusion
Under OPTIMIZATIONS TAB:
set a check mark beside the second, third and forth choices. UN-check the 1st and last.
Under PARTIAL TRANSPARENCY:
check Convert pixels less than 92
Yes, blend with this color: change to white #FFFFFF
Click OK. Click Next, next, next, next.
Play your animation.
At times your animation may or will come out terrible. Optimization in Animation Shop is not the greatest.
You can play around will your settings, especially under the Tab: Optimization. I change this setting at times from anywhere between 70 and 100.
Some people add a white background. To add background, go to Animation: Animation Properties, select Opaque and change color to white.
Hope you enjoyed this tutorial,
Hugs Simone
Please, always direct people to my blog to download my animations.
Do not load to any other download site and don't claim as your own.
Tutorial written by SophisticatSimone aka Lorraine Halle on Sunday August 11, 2013.
Please click on TAG to see in full size.
••• Supplies needed to complete this tutorial. •••
________________________________________________________________________
Programs: Paint Shop Pro, I'm using version 10. Animation Shop 3.
Plugin : Eye Candy 4: Gradient Glow
Font used: Fontasia
Tube of choice: I'm using "Geisha" by Zlata.
Scrap Kit : I'm using "Me Geisha" by SkyScraps from SATC, no longer in business.
Animation: SimoneAni-Geisha
Mask: 0159 HERE
________________________________________________________________________
♥♥♥
Save your tag often. Nothing like working long and hard on a tag and PSP crashes.
♥♥♥
Create a new image 700 x 700, transparent and 72dpi.
Copy and paste element 20 as a new layer. Re-size by 80%. Position on the left side of tag and about 2/3 of the way down.
Copy and paste a close up image of your tube. Position on the right side of tag.
Using your lasso tool, set to Point to point, mode: add shift, feather 28 and anti-alias checked, surround the bottom portion of your tube
and delete.
Copy and paste element 39 as a new layer and position in the upper left hand side of tag.
Copy and paste element 10 as a new layer and position at top of tag.
Copy and paste element 49 as a new layer and position in bottom left hand side of tag. This layer should be your top layer.
Copy and paste element 57 as a new layer and position left hand side of tag. This layer should be behind the rock/leaf element.
Copy and paste element 23 as a new layer and position in right hand side of tag. This layer should be on top of the geisha.
Copy and paste element 63 as a new layer (re-size by 50%) and position in right hand side of tag. This layer should be behind the geisha.
Apply mask of choice (or mine Masks0159) to paper 6, merge group. Copy and paste as a new layer on your tag and send to bottom.
Re-size to make fit if you need to.
Add artist copyright layer as your top layer.
Merge all visible.
To animate:
Go to Selections, select all.
Go to Edit and copy merged. Paste as a new animation in Animation Shop.
Hold your Ctrl key down and repeatedly hit letter L on your keyboard for a total of 15 frames.
You can watch the count on the lower right hand side of your screen in AS.
Open SimoneAni-Geisha
Go to Edit, select all.
Go to Edit, copy.
Activate your tag.
Go to Edit, select all.
Go to Edit, make sure Propagate Paste is selected.
Go to Edit, Paste, paste into selected frames.
Position on your tag and click into place. I placed mine more to the left side of tag.
Play and save.
Don't forget to add your name.
To save:
Go to File, Save as, enter the name of your file and select the folder to save to.
Now click on Customize:
Under COLORS TAB:
Number of colors: 255 Colors
Create palette by: OPTIMIZED OCTREE
Reduce colors by: Error Diffusion
Under OPTIMIZATIONS TAB:
set a check mark beside the second, third and forth choices. UN-check the 1st and last.
Under PARTIAL TRANSPARENCY:
check Convert pixels less than 92
Yes, blend with this color: change to white #FFFFFF
Click OK. Click Next, next, next, next.
Play your animation.
At times your animation may or will come out terrible. Optimization in Animation Shop is not the greatest.
You can play around will your settings, especially under the Tab: Optimization. I change this setting at times from anywhere between 70 and 100.
Some people add a white background. To add background, go to Animation: Animation Properties, select Opaque and change color to white.
Hope you enjoyed this tutorial,
Hugs Simone
Please, always direct people to my blog to download my animations.
Do not load to any other download site and don't claim as your own.
Tutorial written by SophisticatSimone aka Lorraine Halle on Sunday August 11, 2013.
Thursday, August 8, 2013

♥♥♥
Please click on TAG to see in full size.
••• Supplies needed to complete this tutorial. •••
________________________________________________________________________
Programs: Paint Shop Pro, I'm using version 10. Animation Shop 3.
Plugin : Gradient Glow (Eye Candy) for the name
Font used: BickhamScriptFancy2
Tube of choice: I'm using "Andrea" by Verymany.
Scrap Kit : I'm using "Andrea" by SkyScraps from SATC(no longer in business)
Animation: SimoneAni-Andrea
Mask: 0110 HERE
________________________________________________________________________
♥♥♥
Save your tag often. Nothing like working long and hard on a tag and PSP crashes.
♥♥♥
Open a new canvas 700 x 700 transparent.
Copy and paste tube as a new layer.
Copy and paste element 66 as a new layer layer.
Using your Magic wand, remove some of the wires that are really close to the edges of your tag.
Now set your selection tool to Point to Point, Mode: Add shift, feather 0, smoothing 0, anti-alias checked.
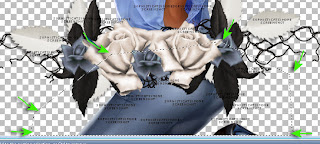
Surround and remove the lower portion of your tube by clicking around from one point to the next.
Hit delete on your keyboard.
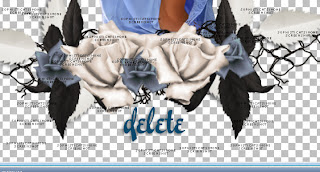
Copy and paste element 65 as a new layer. Move a bit to the left and should be behind your tube in the layers palette.
Copy and paste element 27 as a new layer. Re-size by 50% and position in lower right hand side of tag.
Copy and paste element 23 as a new layer and position behind your tube on the right side of tag.
Duplicate this layer and re-size by 50%. Hold down your shift key and using your mover tool, drag this layer to the left hand side of tag.
Duplicate this layer and free rotate to the right by 45 degrees. Move to right side of tag.
Duplicate this layer and mirror. Move to upper left hand side. You can rearrange once the crate is in place.
Copy and paste element 31 as a new layer and Re-size by 70%. Position behind your tube on the left side.
Copy and paste element 37 as a new layer and position as second to last layer and in the upper right hand side of tag.
Duplicate layer and re-size by 70%. Go to Image and flip.
Hold down your shift key and using your mover tool, drag this layer to the lower left hand side.
Copy and paste element 56 as a new layer and move it to the right side of tag. Should be behind the beautiful blue flower.
Duplicate and change the blend mode of top copy to Screen. Should make the flower whiter.
Copy and paste element 76 as a new layer and re-size by 60%. Place inside the crate. Sharpen.
Copy and paste element 54 as a new layer and re-size by 45%. Place inside crate and beside the wiskey bottle.
Copy and paste element 36 as a new layer. Re-size by 45%. Position as bottom layer and in the lower left hand side of tag.
Duplicate and move this one beside the 1st one.
Duplicate and move beside the 2nd one.
Duplicate and move beside the 3rd.
Duplicate and move to right side.
Should make a type of leave floor.
Copy and paste element 102 as a new layer and re-size by 30%. Move the left side tag about half way mark.
Duplicate butterfly and mirror. Move this one to upper left hand side.
Add drop shadow to all layers.
Add any other element that you feel would make it better.
Merge visible.
Go to Selections > Select all.
Copy and paste Paper 1 Into the Selection.
De-select.
Apply Mask0110 and merge group.
Duplicate, merge down. Duplicate and merge down (twice).
Merge all visible.
Add artist copyright and your license number.
Add your name.
Merge visible.
To animate:
Go to Selections, select all.
Go to Edit and copy merged. Paste as a new animation in Animation Shop.
Hold your Ctrl key down and repeatedly hit letter L on your keyboard for a total of 16 frames.
You can watch the count on the lower right hand side of your screen in AS.
Open SimoneAni-Andrea-01-MNG
Go to Edit, select all.
Go to Edit, copy.
Activate your tag.
Go to Edit, select all.
Go to Edit, make sure Propagate Paste is selected.
Go to Edit, Paste, paste into selected frames.
Position on your tag and click into place. I placed mine as the middle.
Play and save.
To save:
Go to File, Save as, enter the name of your file and select the folder to save to.
Now click on Customize:
Under COLORS TAB:
Number of colors: 255 Colors
Create palette by: OPTIMIZED OCTREE
Reduce colors by: Error Diffusion
Under OPTIMIZATIONS TAB:
set a check mark beside the second, third and forth choices. UN-check the 1st and last.
Under PARTIAL TRANSPARENCY:
check Convert pixels less than 92
Yes, blend with this color: change to white #FFFFFF
Click OK. Click Next, next, next, next.
Play your animation.
At times your animation may or will come out terrible. Optimization in Animation Shop is not the greatest.
You can play around will your settings, especially under the Tab: Optimization. I change this setting at times from anywhere between 70 and 100.
Some people add a white background. To add background, go to Animation: Animation Properties, select Opaque and change color to white.
Hope you enjoyed this tutorial,
Hugs Simone
Please, always direct people to my blog to download my animations.
Do not load to any other download site and don't claim as your own.
Tutorial written by SophisticatSimone aka Lorraine Halle on Thursay August 8, 2013
Please click on TAG to see in full size.
••• Supplies needed to complete this tutorial. •••
________________________________________________________________________
Programs: Paint Shop Pro, I'm using version 10. Animation Shop 3.
Plugin : Gradient Glow (Eye Candy) for the name
Font used: BickhamScriptFancy2
Tube of choice: I'm using "Andrea" by Verymany.
Scrap Kit : I'm using "Andrea" by SkyScraps from SATC(no longer in business)
Animation: SimoneAni-Andrea
Mask: 0110 HERE
________________________________________________________________________
♥♥♥
Save your tag often. Nothing like working long and hard on a tag and PSP crashes.
♥♥♥
Open a new canvas 700 x 700 transparent.
Copy and paste tube as a new layer.
Copy and paste element 66 as a new layer layer.
Using your Magic wand, remove some of the wires that are really close to the edges of your tag.
Now set your selection tool to Point to Point, Mode: Add shift, feather 0, smoothing 0, anti-alias checked.

Surround and remove the lower portion of your tube by clicking around from one point to the next.
Hit delete on your keyboard.

Copy and paste element 65 as a new layer. Move a bit to the left and should be behind your tube in the layers palette.
Copy and paste element 27 as a new layer. Re-size by 50% and position in lower right hand side of tag.
Copy and paste element 23 as a new layer and position behind your tube on the right side of tag.
Duplicate this layer and re-size by 50%. Hold down your shift key and using your mover tool, drag this layer to the left hand side of tag.
Duplicate this layer and free rotate to the right by 45 degrees. Move to right side of tag.
Duplicate this layer and mirror. Move to upper left hand side. You can rearrange once the crate is in place.
Copy and paste element 31 as a new layer and Re-size by 70%. Position behind your tube on the left side.
Copy and paste element 37 as a new layer and position as second to last layer and in the upper right hand side of tag.
Duplicate layer and re-size by 70%. Go to Image and flip.
Hold down your shift key and using your mover tool, drag this layer to the lower left hand side.
Copy and paste element 56 as a new layer and move it to the right side of tag. Should be behind the beautiful blue flower.
Duplicate and change the blend mode of top copy to Screen. Should make the flower whiter.
Copy and paste element 76 as a new layer and re-size by 60%. Place inside the crate. Sharpen.
Copy and paste element 54 as a new layer and re-size by 45%. Place inside crate and beside the wiskey bottle.
Copy and paste element 36 as a new layer. Re-size by 45%. Position as bottom layer and in the lower left hand side of tag.
Duplicate and move this one beside the 1st one.
Duplicate and move beside the 2nd one.
Duplicate and move beside the 3rd.
Duplicate and move to right side.
Should make a type of leave floor.
Copy and paste element 102 as a new layer and re-size by 30%. Move the left side tag about half way mark.
Duplicate butterfly and mirror. Move this one to upper left hand side.
Add drop shadow to all layers.
Add any other element that you feel would make it better.
Merge visible.
Go to Selections > Select all.
Copy and paste Paper 1 Into the Selection.
De-select.
Apply Mask0110 and merge group.
Duplicate, merge down. Duplicate and merge down (twice).
Merge all visible.
Add artist copyright and your license number.
Add your name.
Merge visible.
To animate:
Go to Selections, select all.
Go to Edit and copy merged. Paste as a new animation in Animation Shop.
Hold your Ctrl key down and repeatedly hit letter L on your keyboard for a total of 16 frames.
You can watch the count on the lower right hand side of your screen in AS.
Open SimoneAni-Andrea-01-MNG
Go to Edit, select all.
Go to Edit, copy.
Activate your tag.
Go to Edit, select all.
Go to Edit, make sure Propagate Paste is selected.
Go to Edit, Paste, paste into selected frames.
Position on your tag and click into place. I placed mine as the middle.
Play and save.
To save:
Go to File, Save as, enter the name of your file and select the folder to save to.
Now click on Customize:
Under COLORS TAB:
Number of colors: 255 Colors
Create palette by: OPTIMIZED OCTREE
Reduce colors by: Error Diffusion
Under OPTIMIZATIONS TAB:
set a check mark beside the second, third and forth choices. UN-check the 1st and last.
Under PARTIAL TRANSPARENCY:
check Convert pixels less than 92
Yes, blend with this color: change to white #FFFFFF
Click OK. Click Next, next, next, next.
Play your animation.
At times your animation may or will come out terrible. Optimization in Animation Shop is not the greatest.
You can play around will your settings, especially under the Tab: Optimization. I change this setting at times from anywhere between 70 and 100.
Some people add a white background. To add background, go to Animation: Animation Properties, select Opaque and change color to white.
Hope you enjoyed this tutorial,
Hugs Simone
Please, always direct people to my blog to download my animations.
Do not load to any other download site and don't claim as your own.
Tutorial written by SophisticatSimone aka Lorraine Halle on Thursay August 8, 2013
Tuesday, August 6, 2013

♥♥♥
Please click on TAG to see in full size.
••• Supplies needed to complete this tutorial. •••
________________________________________________________________________
Programs: Paint Shop Pro, I'm using version 10. Animation Shop 3.
Plugin : Gradient Glow (Eye Candy) for the name
Font used: Playball
Tube of choice: I'm using "Backslide" package 29 by Barbara Jensen
Scrap Kit : I'm using "Tequila Sunrise" by SkyScraps (no longer in business)
Animation: SimoneAni-Tequila Sunrise
Mask: 0105 HERE
________________________________________________________________________
♥♥♥
Save your tag often. Nothing like working long and hard on a tag and PSP crashes.
♥♥♥
Open a new image 650 x 650, transparent.
Copy and paste element 40 as a new layer and re-size by 70%. Duplicate and merge down.
Copy and paste element 26 as a new layer and re-size by 70%. Position in lower right hand side of the pink circle frame.
Copy and paste your tube as a new layer and move to the left of the boat.
Copy and paste element 55 as a new layer and move behind your tube on the left, and below the pink frame layer.
Duplicate and re-size by 70% and free rotate to the right by 45 degrees. Move this element above the other. Sharpen.
Add drop shadow to each and merge together.
Duplicate this merged layer and mirror.
Copy and paste element 58 as a new layer and re-size by 65%. This element should be between the boat and pink circle frame layer in the layers
palette.
Add drop shadow.
Copy and paste element 17 as a new layer. Should be behind the bird element. Add drop shadow.
Copy and paste element 60 as a new layer. Position in the upper right hand side of tag.
Copy and paste element 34 as a new layer. Position in the lower right hand side of tag.
Copy and paste element 39 as a new layer. Position in the lower right hand side of tag. Colorize pink or color from your tube or leave as is.
Copy and paste element 2 as a new layer. Re-size by 55% and position in the lower right hand side of tag behind the crab.
Make sure all elements have a drop shadow.
Select your crop tool and click on Crop Merged Opaque.
Now go to Selections > Select All.
Copy and paste Paper 8 into selection.
Apply Mask of choice or the one I used Masks0105. Merge group.
Duplicate this layer and merge down.
Add Noise of 30%, Gaussian checked.
Add artist's copyright and your license number.
Merge visible.
To animate:
Go to selections, select all and copy.
In animation shop, right click and paste as a new animation.
Hold your Ctrl key down and repeatedly hit letter L on your keyboard for a total of 15 frames.
You can watch the count on the lower right hand side of your screen in AS.
Open SimoneAni-TequilaSunrise
Go to Edit, select all.
Go to Edit, copy.
Activate your tag.
Go to Edit, select all.
Go to Edit, make sure Propagate Paste is selected.
Go to Edit, Paste, paste into selected frames.
Add your name or someone else's and save.
To save:
Go to File, Save as, enter the name of your file and select the folder to save to.
Now click on Customize:
Under COLORS TAB:
Number of colors: 255 Colors
Create palette by: OPTIMIZED OCTREE
Reduce colors by: Error Diffusion
Under OPTIMIZATIONS TAB:
set a check mark beside the second, third and forth choices. UN-check the 1st and last.
Under PARTIAL TRANSPARENCY:
check Convert pixels less than 96
Yes, blend with this color: change to white #FFFFFF
Click OK. Click Next, next, next, next.
Play your animation.
At times your animation may or will come out terrible. Optimization in Animation Shop is not the greatest.
You can play around will your settings, especially under the Tab: Optimization. I change this setting at times from anywhere between 70 and 100.
Some people add a white background. To add background, go to Animation: Animation Properties, select Opaque and change color to white.
Hope you enjoyed this tutorial,
Hugs Simone
Please, always direct people to my blog to download my animations.
Do not load to any other download site and don't claim as your own.
Tutorial written by SophisticatSimone aka Lorraine Halle on Tuesday August 6, 2013
Please click on TAG to see in full size.
••• Supplies needed to complete this tutorial. •••
________________________________________________________________________
Programs: Paint Shop Pro, I'm using version 10. Animation Shop 3.
Plugin : Gradient Glow (Eye Candy) for the name
Font used: Playball
Tube of choice: I'm using "Backslide" package 29 by Barbara Jensen
Scrap Kit : I'm using "Tequila Sunrise" by SkyScraps (no longer in business)
Animation: SimoneAni-Tequila Sunrise
Mask: 0105 HERE
________________________________________________________________________
♥♥♥
Save your tag often. Nothing like working long and hard on a tag and PSP crashes.
♥♥♥
Open a new image 650 x 650, transparent.
Copy and paste element 40 as a new layer and re-size by 70%. Duplicate and merge down.
Copy and paste element 26 as a new layer and re-size by 70%. Position in lower right hand side of the pink circle frame.
Copy and paste your tube as a new layer and move to the left of the boat.
Copy and paste element 55 as a new layer and move behind your tube on the left, and below the pink frame layer.
Duplicate and re-size by 70% and free rotate to the right by 45 degrees. Move this element above the other. Sharpen.
Add drop shadow to each and merge together.
Duplicate this merged layer and mirror.
Copy and paste element 58 as a new layer and re-size by 65%. This element should be between the boat and pink circle frame layer in the layers
palette.
Add drop shadow.
Copy and paste element 17 as a new layer. Should be behind the bird element. Add drop shadow.
Copy and paste element 60 as a new layer. Position in the upper right hand side of tag.
Copy and paste element 34 as a new layer. Position in the lower right hand side of tag.
Copy and paste element 39 as a new layer. Position in the lower right hand side of tag. Colorize pink or color from your tube or leave as is.
Copy and paste element 2 as a new layer. Re-size by 55% and position in the lower right hand side of tag behind the crab.
Make sure all elements have a drop shadow.
Select your crop tool and click on Crop Merged Opaque.
Now go to Selections > Select All.
Copy and paste Paper 8 into selection.
Apply Mask of choice or the one I used Masks0105. Merge group.
Duplicate this layer and merge down.
Add Noise of 30%, Gaussian checked.
Add artist's copyright and your license number.
Merge visible.
To animate:
Go to selections, select all and copy.
In animation shop, right click and paste as a new animation.
Hold your Ctrl key down and repeatedly hit letter L on your keyboard for a total of 15 frames.
You can watch the count on the lower right hand side of your screen in AS.
Open SimoneAni-TequilaSunrise
Go to Edit, select all.
Go to Edit, copy.
Activate your tag.
Go to Edit, select all.
Go to Edit, make sure Propagate Paste is selected.
Go to Edit, Paste, paste into selected frames.
Add your name or someone else's and save.
To save:
Go to File, Save as, enter the name of your file and select the folder to save to.
Now click on Customize:
Under COLORS TAB:
Number of colors: 255 Colors
Create palette by: OPTIMIZED OCTREE
Reduce colors by: Error Diffusion
Under OPTIMIZATIONS TAB:
set a check mark beside the second, third and forth choices. UN-check the 1st and last.
Under PARTIAL TRANSPARENCY:
check Convert pixels less than 96
Yes, blend with this color: change to white #FFFFFF
Click OK. Click Next, next, next, next.
Play your animation.
At times your animation may or will come out terrible. Optimization in Animation Shop is not the greatest.
You can play around will your settings, especially under the Tab: Optimization. I change this setting at times from anywhere between 70 and 100.
Some people add a white background. To add background, go to Animation: Animation Properties, select Opaque and change color to white.
Hope you enjoyed this tutorial,
Hugs Simone
Please, always direct people to my blog to download my animations.
Do not load to any other download site and don't claim as your own.
Tutorial written by SophisticatSimone aka Lorraine Halle on Tuesday August 6, 2013
Monday, August 5, 2013

♥♥♥
Please click on TAG to see in full size.
••• Supplies needed to complete this tutorial. •••
________________________________________________________________________
Programs: Paint Shop Pro, I'm using version 10. Animation Shop 3.
Plugin : none
Font used: Praying Angel
Tube of choice: I'm using "Lady Vampire" by Jose A Cano
Please click on TAG to see in full size.
••• Supplies needed to complete this tutorial. •••
________________________________________________________________________
Programs: Paint Shop Pro, I'm using version 10. Animation Shop 3.
Plugin : none
Font used: Praying Angel
Tube of choice: I'm using "Lady Vampire" by Jose A Cano
Scrap Kit : I'm using "Lady Vampire" by SkyScraps(no longer in business)
Animation: SimoneAni-LadyVampire
Mask: 0149 HERE
________________________________________________________________________
♥♥♥
Save your tag often. Nothing like working long and hard on a tag and PSP crashes.
♥♥♥
Let's start.
Open element 50 and duplicate. Close original. Re-size the duplicate by 80% and 72 dpi.
Go to image> canvas size> enter 700x700.
Using your lasso tool, set to Point to point, mode: add shift, feather : 0, smoothing: 0 and anti-alias checked.
Mask: 0149 HERE
________________________________________________________________________
♥♥♥
Save your tag often. Nothing like working long and hard on a tag and PSP crashes.
♥♥♥
Let's start.
Open element 50 and duplicate. Close original. Re-size the duplicate by 80% and 72 dpi.
Go to image> canvas size> enter 700x700.
Using your lasso tool, set to Point to point, mode: add shift, feather : 0, smoothing: 0 and anti-alias checked.

Click on the thickest portion of the branch (frame), so you need to make little movements with clicks every bend in the branch.
See my screenshot.
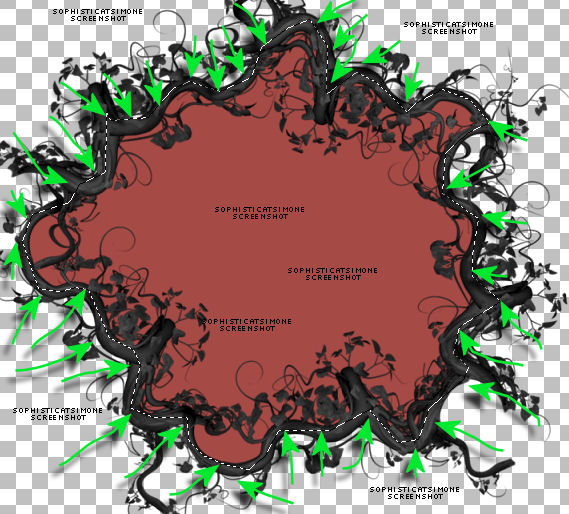
Add a new raster layer and send to bottom. Flood fill the selection with this color : #a74945 or a color from your tube.
Copy the close up of your tube and paste as a new layer.
Using your mover tool, position the face within the selection.
Go to Selections > invert > hit delete on your keyboard.
Selections > select none.
Duplicate the close up. On the original go to Adjust > Blur > Gaussian Blur > 5.
Go to Effects, Photo Effects, Black and White Film, filter color: blue, strength: 0
On the duplicate close up, change blend mode to : soft light.
Select Manual Color Correction:
Source should be black and target should be : #dc403b
Add drop shadow to the branch frame. Merge layers together.
C/P element 58 as a new layer and position behind the frame layer and to the left side of tag.
Add drop shadow.
C/P element 57 as a new layer and triplicate.
1st layer re-size by 60% and move to left side of frame and colorize red. Add d/s.
2nd layer re-size by 45% and move to lower right side of frame. Add d/s.
3rd layer re-size by 45% and mirror. Move to left side of tag and behind the tombstone. Add d/s.
C/P the regular sized tube. I had to re-size by 50%. Position to the right side of tag. Add d/s.
C/P element 61 and re-size by 35% and move down below in front of your tube on the right hand side of tag.
C/P element 6 and re-size by 50% and move to upper left hand side of tag. Add d/s.
C/P element 32 and re-size by 50%. Position lower center of tag/frame. Add d/s. Should be close to your tube. This is the flower cluster.
See my tag for reference.
C/P again. This time re-size by 40% and flip. Move to upper center right. Duplicate and mirror. Add drop shadow to each. These should be at top of
frame and at center of tag.
C/P element 2 and re-size by 35%. Move to lower right hand side. In front of your tube layer and the black grassy layer. Add d/s.
C/P element 1 and re-size by 35%. Move to lower right hand side. In front of red bottle layer. Colorize red. Add d/s.
C/P element 74 as a new layer and re-size by 50%. Move to the left side of tag in front of tombstone and frame. Add drop shadow.
C/P element 53 as a new layer and re-size by 60%. Move to the left side of tag and in front of carriage. Add d/s.
C/P element 64 and re-size by 50%. Place behind the carriage front section and duplicate. Move duplicated layer over to the left behind the read
portion of carriage. Merge these two layers together.
Duplicate this merged layer and move to the upper right hand side of tag and behind the merged frame layer.
C/P element 47 and re-size by 50%, mirror and add small drop shadow. Move to left side of tag over the carriage.
C/P element 23 as a new layer and re-size by 35%. Duplicate and mirror.
Position one left in front of book, add d/s.
Position the other right climbing the bottle, add d/s.
C/P element 8 as a new layer and re-size by 50%. Move in front of your tube, at the bottom of tag. Add drop shadow.
Crop merged opaque. Add paper to bottom and apply Mask of choice or the one I used Masks0149.
Add artist copyright and your license number.
Merge visible.
To animate:
Go to selections, select all and copy.
In animation shop, right click and paste as a new animation.
Hold your Ctrl key down and repeatedly hit letter L on your keyboard for a total of 16 frames.
You can watch the count on the lower right hand side of your screen in AS.
Open SimoneAni-LadyVampire-01
Go to Edit, select all.
Go to Edit, copy.
Activate your tag.
Go to Edit, select all.
Go to Edit, make sure Propagate Paste is selected.
Go to Edit, Paste, paste into selected frames.
Position on the skull's forehead, click into place.
Now open SimoneAni-LadyVampire-02 and repeat.
Position just a bit above the current animation.
For third animation, open SimoneAni-LadyVampire-06
Position this one on the little bottle at bottom right of tag.
To save:
Go to File, Save as, enter the name of your file and select the folder to save to.
Now click on Customize:
Under COLORS TAB:
Number of colors: 255 Colors
Create palette by: OPTIMIZED OCTREE
Reduce colors by: Error Diffusion
Under OPTIMIZATIONS TAB:
set a check mark beside the second, third and forth choices. UN-check the 1st and last.
Under PARTIAL TRANSPARENCY:
check Convert pixels less than 96
Yes, blend with this color: change to white #FFFFFF
Click OK. Click Next, next, next, next.
Play your animation.
At times your animation may or will come out terrible. Optimization in Animation Shop is not the greatest.
You can play around will your settings, especially under the Tab: Optimization. I change this setting at times from anywhere between 70 and 100.
Some people add a white background. To add background, go to Animation: Animation Properties, select Opaque and change color to white.
Hope you enjoyed this tutorial,
Hugs Simone
Please, always direct people to my blog to download my animations.
Do not load to any other download site and don't claim as your own.
Tutorial written by SophisticatSimone aka Lorraine Hallé on Sunday August 4, 2013
Friday, July 5, 2013

♥♥♥
Please click on TAG to see in full size.
••• Supplies needed to complete this tutorial. •••
________________________________________________________________________
Programs: Paint Shop Pro, I'm using version 10. Animation Shop 3.
Plugin : Eye Candy 4: Gradient Glow for name
Font used: LD Edward
Tube of choice: I'm using "Christine" by Christine Marie Kotlark from CDO.
Scrap Kit : I'm using "Twilight" by SkyScraps from SATC (no longer in business)
Animation: SimoneAni-DarkMagic
Mask: 0145 HERE
________________________________________________________________________
♥♥♥
Save your tag often. Nothing like working long and hard on a tag and PSP crashes.
♥♥♥
Open Paper 2, Mask0145, and open a new image 700 x 700 transparent.
Copy your paper.
Activate your blank canvas and go to Selections, select all.
Go to Edit, Paste, Paste into selection.
De-select. Go to Selections, select none.
Close original paper.
Apply mask. Go to Layers, new mask layer, from image and search your drop down box for Mask0145 and apply.
Merge group.
Close Mask.
Copy and paste your tube as a new layer. I selected the medium sized tube from Christine Marie Kotlark.
Re-size by 76%. Add drop shadow. Close original tube.
C/P element 20 as a new layer on top of your tube layer and re-size by 85%. Add drop shadow.
C/P element 18 as a new layer and re-size by 60%. Add drop shadow. Move this layer behind your tube and to the left.
C/P element Wolf1 as a new layer and re-size by 60%. Add drop shadow. Move this layer behind your tube and to the
right.
C/P element 10 as a new layer and re-size by 60%. Move to the left and over the grave marker.
C/P element Flower2 as a new layer and move to upper right side of tag, behind your tube and your wolf layers.
Add drop shadow. Duplicate and mirror. Merge together.
Make sure all your layers have drop shadows.
Add artist copyright and your license number.
Save your tag as pspimage.
Ok now merge the following layers together. The flower layer, the grave maker, the black wolf and the mask layer.
This is your bottom layer. Hide this layer (click eye on layer, in layers palette). Activate the tube layer and right click
merge all visible. UN-hide your bottom layer.
Now to animate.
Making sure your merged BOTTOM layer is selected,
Go to Selections, select all.
Go to Edit and copy merged. Paste as a new animation in Animation Shop.
Hold your Ctrl key down and repeatedly hit letter L on your keyboard for a total of 15 frames.
You can watch the count on the lower right hand side of your screen in AS.
Open SimoneAni-DarkMagic-001
Go to Edit, select all.
Go to Edit, copy.
Activate your tag.
Go to Edit, select all.
Go to Edit, make sure Propagate Paste is selected.
Go to Edit, Paste, paste into selected frames. See my screenshot.
Move your cursor around on the tag and you will see a little star, place that on the right hand side,
near edge of mask.
Go back to PSP now and highlight (activate) your tube layer and copy.
Paste as a NEW animation in AS.
Go to Edit, copy.
Activate your tag.
IMPORTANT PART!
Before you click into place, do the following.
On your active tag, place a registration Mark.
Click on the cross icon on your tool bar at top in AS, and select Spanning Cross under Mark Style.
Now with your cursor move the mark on your tiny sparkle animation.
Go to Edit, select all. Go to Edit, Paste, paste into selected frames.
IMPORTANT AGAIN!
So with your cursor you will move your top layer around positioning it as precisely as possible.
JUST BEFORE you click into place, take a screen shot.
Screenshot key is on your keyboard: prt scr/sys rq.
Click into place now.
Right click on your workspace and paste as a NEW animation.
Grab your crop tool and just select the area that shows your sparkle ani with the cross over-top it.
Make sure this image is visible to you because when placing the second animation you will need to rely on this visual aid.
To remove spanning cross, click "Clear" at top tool bar.
Ok activate SimoneAni-DarkMagic-002.
Go to Edit, select all.
Go to Edit and copy.
Activate your tag.
Go to Edit, select all.
Go to Edit, Paste, paste into selected frames.
Move your cursor around on the tag and place on the right hand side, near edge of mask.
Look over at your reference and you should be placing it just over the tree trunk on the right side of tag.
Play and save.
Don't forget to add your name.
To save:
Go to File, Save as, enter the name of your file and select the folder to save to.
Now click on Customize:
Under COLORS TAB:
Number of colors: 255 Colors
Create palette by: OPTIMIZED OCTREE
Reduce colors by: Error Diffusion
Under OPTIMIZATIONS TAB:
set a check mark beside the second, third and forth choices. UN-check the 1st and last.
Under PARTIAL TRANSPARENCY:
check Convert pixels less than 92
Yes, blend with this color: change to white #FFFFFF
Click OK. Click Next, next, next, next.
Play your animation.
At times your animation may or will come out terrible. Optimization in Animation Shop is not the greatest.
You can play around will your settings, especially under the Tab: Optimization. I change this setting at times from anywhere between 70 and 100.
Some people add a white background. To add background, go to Animation: Animation Properties, select Opaque and change color to white.
Hope you enjoyed this tutorial,
Hugs Simone
Please, always direct people to my blog to download my animations.
Do not load to any other download site and don't claim as your own.
Tutorial written by SophisticatSimone aka Lorraine Halle on Friday July 5, 2013.
Please click on TAG to see in full size.
••• Supplies needed to complete this tutorial. •••
________________________________________________________________________
Programs: Paint Shop Pro, I'm using version 10. Animation Shop 3.
Plugin : Eye Candy 4: Gradient Glow for name
Font used: LD Edward
Tube of choice: I'm using "Christine" by Christine Marie Kotlark from CDO.
Scrap Kit : I'm using "Twilight" by SkyScraps from SATC (no longer in business)
Animation: SimoneAni-DarkMagic
Mask: 0145 HERE
________________________________________________________________________
♥♥♥
Save your tag often. Nothing like working long and hard on a tag and PSP crashes.
♥♥♥
Open Paper 2, Mask0145, and open a new image 700 x 700 transparent.
Copy your paper.
Activate your blank canvas and go to Selections, select all.
Go to Edit, Paste, Paste into selection.
De-select. Go to Selections, select none.
Close original paper.
Apply mask. Go to Layers, new mask layer, from image and search your drop down box for Mask0145 and apply.
Merge group.
Close Mask.
Copy and paste your tube as a new layer. I selected the medium sized tube from Christine Marie Kotlark.
Re-size by 76%. Add drop shadow. Close original tube.
C/P element 20 as a new layer on top of your tube layer and re-size by 85%. Add drop shadow.
C/P element 18 as a new layer and re-size by 60%. Add drop shadow. Move this layer behind your tube and to the left.
C/P element Wolf1 as a new layer and re-size by 60%. Add drop shadow. Move this layer behind your tube and to the
right.
C/P element 10 as a new layer and re-size by 60%. Move to the left and over the grave marker.
C/P element Flower2 as a new layer and move to upper right side of tag, behind your tube and your wolf layers.
Add drop shadow. Duplicate and mirror. Merge together.
Make sure all your layers have drop shadows.
Add artist copyright and your license number.
Save your tag as pspimage.
Ok now merge the following layers together. The flower layer, the grave maker, the black wolf and the mask layer.
This is your bottom layer. Hide this layer (click eye on layer, in layers palette). Activate the tube layer and right click
merge all visible. UN-hide your bottom layer.
Now to animate.
Making sure your merged BOTTOM layer is selected,
Go to Selections, select all.
Go to Edit and copy merged. Paste as a new animation in Animation Shop.
Hold your Ctrl key down and repeatedly hit letter L on your keyboard for a total of 15 frames.
You can watch the count on the lower right hand side of your screen in AS.
Open SimoneAni-DarkMagic-001
Go to Edit, select all.
Go to Edit, copy.
Activate your tag.
Go to Edit, select all.
Go to Edit, make sure Propagate Paste is selected.
Go to Edit, Paste, paste into selected frames. See my screenshot.
Move your cursor around on the tag and you will see a little star, place that on the right hand side,
near edge of mask.
Go back to PSP now and highlight (activate) your tube layer and copy.
Paste as a NEW animation in AS.
Go to Edit, copy.
Activate your tag.
IMPORTANT PART!
Before you click into place, do the following.
On your active tag, place a registration Mark.
Click on the cross icon on your tool bar at top in AS, and select Spanning Cross under Mark Style.
Now with your cursor move the mark on your tiny sparkle animation.
Go to Edit, select all. Go to Edit, Paste, paste into selected frames.
IMPORTANT AGAIN!
So with your cursor you will move your top layer around positioning it as precisely as possible.
JUST BEFORE you click into place, take a screen shot.
Screenshot key is on your keyboard: prt scr/sys rq.
Click into place now.
Right click on your workspace and paste as a NEW animation.
Grab your crop tool and just select the area that shows your sparkle ani with the cross over-top it.
Make sure this image is visible to you because when placing the second animation you will need to rely on this visual aid.
To remove spanning cross, click "Clear" at top tool bar.
Ok activate SimoneAni-DarkMagic-002.
Go to Edit, select all.
Go to Edit and copy.
Activate your tag.
Go to Edit, select all.
Go to Edit, Paste, paste into selected frames.
Move your cursor around on the tag and place on the right hand side, near edge of mask.
Look over at your reference and you should be placing it just over the tree trunk on the right side of tag.
Play and save.
Don't forget to add your name.
To save:
Go to File, Save as, enter the name of your file and select the folder to save to.
Now click on Customize:
Under COLORS TAB:
Number of colors: 255 Colors
Create palette by: OPTIMIZED OCTREE
Reduce colors by: Error Diffusion
Under OPTIMIZATIONS TAB:
set a check mark beside the second, third and forth choices. UN-check the 1st and last.
Under PARTIAL TRANSPARENCY:
check Convert pixels less than 92
Yes, blend with this color: change to white #FFFFFF
Click OK. Click Next, next, next, next.
Play your animation.
At times your animation may or will come out terrible. Optimization in Animation Shop is not the greatest.
You can play around will your settings, especially under the Tab: Optimization. I change this setting at times from anywhere between 70 and 100.
Some people add a white background. To add background, go to Animation: Animation Properties, select Opaque and change color to white.
Hope you enjoyed this tutorial,
Hugs Simone
Please, always direct people to my blog to download my animations.
Do not load to any other download site and don't claim as your own.
Tutorial written by SophisticatSimone aka Lorraine Halle on Friday July 5, 2013.


Tuesday, July 2, 2013

♥♥♥
Please click on TAG to see in full size.
••• Supplies needed to complete this tutorial. •••
________________________________________________________________________
Programs: Paint Shop Pro, I'm using version 10. Animation Shop 3.
Plugin : Eye Candy 4: Gradient Glow for name
Font used: Carpenter
Tube of choice: I'm using "Monique" by Zlata M
Please click on TAG to see in full size.
••• Supplies needed to complete this tutorial. •••
________________________________________________________________________
Programs: Paint Shop Pro, I'm using version 10. Animation Shop 3.
Plugin : Eye Candy 4: Gradient Glow for name
Font used: Carpenter
Tube of choice: I'm using "Monique" by Zlata M
Scrap Kit : I'm using "Monica" by SkyScraps
This is a freebie kit.
Animation: SimoneAni472-485
Mask: 0144 HERE
________________________________________________________________________
♥♥♥
Save your tag often. Nothing like working long and hard on a tag and PSP crashes.
♥♥♥
Open Paper 5 and duplicate. Re-size by 87%, smart size checked and resolution is 72 dpi.
Open mask0144 and minimize. Make sure your paper is active.
Go to Layers, New mask layer, from image. Find the mask in drop down list and apply.
Merge group.
Close Mask, it's no longer needed.
Copy and paste element 14 as a new layer. Position at bottom of tag.
Duplicate element and flip and mirror. Fit them together to make a closed frame and merge them together.
We will add little stars later on the seams to hide were they join.
With your magic wand, feather 0, click inside the frame and go to Selections, modify and expand by 8.
Copy and paste your tube as a new layer.
Drag it below your frame in the layers palette.
Use your mover tool to position your tube inside the frame.
Go to selections, invert and hit delete on your keyboard.
Select another paper of choice and copy and paste as a new layer, make sure this layer is below your tube.
I used paper 2 and re-sized by 70%.
Add drop shadow to frame and tube.
Copy and paste element 25 as a new layer. Re-size by 45% and move over seam on the left side of frame, add drop shadow.
Copy and paste element 35 as a new layer. Move this over the right side of frame and add drop shadow.
Using the font : LD Mosquito with background color set to: #32516e I typed out the words "of july" and positioned it just below "Happy 4th" . My kerning was -25, size was 122, bold selected and anti-alias: sharp. If you have gradient glow, add a white glow of 3 around your text and add drop shadow.
Copy and paste element 8 as a new layer and re-size by 80%. Move to upper right side of frame.
Increase your canvas size to 985 x 700. We will re-size at the end. I just like a lot of room to play on.
Copy and paste element 28 as a new layer and position upper left hand side of tag behind the frame and it's background. Duplicate and move this down lower and on the edge of the frame. Duplicate and mirror. Move this one out a little bit from the frame on the right side. Add drop shadow to each layer.
Merge all visible and crop merged opaque.
Re-size your tag by 82% and sharpen.
Add artist copyright and license number, merge down.
Save your tag.
Now to animate.
Go to Selections, select all.
Go to Edit and copy merged. Paste as a new animation in Animation Shop.
Hold your Ctrl key down and repeatedly hit letter L on your keyboard for a total of 15 frames.
You can watch the count on the lower right hand side of your screen in AS.
Open SimoneAni484 or 474. Either one works well here. I tried both and it looked good.
Go to Edit, select all.
Go to Edit, copy.
Activate your tag.
Go to Edit, select all.
Go to Edit, make sure Propagate Paste is selected.
Go to Edit, Paste, paste into selected frames.
Position on your tag OVER the firework element and click into place.
Play and save.
Don't forget to add your name. I used the font: Carpenter and the color: #7b1d18
To save:
Go to File, Save as, enter the name of your file and select the folder to save to.
Now click on Customize:
Under COLORS TAB:
Number of colors: 255 Colors
Create palette by: OPTIMIZED OCTREE
Reduce colors by: Error Diffusion
Under OPTIMIZATIONS TAB:
set a check mark beside the second, third and forth choices. UN-check the 1st and last.
Under PARTIAL TRANSPARENCY:
check Convert pixels less than 92
Yes, blend with this color: change to white #FFFFFF
Click OK. Click Next, next, next, next.
Play your animation.
At times your animation may or will come out terrible. Optimization in Animation Shop is not the greatest.
You can play around will your settings, especially under the Tab: Optimization. I change this setting at times from anywhere between 70 and 100.
Some people add a white background. To add background, go to Animation: Animation Properties, select Opaque and change color to white.
Hope you enjoyed this tutorial,
Hugs Simone
Please, always direct people to my blog to download my animations.
Do not load to any other download site and don't claim as your own.
Tutorial written by SophisticatSimone aka Lorraine Halle on Tuesday July 2, 2013.
Animation: SimoneAni472-485
Mask: 0144 HERE
________________________________________________________________________
♥♥♥
Save your tag often. Nothing like working long and hard on a tag and PSP crashes.
♥♥♥
Open Paper 5 and duplicate. Re-size by 87%, smart size checked and resolution is 72 dpi.
Open mask0144 and minimize. Make sure your paper is active.
Go to Layers, New mask layer, from image. Find the mask in drop down list and apply.
Merge group.
Close Mask, it's no longer needed.
Copy and paste element 14 as a new layer. Position at bottom of tag.
Duplicate element and flip and mirror. Fit them together to make a closed frame and merge them together.
We will add little stars later on the seams to hide were they join.
With your magic wand, feather 0, click inside the frame and go to Selections, modify and expand by 8.
Copy and paste your tube as a new layer.
Drag it below your frame in the layers palette.
Use your mover tool to position your tube inside the frame.
Go to selections, invert and hit delete on your keyboard.
Select another paper of choice and copy and paste as a new layer, make sure this layer is below your tube.
I used paper 2 and re-sized by 70%.
Add drop shadow to frame and tube.
Copy and paste element 25 as a new layer. Re-size by 45% and move over seam on the left side of frame, add drop shadow.
Copy and paste element 35 as a new layer. Move this over the right side of frame and add drop shadow.
Using the font : LD Mosquito with background color set to: #32516e I typed out the words "of july" and positioned it just below "Happy 4th" . My kerning was -25, size was 122, bold selected and anti-alias: sharp. If you have gradient glow, add a white glow of 3 around your text and add drop shadow.
Copy and paste element 8 as a new layer and re-size by 80%. Move to upper right side of frame.
Increase your canvas size to 985 x 700. We will re-size at the end. I just like a lot of room to play on.
Copy and paste element 28 as a new layer and position upper left hand side of tag behind the frame and it's background. Duplicate and move this down lower and on the edge of the frame. Duplicate and mirror. Move this one out a little bit from the frame on the right side. Add drop shadow to each layer.
Merge all visible and crop merged opaque.
Re-size your tag by 82% and sharpen.
Add artist copyright and license number, merge down.
Save your tag.
Now to animate.
Go to Selections, select all.
Go to Edit and copy merged. Paste as a new animation in Animation Shop.
Hold your Ctrl key down and repeatedly hit letter L on your keyboard for a total of 15 frames.
You can watch the count on the lower right hand side of your screen in AS.
Open SimoneAni484 or 474. Either one works well here. I tried both and it looked good.
Go to Edit, select all.
Go to Edit, copy.
Activate your tag.
Go to Edit, select all.
Go to Edit, make sure Propagate Paste is selected.
Go to Edit, Paste, paste into selected frames.
Position on your tag OVER the firework element and click into place.
Play and save.
Don't forget to add your name. I used the font: Carpenter and the color: #7b1d18
To save:
Go to File, Save as, enter the name of your file and select the folder to save to.
Now click on Customize:
Under COLORS TAB:
Number of colors: 255 Colors
Create palette by: OPTIMIZED OCTREE
Reduce colors by: Error Diffusion
Under OPTIMIZATIONS TAB:
set a check mark beside the second, third and forth choices. UN-check the 1st and last.
Under PARTIAL TRANSPARENCY:
check Convert pixels less than 92
Yes, blend with this color: change to white #FFFFFF
Click OK. Click Next, next, next, next.
Play your animation.
At times your animation may or will come out terrible. Optimization in Animation Shop is not the greatest.
You can play around will your settings, especially under the Tab: Optimization. I change this setting at times from anywhere between 70 and 100.
Some people add a white background. To add background, go to Animation: Animation Properties, select Opaque and change color to white.
Hope you enjoyed this tutorial,
Hugs Simone
Please, always direct people to my blog to download my animations.
Do not load to any other download site and don't claim as your own.
Tutorial written by SophisticatSimone aka Lorraine Halle on Tuesday July 2, 2013.

♥♥♥
Please click on TAG to see in full size.
••• Supplies needed to complete this tutorial. •••
________________________________________________________________________
Programs: Paint Shop Pro, I'm using version 10. Animation Shop 3.
Plugin : Eye Candy 4: Gradient Glow for name
Font used: Olivier
Tube of choice: I'm using "Festive" by Zlata M from SATC.
Scrap Kit : I'm using "Festive Evening" by SkyScraps from SATC
Animation: SimoneAni-VIPGirl-Tutorial
Mask: 0142 HERE
________________________________________________________________________
♥♥♥
Save your tag often. Nothing like working long and hard on a tag and PSP crashes.
♥♥♥
Open a new image, transparent, 700 x 700.
Copy and paste your tube as a new layer. Re-size by 80% and add drop shadow.
C/P element 27 as a new layer and re-size by 75%.
Grab your magic wand, tolerance and feather set to 0 and click inside the frame.
Go to Selections, modify, expand by 5. C/P element 77 as a new layer. Re-size by 75%.
Move this layer below the frame element.
Go to Selections, invert and hit delete on keyboard.
C/P paper 4 as a new layer and drag below the skyline element.
Hit delete and deselect.
Add drop shadow to skyline and to the frame.
On your skyline image add a little noise: Random 5, monochrome checked.
C/P element 6 as a new layer and re-size by 75%. Position on left side of tag.
C/P element 68 as a new layer and re-size by 55%. Position over the left side of frame.
C/P element 11 as a new layer and mirror. Re-size by 35%. Position behind your tube on the left side.
Duplicate and free rotate to the left by 40 degrees. Sharpen and move above the other flowers. Duplicate and flip.
Position near bottom of her dress. Add drop shadow to each layer.
Paste original again and re-size by 27% and free rotate to the left by 70 degrees. Add a couple at top and bottom of the other flowers.
C/P element 60 as a new layer and re-size by 60%. Sharpen. Position behind your tubes back. Add drop shadow.
Repeat paste and re-size by 60, sharpen, mirror, free rotate by 90 degrees to the left. Place behind the chair, and near the tube. Duplicate and move to upper right hand side of frame and send this layer to bottom. Should appear behind the frame. Make sure all your layers have drop shadows.
C/P element 1 and position to the right side of tag. Add drop shadow. This element should be just above your frame layer.
C/P element 7 and re-size by 50%. Place on chair and add drop shadow.
C/P element 5 and re-size by 50%. Place in front of chair and add drop shadow.
C/P element 8 and re-size by 20%. Place on frame. Triplicate, add move those around. Add drop shadow to each.
C/P element 43 and re-size by 55%. Place at top of frame on left side and add drop shadow.
C/P element 76 and move to lower left hand side and add drop shadow. Duplicate and free rotate to the right by 90 degrees. Move to the right hand side of tag. Merge together.
Starting with your frame layer, merge all your layers down one by one till you get to bottom.
X-out that layer. Click on your tube layer and merge all visible.
Un hide your bottom layer.
Add new Raster layer and send to bottom. Go to Selections, select all.
Open paper 4 and copy. Paste into selection. De-select.
Open Mask 0142 and apply to paper layer on your tag.
Merge group. Merge your frame layer down.
Add artist copyright and merge that to the tube layer.
Now to animate.
Go to Selections, select all.
Go to Edit and copy merged. Paste as a new animation in Animation Shop.
Hold your Ctrl key down and repeatedly hit letter L on your keyboard for a total of 12 frames.
You can watch the count on the lower right hand side of your screen in AS.
Open SimoneAni-VIPGirl
Go to Edit, select all.
Go to Edit, copy.
Activate your tag.
Go to Edit, select all.
Go to Edit, make sure Propagate Paste is selected.
Go to Edit, Paste, paste into selected frames.
Position on your tag OVER the frame area and click into place.
Go to PSP and select the tube layer and copy.
Paste in Animation Shop as a new layer.
Copy.
Click on your tag to activate.
Go to Edit and paste into selected frame.
Careful you don't cut off anything from that layer when you click it into place.
You can move it around on the frame until you are happy, click into place.
Repeat steps using SimoneAni-VIPGirl-02 and position this animation at the feet of your tube on the lower right hand side of tag.
Play and save.
Don't forget to add your name.
To save:
Go to File, Save as, enter the name of your file and select the folder to save to.
Now click on Customize:
Under COLORS TAB:
Number of colors: 255 Colors
Create palette by: OPTIMIZED OCTREE
Reduce colors by: Error Diffusion
Under OPTIMIZATIONS TAB:
set a check mark beside the second, third and forth choices. UN-check the 1st and last.
Under PARTIAL TRANSPARENCY:
check Convert pixels less than 92
Yes, blend with this color: change to white #FFFFFF
Click OK. Click Next, next, next, next.
Play your animation.
At times your animation may or will come out terrible. Optimization in Animation Shop is not the greatest.
You can play around will your settings, especially under the Tab: Optimization. I change this setting at times from anywhere between 70 and 100.
Some people add a white background. To add background, go to Animation: Animation Properties, select Opaque and change color to white.
Hope you enjoyed this tutorial,
Hugs Simone
Please, always direct people to my blog to download my animations.
Do not load to any other download site and don't claim as your own.
Tutorial written by SophisticatSimone aka Lorraine Halle on Tuesday July 2, 2013.
Please click on TAG to see in full size.
••• Supplies needed to complete this tutorial. •••
________________________________________________________________________
Programs: Paint Shop Pro, I'm using version 10. Animation Shop 3.
Plugin : Eye Candy 4: Gradient Glow for name
Font used: Olivier
Tube of choice: I'm using "Festive" by Zlata M from SATC.
Scrap Kit : I'm using "Festive Evening" by SkyScraps from SATC
Animation: SimoneAni-VIPGirl-Tutorial
Mask: 0142 HERE
________________________________________________________________________
♥♥♥
Save your tag often. Nothing like working long and hard on a tag and PSP crashes.
♥♥♥
Open a new image, transparent, 700 x 700.
Copy and paste your tube as a new layer. Re-size by 80% and add drop shadow.
C/P element 27 as a new layer and re-size by 75%.
Grab your magic wand, tolerance and feather set to 0 and click inside the frame.
Go to Selections, modify, expand by 5. C/P element 77 as a new layer. Re-size by 75%.
Move this layer below the frame element.
Go to Selections, invert and hit delete on keyboard.
C/P paper 4 as a new layer and drag below the skyline element.
Hit delete and deselect.
Add drop shadow to skyline and to the frame.
On your skyline image add a little noise: Random 5, monochrome checked.
C/P element 6 as a new layer and re-size by 75%. Position on left side of tag.
C/P element 68 as a new layer and re-size by 55%. Position over the left side of frame.
C/P element 11 as a new layer and mirror. Re-size by 35%. Position behind your tube on the left side.
Duplicate and free rotate to the left by 40 degrees. Sharpen and move above the other flowers. Duplicate and flip.
Position near bottom of her dress. Add drop shadow to each layer.
Paste original again and re-size by 27% and free rotate to the left by 70 degrees. Add a couple at top and bottom of the other flowers.
C/P element 60 as a new layer and re-size by 60%. Sharpen. Position behind your tubes back. Add drop shadow.
Repeat paste and re-size by 60, sharpen, mirror, free rotate by 90 degrees to the left. Place behind the chair, and near the tube. Duplicate and move to upper right hand side of frame and send this layer to bottom. Should appear behind the frame. Make sure all your layers have drop shadows.
C/P element 1 and position to the right side of tag. Add drop shadow. This element should be just above your frame layer.
C/P element 7 and re-size by 50%. Place on chair and add drop shadow.
C/P element 5 and re-size by 50%. Place in front of chair and add drop shadow.
C/P element 8 and re-size by 20%. Place on frame. Triplicate, add move those around. Add drop shadow to each.
C/P element 43 and re-size by 55%. Place at top of frame on left side and add drop shadow.
C/P element 76 and move to lower left hand side and add drop shadow. Duplicate and free rotate to the right by 90 degrees. Move to the right hand side of tag. Merge together.
Starting with your frame layer, merge all your layers down one by one till you get to bottom.
X-out that layer. Click on your tube layer and merge all visible.
Un hide your bottom layer.
Add new Raster layer and send to bottom. Go to Selections, select all.
Open paper 4 and copy. Paste into selection. De-select.
Open Mask 0142 and apply to paper layer on your tag.
Merge group. Merge your frame layer down.
Add artist copyright and merge that to the tube layer.
Now to animate.
Go to Selections, select all.
Go to Edit and copy merged. Paste as a new animation in Animation Shop.
Hold your Ctrl key down and repeatedly hit letter L on your keyboard for a total of 12 frames.
You can watch the count on the lower right hand side of your screen in AS.
Open SimoneAni-VIPGirl
Go to Edit, select all.
Go to Edit, copy.
Activate your tag.
Go to Edit, select all.
Go to Edit, make sure Propagate Paste is selected.
Go to Edit, Paste, paste into selected frames.
Position on your tag OVER the frame area and click into place.
Go to PSP and select the tube layer and copy.
Paste in Animation Shop as a new layer.
Copy.
Click on your tag to activate.
Go to Edit and paste into selected frame.
Careful you don't cut off anything from that layer when you click it into place.
You can move it around on the frame until you are happy, click into place.
Repeat steps using SimoneAni-VIPGirl-02 and position this animation at the feet of your tube on the lower right hand side of tag.
Play and save.
Don't forget to add your name.
To save:
Go to File, Save as, enter the name of your file and select the folder to save to.
Now click on Customize:
Under COLORS TAB:
Number of colors: 255 Colors
Create palette by: OPTIMIZED OCTREE
Reduce colors by: Error Diffusion
Under OPTIMIZATIONS TAB:
set a check mark beside the second, third and forth choices. UN-check the 1st and last.
Under PARTIAL TRANSPARENCY:
check Convert pixels less than 92
Yes, blend with this color: change to white #FFFFFF
Click OK. Click Next, next, next, next.
Play your animation.
At times your animation may or will come out terrible. Optimization in Animation Shop is not the greatest.
You can play around will your settings, especially under the Tab: Optimization. I change this setting at times from anywhere between 70 and 100.
Some people add a white background. To add background, go to Animation: Animation Properties, select Opaque and change color to white.
Hope you enjoyed this tutorial,
Hugs Simone
Please, always direct people to my blog to download my animations.
Do not load to any other download site and don't claim as your own.
Tutorial written by SophisticatSimone aka Lorraine Halle on Tuesday July 2, 2013.
Monday, June 24, 2013

♥♥♥
Please click on TAG to see in full size.
••• Supplies needed to complete this tutorial. •••
________________________________________________________________________
Programs: Paint Shop Pro, I'm using version 10. Animation Shop 3.
Plugin : Gradient Glow Eye Candy 4 for the name
Font used: LD Newborn Vampire
Tube of choice: I'm using "Night Crawler" by Christine Marie Kotlark from SATC.
Scrap Kit : I'm using "Army Girl" by SkyScraps from SATC
Animation: none
Mask: 0116 HERE
________________________________________________________________________
♥♥♥
Save your tag often. Nothing like working long and hard on a tag and PSP crashes.
♥♥♥
Open new canvas 650 x 650. Paste a paper of choice and crop merged opaque. Apply mask and merge group.
C/P your tube as a new layer and re-size if it's too large. I re-sized my tube by 70%. Add drop shadow.
C/P element 51 as a new layer and re-size by 70%. Move this layer below your tube layer. Add drop shadow.
C/P element 72 as a new layer and re-size by 50%. Move to left side of your tube. Add drop shadow.
C/P element 70 as a new layer and position at bottom of frame under your tube. Duplicate.
C/P element 68 as a new layer and duplicate. Place one on the left hand side of frame and the other on the right hand side.
Make sure these are below the frame in the layer palette.
Merge them together.
Select you magic wand, feather 0 and click inside the frame. Selection/modify/expand by 8. Delete the excess trees you see in the center.
Repeat this process for anything further we place behind the frame layer.
C/P element 31 as a new layer and position upper left hand side of frame. Delete extra in center of frame.
C/P element 57 as a new layer and re-size by 70%. Position in front of frame and behind your tube. Place on the lower right hand side of frame.
C/P element 73 as a new layer and re-size by 30%. Position on the upper left hand side of frame.
C/P element 5 as a new layer and re-size by 70%. Mirror. Position on the lower right hand side of frame and over the barrels.
Now within the frame (circle), paste the army tank and element 67. To remove extra, just click in the circle with magic wand and invert select. In layers palette click on tank, delete and then click on element 67 and delete.
Add element 20 on the right side of frame (behind) and delete the extra from the center.
C/P element 21 as a new layer and re-size by 60%. Position at bottom of tag and just under your tubes hands on the ground.
Add drop shadow to all layers.
Add artist copyright and merge all visible.
Add name.
Merge all visible and save as a PNG.
Hope you enjoyed this tutorial,
Hugs Simone
Please, always direct people to my blog to download my animations.
Do not load to any other download site and don't claim as your own.
Tutorial written by SophisticatSimone aka Lorraine Halle on Monday June 24, 2013.
Please click on TAG to see in full size.
••• Supplies needed to complete this tutorial. •••
________________________________________________________________________
Programs: Paint Shop Pro, I'm using version 10. Animation Shop 3.
Plugin : Gradient Glow Eye Candy 4 for the name
Font used: LD Newborn Vampire
Tube of choice: I'm using "Night Crawler" by Christine Marie Kotlark from SATC.
Scrap Kit : I'm using "Army Girl" by SkyScraps from SATC
Animation: none
Mask: 0116 HERE
________________________________________________________________________
♥♥♥
Save your tag often. Nothing like working long and hard on a tag and PSP crashes.
♥♥♥
Open new canvas 650 x 650. Paste a paper of choice and crop merged opaque. Apply mask and merge group.
C/P your tube as a new layer and re-size if it's too large. I re-sized my tube by 70%. Add drop shadow.
C/P element 51 as a new layer and re-size by 70%. Move this layer below your tube layer. Add drop shadow.
C/P element 72 as a new layer and re-size by 50%. Move to left side of your tube. Add drop shadow.
C/P element 70 as a new layer and position at bottom of frame under your tube. Duplicate.
C/P element 68 as a new layer and duplicate. Place one on the left hand side of frame and the other on the right hand side.
Make sure these are below the frame in the layer palette.
Merge them together.
Select you magic wand, feather 0 and click inside the frame. Selection/modify/expand by 8. Delete the excess trees you see in the center.
Repeat this process for anything further we place behind the frame layer.
C/P element 31 as a new layer and position upper left hand side of frame. Delete extra in center of frame.
C/P element 57 as a new layer and re-size by 70%. Position in front of frame and behind your tube. Place on the lower right hand side of frame.
C/P element 73 as a new layer and re-size by 30%. Position on the upper left hand side of frame.
C/P element 5 as a new layer and re-size by 70%. Mirror. Position on the lower right hand side of frame and over the barrels.
Now within the frame (circle), paste the army tank and element 67. To remove extra, just click in the circle with magic wand and invert select. In layers palette click on tank, delete and then click on element 67 and delete.
Add element 20 on the right side of frame (behind) and delete the extra from the center.
C/P element 21 as a new layer and re-size by 60%. Position at bottom of tag and just under your tubes hands on the ground.
Add drop shadow to all layers.
Add artist copyright and merge all visible.
Add name.
Merge all visible and save as a PNG.
Hope you enjoyed this tutorial,
Hugs Simone
Please, always direct people to my blog to download my animations.
Do not load to any other download site and don't claim as your own.
Tutorial written by SophisticatSimone aka Lorraine Halle on Monday June 24, 2013.
Sunday, June 23, 2013

♥♥♥
Please click on TAG to see in full size.
••• Supplies needed to complete this tutorial. •••
________________________________________________________________________
Programs: Paint Shop Pro, I'm using version 10. Animation Shop 3.
Plugin : Eye Candy 4: Gradient Glow
Font used: Genial Black Regular
Tube of choice: I'm using "Gatana" by Mistycheskaya.
Scrap Kit : I'm using "Cruelina" by SkyScraps.
Animation: SimoneAni320
Mask: 0107 HERE
________________________________________________________________________
♥♥♥
Save your tag often. Nothing like working long and hard on a tag and PSP crashes.
♥♥♥
Open a new image 700 x 650.
Copy and paste your tube as a new layer. Re-size by 80% and add drop shadow. Move low towards bottom of tag.
C/P element 65 as a new layer and re-size by 65%. Position behind tube and on right side. Add drop shadow.
C/P element 37 as a new layer and re-size by 65%. Position behind tube and on left side. Add drop shadow.
C/P element 1 as a new layer and re-size by 40%. Position puppy on crate. Duplicate and mirror. Position in front of tube and
by her arm. Add drop shadow to each puppy.
C/P element 11 as a new layer and re-size by 40%. Position facing her face, on the left side of tag. Add drop shadow.
C/P element 31 as a new layer. Position behind the other tree on it's left side.
If you need to increase your canvas size at this time, go ahead. I made mine 900 x 900.
This is temporary until we re-size at the end.
C/P element 61 as a new layer and re-size by 60%. Move behind your tube's feet/legs on the right side of tag.
Duplicate and move to middle of tag and behind the crate.
Duplicate and mirror. Move to the edge of crate on the left side of tag.
Add drop shadow to each layer.
C/P element 64 as a new layer and re-size by 70%. Mirror and position above the puppy on the crate. Add drop shadow.
C/P element 63 as a new layer and re-size by 50%. Move to left side of tag and place on edge of crate. Add drop shadow.
C/P element 75 as a new layer. Move to bottom of tag behind the crate. Duplicate and move this layer in front of crate. Add drop shadow to each.
C/P element 49 as a new layer and move behind crate and in front of the evergreen tree. Duplicate and merge together.
C/P element 93 as a new layer and re-size by 22%. Duplicate and merge down. Move to right lower hand side. Add drop shadow.
C/P element 7 as a new layer and re-size by 50%. Move to lower right hand side. Add drop shadow.
C/P element 29 as a new layer. Move to top of canvas. In layers palette send to bottom.
C/P element 3 as a new layer and re-size by 70%. Move to right side of tag. This should be your last layer.
Activate your crate layer and duplicate. Re-size by 70% and mirror. Position it so it covers the bottom area of your castle.
Add drop shadow.
C/P element 45 as a new layer. This should be your top layer. Position sparkles so they don't cover tube's face.
C/P paper 1 as a new layer and move to bottom. Crop merged opaque.
Apply mask 0107 to the paper. Merge group. Duplicate and merge down.
Starting from your top layer, merge all elements down one at a time until you get to the tube. Include the tube in this layer.
X-out.
Merge all visible.
Crop your tag and re-size by 80%.
Add artist copyright and merge down.
Add your name and save as PNG.
If animating, go to Selections, select ALL.
Activate the bottom layer and copy.
Paste as a new Animation in Animation Shop.
Hold your Ctrl key down and repeatedly hit letter L on your keyboard for a total of 16frames.
You can watch the count on the lower right hand side of your screen in AS.
Open SimoneAni320
Go to Edit, select all.
Go to Edit, copy.
Activate your tag.
Go to Edit, select all.
Go to Edit, make sure Propagate Paste is selected.
Go to Edit, Paste, paste into selected frames.
Position on your tag and click into place. I pasted this animation 3 times. Once in between the black crow and puppy on crate.
Again near tree and castle and then lower down by her buttocks.
Go back in PSP and activate the top layer. Copy and paste in AS as a new animation.
Go Edit and Copy.
Activate your tag.
Go to Edit, Paste, paste into selected frames.
Position as best as you can, the way it looked on your tag in PSP. Click into place.
Play and save.
To save:
Go to File, Save as, enter the name of your file and select the folder to save to.
Now click on Customize:
Under COLORS TAB:
Number of colors: 255 Colors
Create palette by: OPTIMIZED OCTREE
Reduce colors by: Error Diffusion
Under OPTIMIZATIONS TAB:
set a check mark beside the second, third and forth choices. UN-check the 1st and last.
Under PARTIAL TRANSPARENCY:
check Convert pixels less than 92
Yes, blend with this color: change to white #FFFFFF
Click OK. Click Next, next, next, next.
Play your animation.
At times your animation may or will come out terrible. Optimization in Animation Shop is not the greatest.
You can play around will your settings, especially under the Tab: Optimization. I change this setting at times from anywhere between 70 and 100.
Some people add a white background. To add background, go to Animation: Animation Properties, select Opaque and change color to white.
Hope you enjoyed this tutorial,
Hugs Simone
Please, always direct people to my blog to download my animations.
Do not load to any other download site and don't claim as your own.
Tutorial written by SophisticatSimone aka Lorraine Halle on Sunday June 23, 2013
Please click on TAG to see in full size.
••• Supplies needed to complete this tutorial. •••
________________________________________________________________________
Programs: Paint Shop Pro, I'm using version 10. Animation Shop 3.
Plugin : Eye Candy 4: Gradient Glow
Font used: Genial Black Regular
Tube of choice: I'm using "Gatana" by Mistycheskaya.
Scrap Kit : I'm using "Cruelina" by SkyScraps.
Animation: SimoneAni320
Mask: 0107 HERE
________________________________________________________________________
♥♥♥
Save your tag often. Nothing like working long and hard on a tag and PSP crashes.
♥♥♥
Open a new image 700 x 650.
Copy and paste your tube as a new layer. Re-size by 80% and add drop shadow. Move low towards bottom of tag.
C/P element 65 as a new layer and re-size by 65%. Position behind tube and on right side. Add drop shadow.
C/P element 37 as a new layer and re-size by 65%. Position behind tube and on left side. Add drop shadow.
C/P element 1 as a new layer and re-size by 40%. Position puppy on crate. Duplicate and mirror. Position in front of tube and
by her arm. Add drop shadow to each puppy.
C/P element 11 as a new layer and re-size by 40%. Position facing her face, on the left side of tag. Add drop shadow.
C/P element 31 as a new layer. Position behind the other tree on it's left side.
If you need to increase your canvas size at this time, go ahead. I made mine 900 x 900.
This is temporary until we re-size at the end.
C/P element 61 as a new layer and re-size by 60%. Move behind your tube's feet/legs on the right side of tag.
Duplicate and move to middle of tag and behind the crate.
Duplicate and mirror. Move to the edge of crate on the left side of tag.
Add drop shadow to each layer.
C/P element 64 as a new layer and re-size by 70%. Mirror and position above the puppy on the crate. Add drop shadow.
C/P element 63 as a new layer and re-size by 50%. Move to left side of tag and place on edge of crate. Add drop shadow.
C/P element 75 as a new layer. Move to bottom of tag behind the crate. Duplicate and move this layer in front of crate. Add drop shadow to each.
C/P element 49 as a new layer and move behind crate and in front of the evergreen tree. Duplicate and merge together.
C/P element 93 as a new layer and re-size by 22%. Duplicate and merge down. Move to right lower hand side. Add drop shadow.
C/P element 7 as a new layer and re-size by 50%. Move to lower right hand side. Add drop shadow.
C/P element 29 as a new layer. Move to top of canvas. In layers palette send to bottom.
C/P element 3 as a new layer and re-size by 70%. Move to right side of tag. This should be your last layer.
Activate your crate layer and duplicate. Re-size by 70% and mirror. Position it so it covers the bottom area of your castle.
Add drop shadow.
C/P element 45 as a new layer. This should be your top layer. Position sparkles so they don't cover tube's face.
C/P paper 1 as a new layer and move to bottom. Crop merged opaque.
Apply mask 0107 to the paper. Merge group. Duplicate and merge down.
Starting from your top layer, merge all elements down one at a time until you get to the tube. Include the tube in this layer.
X-out.
Merge all visible.
Crop your tag and re-size by 80%.
Add artist copyright and merge down.
Add your name and save as PNG.
If animating, go to Selections, select ALL.
Activate the bottom layer and copy.
Paste as a new Animation in Animation Shop.
Hold your Ctrl key down and repeatedly hit letter L on your keyboard for a total of 16frames.
You can watch the count on the lower right hand side of your screen in AS.
Open SimoneAni320
Go to Edit, select all.
Go to Edit, copy.
Activate your tag.
Go to Edit, select all.
Go to Edit, make sure Propagate Paste is selected.
Go to Edit, Paste, paste into selected frames.
Position on your tag and click into place. I pasted this animation 3 times. Once in between the black crow and puppy on crate.
Again near tree and castle and then lower down by her buttocks.
Go back in PSP and activate the top layer. Copy and paste in AS as a new animation.
Go Edit and Copy.
Activate your tag.
Go to Edit, Paste, paste into selected frames.
Position as best as you can, the way it looked on your tag in PSP. Click into place.
Play and save.
To save:
Go to File, Save as, enter the name of your file and select the folder to save to.
Now click on Customize:
Under COLORS TAB:
Number of colors: 255 Colors
Create palette by: OPTIMIZED OCTREE
Reduce colors by: Error Diffusion
Under OPTIMIZATIONS TAB:
set a check mark beside the second, third and forth choices. UN-check the 1st and last.
Under PARTIAL TRANSPARENCY:
check Convert pixels less than 92
Yes, blend with this color: change to white #FFFFFF
Click OK. Click Next, next, next, next.
Play your animation.
At times your animation may or will come out terrible. Optimization in Animation Shop is not the greatest.
You can play around will your settings, especially under the Tab: Optimization. I change this setting at times from anywhere between 70 and 100.
Some people add a white background. To add background, go to Animation: Animation Properties, select Opaque and change color to white.
Hope you enjoyed this tutorial,
Hugs Simone
Please, always direct people to my blog to download my animations.
Do not load to any other download site and don't claim as your own.
Tutorial written by SophisticatSimone aka Lorraine Halle on Sunday June 23, 2013
Sunday, June 9, 2013

♥♥♥
Please click on TAG to see in full size.
••• Supplies needed to complete this tutorial. •••
________________________________________________________________________
Programs: Paint Shop Pro, I'm using version 10. Animation Shop 3.
Plugin : NONE
Font used: ICT Symbol Black
Tube of choice: I'm using "Nurse" by Diana Gali.
Scrap Kit : I'm using "Allo Maman Bobo" by SkyScraps.
Animation: SimoneAni-486-491
________________________________________________________________________
♥♥♥
Save your tag often. Nothing like working long and hard on a tag and PSP crashes.
♥♥♥
Open a new canvas 700 x 800 transparent background.
We will re-size at the end.
Copy and paste your tube as a new layer.
C/P element 26 as a new layer and move behind your tube.
C/P element 55 as a new layer and add very small drop shadow.
C/p element 63 as a new layer and center.
C/P element 17 as a new layer and leave centered.
C/P element 2 as a new layer and triplicate. Move one to the left and one to the right, the other stays in the center.
Merge these 3 together. RE-size by 70% and duplicate. Move down and duplicate this layer and flip.
Add drop shadow to each.
C/P element 23 as a new layer and move to right hand side.
C/P element 3 as a new layer and move slightly behind your tube on the right side of tag.
C/P element 9 as a new layer. Re-size and add drop shadow.
C/P element 31 as a new layer. Re-size and add drop shadow.
C/P element 24 as a new layer . Re-size and place to the right, add D/S.
C/P element 7 as a new layer . Move to the left of tag and add D/S.
C/P element 37 as a new layer . Move to the left of tag behind the large needle. Add D/S.
See my tag for reference or do your own thing.
C/P element 5 as a new layer. Re-size and add drop shadow. Position at bottom.
Add as many elements as you want. Once ready we will animate.
Remember to add your artist copyright.
Save tag.
Let do the dripping blood animation.
Copy merge all layers and paste in Animation Shop as a new animation.
Hold your Ctrl key down and repeatedly hit letter L on your keyboard for a total of 21 frames.
You can watch the count on the lower right hand side of your screen in AS.
Open SimoneAni488
Go to Edit, select all.
Go to Edit, copy.
Activate your tag.
Go to Edit, select all.
Go to Edit, make sure Propagate Paste is selected.
Go to Edit, Paste, paste into selected frames.
Position on your tag and click into place.
Ok click play and see if it's position pretty good. I had to redo the paste about 6 times before I got right where I wanted it.
Once you're happy with it, just leave it open in AS. I've learned over the years to save a copy right away, so shift + D to duplicate and save as MNG to your folder of
choice.
Now let's go back to PSP for the completion of tag.
Doing the NAME with blood animation:
Open SimoneAni87-PSD in Paint Shop Pro.
There are 16 frames that we will be playing with so you need patience and time.
It a little time consuming but fun! :)
Clean up your work space, close any opened images that you're not using.
Have only the animation open and your tag.
Make sure you've saved your tag at least once and duplicate it. Close original.
We will work on the duplicated one. Merge all your layers, {don't flatten} and type your name out using a nice big chunky font. I'm using:
ICT Symbol Black.
See Screenshot:
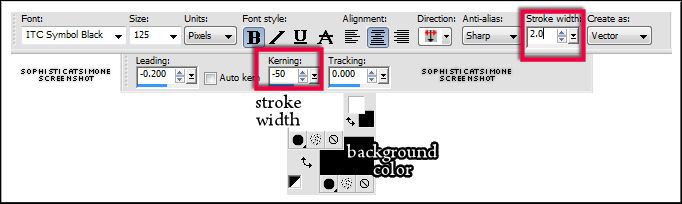
Convert to Raster Layer and duplicate.
On the bottom name layer apply a nice dark drop shadow . I used:
V=10
H=7
Opacity=83
Blur=8
Color=Black
Ok back onto the top name layer.
Grab your magic wand, mode: add shift, Match Mode: RGB Value, feather set to 0, tolerance set to 5, anti-alias checked.
Now click on the black in your name (all letters or a couple). Marching ants will appear around selected black text.
Now X-out your tag layer. Only have the two text layers visible.
Activate your animation. Starting from the top layer in Layers Palette, X-out all the layers one by one till you get to the last one (bottom).
Leave that one visible and click on it so it's the active layer.
Go to Material palette and double click on background color.
Select Pattern Tab and find your animation. Should be at the very beginning.
You'll see your tag, plus anything else open in PSP.
Click on it and set Angle to 0 and Scale to 100.
••• Supplies needed to complete this tutorial. •••
________________________________________________________________________
Programs: Paint Shop Pro, I'm using version 10. Animation Shop 3.
Plugin : NONE
Font used: ICT Symbol Black
Tube of choice: I'm using "Nurse" by Diana Gali.
Scrap Kit : I'm using "Allo Maman Bobo" by SkyScraps.
Animation: SimoneAni-486-491
________________________________________________________________________
♥♥♥
Save your tag often. Nothing like working long and hard on a tag and PSP crashes.
♥♥♥
Open a new canvas 700 x 800 transparent background.
We will re-size at the end.
Copy and paste your tube as a new layer.
C/P element 26 as a new layer and move behind your tube.
C/P element 55 as a new layer and add very small drop shadow.
C/p element 63 as a new layer and center.
C/P element 17 as a new layer and leave centered.
C/P element 2 as a new layer and triplicate. Move one to the left and one to the right, the other stays in the center.
Merge these 3 together. RE-size by 70% and duplicate. Move down and duplicate this layer and flip.
Add drop shadow to each.
C/P element 23 as a new layer and move to right hand side.
C/P element 3 as a new layer and move slightly behind your tube on the right side of tag.
C/P element 9 as a new layer. Re-size and add drop shadow.
C/P element 31 as a new layer. Re-size and add drop shadow.
C/P element 24 as a new layer . Re-size and place to the right, add D/S.
C/P element 7 as a new layer . Move to the left of tag and add D/S.
C/P element 37 as a new layer . Move to the left of tag behind the large needle. Add D/S.
See my tag for reference or do your own thing.
C/P element 5 as a new layer. Re-size and add drop shadow. Position at bottom.
Add as many elements as you want. Once ready we will animate.
Remember to add your artist copyright.
Save tag.
Let do the dripping blood animation.
Copy merge all layers and paste in Animation Shop as a new animation.
Hold your Ctrl key down and repeatedly hit letter L on your keyboard for a total of 21 frames.
You can watch the count on the lower right hand side of your screen in AS.
Open SimoneAni488
Go to Edit, select all.
Go to Edit, copy.
Activate your tag.
Go to Edit, select all.
Go to Edit, make sure Propagate Paste is selected.
Go to Edit, Paste, paste into selected frames.
Position on your tag and click into place.
Ok click play and see if it's position pretty good. I had to redo the paste about 6 times before I got right where I wanted it.
Once you're happy with it, just leave it open in AS. I've learned over the years to save a copy right away, so shift + D to duplicate and save as MNG to your folder of
choice.
Now let's go back to PSP for the completion of tag.
Doing the NAME with blood animation:
Open SimoneAni87-PSD in Paint Shop Pro.
There are 16 frames that we will be playing with so you need patience and time.
It a little time consuming but fun! :)
Clean up your work space, close any opened images that you're not using.
Have only the animation open and your tag.
Make sure you've saved your tag at least once and duplicate it. Close original.
We will work on the duplicated one. Merge all your layers, {don't flatten} and type your name out using a nice big chunky font. I'm using:
ICT Symbol Black.
See Screenshot:
Convert to Raster Layer and duplicate.
On the bottom name layer apply a nice dark drop shadow . I used:
V=10
H=7
Opacity=83
Blur=8
Color=Black
Ok back onto the top name layer.
Grab your magic wand, mode: add shift, Match Mode: RGB Value, feather set to 0, tolerance set to 5, anti-alias checked.
Now click on the black in your name (all letters or a couple). Marching ants will appear around selected black text.
Now X-out your tag layer. Only have the two text layers visible.
Activate your animation. Starting from the top layer in Layers Palette, X-out all the layers one by one till you get to the last one (bottom).
Leave that one visible and click on it so it's the active layer.
Go to Material palette and double click on background color.
Select Pattern Tab and find your animation. Should be at the very beginning.
You'll see your tag, plus anything else open in PSP.
Click on it and set Angle to 0 and Scale to 100.
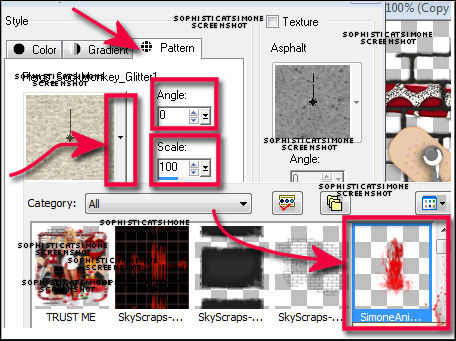
Activate your tag and X-out tube/tag layer if you haven't done so already.
Select your Flood Fill tool and fill your name. Make sure it's the top text layer.
Go to SELECTIONS, select ALL.
Go to EDIT, copy MERGED.
Go to Animation Shop and right click Paste as a NEW Animation.
Back in PSP. Go to EDIT and Undo until you get to undo fill. Undo Fill.
Ok activate your animation and X-out the bottom layer. Un-hide the next layer and activate it by clicking on it in Layers Palette.
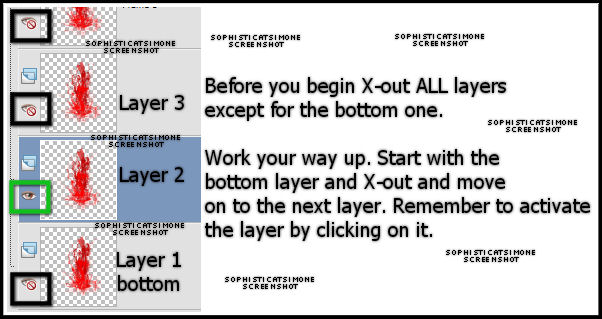
Go back to your tag. Go to Material palette and double click on background color. You should see your animation there, BUT it's the previous layer, so
select in drop down box and find the animation again. It will activate the current layer.
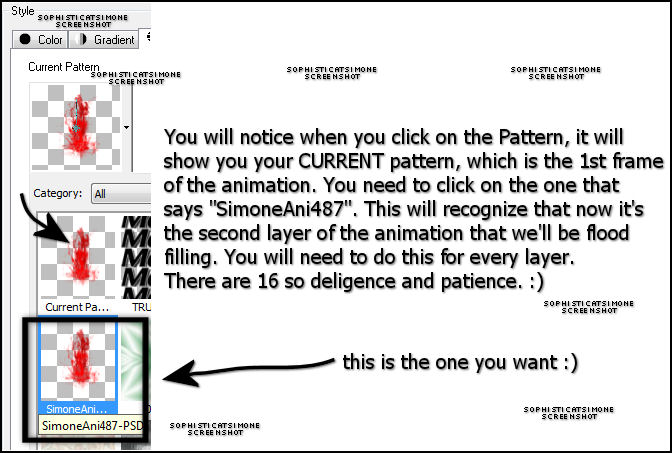
Flood fill your name again.
Go to SELECTIONS, select ALL.
Go to EDIT, copy MERGED.
Go to Animation Shop and right click on the text and Paste AFTER current frame.
Back in PSP. Go to EDIT and Undo until you get to undo fill. Undo Fill.
Activate animation and X-out the layer we just used. Activate the next top layer and un hide it.
Go back to your tag. Go to Material palette and double click on background color. You should see your animation there, BUT it's the previous layer, so
select in drop down box and find the animation again. It will activate the current layer.
Flood fill your name again.
Go to SELECTIONS, select ALL.
Go to EDIT, copy MERGED.
Go to Animation Shop and right click on the LAST frame, so in this case FRAME 2 and Paste AFTER current frame.
Back in PSP.
Repeat all steps until you've done all 16 layers of animation.
Have fun! :)
Hope you enjoyed this tutorial,
Hugs Simone
Please, always direct people to my blog to download my animations.
Do not load to any other download site and don't claim as your own.
Tutorial written by SophisticatSimone aka Lorraine Halle on Monday June 3, 2013.
Back in PSP. Go to EDIT and Undo until you get to undo fill. Undo Fill.
Activate animation and X-out the layer we just used. Activate the next top layer and un hide it.
Go back to your tag. Go to Material palette and double click on background color. You should see your animation there, BUT it's the previous layer, so
select in drop down box and find the animation again. It will activate the current layer.
Flood fill your name again.
Go to SELECTIONS, select ALL.
Go to EDIT, copy MERGED.
Go to Animation Shop and right click on the LAST frame, so in this case FRAME 2 and Paste AFTER current frame.
Back in PSP.
Repeat all steps until you've done all 16 layers of animation.
Have fun! :)
Hope you enjoyed this tutorial,
Hugs Simone
Please, always direct people to my blog to download my animations.
Do not load to any other download site and don't claim as your own.
Tutorial written by SophisticatSimone aka Lorraine Halle on Monday June 3, 2013.
Sunday, June 2, 2013

♥♥♥
Please click on TAG to see in full size.
••• Supplies needed to complete this tutorial. •••
________________________________________________________________________
Programs: Paint Shop Pro, I'm using version 10. Animation Shop 3.
Plugin : Gradient Glow by Eye Candy 4000 (for name)
Font used: A&S Black Swan
Tube of choice: I'm using "Dina" by Verymany from SATC.
Scrap Kit : I'm using "Dina" by SkyScraps from SATC
Animation: SimoneAni-Island2
Mask: Masks0124 (one of mine)
________________________________________________________________________
♥♥♥
Save your tag often. Nothing like working long and hard on a tag and PSP crashes.
♥♥♥
Open Mask 0124 in PSP and minimize.
Open paper 10, duplicate and re-size by 85%.
Apply Mask and merge group.
Close mask and original paper.
Copy and paste your tube as a new layer. I re-sized by 80%. Add drop shadow.
Copy and paste element 14 as a new layer. I re-sized by 90%. Add drop shadow. Move behind your tube layer and to the left.
Copy and paste element 13 as a new layer. I re-sized by 50%. Add drop shadow. Move in front of your tube
layer and to the right.
Repeat for element 40. Move to far right side.
Repeat for element 55 and re-size by 50%. Move in front of beach ball. Add drop shadow.
Repeat for element 12 and re-size by 30%. Position in front.
C/P element 72 and move behind tube. Position more to the right side of tag. Add D/S.
Repeat for element 76. Move between beach ball and watermelon.
C/P element 81 and duplicate. Re-size both layers by 42%. Place one to the left behind beach ball.
Place one to the lower left hand side of tag.
C/P element 80 and re-size by 50%. Flip and place on tiki's head.
Add parrot, crab, grass elements and sandals. Elements 74, 8, 68, 67.
Add black grass in behind surfboard, element 95.
Add big grass, element 66 in front of your tube ( just a little) and to the left. Add drop shadow.
Add anything else you'd like from the kit.
Make sure all your layers have a drop shadow.
Merge all visible.
Add artist copyright and your license number.
Save your tag.
To animate:
Go to Selections, select all.
Go to Edit and copy merged. Paste as a new animation in Animation Shop.
Hold your Ctrl key down and repeatedly hit letter L on your keyboard for a total of 16 frames.
You can watch the count on the lower right hand side of your screen in AS.
Open SimoneAni-Island2
Go to Edit, select all.
Go to Edit, copy.
Activate your tag.
Go to Edit, select all.
Go to Edit, make sure Propagate Paste is selected.
Go to Edit, Paste, paste into selected frames.
Position on your tag and click into place.
Play and save.
Don't forget to add your name.
You can see my name tutorial HERE.
To save:
Go to File, Save as, enter the name of your file and select the folder to save to.
Now click on Customize:
Under COLORS TAB:
Number of colors: 255 Colors
Create palette by: OPTIMIZED OCTREE
Reduce colors by: Error Diffusion
Under OPTIMIZATIONS TAB:
set a check mark beside the second, third and forth choices. UN-check the 1st and last.
Under PARTIAL TRANSPARENCY:
check Convert pixels less than 96
Yes, blend with this color: change to white #FFFFFF
Click OK. Click Next, next, next, next.
Play your animation.
At times your animation may or will come out terrible. Optimization in Animation Shop is not the greatest.
You can play around will your settings, especially under the Tab: Optimization. I change this setting at times from anywhere between 70 and 100.
Some people add a white background. To add background, go to Animation: Animation Properties, select Opaque and change color to white.
Hope you enjoyed this tutorial,
Hugs Simone
Please, always direct people to my blog to download my animations.
Do not load to any other download site and don't claim as your own.
Tutorial written by SophisticatSimone aka Lorraine Halle on Sunday, June 2, 2013.
Please click on TAG to see in full size.
••• Supplies needed to complete this tutorial. •••
________________________________________________________________________
Programs: Paint Shop Pro, I'm using version 10. Animation Shop 3.
Plugin : Gradient Glow by Eye Candy 4000 (for name)
Font used: A&S Black Swan
Tube of choice: I'm using "Dina" by Verymany from SATC.
Scrap Kit : I'm using "Dina" by SkyScraps from SATC
Animation: SimoneAni-Island2
Mask: Masks0124 (one of mine)
________________________________________________________________________
♥♥♥
Save your tag often. Nothing like working long and hard on a tag and PSP crashes.
♥♥♥
Open Mask 0124 in PSP and minimize.
Open paper 10, duplicate and re-size by 85%.
Apply Mask and merge group.
Close mask and original paper.
Copy and paste your tube as a new layer. I re-sized by 80%. Add drop shadow.
Copy and paste element 14 as a new layer. I re-sized by 90%. Add drop shadow. Move behind your tube layer and to the left.
Copy and paste element 13 as a new layer. I re-sized by 50%. Add drop shadow. Move in front of your tube
layer and to the right.
Repeat for element 40. Move to far right side.
Repeat for element 55 and re-size by 50%. Move in front of beach ball. Add drop shadow.
Repeat for element 12 and re-size by 30%. Position in front.
C/P element 72 and move behind tube. Position more to the right side of tag. Add D/S.
Repeat for element 76. Move between beach ball and watermelon.
C/P element 81 and duplicate. Re-size both layers by 42%. Place one to the left behind beach ball.
Place one to the lower left hand side of tag.
C/P element 80 and re-size by 50%. Flip and place on tiki's head.
Add parrot, crab, grass elements and sandals. Elements 74, 8, 68, 67.
Add black grass in behind surfboard, element 95.
Add big grass, element 66 in front of your tube ( just a little) and to the left. Add drop shadow.
Add anything else you'd like from the kit.
Make sure all your layers have a drop shadow.
Merge all visible.
Add artist copyright and your license number.
Save your tag.
To animate:
Go to Selections, select all.
Go to Edit and copy merged. Paste as a new animation in Animation Shop.
Hold your Ctrl key down and repeatedly hit letter L on your keyboard for a total of 16 frames.
You can watch the count on the lower right hand side of your screen in AS.
Open SimoneAni-Island2
Go to Edit, select all.
Go to Edit, copy.
Activate your tag.
Go to Edit, select all.
Go to Edit, make sure Propagate Paste is selected.
Go to Edit, Paste, paste into selected frames.
Position on your tag and click into place.
Play and save.
Don't forget to add your name.
You can see my name tutorial HERE.
To save:
Go to File, Save as, enter the name of your file and select the folder to save to.
Now click on Customize:
Under COLORS TAB:
Number of colors: 255 Colors
Create palette by: OPTIMIZED OCTREE
Reduce colors by: Error Diffusion
Under OPTIMIZATIONS TAB:
set a check mark beside the second, third and forth choices. UN-check the 1st and last.
Under PARTIAL TRANSPARENCY:
check Convert pixels less than 96
Yes, blend with this color: change to white #FFFFFF
Click OK. Click Next, next, next, next.
Play your animation.
At times your animation may or will come out terrible. Optimization in Animation Shop is not the greatest.
You can play around will your settings, especially under the Tab: Optimization. I change this setting at times from anywhere between 70 and 100.
Some people add a white background. To add background, go to Animation: Animation Properties, select Opaque and change color to white.
Hope you enjoyed this tutorial,
Hugs Simone
Please, always direct people to my blog to download my animations.
Do not load to any other download site and don't claim as your own.
Tutorial written by SophisticatSimone aka Lorraine Halle on Sunday, June 2, 2013.
Sunday, May 26, 2013

♥♥♥
Please click on TAG to see in full size.
••• Supplies needed to complete this tutorial. •••
________________________________________________________________________
Programs: Paint Shop Pro, I'm using version 10. Animation Shop 3.
Plugin : Gradient Glow by Eye Candy 4000 (for name)
Font used: Miss Le Gatees
Tube of choice: I'm using "Suzanne" by Diana Gali
Please click on TAG to see in full size.
••• Supplies needed to complete this tutorial. •••
________________________________________________________________________
Programs: Paint Shop Pro, I'm using version 10. Animation Shop 3.
Plugin : Gradient Glow by Eye Candy 4000 (for name)
Font used: Miss Le Gatees
Tube of choice: I'm using "Suzanne" by Diana Gali
Animation: SimoneAni-PinkFlames
Mask: Masks0122 (one of mine)
________________________________________________________________________
♥♥♥
Save your tag often. Nothing like working long and hard on a tag and PSP crashes.
♥♥♥
Open mask of choice or mine in PSP and minimize.
Open paper 1 and duplicate. Close original. Re-size by 80%.
Apply mask to the paper.
Merge group. Duplicate and merge down.
Copy and paste element 5 as a new layer, re-size by 80% and move to the lower left hand side. Add drop shadow.
Copy and paste element 15 and mirror. Re-size by 69% and move to the right side of tag. Add drop shadow.
Copy and paste element 25 as a new layer. Leave in center. Add drop shadow.
Copy and paste element 95 as a new layer. Re-size by 50%. Move to the left side of tag and add drop shadow.
Copy and paste element 71 as a new layer. Re-size by 30%. Move to the upper right hand side of tag behind the big black box. Duplicate and move down lower.
Duplicate and mirror. Drop shadow each.
Copy and paste element 15 and re-size by 40%. Move to the left side of tag. Add drop shadow.
Copy and paste element 72 and re-size by 45%. Move to the left side over the black box and add drop shadow.
Copy and paste element 93 and move to the left side of tag. Add drop shadow.
Merge visible.
Save tag.
Copy and paste tube as a new layer and move a little to the right. Add drop shadow.
Copy and paste element 10 and move to the right side of tag. Duplicate and mirror.
Add drop shadow to each layer.
Copy and paste element 23 and re-size by 80%. Move to the right side and add drop shadow.
Duplicate and move to the left. Using selection tool remove the bottom portion from about midway down. Move candles down low about half way down left hand side of tag. Add drop shadow.
Copy and paste element 22 as a new layer and re-size by 50% and move to the right of car. Add drop shadow.
Copy and paste element 17 as a new layer. Mirror and re-size by 75% and add drop shadow. Move to the lower Right hand side of tag.
Merge all layers.
Add artist copyright. Merge down.
Now to animate.
Go to Selections, select all.
Go to Edit and copy merged. Paste as a new animation in Animation Shop.
Hold your Ctrl key down and repeatedly hit letter L on your keyboard for a total of 12 frames.
You can watch the count on the lower right hand side of your screen in AS.
Open SimoneAni-PinkFlame-04
Go to Edit, select all.
Go to Edit, copy.
Activate your tag.
Go to Edit, select all.
Go to Edit, make sure Propagate Paste is selected.
Go to Edit, Paste, paste into selected frames.
Position on your tag and click into place over the largest candle. Right lower hand side of tag.
Repeat this process using any of the other flames.
I did mirror
Play and save.
Don't forget to add your name.
You can see my name tutorial HERE.
To save:
Go to File, Save as, enter the name of your file and select the folder to save to.
Now click on Customize:
Under COLORS TAB:
Number of colors: 255 Colors
Create palette by: OPTIMIZED OCTREE
Reduce colors by: Error Diffusion
Under OPTIMIZATIONS TAB:
set a check mark beside the second, third and forth choices. UN-check the 1st and last.
Under PARTIAL TRANSPARENCY:
check Convert pixels less than 92
Yes, blend with this color: change to white #FFFFFF
Click OK. Click Next, next, next, next.
Play your animation.
At times your animation may or will come out terrible. Optimization in Animation Shop is not the greatest.
You can play around will your settings, especially under the Tab: Optimization. I change this setting at times from anywhere between 70 and 100.
Some people add a white background. To add background, go to Animation: Animation Properties, select Opaque and change color to white.
Hope you enjoyed this tutorial,
Hugs Simone
Please, always direct people to my blog to download my animations.
Do not load to any other download site and don't claim as your own.
Tutorial written by SophisticatSimone aka Lorraine Halle on Sunday May26, 2013.
Mask: Masks0122 (one of mine)
________________________________________________________________________
♥♥♥
Save your tag often. Nothing like working long and hard on a tag and PSP crashes.
♥♥♥
Open mask of choice or mine in PSP and minimize.
Open paper 1 and duplicate. Close original. Re-size by 80%.
Apply mask to the paper.
Merge group. Duplicate and merge down.
Copy and paste element 5 as a new layer, re-size by 80% and move to the lower left hand side. Add drop shadow.
Copy and paste element 15 and mirror. Re-size by 69% and move to the right side of tag. Add drop shadow.
Copy and paste element 25 as a new layer. Leave in center. Add drop shadow.
Copy and paste element 95 as a new layer. Re-size by 50%. Move to the left side of tag and add drop shadow.
Copy and paste element 71 as a new layer. Re-size by 30%. Move to the upper right hand side of tag behind the big black box. Duplicate and move down lower.
Duplicate and mirror. Drop shadow each.
Copy and paste element 15 and re-size by 40%. Move to the left side of tag. Add drop shadow.
Copy and paste element 72 and re-size by 45%. Move to the left side over the black box and add drop shadow.
Copy and paste element 93 and move to the left side of tag. Add drop shadow.
Merge visible.
Save tag.
Copy and paste tube as a new layer and move a little to the right. Add drop shadow.
Copy and paste element 10 and move to the right side of tag. Duplicate and mirror.
Add drop shadow to each layer.
Copy and paste element 23 and re-size by 80%. Move to the right side and add drop shadow.
Duplicate and move to the left. Using selection tool remove the bottom portion from about midway down. Move candles down low about half way down left hand side of tag. Add drop shadow.
Copy and paste element 22 as a new layer and re-size by 50% and move to the right of car. Add drop shadow.
Copy and paste element 17 as a new layer. Mirror and re-size by 75% and add drop shadow. Move to the lower Right hand side of tag.
Merge all layers.
Add artist copyright. Merge down.
Now to animate.
Go to Selections, select all.
Go to Edit and copy merged. Paste as a new animation in Animation Shop.
Hold your Ctrl key down and repeatedly hit letter L on your keyboard for a total of 12 frames.
You can watch the count on the lower right hand side of your screen in AS.
Open SimoneAni-PinkFlame-04
Go to Edit, select all.
Go to Edit, copy.
Activate your tag.
Go to Edit, select all.
Go to Edit, make sure Propagate Paste is selected.
Go to Edit, Paste, paste into selected frames.
Position on your tag and click into place over the largest candle. Right lower hand side of tag.
Repeat this process using any of the other flames.
I did mirror
Play and save.
Don't forget to add your name.
You can see my name tutorial HERE.
To save:
Go to File, Save as, enter the name of your file and select the folder to save to.
Now click on Customize:
Under COLORS TAB:
Number of colors: 255 Colors
Create palette by: OPTIMIZED OCTREE
Reduce colors by: Error Diffusion
Under OPTIMIZATIONS TAB:
set a check mark beside the second, third and forth choices. UN-check the 1st and last.
Under PARTIAL TRANSPARENCY:
check Convert pixels less than 92
Yes, blend with this color: change to white #FFFFFF
Click OK. Click Next, next, next, next.
Play your animation.
At times your animation may or will come out terrible. Optimization in Animation Shop is not the greatest.
You can play around will your settings, especially under the Tab: Optimization. I change this setting at times from anywhere between 70 and 100.
Some people add a white background. To add background, go to Animation: Animation Properties, select Opaque and change color to white.
Hope you enjoyed this tutorial,
Hugs Simone
Please, always direct people to my blog to download my animations.
Do not load to any other download site and don't claim as your own.
Tutorial written by SophisticatSimone aka Lorraine Halle on Sunday May26, 2013.
Friday, May 24, 2013

♥♥♥
Please click on TAG to see in full size.
••• Supplies needed to complete this tutorial. •••
________________________________________________________________________
Programs: Paint Shop Pro, I'm using version 10. Animation Shop 3.
Plugin : Eye Candy: Gradient Glow for name.
Font used: Brahn Mufun
Tube of choice: I'm using "Billy" by Christine Marie Kotlark
Please click on TAG to see in full size.
••• Supplies needed to complete this tutorial. •••
________________________________________________________________________
Programs: Paint Shop Pro, I'm using version 10. Animation Shop 3.
Plugin : Eye Candy: Gradient Glow for name.
Font used: Brahn Mufun
Tube of choice: I'm using "Billy" by Christine Marie Kotlark
Scrap Kit : I'm using "Hallows Eve" by SkyScrap no longer in business
Animation: I'm using my own, SimoneAni-Where's Billy Tutorial
________________________________________________________________________
♥♥♥
Save your tag often. Nothing like working long and hard on a tag and PSP crashes.
♥♥♥
Open a new image size 750 x 685. We can re-size at the end.
Copy and paste element 83 as a new layer on your canvas. Activate your selection tool, set to Freehand Select.
Type: Point to point
Mode: Add(shift)
Feather: 5
Smoothing: 0
Anti-alias: checked.
Just remove the extra little dots at the top of this element.
See screenshot.
Animation: I'm using my own, SimoneAni-Where's Billy Tutorial
________________________________________________________________________
♥♥♥
Save your tag often. Nothing like working long and hard on a tag and PSP crashes.
♥♥♥
Open a new image size 750 x 685. We can re-size at the end.
Copy and paste element 83 as a new layer on your canvas. Activate your selection tool, set to Freehand Select.
Type: Point to point
Mode: Add(shift)
Feather: 5
Smoothing: 0
Anti-alias: checked.
Just remove the extra little dots at the top of this element.
See screenshot.

Once I selected my area I hit delete twice on keyboard.
Go to selections, select none.
Using your mover tool, drag this element to the upper right hand side of tag.
Duplicate and mirror. Merge them together.
Duplicate and flip. Merge them together.
This will be our background.

Now re-size it by 94% and move it up a little bit. Merge down.
Go to Adjust and sharpen.
Copy and paste your tube Billy. If you are using the same tube as new re-size and drag him down till his chopped off feet/ankles are about flush with the lower edge of your background.
See Screenshot.

Now grab your selection tool, set to rectangle, same feather. Drag out a rectangle starting below his hands/knees and down past his non existing feet.
Add a new layer. Drag this layer below him in layers palette.
Select your flood fill tool and set background color to black.
Fill the layer. This is his little mat.
Go to Selections, select none.
Copy and paste element 52 as a new layer and re-size by 90%. Move higher up on your canvas. Add drop shadow.
V=-2 H=2 Opacity=90 Blur=5 Color=black
Open element 34 and using your selection tool set to rectangle again, select only the top portion of this element.
Go to Edit and copy.
Activate your tag and paste as a new layer. Re-size by 90% and move to left side of tag. Duplicate and re-size by 80% and move this to the right side. Add drop shadow to each and merge them together.
Copy and paste element 30 as a new layer and re-size by 80%. Should be over the black wiggly swirls and behind Billy. Add drop shadow.
Copy and paste element 54 as a new layer and re-size by 80%. Position lower behind your tube so it appears like his elbows are resting on the trunk and crate. Add drop shadow.
Copy and paste element 28 as a new layer and re-size by 80%. Position so the white skull on right side is at bottom corner of crate element.
Add drop shadow. Duplicate and drag over to the left, having some of the grass over the trunk. You can merge these together.
Copy and paste image 42 as a new layer and re-size by 36%. Position to the right side of tag. Place him on the edge of crate. Add drop shadow. I added a bigger blur to him and H=3.
Copy and paste element 2 as a new layer. Move this layer to the top. Re-size by 86%. Move it over to the left. Add drop shadow.
Grab your selection tool set to rectangle again, feather 0. You are going to select a portion of your tube and move up above a few of the branches. So make sure you get his head and his upper right shoulder and chest area. See my screen shot.

Promote selection to layer. In layers palette, drag the promoted layer above the tree element.
Your layers should appear like this:

Lock your layers. So on the tube layer click the the lock icon in the layers palette and make sure it says 1. On the promoted Selection (his head) click on lock and make sure it's set to 1 as well. That way if you happen to move them around they will always stay together. If you need to unlock just click on the lock until it goes to "none".
Copy and paste element 50 as a new layer and re-size by 70%. Position to the left and in front of the tree. Add drop shadow.
Copy and paste element 55 as a new layer and re-size by 45%. Position to the right of the bucket and in front of your tube. Add drop shadow.
Copy and paste element 56 as a new layer and re-size by 35%. Position to the right side of tag and in front of Billy's left foot. Add drop shadow.
Copy and paste element 80 as a new layer and re-size by 50%. Mirror and position to the right side of tag. Should be next to his leg. This layer should be below the other rat layer, so it appears behind it on the tag. Add drop shadow.
Copy and paste element 38 as a new layer and re-size by 40%. Move these grey leaves to the left side of the tag, down in front. Place this layer between the vase layer and the bucket layer.
Duplicate layer and mirror. Move this layer behind the bucket layer.
Duplicate this layer now and mirror. It should appear to the right side of tag, behind the rat and books layer.
Duplicate layer and drag to center in front of Billy.
Duplicate that layer and re-size by 50% and move this in front of rat with books. Just as a filler. It seemed a little empty to me in that area.
Make sure you add drop shadow to each of these layers.
Activate your crop tool and under Snap Crop Rectangle to: select Merged Opaque.
Merge visible.
Add artist copyright and scrap kit maker credit.
If not animating, add your name and save as PNG.
If animating
Go to Selections, select all.
Go to Edit and copy merged. Paste as a new animation in Animation Shop.
Hold your Ctrl key down and repeatedly hit letter L on your keyboard for a total of 20 frames.
You can watch the count on the lower right hand side of your screen in AS.
Open SimoneAni-Where's Billy Tutorial
Go to Edit, select all.
Go to Edit, copy.
Activate your tag.
Go to Edit, select all.
Go to Edit, make sure Propagate Paste is selected.
Go to Edit, Paste, paste into selected frames.
Position on your tag and click into place.
Play and save.
Don't forget to add your name.
You can see my name tutorial HERE.
To save:
Go to File, Save as, enter the name of your file and select the folder to save to.
Now click on Customize:
Under COLORS TAB:
Number of colors: 255 Colors
Create palette by: OPTIMIZED OCTREE
Reduce colors by: Error Diffusion
Under OPTIMIZATIONS TAB:
set a check mark beside the second, third and forth choices. UN-check the 1st and last.
Under PARTIAL TRANSPARENCY:
check Convert pixels less than 92
Yes, blend with this color: change to white #FFFFFF
Click OK. Click Next, next, next, next.
Play your animation.
At times your animation may or will come out terrible. Optimization in Animation Shop is not the greatest.
You can play around will your settings, especially under the Tab: Optimization. I change this setting at times from anywhere between 70 and 100.
Some people add a white background. To add background, go to Animation: Animation Properties, select Opaque and change color to white.
Hope you enjoyed this tutorial,
Hugs Simone
Please, always direct people to my blog to download my animations.
Do not load to any other download site and don't claim as your own.
Tutorial written by SophisticatSimone aka Lorraine Halle on Friday, May 24, 2013.
Copy and paste element 50 as a new layer and re-size by 70%. Position to the left and in front of the tree. Add drop shadow.
Copy and paste element 55 as a new layer and re-size by 45%. Position to the right of the bucket and in front of your tube. Add drop shadow.
Copy and paste element 56 as a new layer and re-size by 35%. Position to the right side of tag and in front of Billy's left foot. Add drop shadow.
Copy and paste element 80 as a new layer and re-size by 50%. Mirror and position to the right side of tag. Should be next to his leg. This layer should be below the other rat layer, so it appears behind it on the tag. Add drop shadow.
Copy and paste element 38 as a new layer and re-size by 40%. Move these grey leaves to the left side of the tag, down in front. Place this layer between the vase layer and the bucket layer.
Duplicate layer and mirror. Move this layer behind the bucket layer.
Duplicate this layer now and mirror. It should appear to the right side of tag, behind the rat and books layer.
Duplicate layer and drag to center in front of Billy.
Duplicate that layer and re-size by 50% and move this in front of rat with books. Just as a filler. It seemed a little empty to me in that area.
Make sure you add drop shadow to each of these layers.
Activate your crop tool and under Snap Crop Rectangle to: select Merged Opaque.
Merge visible.
Add artist copyright and scrap kit maker credit.
If not animating, add your name and save as PNG.
If animating
Go to Selections, select all.
Go to Edit and copy merged. Paste as a new animation in Animation Shop.
Hold your Ctrl key down and repeatedly hit letter L on your keyboard for a total of 20 frames.
You can watch the count on the lower right hand side of your screen in AS.
Open SimoneAni-Where's Billy Tutorial
Go to Edit, select all.
Go to Edit, copy.
Activate your tag.
Go to Edit, select all.
Go to Edit, make sure Propagate Paste is selected.
Go to Edit, Paste, paste into selected frames.
Position on your tag and click into place.
Play and save.
Don't forget to add your name.
You can see my name tutorial HERE.
To save:
Go to File, Save as, enter the name of your file and select the folder to save to.
Now click on Customize:
Under COLORS TAB:
Number of colors: 255 Colors
Create palette by: OPTIMIZED OCTREE
Reduce colors by: Error Diffusion
Under OPTIMIZATIONS TAB:
set a check mark beside the second, third and forth choices. UN-check the 1st and last.
Under PARTIAL TRANSPARENCY:
check Convert pixels less than 92
Yes, blend with this color: change to white #FFFFFF
Click OK. Click Next, next, next, next.
Play your animation.
At times your animation may or will come out terrible. Optimization in Animation Shop is not the greatest.
You can play around will your settings, especially under the Tab: Optimization. I change this setting at times from anywhere between 70 and 100.
Some people add a white background. To add background, go to Animation: Animation Properties, select Opaque and change color to white.
Hope you enjoyed this tutorial,
Hugs Simone
Please, always direct people to my blog to download my animations.
Do not load to any other download site and don't claim as your own.
Tutorial written by SophisticatSimone aka Lorraine Halle on Friday, May 24, 2013.
Subscribe to:
Posts
(Atom)
CT TEAM