My Blinkie

Showing posts with label Pinup Bombshells. Show all posts
Showing posts with label Pinup Bombshells. Show all posts
Monday, July 8, 2013


♥♥♥
Please click on TAG to see in full size.
••• Supplies needed to complete this tutorial. •••
________________________________________________________________________
Programs: Paint Shop Pro, I'm using version 10. Animation Shop 3.
Plugin : AAA Frame Works, Gradient Glow:EyeCandy for name.
Font used: Playball
Tube of choice: I'm using "Beach Babe 1" by Pinup Bombshells from SATC.
Scrap Kit : I'm using "Beach Girl" by Design by Joan from SATC
Animation: none
Mask: none
________________________________________________________________________
♥♥♥
Save your tag often. Nothing like working long and hard on a tag and PSP crashes.
♥♥♥
Open a new image 846 x 350, transparent.
Copy and paste paper 3 as a new layer and position so the left side is completely covered.
You will notice that some of your right side is uncovered, that's OK we will be adding our tube there.
But first, duplicate the paper layer.
Highlight the bottom paper in layers palette.
Using your shift key, hold it down and using your mover tool, move the paper to the edge on the right side.
Copy and paste your tube as a new layer and move it over to the right side, covering the seem, where the paper layers overlap.
Copy and paste element 45 as a new layer (boat). Position to the left side of banner.
Copy and paste element 61 as a new layer (beach word). Position at top left.
Copy and paste element 71 as a new layer (grass). Duplicate, re-size by 62%. Do it a couple of more times, and scatter behind your tube and in front of the
palm trees. Place them all on the right side of banner.
Copy and paste element 39 as a new layer (palm tree). Duplicate and re-size by 50%. Free rotate to the left by 20 degrees. Position large tree behind your
tube and position smaller one if front of the large one and pull it out a little towards the center of the banner. Place all on the right side of banner.
Copy and paste element 37 as a new layer (seahorse net). Position to the left side of banner.
Copy and paste element 27 as a new layer (lighthouse). Re-size by 62%. Place 1/4 of the way from the left edge of your banner.
Copy and paste element 76 as a new layer (dolphin). Re-size by 62%. Mirror. Position center middle.
Copy and paste element 1 as a new layer (water splash). Position center bottom of banner.
Copy and paste element 51 as a new layer (shell). Position center bottom.
Copy and paste element 50 as a new layer (starfish). Re-size by 50%. Position to the side of boat.
Copy and paste element 62 as a new layer (crab). Re-size by 50%. Position at bottom near your tube's hip.
Make sure all your layers have a drop shadow.
Save your tag as pspimage.
Go to Edit, copy merged. Right click on workspace and paste as a new image. Duplicate.
Minimize your original Banner you were working on. We will use again for the avatar.
Back to duplicated banner.
On bottom copy, blur by 3. On top layer, change blend mode to screen.
Merge visible. Add artist copyright. Merge down.
Add your name is you like or a cute summer saying!
Save as jpeg or png.
Let's make the avatar now.
Go back to original Banner.
With your mover tool, move your tube over the left hand side of banner and near bottom. Re-size by 78%.
See screenshot:
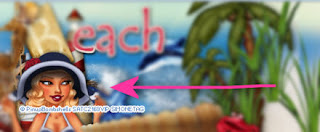
Now grab your crop tool, and enter 180 x 180. Move the crop box over the area down by the bottom, which of course has your tube's face.
See screenshot:
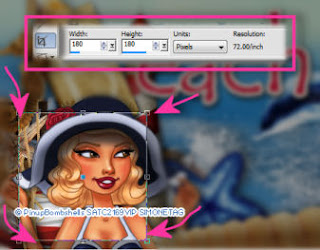
Double click. If the layers are all separate, merge visible. Duplicate. On bottom copy, blur by 3. On top layer, change blend mode to screen.
Merge visible. Add artist copyright. Merge down. You can add your initial or your name.
Adding the frame border.
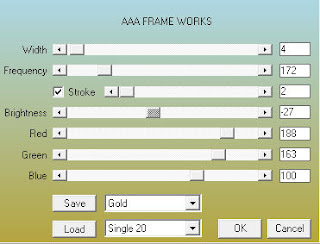
Go to Effects, Plugins, AAA Frame Works and enter the following for both the avatar and the banner.
See screenshot:
Save both to your Banner Folder, if you have one, or save to your tagging folder.
Go to Facebook and upload to your page.
Hope you enjoyed this tutorial,
Hugs Simone
Please, always direct people to my blog to download my animations.
Do not load to any other download site and don't claim as your own.
Tutorial written by SophisticatSimone aka Lorraine Halle on Monday July 8, 2013.
Please click on TAG to see in full size.
••• Supplies needed to complete this tutorial. •••
________________________________________________________________________
Programs: Paint Shop Pro, I'm using version 10. Animation Shop 3.
Plugin : AAA Frame Works, Gradient Glow:EyeCandy for name.
Font used: Playball
Tube of choice: I'm using "Beach Babe 1" by Pinup Bombshells from SATC.
Scrap Kit : I'm using "Beach Girl" by Design by Joan from SATC
Animation: none
Mask: none
________________________________________________________________________
♥♥♥
Save your tag often. Nothing like working long and hard on a tag and PSP crashes.
♥♥♥
Open a new image 846 x 350, transparent.
Copy and paste paper 3 as a new layer and position so the left side is completely covered.
You will notice that some of your right side is uncovered, that's OK we will be adding our tube there.
But first, duplicate the paper layer.
Highlight the bottom paper in layers palette.
Using your shift key, hold it down and using your mover tool, move the paper to the edge on the right side.
Copy and paste your tube as a new layer and move it over to the right side, covering the seem, where the paper layers overlap.
Copy and paste element 45 as a new layer (boat). Position to the left side of banner.
Copy and paste element 61 as a new layer (beach word). Position at top left.
Copy and paste element 71 as a new layer (grass). Duplicate, re-size by 62%. Do it a couple of more times, and scatter behind your tube and in front of the
palm trees. Place them all on the right side of banner.
Copy and paste element 39 as a new layer (palm tree). Duplicate and re-size by 50%. Free rotate to the left by 20 degrees. Position large tree behind your
tube and position smaller one if front of the large one and pull it out a little towards the center of the banner. Place all on the right side of banner.
Copy and paste element 37 as a new layer (seahorse net). Position to the left side of banner.
Copy and paste element 27 as a new layer (lighthouse). Re-size by 62%. Place 1/4 of the way from the left edge of your banner.
Copy and paste element 76 as a new layer (dolphin). Re-size by 62%. Mirror. Position center middle.
Copy and paste element 1 as a new layer (water splash). Position center bottom of banner.
Copy and paste element 51 as a new layer (shell). Position center bottom.
Copy and paste element 50 as a new layer (starfish). Re-size by 50%. Position to the side of boat.
Copy and paste element 62 as a new layer (crab). Re-size by 50%. Position at bottom near your tube's hip.
Make sure all your layers have a drop shadow.
Save your tag as pspimage.
Go to Edit, copy merged. Right click on workspace and paste as a new image. Duplicate.
Minimize your original Banner you were working on. We will use again for the avatar.
Back to duplicated banner.
On bottom copy, blur by 3. On top layer, change blend mode to screen.
Merge visible. Add artist copyright. Merge down.
Add your name is you like or a cute summer saying!
Save as jpeg or png.
Let's make the avatar now.
Go back to original Banner.
With your mover tool, move your tube over the left hand side of banner and near bottom. Re-size by 78%.
See screenshot:

Now grab your crop tool, and enter 180 x 180. Move the crop box over the area down by the bottom, which of course has your tube's face.
See screenshot:

Double click. If the layers are all separate, merge visible. Duplicate. On bottom copy, blur by 3. On top layer, change blend mode to screen.
Merge visible. Add artist copyright. Merge down. You can add your initial or your name.
Adding the frame border.
Go to Effects, Plugins, AAA Frame Works and enter the following for both the avatar and the banner.
See screenshot:

Save both to your Banner Folder, if you have one, or save to your tagging folder.
Go to Facebook and upload to your page.
Hope you enjoyed this tutorial,
Hugs Simone
Please, always direct people to my blog to download my animations.
Do not load to any other download site and don't claim as your own.
Tutorial written by SophisticatSimone aka Lorraine Halle on Monday July 8, 2013.

Monday, June 3, 2013

♥♥♥
Please click on TAG to see in full size.
••• Supplies needed to complete this tutorial. •••
________________________________________________________________________
Programs: Paint Shop Pro, I'm using version 10. Animation Shop 3.
Plugin : Eye Candy: Gradient Glow for name
Font used: A&S Graceland
••• Supplies needed to complete this tutorial. •••
________________________________________________________________________
Programs: Paint Shop Pro, I'm using version 10. Animation Shop 3.
Plugin : Eye Candy: Gradient Glow for name
Font used: A&S Graceland
Tube of choice: I'm using "Bunny Baby" by Pinup Bombshells from SATC.
Scrap Kit : I'm using "Bunny Baby Style" by Disturbed Scraps from SATC
Animation: SimoneAni-BunnyBaby
Mask: 0125SS
________________________________________________________________________
♥♥♥
Save your tag often. Nothing like working long and hard on a tag and PSP crashes.
♥♥♥
Open paper 10 and duplicate. Close original.
Re-size by 85%. Copy and paste close up of tube as a new layer.
Move to the left. Change blend mode to Luminescence and duplicate.
Mirror. Merge together.
Apply Noise: Random 10 to the close up layer and the paper.
Merge visible.
Copy and paste paper 1 as a new layer and change blend mode to Overlay.
Merge visible. Crop merged Opaque.
Apply Mask. I used one of my own, Masks0125SS.
Copy and paste tube as a new layer. I had to re-sizy mine by 85%.
Add drop shadow. Drop shadow I'm using during this tutorial with slight variations:
V=-1 H=-3 Opacity=77 Blur=13 Color=black.
C/P element 17 as a new layer and move to the right. Make it appear like her hand is resting on the dice.
Add drop shadow.
C/P element 18 as a new layer and re-size by 38% and move to the bottom left hand side of tag. Add drop shadow.
C/P element 33 and move to the right side of tag. Add D/S.
Paste again, free rotate to the left by 45 degrees. Move behind the dice, add drop shadow.
C/P element 40 as a new layer and re-size by 40%. Position as top layer over the pink branch doodle.
Add drop shadow.
Paste again, re-size by 20%. Free rotate to the left by 63 degrees. Move over the bottom branch and just above the dice. Add drop shadow.
C/P element 118 as a new layer. Re-size and duplicate. Merge down and position to upper portion of tag.
C/P element 77 and re-size by 75% and add drop shadow. Position between your tulip layer and branch layer.
C/P 67 re-size by 70% and move to bottom left hand side. D/S.
C/P 64 re-size by 57% and move to the bottom center tag. D/S.
C/P 53 re-size by 57% and move to the bottom center tag. D/S.
C/P 68 and move behind your tube and in front of dice. Add drop shadow.
Duplicate your dice a couple of times and re-size by 50 %. Position around tag.
C/P 84 as new layer and re-size by 34% and move to right side of tag behind the large dice.
Hide your mask layer and the glitter layer.
Activate your tube layer. Right click and merge visible.
Merge your glitter layer to Mask layer.
Add copyright and license number. Merge down to top layer.
You should have two layers now. The bottom mask layer and the top tube layer with all the elements.
To animate.
Go to Selections, select all.
Go to Edit and copy merged. Paste as a new animation in Animation Shop.
Hold your Ctrl key down and repeatedly hit letter L on your keyboard for a total of 16 frames.
You can watch the count on the lower right hand side of your screen in AS.
Open SimoneAni-BunnyBaby
Go to Edit, select all.
Go to Edit, copy.
Activate your tag.
Go to Edit, select all.
Go to Edit, make sure Propagate Paste is selected.
Go to Edit, Paste, paste into selected frames.
Position on your tag and click into place.
Back in PSP copy your top layer and paste in AS.
Copy and paste in your tag.
Play and save.
Don't forget to add your name.
To save:
Go to File, Save as, enter the name of your file and select the folder to save to.
Now click on Customize:
Under COLORS TAB:
Number of colors: 255 Colors
Create palette by: OPTIMIZED OCTREE
Reduce colors by: Error Diffusion
Under OPTIMIZATIONS TAB:
set a check mark beside the second, third and forth choices. UN-check the 1st and last.
Under PARTIAL TRANSPARENCY:
check Convert pixels less than 92
Yes, blend with this color: change to white #FFFFFF
Click OK. Click Next, next, next, next.
Play your animation.
At times your animation may or will come out terrible. Optimization in Animation Shop is not the greatest.
You can play around will your settings, especially under the Tab: Optimization. I change this setting at times from anywhere between 70 and 100.
Some people add a white background. To add background, go to Animation: Animation Properties, select Opaque and change color to white.
Hope you enjoyed this tutorial,
Hugs Simone
Please, always direct people to my blog to download my animations.
Do not load to any other download site and don't claim as your own.
Tutorial written by SophisticatSimone aka Lorraine Halle on Monday June 3, 2013.
Scrap Kit : I'm using "Bunny Baby Style" by Disturbed Scraps from SATC
Animation: SimoneAni-BunnyBaby
Mask: 0125SS
________________________________________________________________________
♥♥♥
Save your tag often. Nothing like working long and hard on a tag and PSP crashes.
♥♥♥
Open paper 10 and duplicate. Close original.
Re-size by 85%. Copy and paste close up of tube as a new layer.
Move to the left. Change blend mode to Luminescence and duplicate.
Mirror. Merge together.
Apply Noise: Random 10 to the close up layer and the paper.
Merge visible.
Copy and paste paper 1 as a new layer and change blend mode to Overlay.
Merge visible. Crop merged Opaque.
Apply Mask. I used one of my own, Masks0125SS.
Copy and paste tube as a new layer. I had to re-sizy mine by 85%.
Add drop shadow. Drop shadow I'm using during this tutorial with slight variations:
V=-1 H=-3 Opacity=77 Blur=13 Color=black.
C/P element 17 as a new layer and move to the right. Make it appear like her hand is resting on the dice.
Add drop shadow.
C/P element 18 as a new layer and re-size by 38% and move to the bottom left hand side of tag. Add drop shadow.
C/P element 33 and move to the right side of tag. Add D/S.
Paste again, free rotate to the left by 45 degrees. Move behind the dice, add drop shadow.
C/P element 40 as a new layer and re-size by 40%. Position as top layer over the pink branch doodle.
Add drop shadow.
Paste again, re-size by 20%. Free rotate to the left by 63 degrees. Move over the bottom branch and just above the dice. Add drop shadow.
C/P element 118 as a new layer. Re-size and duplicate. Merge down and position to upper portion of tag.
C/P element 77 and re-size by 75% and add drop shadow. Position between your tulip layer and branch layer.
C/P 67 re-size by 70% and move to bottom left hand side. D/S.
C/P 64 re-size by 57% and move to the bottom center tag. D/S.
C/P 53 re-size by 57% and move to the bottom center tag. D/S.
C/P 68 and move behind your tube and in front of dice. Add drop shadow.
Duplicate your dice a couple of times and re-size by 50 %. Position around tag.
C/P 84 as new layer and re-size by 34% and move to right side of tag behind the large dice.
Hide your mask layer and the glitter layer.
Activate your tube layer. Right click and merge visible.
Merge your glitter layer to Mask layer.
Add copyright and license number. Merge down to top layer.
You should have two layers now. The bottom mask layer and the top tube layer with all the elements.
To animate.
Go to Selections, select all.
Go to Edit and copy merged. Paste as a new animation in Animation Shop.
Hold your Ctrl key down and repeatedly hit letter L on your keyboard for a total of 16 frames.
You can watch the count on the lower right hand side of your screen in AS.
Open SimoneAni-BunnyBaby
Go to Edit, select all.
Go to Edit, copy.
Activate your tag.
Go to Edit, select all.
Go to Edit, make sure Propagate Paste is selected.
Go to Edit, Paste, paste into selected frames.
Position on your tag and click into place.
Back in PSP copy your top layer and paste in AS.
Copy and paste in your tag.
Play and save.
Don't forget to add your name.
To save:
Go to File, Save as, enter the name of your file and select the folder to save to.
Now click on Customize:
Under COLORS TAB:
Number of colors: 255 Colors
Create palette by: OPTIMIZED OCTREE
Reduce colors by: Error Diffusion
Under OPTIMIZATIONS TAB:
set a check mark beside the second, third and forth choices. UN-check the 1st and last.
Under PARTIAL TRANSPARENCY:
check Convert pixels less than 92
Yes, blend with this color: change to white #FFFFFF
Click OK. Click Next, next, next, next.
Play your animation.
At times your animation may or will come out terrible. Optimization in Animation Shop is not the greatest.
You can play around will your settings, especially under the Tab: Optimization. I change this setting at times from anywhere between 70 and 100.
Some people add a white background. To add background, go to Animation: Animation Properties, select Opaque and change color to white.
Hope you enjoyed this tutorial,
Hugs Simone
Please, always direct people to my blog to download my animations.
Do not load to any other download site and don't claim as your own.
Tutorial written by SophisticatSimone aka Lorraine Halle on Monday June 3, 2013.
Thursday, May 23, 2013

♥♥♥
Please click on TAG to see in full size.
••• Supplies needed to complete this tutorial. •••
________________________________________________________________________
Programs: Paint Shop Pro, I'm using version 10. Animation Shop 3.
Plugin : Gradient Glow by Eye Candy 4000 (for name)
Font used: MsMadi
Tube of choice: I'm using "REGGIE REY" by Pinup Bombshells from SATC.
Scrap Kit : I'm using "Toyland" by Bibi's Collection from SATC
Animation: SimoneAni-MyBedroom
Mask: Masks0121
________________________________________________________________________
♥♥♥
Save your tag often. Nothing like working long and hard on a tag and PSP crashes.
♥♥♥
Open paper 5 and duplicate. Close original.
Re-size your paper by 80%. Make sure resolution is set to 72 dpi.
When re-sizing any of the elements or papers make sure the resolution is always set to 72.
Apply Mask 0121 to paper and merge group. Add noise:
Random, 7, monochrome checked.
C/P element 90 as a new layer and re-size by 80%. Move to the lower right hand side of tag.
Add drop shadow.
C/P element 44 as a new layer and position a little higher on the canvas. Add light drop shadow.
Make sure it's behind the bed layer.
C/P element 72 as a new layer. Remove a portion of the plant down at the bottom. Activate your Selection Tool, set to Rectangle, Mode: add shift, feather 0 and anti-alias checked.
Just drag out a box over the bottom portion of plant and then hit delete on keyboard. Right click on tag to de-select or go to Selections, select none.
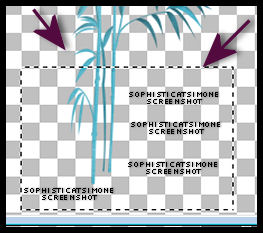
Duplicate this layer and mirror. Add drop shadow to each. They should frame the screen.
C/P element 88 as a new layer. Re-size by 60%. Position high in middle of tag. Should appear a little above the screen. Duplicate and re-size by 50%. Move it to far right side of tag. Add drop shadow to each balloon.
C/P element 83 as a new layer. Re-size by 60% and move in front of bed and to the right of tag at bottom. Add drop shadow.
C/P element 80 as a new layer and move to the side of bed on left side of tag. Add drop shadow.
C/P element 71 as a new layer and Re-size by 50%. Move behind the bed, over the screen. Duplicate, re-size by 50% and move to the far left of tag, in front of toy box.
Back to original purple plant layer. Duplicate and re-size by 80% and move down in front of bed, to the right hand side of mid-line. Should be near the toy chest. Add drop shadows to all these flowers.
C/P element 18 as a new layer and re-size by 55%. Move to top of tag, on right side of blue balloon. Add drop shadow.
C/P element 84 as a new layer and position middle of tag and a little higher than center.
C/P your tube as a new layer. Re-size if need be. I didn't re-size mine, but I deleted some of her legs. I used selection tool, set to rectangle and feather of 10. I also mirrored her position and placed her on left side of tag at foot of bed. Add drop shadow. Make sure she is behind/below the bed layer in layers palette.
OK click on your screen element in layers palette to activate.
C/P element 87 as a new layer. Free rotate by 20 degrees to the right and re-size by 60%. Make sure it's tucked behind the toy box and the blue plant. Add drop shadow.
Click on tube layer to activate.
C/P element 91 as a new layer and mirror. Re-size by 60%. Move this little mouse in front of your tube down by her legs. Add drop shadow.
C/P element 21 as a new layer and re-size by 65%. Move to left hand side of tag at bottom of tag. Add drop shadow.
C/P element 31 as a new layer and re-size by 80%. Move to left hand side of tag at bottom of tag and place him on top of purple ball. Add drop shadow.
C/P element 73 as a new layer and re-size by 40%. Move to right lower hand side of tag in front of toy chest. Add drop shadow.
C/P element 23 as a new layer and re-size by 60%. Move to bottom of tag. Add drop shadow.
C/P element 77 as a new layer, re-size by 80% and have him sit on top of bed canape. Add drop shadow.
C/P element 78 as a new layer, re-size by 70% and have him sit on top of bed. Add drop shadow.
C/P element 1as a new layer, re-size by 40% and have her sit on the toy chest on the right side of tag. Add drop shadow.
Go to Selections, select all.
Go to Edit, Crop to Selection.
Now to animate.
Go to Selections, select all.
Go to Edit and copy merged. Paste as a new animation in Animation Shop.
Hold your Ctrl key down and repeatedly hit letter L on your keyboard for a total of 20 frames.
You can watch the count on the lower right hand side of your screen in AS.
Open SimoneAni-MyBedroom
Go to Edit, select all.
Go to Edit, copy.
Activate your tag.
Go to Edit, select all.
Go to Edit, make sure Propagate Paste is selected.
Go to Edit, Paste, paste into selected frames.
Position on your tag and click into place.
Play and save.
Don't forget to add your name.
You can see my name tutorial HERE.
To save:
Go to File, Save as, enter the name of your file and select the folder to save to.
Now click on Customize:
Under COLORS TAB:
Number of colors: 255 Colors
Create palette by: OPTIMIZED OCTREE
Reduce colors by: Error Diffusion
Under OPTIMIZATIONS TAB:
set a check mark beside the second, third and forth choices. UN-check the 1st and last.
Under PARTIAL TRANSPARENCY:
check Convert pixels less than 92
Yes, blend with this color: change to white #FFFFFF
Click OK. Click Next, next, next, next.
Play your animation.
At times your animation may or will come out terrible. Optimization in Animation Shop is not the greatest.
You can play around will your settings, especially under the Tab: Optimization. I change this setting at times from anywhere between 70 and 100.
Some people add a white background. To add background, go to Animation: Animation Properties, select Opaque and change color to white.
Hope you enjoyed this tutorial,
Hugs Simone
Please, always direct people to my blog to download my animations.
Do not load to any other download site and don't claim as your own.
Tutorial written by SophisticatSimone aka Lorraine Halle on Thursday, May 23, 2013.
Please click on TAG to see in full size.
••• Supplies needed to complete this tutorial. •••
________________________________________________________________________
Programs: Paint Shop Pro, I'm using version 10. Animation Shop 3.
Plugin : Gradient Glow by Eye Candy 4000 (for name)
Font used: MsMadi
Tube of choice: I'm using "REGGIE REY" by Pinup Bombshells from SATC.
Scrap Kit : I'm using "Toyland" by Bibi's Collection from SATC
Animation: SimoneAni-MyBedroom
Mask: Masks0121
________________________________________________________________________
♥♥♥
Save your tag often. Nothing like working long and hard on a tag and PSP crashes.
♥♥♥
Open paper 5 and duplicate. Close original.
Re-size your paper by 80%. Make sure resolution is set to 72 dpi.
When re-sizing any of the elements or papers make sure the resolution is always set to 72.
Apply Mask 0121 to paper and merge group. Add noise:
Random, 7, monochrome checked.
C/P element 90 as a new layer and re-size by 80%. Move to the lower right hand side of tag.
Add drop shadow.
C/P element 44 as a new layer and position a little higher on the canvas. Add light drop shadow.
Make sure it's behind the bed layer.
C/P element 72 as a new layer. Remove a portion of the plant down at the bottom. Activate your Selection Tool, set to Rectangle, Mode: add shift, feather 0 and anti-alias checked.
Just drag out a box over the bottom portion of plant and then hit delete on keyboard. Right click on tag to de-select or go to Selections, select none.
Duplicate this layer and mirror. Add drop shadow to each. They should frame the screen.
C/P element 88 as a new layer. Re-size by 60%. Position high in middle of tag. Should appear a little above the screen. Duplicate and re-size by 50%. Move it to far right side of tag. Add drop shadow to each balloon.
C/P element 83 as a new layer. Re-size by 60% and move in front of bed and to the right of tag at bottom. Add drop shadow.
C/P element 80 as a new layer and move to the side of bed on left side of tag. Add drop shadow.
C/P element 71 as a new layer and Re-size by 50%. Move behind the bed, over the screen. Duplicate, re-size by 50% and move to the far left of tag, in front of toy box.
Back to original purple plant layer. Duplicate and re-size by 80% and move down in front of bed, to the right hand side of mid-line. Should be near the toy chest. Add drop shadows to all these flowers.
C/P element 18 as a new layer and re-size by 55%. Move to top of tag, on right side of blue balloon. Add drop shadow.
C/P element 84 as a new layer and position middle of tag and a little higher than center.
C/P your tube as a new layer. Re-size if need be. I didn't re-size mine, but I deleted some of her legs. I used selection tool, set to rectangle and feather of 10. I also mirrored her position and placed her on left side of tag at foot of bed. Add drop shadow. Make sure she is behind/below the bed layer in layers palette.
OK click on your screen element in layers palette to activate.
C/P element 87 as a new layer. Free rotate by 20 degrees to the right and re-size by 60%. Make sure it's tucked behind the toy box and the blue plant. Add drop shadow.
Click on tube layer to activate.
C/P element 91 as a new layer and mirror. Re-size by 60%. Move this little mouse in front of your tube down by her legs. Add drop shadow.
C/P element 21 as a new layer and re-size by 65%. Move to left hand side of tag at bottom of tag. Add drop shadow.
C/P element 31 as a new layer and re-size by 80%. Move to left hand side of tag at bottom of tag and place him on top of purple ball. Add drop shadow.
C/P element 73 as a new layer and re-size by 40%. Move to right lower hand side of tag in front of toy chest. Add drop shadow.
C/P element 23 as a new layer and re-size by 60%. Move to bottom of tag. Add drop shadow.
C/P element 77 as a new layer, re-size by 80% and have him sit on top of bed canape. Add drop shadow.
C/P element 78 as a new layer, re-size by 70% and have him sit on top of bed. Add drop shadow.
C/P element 1as a new layer, re-size by 40% and have her sit on the toy chest on the right side of tag. Add drop shadow.
Go to Selections, select all.
Go to Edit, Crop to Selection.
Now to animate.
Go to Selections, select all.
Go to Edit and copy merged. Paste as a new animation in Animation Shop.
Hold your Ctrl key down and repeatedly hit letter L on your keyboard for a total of 20 frames.
You can watch the count on the lower right hand side of your screen in AS.
Open SimoneAni-MyBedroom
Go to Edit, select all.
Go to Edit, copy.
Activate your tag.
Go to Edit, select all.
Go to Edit, make sure Propagate Paste is selected.
Go to Edit, Paste, paste into selected frames.
Position on your tag and click into place.
Play and save.
Don't forget to add your name.
You can see my name tutorial HERE.
To save:
Go to File, Save as, enter the name of your file and select the folder to save to.
Now click on Customize:
Under COLORS TAB:
Number of colors: 255 Colors
Create palette by: OPTIMIZED OCTREE
Reduce colors by: Error Diffusion
Under OPTIMIZATIONS TAB:
set a check mark beside the second, third and forth choices. UN-check the 1st and last.
Under PARTIAL TRANSPARENCY:
check Convert pixels less than 92
Yes, blend with this color: change to white #FFFFFF
Click OK. Click Next, next, next, next.
Play your animation.
At times your animation may or will come out terrible. Optimization in Animation Shop is not the greatest.
You can play around will your settings, especially under the Tab: Optimization. I change this setting at times from anywhere between 70 and 100.
Some people add a white background. To add background, go to Animation: Animation Properties, select Opaque and change color to white.
Hope you enjoyed this tutorial,
Hugs Simone
Please, always direct people to my blog to download my animations.
Do not load to any other download site and don't claim as your own.
Tutorial written by SophisticatSimone aka Lorraine Halle on Thursday, May 23, 2013.
Subscribe to:
Posts
(Atom)
CT TEAM