My Blinkie

Monday, July 8, 2013

♥♥♥
Please click on TAG to see in full size.
••• Supplies needed to complete this tutorial. •••
________________________________________________________________________
Programs: Paint Shop Pro, I'm using version 10. Animation Shop 3.
Plugin : AAA Frame Works, Gradient Glow:EyeCandy for name.
Font used: Playball
Tube of choice: I'm using "Beach Babe 1" by Pinup Bombshells from SATC.
Scrap Kit : I'm using "Beach Girl" by Design by Joan from SATC
Animation: none
Mask: none
________________________________________________________________________
♥♥♥
Save your tag often. Nothing like working long and hard on a tag and PSP crashes.
♥♥♥
Open a new image 846 x 350, transparent.
Copy and paste paper 3 as a new layer and position so the left side is completely covered.
You will notice that some of your right side is uncovered, that's OK we will be adding our tube there.
But first, duplicate the paper layer.
Highlight the bottom paper in layers palette.
Using your shift key, hold it down and using your mover tool, move the paper to the edge on the right side.
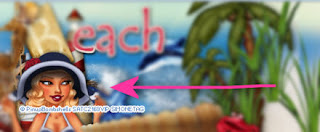
Copy and paste your tube as a new layer and move it over to the right side, covering the seem, where the paper layers overlap.
Copy and paste element 45 as a new layer (boat). Position to the left side of banner.
Copy and paste element 61 as a new layer (beach word). Position at top left.
Copy and paste element 71 as a new layer (grass). Duplicate, re-size by 62%. Do it a couple of more times, and scatter behind your tube and in front of the
palm trees. Place them all on the right side of banner.
Copy and paste element 39 as a new layer (palm tree). Duplicate and re-size by 50%. Free rotate to the left by 20 degrees. Position large tree behind your
tube and position smaller one if front of the large one and pull it out a little towards the center of the banner. Place all on the right side of banner.
Copy and paste element 37 as a new layer (seahorse net). Position to the left side of banner.
Copy and paste element 27 as a new layer (lighthouse). Re-size by 62%. Place 1/4 of the way from the left edge of your banner.
Copy and paste element 76 as a new layer (dolphin). Re-size by 62%. Mirror. Position center middle.
Copy and paste element 1 as a new layer (water splash). Position center bottom of banner.
Copy and paste element 51 as a new layer (shell). Position center bottom.
Copy and paste element 50 as a new layer (starfish). Re-size by 50%. Position to the side of boat.
Copy and paste element 62 as a new layer (crab). Re-size by 50%. Position at bottom near your tube's hip.
Make sure all your layers have a drop shadow.
Save your tag as pspimage.
Go to Edit, copy merged. Right click on workspace and paste as a new image. Duplicate.
Minimize your original Banner you were working on. We will use again for the avatar.
Back to duplicated banner.
On bottom copy, blur by 3. On top layer, change blend mode to screen.
Merge visible. Add artist copyright. Merge down.
Add your name is you like or a cute summer saying!
Save as jpeg or png.
Let's make the avatar now.
Go back to original Banner.
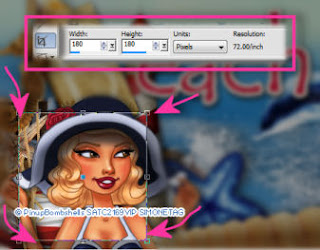
With your mover tool, move your tube over the left hand side of banner and near bottom. Re-size by 78%.
See screenshot:
Now grab your crop tool, and enter 180 x 180. Move the crop box over the area down by the bottom, which of course has your tube's face.
See screenshot:
Double click. If the layers are all separate, merge visible. Duplicate. On bottom copy, blur by 3. On top layer, change blend mode to screen.
Merge visible. Add artist copyright. Merge down. You can add your initial or your name.
Adding the frame border.
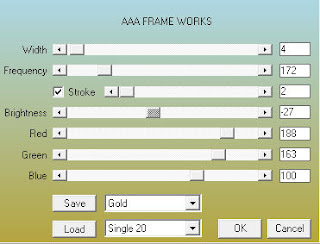
Go to Effects, Plugins, AAA Frame Works and enter the following for both the avatar and the banner.
See screenshot:
Save both to your Banner Folder, if you have one, or save to your tagging folder.
Go to Facebook and upload to your page.
Hope you enjoyed this tutorial,
Hugs Simone
Please, always direct people to my blog to download my animations.
Do not load to any other download site and don't claim as your own.
Tutorial written by SophisticatSimone aka Lorraine Halle on Monday July 8, 2013.
Please click on TAG to see in full size.
••• Supplies needed to complete this tutorial. •••
________________________________________________________________________
Programs: Paint Shop Pro, I'm using version 10. Animation Shop 3.
Plugin : AAA Frame Works, Gradient Glow:EyeCandy for name.
Font used: Playball
Tube of choice: I'm using "Beach Babe 1" by Pinup Bombshells from SATC.
Scrap Kit : I'm using "Beach Girl" by Design by Joan from SATC
Animation: none
Mask: none
________________________________________________________________________
♥♥♥
Save your tag often. Nothing like working long and hard on a tag and PSP crashes.
♥♥♥
Open a new image 846 x 350, transparent.
Copy and paste paper 3 as a new layer and position so the left side is completely covered.
You will notice that some of your right side is uncovered, that's OK we will be adding our tube there.
But first, duplicate the paper layer.
Highlight the bottom paper in layers palette.
Using your shift key, hold it down and using your mover tool, move the paper to the edge on the right side.
Copy and paste your tube as a new layer and move it over to the right side, covering the seem, where the paper layers overlap.
Copy and paste element 45 as a new layer (boat). Position to the left side of banner.
Copy and paste element 61 as a new layer (beach word). Position at top left.
Copy and paste element 71 as a new layer (grass). Duplicate, re-size by 62%. Do it a couple of more times, and scatter behind your tube and in front of the
palm trees. Place them all on the right side of banner.
Copy and paste element 39 as a new layer (palm tree). Duplicate and re-size by 50%. Free rotate to the left by 20 degrees. Position large tree behind your
tube and position smaller one if front of the large one and pull it out a little towards the center of the banner. Place all on the right side of banner.
Copy and paste element 37 as a new layer (seahorse net). Position to the left side of banner.
Copy and paste element 27 as a new layer (lighthouse). Re-size by 62%. Place 1/4 of the way from the left edge of your banner.
Copy and paste element 76 as a new layer (dolphin). Re-size by 62%. Mirror. Position center middle.
Copy and paste element 1 as a new layer (water splash). Position center bottom of banner.
Copy and paste element 51 as a new layer (shell). Position center bottom.
Copy and paste element 50 as a new layer (starfish). Re-size by 50%. Position to the side of boat.
Copy and paste element 62 as a new layer (crab). Re-size by 50%. Position at bottom near your tube's hip.
Make sure all your layers have a drop shadow.
Save your tag as pspimage.
Go to Edit, copy merged. Right click on workspace and paste as a new image. Duplicate.
Minimize your original Banner you were working on. We will use again for the avatar.
Back to duplicated banner.
On bottom copy, blur by 3. On top layer, change blend mode to screen.
Merge visible. Add artist copyright. Merge down.
Add your name is you like or a cute summer saying!
Save as jpeg or png.
Let's make the avatar now.
Go back to original Banner.
With your mover tool, move your tube over the left hand side of banner and near bottom. Re-size by 78%.
See screenshot:

Now grab your crop tool, and enter 180 x 180. Move the crop box over the area down by the bottom, which of course has your tube's face.
See screenshot:

Double click. If the layers are all separate, merge visible. Duplicate. On bottom copy, blur by 3. On top layer, change blend mode to screen.
Merge visible. Add artist copyright. Merge down. You can add your initial or your name.
Adding the frame border.
Go to Effects, Plugins, AAA Frame Works and enter the following for both the avatar and the banner.
See screenshot:

Save both to your Banner Folder, if you have one, or save to your tagging folder.
Go to Facebook and upload to your page.
Hope you enjoyed this tutorial,
Hugs Simone
Please, always direct people to my blog to download my animations.
Do not load to any other download site and don't claim as your own.
Tutorial written by SophisticatSimone aka Lorraine Halle on Monday July 8, 2013.

Subscribe to:
Post Comments
(Atom)
CT TEAM


0 comments:
Post a Comment