My Blinkie

Subscribe for Updates
Contact Me
Followers
Blog Archive
-
►
2023
(1)
- ► 04/09 - 04/16 (1)
-
►
2022
(7)
- ► 09/04 - 09/11 (1)
- ► 08/28 - 09/04 (3)
- ► 06/12 - 06/19 (1)
- ► 05/29 - 06/05 (1)
- ► 05/15 - 05/22 (1)
-
►
2018
(1)
- ► 03/04 - 03/11 (1)
-
▼
2013
(109)
- ► 11/24 - 12/01 (1)
- ► 10/27 - 11/03 (2)
- ► 10/20 - 10/27 (1)
- ► 10/13 - 10/20 (1)
- ► 10/06 - 10/13 (1)
- ► 09/15 - 09/22 (1)
- ► 09/01 - 09/08 (2)
- ► 08/25 - 09/01 (1)
- ► 08/11 - 08/18 (7)
- ► 08/04 - 08/11 (4)
- ► 07/28 - 08/04 (2)
- ► 07/14 - 07/21 (1)
- ► 07/07 - 07/14 (6)
- ► 06/30 - 07/07 (6)
- ► 06/23 - 06/30 (5)
- ► 06/16 - 06/23 (4)
- ► 06/09 - 06/16 (5)
- ► 06/02 - 06/09 (6)
- ► 05/26 - 06/02 (3)
- ► 05/19 - 05/26 (6)
- ► 05/12 - 05/19 (6)
- ► 05/05 - 05/12 (7)
- ► 04/28 - 05/05 (3)
- ► 04/21 - 04/28 (4)
- ► 04/14 - 04/21 (4)
- ► 04/07 - 04/14 (6)
- ▼ 03/31 - 04/07 (7)
- ► 03/24 - 03/31 (1)
- ► 03/17 - 03/24 (2)
- ► 03/10 - 03/17 (2)
- ► 03/03 - 03/10 (2)
Sunday, March 31, 2013
10:19 PM | Edit Post
Please click on TAG to see in full size.
Supplies needed to complete this tutorial.
Supplies needed to complete this tutorial.
Programs: Paint Shop Pro, I'm using version 10, Animation Shop 3
Plugin : Eye Candy 4: Gradient Glow for Name, and MuRa Meister-Cloud.
Font used: Xiomara
Tube of choice, I'm using tube "Huntress"by Angelica S from SATC
Scrap Kit "Fairytale" by Angelica S at SATC
Animations: by me Scrappy Bit Of Fun HERE Mask: by me Mask94SophisticatSimone HERE
Scrap Kit "Fairytale" by Angelica S at SATC
Animations: by me Scrappy Bit Of Fun HERE Mask: by me Mask94SophisticatSimone HERE
Save your tag often. Nothing like working long and hard on a tag and PSP crashes.
•••
Please make sure you add a drop shadow of choice to each and every element as you add them.
♥Let's start♥
Open element 05, duplicate and close original. Always close the original when done with it.
Re-size, 72dpi, smart size, 70%
Rotate, free rotate, right, 90 degrees, all layers UN-checked.
Re-size canvas, 700 x 700
Open element 03, (bridge) copy and paste as a new layer on your canvas.
Move your frame up a little and position bridge a little lower.
Open element 28, (white castle) copy and paste as a new layer.
Re-size, 72dpi, smart size, 40%
Position over the frame and on the lower portion of the frame.
Open element 81, (leaves)copy and paste as a new layer.
Re-size, 72dpi, smart size, 60%
Position to the upper left hand side of frame.
Duplicate. On duplicated image,
Go to Image, free rotate, rotate, right, 90 degrees, all layers UN-checked.
Image, flip.
Move to the upper edge of the frame on the left, creating a leaf corner.
Duplicate this layer, free rotate 90 degrees and place on right side of frame closer to the top.
Open element 74, (Ivy) copy and paste as a new layer.
Re-size, 72dpi, smart size, 40%
Position to the right on the frame.
Duplicate. Mirror.
Open element 33, (curtain) copy and paste as a new layer.
Position over right hand side of frame.
Open element 63, (bow) copy and paste as a new layer.
Re-size, 72dpi, smart size, 18%
Position top right corner of frame over curtain. See my tag for reference.
Open element 67, (rose) copy and paste as a new layer.
Re-size, 72dpi, smart size, 20%
Position on the left side of frame at the middle.
Open element 80, (branch+leaves) copy and paste as a new layer.
Position to the right, behind the bridge railing. Make it appear as though it's a part of the structure.
You may need to use your selection tool and remove some of the bottom edge of the branch.
This layer sound be above the curtain and below the bridge.
Open element 61, (eagle) copy and paste as a new layer.
Re-size, 72dpi, smart size, 70%
Position on the right side making it appear that he is perched on the branch.
Add whatever other little element you think will enhance your tag.
I added a butterfly at the top.
Open paper04, promote background to layer.
Apply your mask to this layer.
Merge group.
Copy and paste on your tag and make sure it's your bottom layer.
Add noise of 27% (gaussian), monochrome checked.
Using your selection tool, set to magic wand, click inside the frame.
Go to Selections, modify, expand by 6
Make sure your mask is the active layer.
Promote selection to layer.
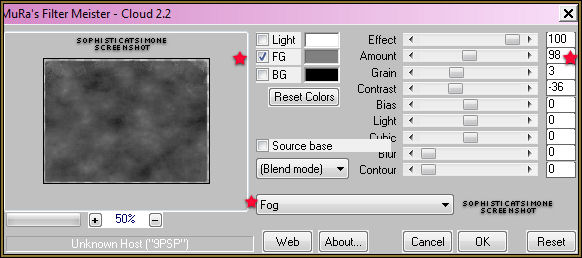
Go to MuRa Meister-Cloud

Set to FOG (drop down)
have a check beside FG only, my color choice is:#808080
Effect=100
Amount=98
Gain=3
Contrast=-36
Bias=0
Light=0
Cubic=0
Blur=0
Contour=0
Click OK
Selections/ Select All
Copy Merged
In Animation Shop, right click and paste as a new animation.
Back in PSP, go to edit and select undo selected all,
Go to Edit and undo Cloud.
Now repeat the filter 3 more times, changing the amount to
83 then, 73 then, 63
Always select all after each and copy merge and paste in AS after current frame.
You should end up with a total of 4 frames.
Working in AS.
Go to Edit, Select ALL.
Go to Edit, Copy.
Click on your last frame to activate it.
Right click and paste after frame.
Scroll to the last frame, you'll notice you have 8 now.
Activate the last frame and repeat.
You will now have 12 frames.
Open animation SimoneAni356-starTrail
Go to Edit, Select all.
Go to Edit, Copy.
Activate your tag.
Go to Edit, Select All.
Go to Edit, choose Propagate Paste.
Go to Edit, Paste, Paste into selected frames.
Position with your cursor.
I placed mine just over the bird's beak.
If you chose the same tube I did this animation will work well, if
you didn't I'm sure you can be creative and play around with positioning.
Click in place.
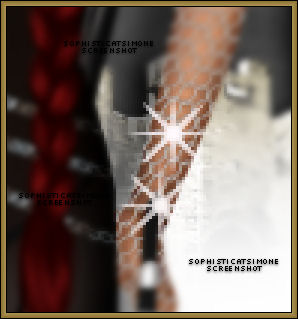
You can add the other animation SimoneAni357-doubleStar as well anywhere around on the tag just to glitz it up a bit.
I added mine on HER left wrist. See screenshot. I also added it to the name.

you didn't I'm sure you can be creative and play around with positioning.
Click in place.
You can add the other animation SimoneAni357-doubleStar as well anywhere around on the tag just to glitz it up a bit.
I added mine on HER left wrist. See screenshot. I also added it to the name.

Make sure you've added your copyright and license number.
Add your name using a font of choice.You can now save it either with transparent background or add a white background.
To add white background, go to Animation: Animation Properties, select Opaque and change color to white.
Hope you enjoyed this tutorial,
Hugs Simone
Please, always direct people to my blog to download my animations.
Do not load to any other download site and don't claim as your own.
Tutorial written by SophisticatSimone aka Lorraine Halle on Sunday, March 31, 2013.
Enjoy!

Labels:Angelica S,Animation,PTU kit,PTU tube
Subscribe to:
Post Comments
(Atom)
Leave Some Love
Categories
- 2 animations same tag using Photoshop (2)
- 2 animations using PSP and AS (1)
- adding 2 animations to tag (2)
- Al Rio (1)
- aldodark (1)
- Alex McMillan (4)
- Alex Prihodko (1)
- AmyMarie Kits (2)
- Angelica S (6)
- Animation (63)
- ARMY (1)
- Barbara Jensen (2)
- Baseball (1)
- Bibi's Collection Kit (38)
- bling (9)
- BLOOD (1)
- bubbles (12)
- CDO Tutorial (1)
- Christine Marie Kotlark (6)
- Christmas (1)
- circles (1)
- Cowgirl (1)
- CU Animations (1)
- Danny Lee (6)
- Design by Joan (3)
- Diana Gali (9)
- Disturbed Scraps (9)
- Easter (1)
- Fairy Dust (3)
- Fire (3)
- Fish (1)
- Forum Set (2)
- Freebie Kit (1)
- FTU Kit (1)
- Glitter (17)
- Goth (9)
- Grunge (6)
- Gunshot (1)
- Hania Designs (1)
- Heatbeatz Creationz (2)
- Jay Trembly (4)
- Jose Cano Tubes (25)
- July 4th (1)
- Lady Mishka Tubes (2)
- LizquisScraps (7)
- Marc Duval (1)
- Mask Tutorial (1)
- Max-13-Tulmes (1)
- Meine Bastelwelt (1)
- Misticheskaya (5)
- Money (1)
- Music (1)
- P-O Concept Kits (4)
- Particle Illusion (1)
- PFD (2)
- PFD Tutorial (1)
- Pink (1)
- Pinup Bombshells (3)
- PIRATE (1)
- Popcorn (1)
- PSP tutorial (1)
- ptu animation (5)
- PTU kit (45)
- PTU tube (46)
- PTU Tutorial (1)
- Rock n Roll (3)
- Roses (1)
- S&Co Store (1)
- SATC (5)
- Scrapz n Pleazure (1)
- SkyScraps Kits (25)
- SkyScraps Tubes (8)
- Sparkle (5)
- Spazz (1)
- Spring (5)
- stars (1)
- Steam Punk (1)
- Summer (1)
- Sweet Occasion Designs (1)
- Teaching Tutorial (5)
- The Hunter (8)
- Timeline Banner (3)
- Tiny Turtle Designs Kits (6)
- Tutorial (43)
- tuts by Rene (1)
- USA (1)
- VeryMany (6)
- Video Tutorial (1)
- waterfall (1)
- ZlataM Tube (5)


0 comments:
Post a Comment