My Blinkie

Subscribe for Updates
Contact Me
Followers
Blog Archive
-
►
2023
(1)
- ► 04/09 - 04/16 (1)
-
►
2022
(7)
- ► 09/04 - 09/11 (1)
- ► 08/28 - 09/04 (3)
- ► 06/12 - 06/19 (1)
- ► 05/29 - 06/05 (1)
- ► 05/15 - 05/22 (1)
-
►
2018
(1)
- ► 03/04 - 03/11 (1)
-
▼
2013
(109)
- ► 11/24 - 12/01 (1)
- ► 10/27 - 11/03 (2)
- ► 10/20 - 10/27 (1)
- ► 10/13 - 10/20 (1)
- ► 10/06 - 10/13 (1)
- ► 09/15 - 09/22 (1)
- ► 09/01 - 09/08 (2)
- ► 08/25 - 09/01 (1)
- ► 08/11 - 08/18 (7)
- ► 08/04 - 08/11 (4)
- ► 07/28 - 08/04 (2)
- ► 07/14 - 07/21 (1)
- ► 07/07 - 07/14 (6)
- ► 06/30 - 07/07 (6)
- ► 06/23 - 06/30 (5)
- ► 06/16 - 06/23 (4)
- ► 06/09 - 06/16 (5)
- ► 06/02 - 06/09 (6)
- ► 05/26 - 06/02 (3)
- ► 05/19 - 05/26 (6)
- ► 05/12 - 05/19 (6)
- ► 05/05 - 05/12 (7)
- ► 04/28 - 05/05 (3)
- ► 04/21 - 04/28 (4)
- ► 04/14 - 04/21 (4)
- ► 04/07 - 04/14 (6)
- ▼ 03/31 - 04/07 (7)
- ► 03/24 - 03/31 (1)
- ► 03/17 - 03/24 (2)
- ► 03/10 - 03/17 (2)
- ► 03/03 - 03/10 (2)
Monday, April 1, 2013
12:06 PM | Edit Post
MY PANDA
Please click on TAG to see in full size.
Supplies needed to complete this tutorial.
Programs: Paint Shop Pro, I'm using version 10, Animation Shop 3
Plugin : Gradient Glow by Eye Candy
Font used: Valken for Upper case letter and Xiomara for lower case letter for Bibi's name.
Tube of choice: Tag 1: Danny Lee "Sugar Girl" found at SATC
Tube of choice: Tag 2: Panda form Bibi's Collections scrap kit "Sugar Girl" from SATC
Scrap Kit: "Sugar Girl" by Bibi's Collections at SATC
Animations: by me Scrappy Bit Of Fun HERE
Save your tag often. Nothing like working long and hard on a tag and PSP crashes.
Please make sure you add a drop shadow of choice to each and every element as you add them.
Remember to close out your original elements and papers once your copy and pasted them on your working tag.
♥♥♥
Let's start
♥♥♥
Open Element (4) purple clouds. Copy and paste as a new Image.
Let's re-size our tag.
Enter Resolution : 72 Pixels/Centimeter
Resample using: Bicubic
Resize all layers: Checked
Width and Height: 80%
Duplicate layer and merge down.
Open Element (33) purple scatter. Copy and paste as a new Image.
Re-size
Enter Resolution : 72 Pixels/Centimeter
Resample using: Bicubic
Resize all layers: Checked
Width and Height: 45%
Duplicate layer and merge down.
Move lower down on your tag.
Duplicate, flip and mirror.
Merge down.
Add your drop shadow.
Open Element (9) doodle. Copy and paste as a new Image.
Delete a little at the top. See Screenshot.
Re-size
Enter Resolution : 72 Pixels/Centimeter
Resample using: Bicubic
Resize all layers: Checked
Width and Height: 60%
Duplicate layer and merge down.
Duplicate again and merge down.
Go to Adjust, Add/Remove Noise, Add Noise
50%, gaussian checked.
Position in center of tag. Make sure the doodle in contained within the tag.
Nothing worse then cut off on a tag :)
Add your drop shadow. Make sure shadow opacity is low.
This is what I used:
Vertical: 1
Horizontal: -2
Opacity: 40
Blur: 2
Color: black
Open Element (62) leafy branch. Copy and paste as a new Image.
Move to upper right hand side of tag.
Duplicate layer, mirror and flip.
Merge together.
Add your drop shadow.
Open Element (6) fan. Copy and paste as a new Image.
Image, free rotate, right, 110 degrees, all layers UN-checked.
Move to lower right hand side of tag.
Add your drop shadow.
Copy and paste again, it should still be in your copy memory. If not, just copy again.
Image, free rotate, left, 50 degrees, all layers UN-checked.
Move to center of tag for now. You can tweak it later once your tube is positioned.
Add your drop shadow.
Move this layer below the other fan layer.
Open Element (46) black grass. Copy and paste as a new Image.
Re-size by 70%. Move to left side of tag.
Add drop shadow.
Open Element (38) branch with buds. Copy and paste as a new Image.
Move to upper portion of your tag.
Add drop shadow.
Open Element ( 30 ) bird. Copy and paste as a new Image.
Re-size by 40%. Move to upper right hand side of tag.
Add drop shadow.
Open Element (67) black leaves. Copy and paste as a new Image.
Re-size by 40%. Move to left lower side of tag.
Duplicate, mirror and flip. Free rotate to the left by 20%
Move to the right of the tag and about the middle of the tag.
Add drop shadow on each layer.
Open Element (69) Panda Bear. Copy and paste as a new Image.
Position him over the leaves, and behind the fan.
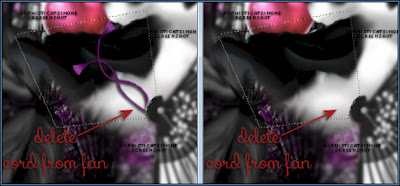
You may need to remove the cord on the fan.
Using your selection tool, set to Point to Point, feather = 0
Click around and be careful over the edge of the fan, just click more often over this area.
Now delete.

Drop shadow I used on my panda is:
V= -4
H= -6
Opacity= 56
Blur= 8
Color= black
Open Element (21) paper flower. Copy and paste as a new Image.
Re-size by 40%. Move to bottom of tag over Panda's derriere.
Add drop shadow.
Open Element (13) flower. Copy and paste as a new Image.
Re-size by 40%. Position over the paper flower on the left upper edge.
Duplicate and mirror. Position slightly lower and more to the left.
See my tag for reference.
Add drop shadow to both.
Open Element (47) long purple grass. Copy and paste as a new Image.
Re-size by 40%. Position to the left of tag.
Duplicate, mirror. Position to the left of tag as well.
Add drop shadow to each.
Open Element (55) mauve flower. Copy and paste as a new Image.
Position to upper right of tag.
Duplicate, mirror and flop . Position to bottom left of tag. Make sure this layer is over the the long purple grass and your black leaf.
Add drop shadow to each.
Open Element (20) sushi. Copy and paste as a new Image.
Re-size by 80%, position at bottom near flower.
Add drop shadow.
Open Element (68) tea set. Copy and paste as a new Image.
Re-size by 60%, position at bottom of tag, see my tag for reference.
I placed it over the fan and the paper flower.
Add drop shadow.
Open Element (53) sushi2. Copy and paste as a new Image.
Re-size by 48%, position at bottom of tag, see my tag for reference.
I placed it between the 1st sushi and the tea set.
Add drop shadow.
Ok tweek your layers now if you need too. If something just doesn't look right, move it around.
Make sure you've drop shadowed all your layers.
Add copyright layer, scrap kit by " " etc.
Go to Edit, Copy Merged.
In Animation Shop, right click and paste as a New Animation.
Hold ctrl key down and tag letter L until you have a total of 24 frames.
Go to Edit, select all.
Open SimoneAni371-with drop shadow.
Go to Edit, select all.
Go to Edit, copy.
Go to Edit, make sure Propagate Paste is depressed.
Activate your tag.
Got to Edit, Paste, Paste into selected frames.
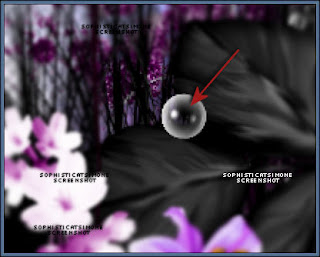
Using your cursor, move the first bubble you see and place on the big black leaf.
See screenshot.

Click into place.
Play your animation.
Hopefully you like it.
Add your name using a font of choice.You can now save it either with transparent background or add a white background.
To add white background, go to Animation: Animation Properties, select Opaque and change color to white.
Hope you enjoyed this tutorial,
Hugs Simone
Please, always direct people to my blog to download my animations.
Do not load to any other download site and don't claim as your own.
Tutorial written by SophisticatSimone aka Lorraine Halle on Monday, April 1st, 2013.
Enjoy!
Supplies needed to complete this tutorial.
Programs: Paint Shop Pro, I'm using version 10, Animation Shop 3
Plugin : Gradient Glow by Eye Candy
Font used: Valken for Upper case letter and Xiomara for lower case letter for Bibi's name.
Tube of choice: Tag 1: Danny Lee "Sugar Girl" found at SATC
Tube of choice: Tag 2: Panda form Bibi's Collections scrap kit "Sugar Girl" from SATC
Scrap Kit: "Sugar Girl" by Bibi's Collections at SATC
Animations: by me Scrappy Bit Of Fun HERE
Save your tag often. Nothing like working long and hard on a tag and PSP crashes.
Please make sure you add a drop shadow of choice to each and every element as you add them.
Remember to close out your original elements and papers once your copy and pasted them on your working tag.
♥♥♥
Let's start
♥♥♥
Open Element (4) purple clouds. Copy and paste as a new Image.
Let's re-size our tag.
Enter Resolution : 72 Pixels/Centimeter
Resample using: Bicubic
Resize all layers: Checked
Width and Height: 80%
Duplicate layer and merge down.
Open Element (33) purple scatter. Copy and paste as a new Image.
Re-size
Enter Resolution : 72 Pixels/Centimeter
Resample using: Bicubic
Resize all layers: Checked
Width and Height: 45%
Duplicate layer and merge down.
Move lower down on your tag.
Duplicate, flip and mirror.
Merge down.
Add your drop shadow.
Open Element (9) doodle. Copy and paste as a new Image.
Delete a little at the top. See Screenshot.
Re-size
Enter Resolution : 72 Pixels/Centimeter
Resample using: Bicubic
Resize all layers: Checked
Width and Height: 60%
Duplicate layer and merge down.
Duplicate again and merge down.
Go to Adjust, Add/Remove Noise, Add Noise
50%, gaussian checked.
Position in center of tag. Make sure the doodle in contained within the tag.
Nothing worse then cut off on a tag :)
Add your drop shadow. Make sure shadow opacity is low.
This is what I used:
Vertical: 1
Horizontal: -2
Opacity: 40
Blur: 2
Color: black
Open Element (62) leafy branch. Copy and paste as a new Image.
Move to upper right hand side of tag.
Duplicate layer, mirror and flip.
Merge together.
Add your drop shadow.
Open Element (6) fan. Copy and paste as a new Image.
Image, free rotate, right, 110 degrees, all layers UN-checked.
Move to lower right hand side of tag.
Add your drop shadow.
Copy and paste again, it should still be in your copy memory. If not, just copy again.
Image, free rotate, left, 50 degrees, all layers UN-checked.
Move to center of tag for now. You can tweak it later once your tube is positioned.
Add your drop shadow.
Move this layer below the other fan layer.
Open Element (46) black grass. Copy and paste as a new Image.
Re-size by 70%. Move to left side of tag.
Add drop shadow.
Open Element (38) branch with buds. Copy and paste as a new Image.
Move to upper portion of your tag.
Add drop shadow.
Open Element ( 30 ) bird. Copy and paste as a new Image.
Re-size by 40%. Move to upper right hand side of tag.
Add drop shadow.
Open Element (67) black leaves. Copy and paste as a new Image.
Re-size by 40%. Move to left lower side of tag.
Duplicate, mirror and flip. Free rotate to the left by 20%
Move to the right of the tag and about the middle of the tag.
Add drop shadow on each layer.
Open Element (69) Panda Bear. Copy and paste as a new Image.
Position him over the leaves, and behind the fan.
You may need to remove the cord on the fan.
Using your selection tool, set to Point to Point, feather = 0
Click around and be careful over the edge of the fan, just click more often over this area.
Now delete.

Drop shadow I used on my panda is:
V= -4
H= -6
Opacity= 56
Blur= 8
Color= black
Open Element (21) paper flower. Copy and paste as a new Image.
Re-size by 40%. Move to bottom of tag over Panda's derriere.
Add drop shadow.
Open Element (13) flower. Copy and paste as a new Image.
Re-size by 40%. Position over the paper flower on the left upper edge.
Duplicate and mirror. Position slightly lower and more to the left.
See my tag for reference.
Add drop shadow to both.
Open Element (47) long purple grass. Copy and paste as a new Image.
Re-size by 40%. Position to the left of tag.
Duplicate, mirror. Position to the left of tag as well.
Add drop shadow to each.
Open Element (55) mauve flower. Copy and paste as a new Image.
Position to upper right of tag.
Duplicate, mirror and flop . Position to bottom left of tag. Make sure this layer is over the the long purple grass and your black leaf.
Add drop shadow to each.
Open Element (20) sushi. Copy and paste as a new Image.
Re-size by 80%, position at bottom near flower.
Add drop shadow.
Open Element (68) tea set. Copy and paste as a new Image.
Re-size by 60%, position at bottom of tag, see my tag for reference.
I placed it over the fan and the paper flower.
Add drop shadow.
Open Element (53) sushi2. Copy and paste as a new Image.
Re-size by 48%, position at bottom of tag, see my tag for reference.
I placed it between the 1st sushi and the tea set.
Add drop shadow.
Ok tweek your layers now if you need too. If something just doesn't look right, move it around.
Make sure you've drop shadowed all your layers.
Add copyright layer, scrap kit by " " etc.
Go to Edit, Copy Merged.
In Animation Shop, right click and paste as a New Animation.
Hold ctrl key down and tag letter L until you have a total of 24 frames.
Go to Edit, select all.
Open SimoneAni371-with drop shadow.
Go to Edit, select all.
Go to Edit, copy.
Go to Edit, make sure Propagate Paste is depressed.
Activate your tag.
Got to Edit, Paste, Paste into selected frames.
Using your cursor, move the first bubble you see and place on the big black leaf.
See screenshot.

Click into place.
Play your animation.
Hopefully you like it.
Add your name using a font of choice.You can now save it either with transparent background or add a white background.
To add white background, go to Animation: Animation Properties, select Opaque and change color to white.
Hope you enjoyed this tutorial,
Hugs Simone
Please, always direct people to my blog to download my animations.
Do not load to any other download site and don't claim as your own.
Tutorial written by SophisticatSimone aka Lorraine Halle on Monday, April 1st, 2013.
Enjoy!

Subscribe to:
Post Comments
(Atom)
Leave Some Love
Categories
- 2 animations same tag using Photoshop (2)
- 2 animations using PSP and AS (1)
- adding 2 animations to tag (2)
- Al Rio (1)
- aldodark (1)
- Alex McMillan (4)
- Alex Prihodko (1)
- AmyMarie Kits (2)
- Angelica S (6)
- Animation (63)
- ARMY (1)
- Barbara Jensen (2)
- Baseball (1)
- Bibi's Collection Kit (38)
- bling (9)
- BLOOD (1)
- bubbles (12)
- CDO Tutorial (1)
- Christine Marie Kotlark (6)
- Christmas (1)
- circles (1)
- Cowgirl (1)
- CU Animations (1)
- Danny Lee (6)
- Design by Joan (3)
- Diana Gali (9)
- Disturbed Scraps (9)
- Easter (1)
- Fairy Dust (3)
- Fire (3)
- Fish (1)
- Forum Set (2)
- Freebie Kit (1)
- FTU Kit (1)
- Glitter (17)
- Goth (9)
- Grunge (6)
- Gunshot (1)
- Hania Designs (1)
- Heatbeatz Creationz (2)
- Jay Trembly (4)
- Jose Cano Tubes (25)
- July 4th (1)
- Lady Mishka Tubes (2)
- LizquisScraps (7)
- Marc Duval (1)
- Mask Tutorial (1)
- Max-13-Tulmes (1)
- Meine Bastelwelt (1)
- Misticheskaya (5)
- Money (1)
- Music (1)
- P-O Concept Kits (4)
- Particle Illusion (1)
- PFD (2)
- PFD Tutorial (1)
- Pink (1)
- Pinup Bombshells (3)
- PIRATE (1)
- Popcorn (1)
- PSP tutorial (1)
- ptu animation (5)
- PTU kit (45)
- PTU tube (46)
- PTU Tutorial (1)
- Rock n Roll (3)
- Roses (1)
- S&Co Store (1)
- SATC (5)
- Scrapz n Pleazure (1)
- SkyScraps Kits (25)
- SkyScraps Tubes (8)
- Sparkle (5)
- Spazz (1)
- Spring (5)
- stars (1)
- Steam Punk (1)
- Summer (1)
- Sweet Occasion Designs (1)
- Teaching Tutorial (5)
- The Hunter (8)
- Timeline Banner (3)
- Tiny Turtle Designs Kits (6)
- Tutorial (43)
- tuts by Rene (1)
- USA (1)
- VeryMany (6)
- Video Tutorial (1)
- waterfall (1)
- ZlataM Tube (5)


0 comments:
Post a Comment