My Blinkie

Subscribe for Updates
Contact Me
Followers
Blog Archive
-
►
2023
(1)
- ► 04/09 - 04/16 (1)
-
►
2022
(7)
- ► 09/04 - 09/11 (1)
- ► 08/28 - 09/04 (3)
- ► 06/12 - 06/19 (1)
- ► 05/29 - 06/05 (1)
- ► 05/15 - 05/22 (1)
-
►
2018
(1)
- ► 03/04 - 03/11 (1)
-
▼
2013
(109)
- ► 11/24 - 12/01 (1)
- ► 10/27 - 11/03 (2)
- ► 10/20 - 10/27 (1)
- ► 10/13 - 10/20 (1)
- ► 10/06 - 10/13 (1)
- ► 09/15 - 09/22 (1)
- ► 09/01 - 09/08 (2)
- ► 08/25 - 09/01 (1)
- ► 08/11 - 08/18 (7)
- ► 08/04 - 08/11 (4)
- ► 07/28 - 08/04 (2)
- ► 07/14 - 07/21 (1)
- ► 07/07 - 07/14 (6)
- ► 06/30 - 07/07 (6)
- ► 06/23 - 06/30 (5)
- ► 06/16 - 06/23 (4)
- ► 06/09 - 06/16 (5)
- ► 06/02 - 06/09 (6)
- ► 05/26 - 06/02 (3)
- ► 05/19 - 05/26 (6)
- ► 05/12 - 05/19 (6)
- ► 05/05 - 05/12 (7)
- ► 04/28 - 05/05 (3)
- ► 04/21 - 04/28 (4)
- ► 04/14 - 04/21 (4)
- ► 04/07 - 04/14 (6)
- ▼ 03/31 - 04/07 (7)
- ► 03/24 - 03/31 (1)
- ► 03/17 - 03/24 (2)
- ► 03/10 - 03/17 (2)
- ► 03/03 - 03/10 (2)
Monday, April 1, 2013
8:58 PM | Edit Post
Name Animation
You will need Paint Shop Pro, I'm using version 10.
Animation Shop 3.
Eye Candy 4000 and Lokas Software/3D Shadow
Select font of choice.
I'm using Xiomara.
Set size to 120, click on your tag and type your name out.
With your Text Entry box still open, highlight all letters in your name except the Upper case letter (1st letter).
Go to your font size and enter 90. You can also change the color at this time if you like.
You just need to click in your foreground color palette and select a color.
STEP 1:
Go to Adjust/Add Remove Noise/Add Noise
Check: Gaussian
Check: Monochrome
Noise: 36%
Click OK
STEP 2:
Go to Effects/3D Effects/Drop Shadow
V = -1
H = 0
Opacity = 96
Blur = 2
Color = black
STEP 3:
Go to Effects/PlugIn/Eye Candy 4000/Gradient Glow
Under Basic TAB:
Glow Width = 3
Soft Corners = 0
Overall Opacity = 100
Under Color TAB:
Select FAT
STEP 4:
Go to Effects/PlugIn/Lokas Software/3D Shadow
Blur: 17
Transparency: 23
Angle X: 0
Angle Y: 0
Angle Z: 0
Zoom: 100
Offset X: -3
Offset Y: 8
Perspective: 80
Color: black
FYI Depending on where you've place your name on your tag, the shadow placement WILL be different.
I always try to place my name in right lower hand corner of my tag when I work on this.
Click OK
STEP 5:
Copy and paste in Animation Shop.
STEP 6:
Go to Edit and undo until you get to your plain name.
STEP 7:
Repeat all steps to step 5. Change the noise in step 1 to 40%
Attention:
STEP 8:
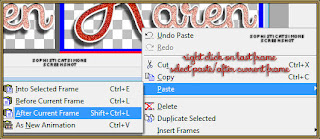
When you are pasting this second frame in Animation Shop, make sure you right click on the current frame there and choose Paste/After Current Frame.

Now click on frame 2 to activate it. If you don't see it, just click on the little arrow at bottom of your animation, it will move your frame out and you can click it. It's activated (selected) when the color changes to blue.
Go back to PSP.
STEP 9:
Go to Edit and undo until you get to your plain name.
STEP 10:
Repeat all steps to step 5. Change the noise in step 1 to 44%
STEP 11:
Your second frame should be selected. Right click on second frame and paste AFTER current frame.
You now have 3 frames with 3 different noise levels.
STEP 12:
Play your animation.
STEP 13.
Go to Edit, Select ALL.
Go to Edit, Copy.
STEP 14:
Activate tag you are working on or have completed.
Go to Edit, Select ALL.
Go to Edit, make sure Propagate Paste is depressed (selected).
Go to Edit, Paste, Paste into Selected Frame.
SAVE
Hope you enjoyed this tutorial,
Hugs Simone
Tutorial writen by SophisticatSimone aka Lorraine Halle on Monday, April 1st, 2013.

Labels:Teaching Tutorial
Subscribe to:
Post Comments
(Atom)
Leave Some Love
Categories
- 2 animations same tag using Photoshop (2)
- 2 animations using PSP and AS (1)
- adding 2 animations to tag (2)
- Al Rio (1)
- aldodark (1)
- Alex McMillan (4)
- Alex Prihodko (1)
- AmyMarie Kits (2)
- Angelica S (6)
- Animation (63)
- ARMY (1)
- Barbara Jensen (2)
- Baseball (1)
- Bibi's Collection Kit (38)
- bling (9)
- BLOOD (1)
- bubbles (12)
- CDO Tutorial (1)
- Christine Marie Kotlark (6)
- Christmas (1)
- circles (1)
- Cowgirl (1)
- CU Animations (1)
- Danny Lee (6)
- Design by Joan (3)
- Diana Gali (9)
- Disturbed Scraps (9)
- Easter (1)
- Fairy Dust (3)
- Fire (3)
- Fish (1)
- Forum Set (2)
- Freebie Kit (1)
- FTU Kit (1)
- Glitter (17)
- Goth (9)
- Grunge (6)
- Gunshot (1)
- Hania Designs (1)
- Heatbeatz Creationz (2)
- Jay Trembly (4)
- Jose Cano Tubes (25)
- July 4th (1)
- Lady Mishka Tubes (2)
- LizquisScraps (7)
- Marc Duval (1)
- Mask Tutorial (1)
- Max-13-Tulmes (1)
- Meine Bastelwelt (1)
- Misticheskaya (5)
- Money (1)
- Music (1)
- P-O Concept Kits (4)
- Particle Illusion (1)
- PFD (2)
- PFD Tutorial (1)
- Pink (1)
- Pinup Bombshells (3)
- PIRATE (1)
- Popcorn (1)
- PSP tutorial (1)
- ptu animation (5)
- PTU kit (45)
- PTU tube (46)
- PTU Tutorial (1)
- Rock n Roll (3)
- Roses (1)
- S&Co Store (1)
- SATC (5)
- Scrapz n Pleazure (1)
- SkyScraps Kits (25)
- SkyScraps Tubes (8)
- Sparkle (5)
- Spazz (1)
- Spring (5)
- stars (1)
- Steam Punk (1)
- Summer (1)
- Sweet Occasion Designs (1)
- Teaching Tutorial (5)
- The Hunter (8)
- Timeline Banner (3)
- Tiny Turtle Designs Kits (6)
- Tutorial (43)
- tuts by Rene (1)
- USA (1)
- VeryMany (6)
- Video Tutorial (1)
- waterfall (1)
- ZlataM Tube (5)


0 comments:
Post a Comment