My Blinkie

Subscribe for Updates
Contact Me
Followers
Blog Archive
-
►
2023
(1)
- ► 04/09 - 04/16 (1)
-
►
2022
(7)
- ► 09/04 - 09/11 (1)
- ► 08/28 - 09/04 (3)
- ► 06/12 - 06/19 (1)
- ► 05/29 - 06/05 (1)
- ► 05/15 - 05/22 (1)
-
►
2018
(1)
- ► 03/04 - 03/11 (1)
-
▼
2013
(109)
- ► 11/24 - 12/01 (1)
- ► 10/27 - 11/03 (2)
- ► 10/20 - 10/27 (1)
- ► 10/13 - 10/20 (1)
- ► 10/06 - 10/13 (1)
- ► 09/15 - 09/22 (1)
- ► 09/01 - 09/08 (2)
- ► 08/25 - 09/01 (1)
- ► 08/11 - 08/18 (7)
- ► 08/04 - 08/11 (4)
- ► 07/28 - 08/04 (2)
- ► 07/14 - 07/21 (1)
- ► 07/07 - 07/14 (6)
- ► 06/30 - 07/07 (6)
- ► 06/23 - 06/30 (5)
- ► 06/16 - 06/23 (4)
- ► 06/09 - 06/16 (5)
- ► 06/02 - 06/09 (6)
- ► 05/26 - 06/02 (3)
- ► 05/19 - 05/26 (6)
- ► 05/12 - 05/19 (6)
- ► 05/05 - 05/12 (7)
- ► 04/28 - 05/05 (3)
- ► 04/21 - 04/28 (4)
- ► 04/14 - 04/21 (4)
- ► 03/31 - 04/07 (7)
- ► 03/24 - 03/31 (1)
- ► 03/17 - 03/24 (2)
- ► 03/10 - 03/17 (2)
- ► 03/03 - 03/10 (2)
Monday, April 8, 2013
8:26 PM | Edit Post
Ultra Violet
Please click on TAG to see in full size.
♥♥♥Supplies needed to complete this tutorial.
♥♥♥Supplies needed to complete this tutorial.
Programs: Paint Shop Pro, I'm using version 10. Animation Shop 3.
Plugin : Eye Candy 4000 : Gradient Glow and Cutout and Lokas Software : 3D Shadow
Font used: Burton's Nightmare
Tube of choice, I'm using tube "Dragon " by Jose A Cano.
Scrap Kit : "UltraViolet" by SkyScrap
Mask: Mask97SophisticatSimone HERE
Animations: Purple glow animations, download HERE
Plugin : Eye Candy 4000 : Gradient Glow and Cutout and Lokas Software : 3D Shadow
Font used: Burton's Nightmare
Tube of choice, I'm using tube "Dragon " by Jose A Cano.
Scrap Kit : "UltraViolet" by SkyScrap
Mask: Mask97SophisticatSimone HERE
Animations: Purple glow animations, download HERE
♥♥♥
Open a new image canvas size 700 x 700.
Open paper UV-E7, copy and paste as a new layer on your canvas.
Apply Mask97SophisticatSimone. Go to Layers, New Mask Layer, from Image.
In source window find Mask97, check : create mask from : source luminance and leave Invert mask data
UN-checked.
Click ok.
Right click on mask in your layers palette and select, merge group.
Let's colorize this layer. Go to Adjust, Hue and Saturation, Colorize, enter the following:
Hue: 225
Saturation: 109
Or select something closer to match your tube of choice.
Duplicate. Merge down.
Copy and paste UV-E13 as a new layer. Re-size by 75%. Move to upper left hand side. Duplicate, mirror and flip. Merge together. Add drop shadow of choice.
Copy and paste UV-E7 as a new layer and move to the top of your canvas and add a drop shadow.
Copy and paste UV-E92 as a new layer and re-size by 75%. Drop shadow.
Copy and paste UV-E31 as a new layer and Move it so it just about covers the mesh element.
You will notice on either edge of this element harsh cut off.
Those drive me nuts, so what I do is set my tool to "Rectangle" selection and a feather of 10. Select both edges and hit delete on keyboard once or twice. That should soften the edges.
Add a drop shadow of choice.
Copy and paste UV-E37 as a new layer and re-size by 50%. Duplicate, merge down and sharpen. Add drop
shadow:
0, 3, 80, 4, black.
Add your tube. I had to re-size mine by 75%. Add drop shadow.
Copy and paste UV-E40 as a new layer and re-size by 75%. Drop shadow. Move just behind your tube.
Copy and paste UV-E4 as a new layer and re-size by 46%. Drop shadow. Move to the right side of your tube.
Copy and paste UV-E42 as a new layer. Drop shadow. Move just behind your tube.
Copy and paste UV-E17 as a new layer. Move just behind your tube. Re-size by 39%. Move to the left of tag behind long grass.
Duplicate and free rotate to the right by 90 degrees.
Duplicate and mirror. Move low on tag and make sure it's behind the curtain element. Add drop shadow to all 3 of these.
Copy and paste UV-E18 as a new layer and re-size by 20%. Drop shadow. Move to the right side of your tube by the glass of wine/poison.
Open Paper UV-E4, duplicate and close original. Re-size by 50%, dpi set at 72.
Now go to image, Canvas size and enter
Width : 350
Height : 200.
Select your crop tool and crop merged.
Go to Effects, Plugins, AAA Frames, Frame Works and enter the following:
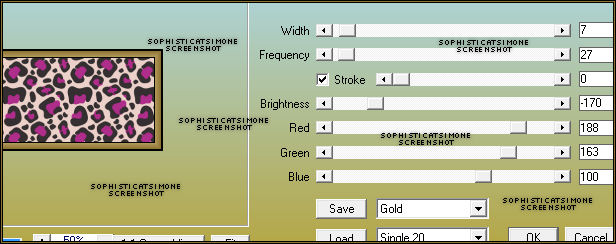

Now copy and paste as a new layer and place behind your tube and the black leaves.
Add drop shadow.
Add the goggles, element E3, re-size by 50% and add drop shadow. Place in front of tube at her legs.
Add element 75. Re-size and free rotate to the left. Move low on tag and to the left. Place behind the curtain
layer.
Duplicate and mirror. Add drop shadow to each and merge them together.
Add any other little embellishment/element to make it yours.
Add artist copyright and scrap kit credit.
Add name as save as PNG.
If you are animating the tag don't add your name yet.
Copy merged and paste in Animation Shop.
Hold ctrl key down and tag letter L until you have a total of 21 frames.
Go to Edit, select all.
Open SimoneAni393-purplebobslarge-shadow
Go to Edit, select all.
Go to Edit, copy.
Go to Edit, make sure Propagate Paste is depressed.
Activate your tag.
Got to Edit, Paste, Paste into selected frames.
Using your cursor, move the purple blog over the goggles.
See screenshot.
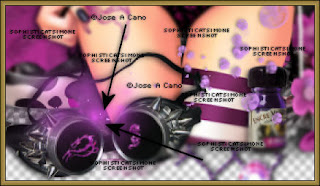
Now you're going to have to guesstimate because you may not have created your tag quite like mine.
You should be able to paste it in the center and it will be within the tag and not cut off on the sides.
Click into place.
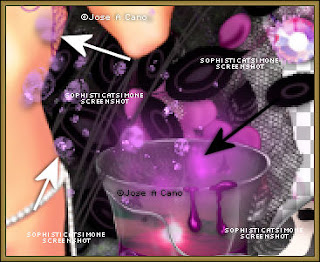
Open SimoneAni394-purplebobsMedium-shadow and repeat the process.
Place over the cup and near the tubes side.
See screenshot.
Ok now let's do the name.
♥♥♥
In PSP open paper UV-E5, duplicate and close original.
Image, re-size by 36%, 72 dpi.
In your Materials palette, set the background to your pattern.
See screen shot.
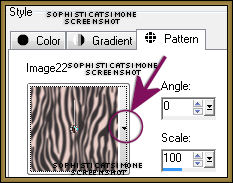
Make sure when you click on the arrow for drop down, you click the re-sized paper.
Select your text tool and select your font, I used Burton's Nightmare,
Size: 120
Stroke width : 0
Kerning: -25
Apply the text.
Convert to raster layer.
Go to Effects, Plugins, Eye Candy 4000, Cutout.
Distance : 2.77
Blur : 5.26
Opacity : 100
Check : Keep original image.
Go to Effects, Plugins, Eye Candy 4000, Gradient Glow.
Under Color TAB select FAT.
Under Basic TAB enter:
Glow Width : 3
Soft Corners : 10
Overall Opacity : 100
Go to Effects, Plugins, Lokas Software, 3D Shadow
Blur : 20
Transparency : 35
Angle X : 0
Angle Y : -6
Angle Z : -2
Zoom : 96
Offset X : 4
Offset Y : 3
Perspective : 66
Color : black
Copy and paste as a new animation in Animation Shop.
Go to Effects, Inset Image Effect.
Select : Rotate Colors
Effect length : 1.7 secs
Frames per second : 7 fps
Go to Edit, select all.
Go to Edit, copy.
Activate your tag.
Go to Edit, paste into selected frame.
Position where you'd like and click into place.
Play and save!
Add drop shadow.
Add the goggles, element E3, re-size by 50% and add drop shadow. Place in front of tube at her legs.
Add element 75. Re-size and free rotate to the left. Move low on tag and to the left. Place behind the curtain
layer.
Duplicate and mirror. Add drop shadow to each and merge them together.
Add any other little embellishment/element to make it yours.
Add artist copyright and scrap kit credit.
Add name as save as PNG.
If you are animating the tag don't add your name yet.
Copy merged and paste in Animation Shop.
Hold ctrl key down and tag letter L until you have a total of 21 frames.
Go to Edit, select all.
Open SimoneAni393-purplebobslarge-shadow
Go to Edit, select all.
Go to Edit, copy.
Go to Edit, make sure Propagate Paste is depressed.
Activate your tag.
Got to Edit, Paste, Paste into selected frames.
Using your cursor, move the purple blog over the goggles.
See screenshot.

Now you're going to have to guesstimate because you may not have created your tag quite like mine.
You should be able to paste it in the center and it will be within the tag and not cut off on the sides.
Click into place.
Open SimoneAni394-purplebobsMedium-shadow and repeat the process.
Place over the cup and near the tubes side.
See screenshot.

Ok now let's do the name.
♥♥♥
In PSP open paper UV-E5, duplicate and close original.
Image, re-size by 36%, 72 dpi.
In your Materials palette, set the background to your pattern.
See screen shot.

Make sure when you click on the arrow for drop down, you click the re-sized paper.
Select your text tool and select your font, I used Burton's Nightmare,
Size: 120
Stroke width : 0
Kerning: -25
Apply the text.
Convert to raster layer.
Go to Effects, Plugins, Eye Candy 4000, Cutout.
Distance : 2.77
Blur : 5.26
Opacity : 100
Check : Keep original image.
Go to Effects, Plugins, Eye Candy 4000, Gradient Glow.
Under Color TAB select FAT.
Under Basic TAB enter:
Glow Width : 3
Soft Corners : 10
Overall Opacity : 100
Go to Effects, Plugins, Lokas Software, 3D Shadow
Blur : 20
Transparency : 35
Angle X : 0
Angle Y : -6
Angle Z : -2
Zoom : 96
Offset X : 4
Offset Y : 3
Perspective : 66
Color : black
Copy and paste as a new animation in Animation Shop.
Go to Effects, Inset Image Effect.
Select : Rotate Colors
Effect length : 1.7 secs
Frames per second : 7 fps
Go to Edit, select all.
Go to Edit, copy.
Activate your tag.
Go to Edit, paste into selected frame.
Position where you'd like and click into place.
Play and save!
Go to File, Save as, enter the name of your file and select the folder to save to.
Now click on Customize:
Under COLORS TAB:
Number of colors: 255 Colors
Create palette by: OPTIMIZED OCTREE
Reduce colors by: Error Diffusion
Under OPTIMIZATIONS TAB:
set a check mark beside the second, third and forth choices. UN-check the 1st and last.
Under PARTIAL TRANSPARENCY:
check Convert pixels less than 92
Yes, blend with this color: change to white #FFFFFF
Click OK. Click Next, next, next, next.
Play your animation.
At times your animation may or will come out terrible. Optimization in Animation Shop is not the greatest.
You can play around will your settings, especially under the Tab: Optimization. I change this setting at times from anywhere between 70 and 100.
Some people add a white background. To add background, go to Animation: Animation Properties, select Opaque and change color to white.
Hope you enjoyed this tutorial,
Hugs Simone
Please, always direct people to my blog to download my animations.
Do not load to any other download site and don't claim as your own.
Tutorial written by SophisticatSimone aka Lorraine Halle on Monday, April 8, 2013.

Subscribe to:
Post Comments
(Atom)
Leave Some Love
Categories
- 2 animations same tag using Photoshop (2)
- 2 animations using PSP and AS (1)
- adding 2 animations to tag (2)
- Al Rio (1)
- aldodark (1)
- Alex McMillan (4)
- Alex Prihodko (1)
- AmyMarie Kits (2)
- Angelica S (6)
- Animation (63)
- ARMY (1)
- Barbara Jensen (2)
- Baseball (1)
- Bibi's Collection Kit (38)
- bling (9)
- BLOOD (1)
- bubbles (12)
- CDO Tutorial (1)
- Christine Marie Kotlark (6)
- Christmas (1)
- circles (1)
- Cowgirl (1)
- CU Animations (1)
- Danny Lee (6)
- Design by Joan (3)
- Diana Gali (9)
- Disturbed Scraps (9)
- Easter (1)
- Fairy Dust (3)
- Fire (3)
- Fish (1)
- Forum Set (2)
- Freebie Kit (1)
- FTU Kit (1)
- Glitter (17)
- Goth (9)
- Grunge (6)
- Gunshot (1)
- Hania Designs (1)
- Heatbeatz Creationz (2)
- Jay Trembly (4)
- Jose Cano Tubes (25)
- July 4th (1)
- Lady Mishka Tubes (2)
- LizquisScraps (7)
- Marc Duval (1)
- Mask Tutorial (1)
- Max-13-Tulmes (1)
- Meine Bastelwelt (1)
- Misticheskaya (5)
- Money (1)
- Music (1)
- P-O Concept Kits (4)
- Particle Illusion (1)
- PFD (2)
- PFD Tutorial (1)
- Pink (1)
- Pinup Bombshells (3)
- PIRATE (1)
- Popcorn (1)
- PSP tutorial (1)
- ptu animation (5)
- PTU kit (45)
- PTU tube (46)
- PTU Tutorial (1)
- Rock n Roll (3)
- Roses (1)
- S&Co Store (1)
- SATC (5)
- Scrapz n Pleazure (1)
- SkyScraps Kits (25)
- SkyScraps Tubes (8)
- Sparkle (5)
- Spazz (1)
- Spring (5)
- stars (1)
- Steam Punk (1)
- Summer (1)
- Sweet Occasion Designs (1)
- Teaching Tutorial (5)
- The Hunter (8)
- Timeline Banner (3)
- Tiny Turtle Designs Kits (6)
- Tutorial (43)
- tuts by Rene (1)
- USA (1)
- VeryMany (6)
- Video Tutorial (1)
- waterfall (1)
- ZlataM Tube (5)


0 comments:
Post a Comment