My Blinkie

Saturday, April 6, 2013

Aurora
Please click on TAG to see in full size.
♥♥♥ Supplies needed to complete this tutorial. ♥♥♥
♥♥♥ Supplies needed to complete this tutorial. ♥♥♥
Programs: Paint Shop Pro, I'm using version 10. Animation Shop 3.
Plugin : Eye Candy 4: Gradient Glow for Name as well as Shadow Lab by Lokas Software and MuRa Meister's Copies
Font used: Ventography Personal Use Only
Scrap Kit : "Aurora" by Angelica S
Save your tag often. Nothing like working long and hard on a tag and PSP crashes.
♥♥♥
Open a new image 700 x 700.
Open element 30. Copy and paste as a new layer on your canvas.
Re-size by 20%. Add a light drop shadow. I used 5, 5, 56, 10
Go to effect/MuRa Meister's Copies
Select : Encircle
Change the shift x and y to 60
Click OK.
Copy element 21 and paste as a new layer. Duplicate and merge.
Add same drop shadow. Move to the left side of frame.
Copy element 47 and paste as a layer. Re-size by 40%.
Move to the upper left hand corner.
Duplicate.
Image, Free Rotate, 90 degrees to the left.
Hold your shift key down and click on that element and move to lower left hand corner.
Duplicate.
Image, Free Rotate, 90 degrees to the left.
Hold your shift key down and click on that element and move to lower right hand corner.
Duplicate.
Image, Free Rotate, 90 degrees to the left.
Hold your shift key down and click on that element and move to upper right hand corner.
Merge all 4 of these layers and move below the bird and above the flower frame.
Copy element 08 and paste as a layer. Re-size by 40%.
Move to the upper left hand area on the frame.
Add same drop shadow.
Open Paper 05, promote background to layer.
Add mask of choice or mine, mask96SophisticatSimone.
Go to Layers, New Mask Layer, From Image.
In source window find the Mask.
Create mask from : source luminance and make sure Invert mask data is UN-checked.
In layers Palette, right click on layer and merge group.
Copy and paste as a new layer on your tag.
Move to bottom.
Close the paper you opened but don't save as you will lose the original.
Copy and paste tube of choice as a new layer.
Re-size by 65%. Move it behind the flower frame.
Select your magic wand and set your feather to 0. Click inside the frame (make sure this layer is selected first in the layer palette).
Go to Selection, modify, expand by 5.
Go to Selection, Invert.
Click on the tube layer and delete.
Change blend mode to Overlay.
Copy and paste element 13 as a new layer. Re-size by 65%
Add drop shadow, 0, -3, 61, 9
Move to the right side of tag.
Copy and paste element 24 as a new layer. Re-size by 20%
Add drop shadow, -1, -3, 61, 9
Move to the top of tag.
Copy and paste element 31 as a new layer. Re-size by 20%
Add drop shadow, -1, -3, 61, 9
Move to the right of tag just by the bottle.
Add copyright.
Copy merged and paste as a new animation in Animation Shop.
Hold Ctrl key and hit letter L for a total of 14 times to give you 15 frames.
Open SimoneAni278
Go to Edit, select all.
Go to Edit, make sure Propagate paste is active.
Go to Edit, copy.
Activate your tag.
Go to Edit, select all.
Go to Edit, Paste, paste into selected frame.
Position on your tag. I place the cluster of stars over the bow.
Click into place.
Add name.
Open paper 12. Shift + D to duplicate, close original.
Promote background to layer.
Re-size 29%, 72dip, all layers checked and re-sample using Smart Size.
Select your font, I chose : Ventography Personal Use Only
Click on your tag to open your Text Entry box.
Type your name. Highlight the lower case letters and enter Size: 145

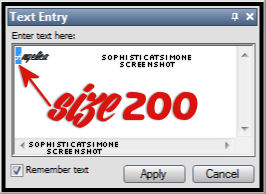
Now highlight the 1st letter in your name and enter the Size: 200
Now highlight the whole name, activate the background color in material palette.
Set the pattern to the paper you just re-sized.
Angle : 0 Scale : 100
Click ok. Convert to raster layer.
Add noise: 30%
Add drop shadow: 0, -1, 53, 2
Add gradient glow: color tab select FAT, under basic tab select 3, 0, 100
Add drop shadow: effect, Lokas Software, 3D Shadow:

Copy and paste in animation shop as a new animation.
Back in PSP, undo till you get to the name.
Repeat all steps, changing NOISE to 40%.
In animation shop right click on the 1st frame of the name and paste after current frame.
Back in PSP, undo till you get to the name.
Repeat all steps, changing NOISE to 50%.
In animation shop right click on the 2nd frame of the name and paste after current frame.
You now have 3 frames.
Go to edit, select all.
Got to edit, copy.
Activate your tag.
Go to edit, select all.
Go to edit, paste, paste into selected frame.
Position lower left hand side.
Click into place.
Save your tag.
Go to File, Save as, enter the name of your file and select the folder to save to.
Now click on Customize:
Under COLORS TAB:
Number of colors: 255 Colors
Create palette by: OPTIMIZED OCTREE
Reduce colors by: Error Diffusion
Under OPTIMIZATIONS TAB:
set a check mark beside the second, third and forth choices. UN-check the 1st and last.
Under PARTIAL TRANSPARENCY:
check Convert pixels less than 92
Yes, blend with this color: change to white #FFFFFF
Click OK. Click Next, next, next, next.
Play your animation.
At times your animation may or will come out terrible. Optimization in Animation Shop is not the greatest.
You can play around will your settings, especially under the Tab: Optimization. I change this setting at times from anywhere between 50 and 110.
Some people add a white background. To add bg, go to Animation: Animation Properties, select Opaque and change color to white.
Hope you enjoyed this tutorial,
Hugs Simone
Please, always direct people to my blog to download my animations.
Do not load to any other download site and don't claim as your own.
Tutorial writen by SophisticatSimone aka Lorraine Halle on Saturday, April 6, 2013.

Friday, April 5, 2013

Magic Bug
Please click on TAG to see in full size.
Supplies needed to complete this tutorial.
♥♥♥
Supplies needed to complete this tutorial.
♥♥♥
Programs: Paint Shop Pro, I'm using version 10. Animation Shop 3.
Plugin : Eye Candy 4: Gradient Glow for Name as well as HSB Noise.
Font used: Xiomara
Tube of choice, I'm using tube Sweet Ladybug "by Meine Bastelwelt" from Heatbeatz Creationz
There are 16 tubes in this package as well as one background image.
Scrap Kit "AM_LadyBugLisa" by Amy Marie at Heatbeatz Creationz
Scrap Kit "AM_LadyBugLisa" by Amy Marie at Heatbeatz Creationz
Mask: Mask93SophisticatSimone HERE
Animations: Waterfall and magic wand sparkles by me, download HERE
Animations: Waterfall and magic wand sparkles by me, download HERE
♥♥♥
Save your tag often. Nothing like working long and hard on a tag and PSP crashes.
Open a new image 700 x 700.
Copy and paste Sweet Ladybug 05 as a new layer. Re-size by 50%.
Copy and paste element 56 as a new layer. Move behind your tube and to the left.
Make it appear as though her foot is on the rock.
Copy and paste again and move these rocks to the right on the tag and move up as top layer.
Open paper pp014 from Amy's papers.
Re-Size to 800 x 800 which is about 80%. Make sure your resolution is 72 dpi.
Promote to raster layer. Let's apply the mask to this paper.
Open Mask93SophisticatSimone.
Open Mask93SophisticatSimone.
Go to layers, new mask layer, from image, find my mask and apply to paper.
Merge group.
Copy and paste as a new layer on your tag and move to bottom.
Re-size by 86% again. Move around to your liking.
From Amy Marie's kit, copy and paste element 3 as a new layer.
Re-size by 50% and position to the left of the tag, behind the rocks.
Copy and paste as a new layer element 30 (swing) as a new layer.
Position to the upper right side of tag behind your tube.
Copy and paste as a new layer element 83 (red flower) as a new layer.
Position to the mid left side of tag behind your tube.
From the tube pack, open MBW-Sweet Ladybug 16.
Select your lasso tool, set to Point to point, Mode: Add (shift), feather 0, Smoothing 0, Anti-alias checked.
Click around the butterfly, when you get back to starting point right click, this will join the start and finish.
You should have a selection around the butterfly now. Go to edit and copy.
Activate your tag and paste as a new layer. Re-size by 85% and sharpen.
Repeat for the mushrooms. Re-size by 22% a position in front at the base of rocks on the right side of tag.
Duplicate, and position between the rock layers and in center of tag.
Copy and paste element 92 as a new layer.
Duplicate and merge together. Place second to last layer.
Copy and paste element 78, re-size by 37%.
Position to the right and behind your rocks.
Paste again, this time re-size by 17%, mirror and place to the left side of the tag, in front of rocks.
Copy and paste element 75. Duplicate and merge together. Position upper left hand side of tag, in front of tube.
Copy and paste element 68.
Position to the left side of tag up high, just above your mask layer. Duplicate and mirror.
Position middle of tag behind your tube and rock layers.
Copy and paste element 72. Re-size and duplicate, position several all over, in front of rocks and behind the rocks.
Copy and paste element 67 and position in center of tag make sure this element (falls) layer is above swing and the 2 trees, as well as behind your tube.
Copy and paste element 21 and position to the right of your tag behind the rocks.
Duplicate your mask layer and on top layer change blend mode to screen.
Add drop shadow to all your layers, except your mask layers.
Merge all your top layers down to the falls layer. Skip the falls.
Merge all layers from below the falls to the last layer, before the mask layers.
X out all layers except your mask layers. Merge visible the mask layers, that way your screen effect will remain.
You should have 3 layers now.
(1) All top elements including your tube (merged)
(2) falls element
(3) swing, trees, swirl and mask layer (merged)
Merge layer 2 down to layer 3.
Add copyright information for your tube artist and scrap kit credit for designer.
Position at top and merge down on your top layer.
You now have 2 layers.
Go to selections, select all. Make sure your bottom layer is active and copy.
Open animation shop. Right click and paste as a new animation.
Hold Ctrl key and hit letter L for a total of 14 times to give you 15 frames.
Open SimoneAni276-waterfall.
Go to Edit, select all.
Go to Edit, make sure Propagate paste is active.
Go to Edit, copy.
Activate your tag.
Go to Edit, select all.
Go to Edit, Paste, paste into selected frame.
Position waterfall animation over the waterfall on your tag.
Click into place.
Go to PSP.
Activate the top layer, make sure you don't deselect.
Copy.
In AS, right click and paste as a new animation.
Go to Edit, Copy.
Activate your tag.
Go to Edit, Paste, paste into selected frame.
Using your cursor position the layer as best as you can within your tag.
Click into place.
Open SimoneAni377-stars and bubble white.
Go to Edit, select all.
Go to Edit, copy.
Activate your tag.
Go to Edit, Paste, paste into selected frame.
Using your cursor move this animation over her magic wand and click into place.
Play your animation. Hopefully you like all your placements, if not go to Edit and undo. Fix. Play.
Add your name to your tag.
Please see this tutorial on animating names and adding to your tags.
Go to File, Save as, enter the name of your file and select the folder to save to.
Now click on Customize:
Under COLORS TAB:
Number of colors: 255 Colors
Create palette by: OPTIMIZED OCTREE
Reduce colors by: Error Diffusion
Under OPTIMIZATIONS TAB:
set a check mark beside the second, third and forth choices. Un-check the 1st and last.
Under PARTIAL TRANSPARENCY:
check Convert pixels less than 92
Yes, blend with this color: change to white #FFFFFF
Click OK. Click Next, next, next, next.
Play your animation.
At times your animation may or will come out terrible. Optimization in Animation Shop is not the greatest.
You can play around will your settings, especially under the Tab: Optimization. I change this setting at times from anywhere between 50 and 110.
Some people add a white background. To add bg, go to Animation: Animation Properties, select Opaque and change color to white.
Hope you enjoyed this tutorial,
Hugs Simone
Please, always direct people to my blog to download my animations.
Do not load to any other download site and don't claim as your own.
Tutorial writen by SophisticatSimone aka Lorraine Halle on Monday, April 5st, 2013.

Please click on TAG to see in full size.
Supplies needed to complete this tutorial.
Supplies needed to complete this tutorial.
Programs: Paint Shop Pro, I'm using version 10
Plugin : Eye Candy 4: Gradient Glow for Name.
Font used: Recorda Script Personal Use Only
Tube of choice, I'm using tube "Sasha"by Diana Gali
Scrap Kit "Rock On" by SkyScraps
Mask: Mask95SophisticatSimone HERE
Save your tag often. Nothing like working long and hard on a tag and PSP crashes.
Create a new image 700 x 700.
Copy element E62 and paste as a new layer on your canvas.
Image, re-size by 62%. Move to the right of your canvas.
Copy element E56 and paste as a new layer on your canvas.
Image, re-size by 62%. Move to the left of your canvas.
Copy element E44 and paste as a new layer on your canvas.
Move to the left of your canvas and behind the statue of liberty and over your skyline.
Copy element E39 and paste as a new layer on your canvas, send to bottom.
Copy element E27 and paste as a new layer on your canvas.
Move to the left of your canvas and move to top.
Copy element E4 and paste as a new layer on your canvas.
Image, re-size by 30%. Move to the left of your canvas if front of your drums.
Copy element E65 and paste as a new layer on your canvas.
Move a little lower and place behind the statue of liberty and fire works, but in front of the skyline.
Copy and paste your tube. I re-sized mine by 62%.
Move to top layer.
Copy element E26 and paste as a new layer on your canvas.
Position lower on tag and centered at bottom in front of your tube.
Copy element E13 and paste as a new layer on your canvas.
Image, re-size by 70%. Move to the right of your canvas behind your tube.
Copy element E37 and paste as a new layer on your canvas.
Image, re-size by 31%. Move to the left behind Statue and colorize using a color from your tube.
Open Paper pp4, copy and paste as a new layer on your tag. Move to bottom.
Open Mask95Sophisticatsimone and go to layers, new mask layer, from image, find my mask and apply to paper.
Add drop shadow to all elements. Add artist copyright and scrap kit credit.
Add your name, merge all visible and save as png.
Hope you enjoyed this tutorial,
Hugs Simone
Tutorial written by SophisticatSimone aka Lorraine Halle on Sunday, April 5th, 2013.
Enjoy!
Monday, April 1, 2013

Name Animation
You will need Paint Shop Pro, I'm using version 10.
Animation Shop 3.
Eye Candy 4000 and Lokas Software/3D Shadow
Select font of choice.
I'm using Xiomara.
Set size to 120, click on your tag and type your name out.
With your Text Entry box still open, highlight all letters in your name except the Upper case letter (1st letter).
Go to your font size and enter 90. You can also change the color at this time if you like.
You just need to click in your foreground color palette and select a color.

Apply.
Convert to Raster Layer.
STEP 1:
Go to Adjust/Add Remove Noise/Add Noise
Check: Gaussian
Check: Monochrome
Noise: 36%
Click OK
STEP 2:
Go to Effects/3D Effects/Drop Shadow
V = -1
H = 0
Opacity = 96
Blur = 2
Color = black
STEP 3:
Go to Effects/PlugIn/Eye Candy 4000/Gradient Glow
Under Basic TAB:
Glow Width = 3
Soft Corners = 0
Overall Opacity = 100
Under Color TAB:
Select FAT
STEP 4:
Go to Effects/PlugIn/Lokas Software/3D Shadow
Blur: 17
Transparency: 23
Angle X: 0
Angle Y: 0
Angle Z: 0
Zoom: 100
Offset X: -3
Offset Y: 8
Perspective: 80
Color: black
FYI Depending on where you've place your name on your tag, the shadow placement WILL be different.
I always try to place my name in right lower hand corner of my tag when I work on this.
Click OK
STEP 5:
Copy and paste in Animation Shop.
STEP 6:
Go to Edit and undo until you get to your plain name.
STEP 7:
Repeat all steps to step 5. Change the noise in step 1 to 40%
Attention:
STEP 8:
When you are pasting this second frame in Animation Shop, make sure you right click on the current frame there and choose Paste/After Current Frame.

Now click on frame 2 to activate it. If you don't see it, just click on the little arrow at bottom of your animation, it will move your frame out and you can click it. It's activated (selected) when the color changes to blue.
Go back to PSP.

STEP 9:
Go to Edit and undo until you get to your plain name.
STEP 10:
Repeat all steps to step 5. Change the noise in step 1 to 44%
STEP 11:
Your second frame should be selected. Right click on second frame and paste AFTER current frame.
You now have 3 frames with 3 different noise levels.

STEP 12:
Play your animation.
STEP 13.
Go to Edit, Select ALL.
Go to Edit, Copy.
STEP 14:
Activate tag you are working on or have completed.
Go to Edit, Select ALL.
Go to Edit, make sure Propagate Paste is depressed (selected).
Go to Edit, Paste, Paste into Selected Frame.
SAVE
Hope you enjoyed this tutorial,
Hugs Simone
Tutorial writen by SophisticatSimone aka Lorraine Halle on Monday, April 1st, 2013.

Please click on TAG to see in full size.
Supplies needed to complete this tutorial.
Programs: Paint Shop Pro, I'm using version 10, Animation Shop 3
Plugin : AAA Frames, Frame Works and Gradient Glow by Eye Candy 4000
Font used: Xiomara
Tube of choice: I'm using Gretta by Max-13-Tulmes. You can purchase this tube at Pics for Design
Scrap Kit: "Spring Floral Explosion" by Sweet Occasion Designs at Heatbeastz Creationz
Animations 372-375 : by me Scrappy Bit Of Fun HERE
Save your tag often. Nothing like working long and hard on a tag and PSP crashes.
Please make sure you add a drop shadow of choice to each and every element as you add them.
Remember to close out your original elements and papers once your copy and pasted them on your working tag.
•••
Let's start
•••
Open element Violet-2. Copy and paste as a new Image.
Re-size by 23%.
Go to Image and Re-size your canvas.
New canvas size : 700 x 700
Add a drop shadow to the flower.
I used:
V= 5
H= -7
O= 68
B= 5
C= black
Go to Effect/Plugins/ MuRa's Filter Meister/Copies
Select : Encircle
Number: 10
Shift x and y : 64
Angle : 0
Rotation : 100
Phase : -25
Cycle : 100
Attenuation : 0
Scale : 100
Tile Gap : 0
Thru BG Range : 0
Thru BG Smooth : 30
Fade Out : 0
Click OK
Open: StarLightDesigns_DesignersCU26_el (13) Copy and paste as a new layer.
Re-size by 51%. Move to the right side of your flower frame. Make sure this layer is behind the flowers.
Duplicate. Image, free rotate, rotate right, 90%. Move to bottom edge of frame, also making sure this layer is behind flowers.
Using your selection tool, select anything that appears in the center of your flower circle and delete it.
Add same drop shadow to each leaf layer.
Open : Rhodo-pink 2-4 Copy and paste as a new layer.
Re-size by 75%. Move to the right upper side of your flower frame. Make sure this layer is behind the flowers.
Duplicate. Image, free rotate, rotate left, 90%. Flip it and move it to the lower left hand side of the flower circle.
Add same drop shadow to each layer.
Open : Daisy-4 Copy and paste as a new layer.
Re-size by 34%. This should be your top layer right now. Move it to the left hand side of circle frame.
Add same drop shadow.
Using Daisy -4 again, copy and paste as a new layer, this time re-size by 44. Mirror and position behind the smaller pink daisies.
Add same drop shadow.
Copy and paste your tube, move to center of tag.
Open paper : back-17. Shift + D, duplicate and close original.
Re-size by 30%. Make the resolution is set to 72 dpi first.
I also always choose Smart Size.
If you are using the same tube as me, copy the "close up" and paste as a new layer on this paper.
Change to Overlay and make sure Opacity is 100%. Crop merged. Merge all.
Go to Effect, plugins, AAA Frames, Frame Works.
Choose from the drop down boxes first and then we will adjust the levels.
Select : Purple Stain
Select : Single 20
Width: 7
Frequency : 246
Stroke : 6
Brightness : -30
Red : 18
Green : -60
Blue : 5
click OK
Copy and paste on your tag, behind your tube.
Mirror if your tube is covering up her face.
Add the following drop shadow if you like:
V= 5
H= -7
O= 50
B= 8
C= black
Open : WishingonaStarr_CU4CU_Dahlias002 Copy and paste as a new layer. Re-size by 30%.
Move to the right side of frame.
Add original d/s:
V= 5
H= -7
O= 68
B= 5
C= black
Open : WishingonaStarr_CU4CU_Dahlias003 Copy and paste as a new layer. Re-size by 34%.
Move to the right side of frame and place this layer below the yellow flowers.
Add drop shadow.
Open : WishingonaStarr_CU4CU_FlowerMix2-006 Copy and paste as a new layer. Re-size by 55%.
Your tube should be your top layer, if not, move to top now.
Make sure the grass layer is your next layer, covering up those other flowers.
Add drop shadow.
Open : Someiyosino-5 Copy and paste as a new layer. Re-size by 18%. Move this layer below the square frame and in the upper left hand corner.
Duplicate, Image, Free rotate, to the left, 90 degrees.
Move it so it peeks out from left upper edge of frame, see my tag for reference.
Open : WishingonaStarr_CU4CU_FlowerMix2-001 re-size by 40%. Mirror and move to the right hand side of square frame.
Add drop shadow. Make sure this layer is above your frame layer. Duplicate and mirror and position on the left side of frame.
Open : Bow 3 Copy and paste as a new layer. Re-size by 20%. Move the bow to the top center frame.
OK, x - out your tube. Go to Selections, select all.
Make sure any layer but your tube layer is active in layers palette.
Go to Edit, copy merged.
Go to Animation Shop. Right click and paste as a New Animation.
Holding the ctrl key down, repeatedly tap the letter L until you have a total of 15 frames.
Go to Edit, Select All.
Open SimoneAni375-with drop shadow. Go to Edit, Select All.
Go to Edit/Copy.
Go to Edit and depress Propagate Paste.
Click on your tag ( top bar ) to activate it again.
Go to Edit, Paste, Paste into selected frames.
Position at top of your tag. Click into place.
Open SimoneAni373. Go to Edit, Select All.
Go to Edit/Copy.
Click on your tag ( top bar ) to activate it again.
Go to Edit, Paste, Paste into selected frames.
Position at bottom of your tag over your grassy area. Click into place.
Play your animation. Hopefully you are happy with your positioning.
If not just go to Edit and undo and retry.
Go to PSP, un-hide your tube and click on layer to activate it.
Go to Edit and copy.
In AS, right click on work space and paste as a New animation.
Go to Edit and copy.
Activate your tag. Go to Edit/Paste/ Paste into selected frames.
I placed her in the middle.
Please refer back to your image in PSP if you're unsure where you should place your tube.
Add all your copyright information and credit the scrap kit maker if you can.
Add your name and save your tag!
Go to File, Save as, enter the name of your file and select the folder to save to.
Now click on Customize:
Under COLORS TAB:
Number of colors: 255 Colors
Create palette by: OPTIMIZED OCTREE
Reduce colors by: Error Diffusion
Under OPTIMIZATIONS TAB:
set a check mark beside the second, third and forth choices. Un-check the 1st and last.
Under PARTIAL TRANSPARENCY:
check Convert pixels less than 92
Yes, blend with this color: change to white #FFFFFF
Click OK. Click Next, next, next, next.
Play your animation.
At times your animation may or will come out terrible. Optimization in Animation Shop is not the greatest.
You can play around will your settings, especially under the Tab: Optimization. I change this setting at times from anywhere between 50 and 110.
Some people add a white background. To add bg, go to Animation: Animation Properties, select Opaque and change color to white.
Hope you enjoyed this tutorial,
Hugs Simone
Please, always direct people to my blog to download my animations.
Do not load to any other download site and don't claim as your own.
Tutorial writen by SophisticatSimone aka Lorraine Halle on Monday, April 1st, 2013.


MY PANDA
Please click on TAG to see in full size.
Supplies needed to complete this tutorial.
Programs: Paint Shop Pro, I'm using version 10, Animation Shop 3
Plugin : Gradient Glow by Eye Candy
Font used: Valken for Upper case letter and Xiomara for lower case letter for Bibi's name.
Tube of choice: Tag 1: Danny Lee "Sugar Girl" found at SATC
Tube of choice: Tag 2: Panda form Bibi's Collections scrap kit "Sugar Girl" from SATC
Scrap Kit: "Sugar Girl" by Bibi's Collections at SATC
Animations: by me Scrappy Bit Of Fun HERE
Save your tag often. Nothing like working long and hard on a tag and PSP crashes.
Please make sure you add a drop shadow of choice to each and every element as you add them.
Remember to close out your original elements and papers once your copy and pasted them on your working tag.
♥♥♥
Let's start
♥♥♥
Open Element (4) purple clouds. Copy and paste as a new Image.
Let's re-size our tag.
Enter Resolution : 72 Pixels/Centimeter
Resample using: Bicubic
Resize all layers: Checked
Width and Height: 80%
Duplicate layer and merge down.
Open Element (33) purple scatter. Copy and paste as a new Image.
Re-size
Enter Resolution : 72 Pixels/Centimeter
Resample using: Bicubic
Resize all layers: Checked
Width and Height: 45%
Duplicate layer and merge down.
Move lower down on your tag.
Duplicate, flip and mirror.
Merge down.
Add your drop shadow.
Open Element (9) doodle. Copy and paste as a new Image.
Delete a little at the top. See Screenshot.

Re-size
Enter Resolution : 72 Pixels/Centimeter
Resample using: Bicubic
Resize all layers: Checked
Width and Height: 60%
Duplicate layer and merge down.
Duplicate again and merge down.
Go to Adjust, Add/Remove Noise, Add Noise
50%, gaussian checked.
Position in center of tag. Make sure the doodle in contained within the tag.
Nothing worse then cut off on a tag :)
Add your drop shadow. Make sure shadow opacity is low.
This is what I used:
Vertical: 1
Horizontal: -2
Opacity: 40
Blur: 2
Color: black
Open Element (62) leafy branch. Copy and paste as a new Image.
Move to upper right hand side of tag.
Duplicate layer, mirror and flip.
Merge together.
Add your drop shadow.
Open Element (6) fan. Copy and paste as a new Image.
Image, free rotate, right, 110 degrees, all layers UN-checked.
Move to lower right hand side of tag.
Add your drop shadow.
Copy and paste again, it should still be in your copy memory. If not, just copy again.
Image, free rotate, left, 50 degrees, all layers UN-checked.
Move to center of tag for now. You can tweak it later once your tube is positioned.
Add your drop shadow.
Move this layer below the other fan layer.
Open Element (46) black grass. Copy and paste as a new Image.
Re-size by 70%. Move to left side of tag.
Add drop shadow.
Open Element (38) branch with buds. Copy and paste as a new Image.
Move to upper portion of your tag.
Add drop shadow.
Open Element ( 30 ) bird. Copy and paste as a new Image.
Re-size by 40%. Move to upper right hand side of tag.
Add drop shadow.
Open Element (67) black leaves. Copy and paste as a new Image.
Re-size by 40%. Move to left lower side of tag.
Duplicate, mirror and flip. Free rotate to the left by 20%
Move to the right of the tag and about the middle of the tag.
Add drop shadow on each layer.
Open Element (69) Panda Bear. Copy and paste as a new Image.
Position him over the leaves, and behind the fan.
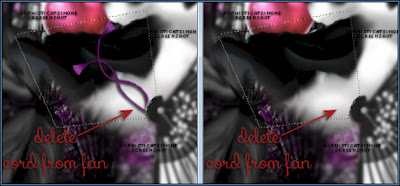
You may need to remove the cord on the fan.
Using your selection tool, set to Point to Point, feather = 0
Click around and be careful over the edge of the fan, just click more often over this area.
Now delete.
Drop shadow I used on my panda is:
V= -4
H= -6
Opacity= 56
Blur= 8
Color= black
Open Element (21) paper flower. Copy and paste as a new Image.
Re-size by 40%. Move to bottom of tag over Panda's derriere.
Add drop shadow.
Open Element (13) flower. Copy and paste as a new Image.
Re-size by 40%. Position over the paper flower on the left upper edge.
Duplicate and mirror. Position slightly lower and more to the left.
See my tag for reference.
Add drop shadow to both.
Open Element (47) long purple grass. Copy and paste as a new Image.
Re-size by 40%. Position to the left of tag.
Duplicate, mirror. Position to the left of tag as well.
Add drop shadow to each.
Open Element (55) mauve flower. Copy and paste as a new Image.
Position to upper right of tag.
Duplicate, mirror and flop . Position to bottom left of tag. Make sure this layer is over the the long purple grass and your black leaf.
Add drop shadow to each.
Open Element (20) sushi. Copy and paste as a new Image.
Re-size by 80%, position at bottom near flower.
Add drop shadow.
Open Element (68) tea set. Copy and paste as a new Image.
Re-size by 60%, position at bottom of tag, see my tag for reference.
I placed it over the fan and the paper flower.
Add drop shadow.
Open Element (53) sushi2. Copy and paste as a new Image.
Re-size by 48%, position at bottom of tag, see my tag for reference.
I placed it between the 1st sushi and the tea set.
Add drop shadow.
Ok tweek your layers now if you need too. If something just doesn't look right, move it around.
Make sure you've drop shadowed all your layers.
Add copyright layer, scrap kit by " " etc.
Go to Edit, Copy Merged.
In Animation Shop, right click and paste as a New Animation.
Hold ctrl key down and tag letter L until you have a total of 24 frames.
Go to Edit, select all.
Open SimoneAni371-with drop shadow.
Go to Edit, select all.
Go to Edit, copy.
Go to Edit, make sure Propagate Paste is depressed.
Activate your tag.
Got to Edit, Paste, Paste into selected frames.
Using your cursor, move the first bubble you see and place on the big black leaf.
See screenshot.
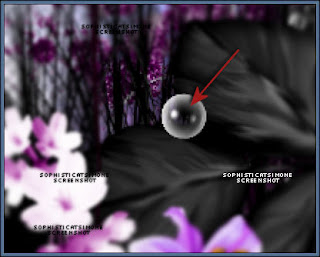
Click into place.
Play your animation.
Hopefully you like it.
Add your name using a font of choice.You can now save it either with transparent background or add a white background.
To add white background, go to Animation: Animation Properties, select Opaque and change color to white.
Hope you enjoyed this tutorial,
Hugs Simone
Please, always direct people to my blog to download my animations.
Do not load to any other download site and don't claim as your own.
Tutorial written by SophisticatSimone aka Lorraine Halle on Monday, April 1st, 2013.
Enjoy!
Supplies needed to complete this tutorial.
Programs: Paint Shop Pro, I'm using version 10, Animation Shop 3
Plugin : Gradient Glow by Eye Candy
Font used: Valken for Upper case letter and Xiomara for lower case letter for Bibi's name.
Tube of choice: Tag 1: Danny Lee "Sugar Girl" found at SATC
Tube of choice: Tag 2: Panda form Bibi's Collections scrap kit "Sugar Girl" from SATC
Scrap Kit: "Sugar Girl" by Bibi's Collections at SATC
Animations: by me Scrappy Bit Of Fun HERE
Save your tag often. Nothing like working long and hard on a tag and PSP crashes.
Please make sure you add a drop shadow of choice to each and every element as you add them.
Remember to close out your original elements and papers once your copy and pasted them on your working tag.
♥♥♥
Let's start
♥♥♥
Open Element (4) purple clouds. Copy and paste as a new Image.
Let's re-size our tag.
Enter Resolution : 72 Pixels/Centimeter
Resample using: Bicubic
Resize all layers: Checked
Width and Height: 80%
Duplicate layer and merge down.
Open Element (33) purple scatter. Copy and paste as a new Image.
Re-size
Enter Resolution : 72 Pixels/Centimeter
Resample using: Bicubic
Resize all layers: Checked
Width and Height: 45%
Duplicate layer and merge down.
Move lower down on your tag.
Duplicate, flip and mirror.
Merge down.
Add your drop shadow.
Open Element (9) doodle. Copy and paste as a new Image.
Delete a little at the top. See Screenshot.
Re-size
Enter Resolution : 72 Pixels/Centimeter
Resample using: Bicubic
Resize all layers: Checked
Width and Height: 60%
Duplicate layer and merge down.
Duplicate again and merge down.
Go to Adjust, Add/Remove Noise, Add Noise
50%, gaussian checked.
Position in center of tag. Make sure the doodle in contained within the tag.
Nothing worse then cut off on a tag :)
Add your drop shadow. Make sure shadow opacity is low.
This is what I used:
Vertical: 1
Horizontal: -2
Opacity: 40
Blur: 2
Color: black
Open Element (62) leafy branch. Copy and paste as a new Image.
Move to upper right hand side of tag.
Duplicate layer, mirror and flip.
Merge together.
Add your drop shadow.
Open Element (6) fan. Copy and paste as a new Image.
Image, free rotate, right, 110 degrees, all layers UN-checked.
Move to lower right hand side of tag.
Add your drop shadow.
Copy and paste again, it should still be in your copy memory. If not, just copy again.
Image, free rotate, left, 50 degrees, all layers UN-checked.
Move to center of tag for now. You can tweak it later once your tube is positioned.
Add your drop shadow.
Move this layer below the other fan layer.
Open Element (46) black grass. Copy and paste as a new Image.
Re-size by 70%. Move to left side of tag.
Add drop shadow.
Open Element (38) branch with buds. Copy and paste as a new Image.
Move to upper portion of your tag.
Add drop shadow.
Open Element ( 30 ) bird. Copy and paste as a new Image.
Re-size by 40%. Move to upper right hand side of tag.
Add drop shadow.
Open Element (67) black leaves. Copy and paste as a new Image.
Re-size by 40%. Move to left lower side of tag.
Duplicate, mirror and flip. Free rotate to the left by 20%
Move to the right of the tag and about the middle of the tag.
Add drop shadow on each layer.
Open Element (69) Panda Bear. Copy and paste as a new Image.
Position him over the leaves, and behind the fan.
You may need to remove the cord on the fan.
Using your selection tool, set to Point to Point, feather = 0
Click around and be careful over the edge of the fan, just click more often over this area.
Now delete.

Drop shadow I used on my panda is:
V= -4
H= -6
Opacity= 56
Blur= 8
Color= black
Open Element (21) paper flower. Copy and paste as a new Image.
Re-size by 40%. Move to bottom of tag over Panda's derriere.
Add drop shadow.
Open Element (13) flower. Copy and paste as a new Image.
Re-size by 40%. Position over the paper flower on the left upper edge.
Duplicate and mirror. Position slightly lower and more to the left.
See my tag for reference.
Add drop shadow to both.
Open Element (47) long purple grass. Copy and paste as a new Image.
Re-size by 40%. Position to the left of tag.
Duplicate, mirror. Position to the left of tag as well.
Add drop shadow to each.
Open Element (55) mauve flower. Copy and paste as a new Image.
Position to upper right of tag.
Duplicate, mirror and flop . Position to bottom left of tag. Make sure this layer is over the the long purple grass and your black leaf.
Add drop shadow to each.
Open Element (20) sushi. Copy and paste as a new Image.
Re-size by 80%, position at bottom near flower.
Add drop shadow.
Open Element (68) tea set. Copy and paste as a new Image.
Re-size by 60%, position at bottom of tag, see my tag for reference.
I placed it over the fan and the paper flower.
Add drop shadow.
Open Element (53) sushi2. Copy and paste as a new Image.
Re-size by 48%, position at bottom of tag, see my tag for reference.
I placed it between the 1st sushi and the tea set.
Add drop shadow.
Ok tweek your layers now if you need too. If something just doesn't look right, move it around.
Make sure you've drop shadowed all your layers.
Add copyright layer, scrap kit by " " etc.
Go to Edit, Copy Merged.
In Animation Shop, right click and paste as a New Animation.
Hold ctrl key down and tag letter L until you have a total of 24 frames.
Go to Edit, select all.
Open SimoneAni371-with drop shadow.
Go to Edit, select all.
Go to Edit, copy.
Go to Edit, make sure Propagate Paste is depressed.
Activate your tag.
Got to Edit, Paste, Paste into selected frames.
Using your cursor, move the first bubble you see and place on the big black leaf.
See screenshot.

Click into place.
Play your animation.
Hopefully you like it.
Add your name using a font of choice.You can now save it either with transparent background or add a white background.
To add white background, go to Animation: Animation Properties, select Opaque and change color to white.
Hope you enjoyed this tutorial,
Hugs Simone
Please, always direct people to my blog to download my animations.
Do not load to any other download site and don't claim as your own.
Tutorial written by SophisticatSimone aka Lorraine Halle on Monday, April 1st, 2013.
Enjoy!
Sunday, March 31, 2013

Please click on TAG to see in full size.
Supplies needed to complete this tutorial.
Supplies needed to complete this tutorial.
Programs: Paint Shop Pro, I'm using version 10, Animation Shop 3
Plugin : Eye Candy 4: Gradient Glow for Name, and MuRa Meister-Cloud.
Font used: Xiomara
Tube of choice, I'm using tube "Huntress"by Angelica S from SATC
Scrap Kit "Fairytale" by Angelica S at SATC
Animations: by me Scrappy Bit Of Fun HERE Mask: by me Mask94SophisticatSimone HERE
Scrap Kit "Fairytale" by Angelica S at SATC
Animations: by me Scrappy Bit Of Fun HERE Mask: by me Mask94SophisticatSimone HERE
Save your tag often. Nothing like working long and hard on a tag and PSP crashes.
•••
Please make sure you add a drop shadow of choice to each and every element as you add them.
♥Let's start♥
Open element 05, duplicate and close original. Always close the original when done with it.
Re-size, 72dpi, smart size, 70%
Rotate, free rotate, right, 90 degrees, all layers UN-checked.
Re-size canvas, 700 x 700
Open element 03, (bridge) copy and paste as a new layer on your canvas.
Move your frame up a little and position bridge a little lower.
Open element 28, (white castle) copy and paste as a new layer.
Re-size, 72dpi, smart size, 40%
Position over the frame and on the lower portion of the frame.
Open element 81, (leaves)copy and paste as a new layer.
Re-size, 72dpi, smart size, 60%
Position to the upper left hand side of frame.
Duplicate. On duplicated image,
Go to Image, free rotate, rotate, right, 90 degrees, all layers UN-checked.
Image, flip.
Move to the upper edge of the frame on the left, creating a leaf corner.
Duplicate this layer, free rotate 90 degrees and place on right side of frame closer to the top.
Open element 74, (Ivy) copy and paste as a new layer.
Re-size, 72dpi, smart size, 40%
Position to the right on the frame.
Duplicate. Mirror.
Open element 33, (curtain) copy and paste as a new layer.
Position over right hand side of frame.
Open element 63, (bow) copy and paste as a new layer.
Re-size, 72dpi, smart size, 18%
Position top right corner of frame over curtain. See my tag for reference.
Open element 67, (rose) copy and paste as a new layer.
Re-size, 72dpi, smart size, 20%
Position on the left side of frame at the middle.
Open element 80, (branch+leaves) copy and paste as a new layer.
Position to the right, behind the bridge railing. Make it appear as though it's a part of the structure.
You may need to use your selection tool and remove some of the bottom edge of the branch.
This layer sound be above the curtain and below the bridge.
Open element 61, (eagle) copy and paste as a new layer.
Re-size, 72dpi, smart size, 70%
Position on the right side making it appear that he is perched on the branch.
Add whatever other little element you think will enhance your tag.
I added a butterfly at the top.
Open paper04, promote background to layer.
Apply your mask to this layer.
Merge group.
Copy and paste on your tag and make sure it's your bottom layer.
Add noise of 27% (gaussian), monochrome checked.
Using your selection tool, set to magic wand, click inside the frame.
Go to Selections, modify, expand by 6
Make sure your mask is the active layer.
Promote selection to layer.
Go to MuRa Meister-Cloud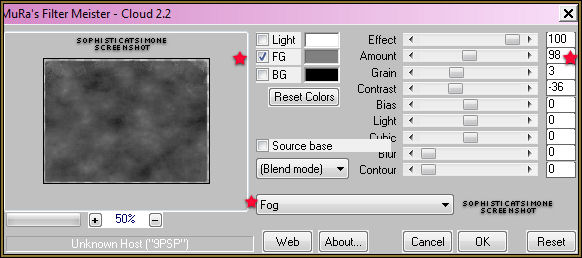
Set to FOG (drop down)
have a check beside FG only, my color choice is:#808080
Effect=100
Amount=98
Gain=3
Contrast=-36
Bias=0
Light=0
Cubic=0
Blur=0
Contour=0
Click OK
Selections/ Select All
Copy Merged
In Animation Shop, right click and paste as a new animation.
Back in PSP, go to edit and select undo selected all,
Go to Edit and undo Cloud.
Now repeat the filter 3 more times, changing the amount to
83 then, 73 then, 63
Always select all after each and copy merge and paste in AS after current frame.
You should end up with a total of 4 frames.
Working in AS.
Go to Edit, Select ALL.
Go to Edit, Copy.
Click on your last frame to activate it.
Right click and paste after frame.
Scroll to the last frame, you'll notice you have 8 now.
Activate the last frame and repeat.
You will now have 12 frames.
Open animation SimoneAni356-starTrail
Go to Edit, Select all.
Go to Edit, Copy.
Activate your tag.
Go to Edit, Select All.
Go to Edit, choose Propagate Paste.
Go to Edit, Paste, Paste into selected frames.
Position with your cursor.
I placed mine just over the bird's beak.

If you chose the same tube I did this animation will work well, if
you didn't I'm sure you can be creative and play around with positioning.
Click in place.
You can add the other animation SimoneAni357-doubleStar as well anywhere around on the tag just to glitz it up a bit.
I added mine on HER left wrist. See screenshot. I also added it to the name.
you didn't I'm sure you can be creative and play around with positioning.
Click in place.
You can add the other animation SimoneAni357-doubleStar as well anywhere around on the tag just to glitz it up a bit.
I added mine on HER left wrist. See screenshot. I also added it to the name.
Make sure you've added your copyright and license number.
Add your name using a font of choice.You can now save it either with transparent background or add a white background.
To add white background, go to Animation: Animation Properties, select Opaque and change color to white.
Hope you enjoyed this tutorial,
Hugs Simone
Please, always direct people to my blog to download my animations.
Do not load to any other download site and don't claim as your own.
Tutorial written by SophisticatSimone aka Lorraine Halle on Sunday, March 31, 2013.
Enjoy!
Subscribe to:
Posts
(Atom)
CT TEAM


