My Blinkie

Sunday, August 11, 2013

♥♥♥
Please click on TAG to see in full size.
••• Supplies needed to complete this tutorial. •••
________________________________________________________________________
Programs: Paint Shop Pro, I'm using version 10. Animation Shop 3.
Plugin : Eye Candy: Gradient Glow for name.
Font used: CarolEtched
Tube of choice: I'm using "Sorceress" by The Hunter from SATC.
Scrap Kit : I'm using "Sorceress" by Bibi's Collection from SATC
Animation: SimoneAni-Sorceress
Mask: none
________________________________________________________________________
♥♥♥
Save your tag often. Nothing like working long and hard on a tag and PSP crashes.
♥♥♥
Open a new image 704 x 704, transparent.
Copy and paste your tube as a new layer. Using your selection tool, feature set to 28, surround the legs and delete.
Duplicate your tube. On the bottom tube layer, add gaussian blur of 3.
Merge together.
Copy and paste element 82 as a new layer and re-size by 35%. Make sure you change the dpi to 72.
Position on the right side of tag and behind the tube.
Copy and paste element 81 as a new layer and re-size by 55%. Position behind your tube on the left upper side of tag.
Copy and paste element 89 as a new layer and re-size by 55%. Position in front of your tube on the lower left-center hand side of tag.
Copy and paste element 121 as a new layer and re-size by 70%. Drag down as last layer and position more to the left upper hand side of tag.
Copy and paste element 50 as a new layer and re-size by 50%. Make sure you change the dpi to 72.
Position on the right side of tag in front of tube.
Copy and paste element 57 as a new layer and re-size by 50%. Position on your tube on the left upper hand side of tag.
Copy and paste element 131 as a new layer and re-size by 50%. Position in front of your tube in the lower left hand side of tag.
Copy and paste element 72 as a new layer and re-size by 50%. Mirror and position behind kitty cat on the left side.
Duplicate layer and re-size by 50%. Position over current leaves to fill it in a bit.
Duplicate and mirror. Position upper right hand side of tag behind the bookcase.
Copy and paste element 18 as a new layer and re-size by 50%. Position in front in the lower right hand side of tag.
Copy and paste element 58 as a new layer and position in front of bookcase.
Copy and paste element 92 as a new layer and re-size by 50%. This fancy book should be between your tube and the cat.
It should also be one the layer above the tree layer in your layers palette.
Add element 86 as a new layer and re-size by 30%. Position in front of book at center.
Add element 67 as a new layer and re-size by 30%. Position in front in between book and wine glass.
Add drop shadow to all your layers.
Now for your castle, I added two more turrets. So you should have one at top left, one top right and one right beside the one on the right and make it a little higher then the others.
Activate your crop tool. Click on "Snap crop rectangle to: Merged Opaque" . You can either click on the little green arrow to apply or double click on
your tag.
Add artist copyright as your top layer.
To animate:
Go to Selections, select all.
Go to Edit and copy merged. Paste as a new animation in Animation Shop.
Hold your Ctrl key down and repeatedly hit letter L on your keyboard for a total of 15 frames.
You can watch the count on the lower right hand side of your screen in AS.
Open SimoneAni-Sorceress-06
Go to Edit, select all.
Go to Edit, copy.
Activate your tag.
Go to Edit, select all.
Go to Edit, make sure Propagate Paste is selected.
Go to Edit, Paste, paste into selected frames.
Position on your tag and click into place. I placed mine on the right side in her hand.
Delete the first 3 frames. You should now have 12 frames.
Play and save.
Don't forget to add your name.
To save:
Go to File, Save as, enter the name of your file and select the folder to save to.
Now click on Customize:
Under COLORS TAB:
Number of colors: 255 Colors
Create palette by: OPTIMIZED OCTREE
Reduce colors by: Error Diffusion
Under OPTIMIZATIONS TAB:
set a check mark beside the second, third and forth choices. UN-check the 1st and last.
Under PARTIAL TRANSPARENCY:
check Convert pixels less than 92
Yes, blend with this color: change to white #FFFFFF
Click OK. Click Next, next, next, next.
Play your animation.
At times your animation may or will come out terrible. Optimization in Animation Shop is not the greatest.
You can play around will your settings, especially under the Tab: Optimization. I change this setting at times from anywhere between 70 and 100.
Some people add a white background. To add background, go to Animation: Animation Properties, select Opaque and change color to white.
Hope you enjoyed this tutorial,
Hugs Simone
Please, always direct people to my blog to download my animations.
Do not load to any other download site and don't claim as your own.
Tutorial written by SophisticatSimone aka Lorraine Halle on Sunday August 11, 2013.
Please click on TAG to see in full size.
••• Supplies needed to complete this tutorial. •••
________________________________________________________________________
Programs: Paint Shop Pro, I'm using version 10. Animation Shop 3.
Plugin : Eye Candy: Gradient Glow for name.
Font used: CarolEtched
Tube of choice: I'm using "Sorceress" by The Hunter from SATC.
Scrap Kit : I'm using "Sorceress" by Bibi's Collection from SATC
Animation: SimoneAni-Sorceress
Mask: none
________________________________________________________________________
♥♥♥
Save your tag often. Nothing like working long and hard on a tag and PSP crashes.
♥♥♥
Open a new image 704 x 704, transparent.
Copy and paste your tube as a new layer. Using your selection tool, feature set to 28, surround the legs and delete.
Duplicate your tube. On the bottom tube layer, add gaussian blur of 3.
Merge together.
Copy and paste element 82 as a new layer and re-size by 35%. Make sure you change the dpi to 72.
Position on the right side of tag and behind the tube.
Copy and paste element 81 as a new layer and re-size by 55%. Position behind your tube on the left upper side of tag.
Copy and paste element 89 as a new layer and re-size by 55%. Position in front of your tube on the lower left-center hand side of tag.
Copy and paste element 121 as a new layer and re-size by 70%. Drag down as last layer and position more to the left upper hand side of tag.
Copy and paste element 50 as a new layer and re-size by 50%. Make sure you change the dpi to 72.
Position on the right side of tag in front of tube.
Copy and paste element 57 as a new layer and re-size by 50%. Position on your tube on the left upper hand side of tag.
Copy and paste element 131 as a new layer and re-size by 50%. Position in front of your tube in the lower left hand side of tag.
Copy and paste element 72 as a new layer and re-size by 50%. Mirror and position behind kitty cat on the left side.
Duplicate layer and re-size by 50%. Position over current leaves to fill it in a bit.
Duplicate and mirror. Position upper right hand side of tag behind the bookcase.
Copy and paste element 18 as a new layer and re-size by 50%. Position in front in the lower right hand side of tag.
Copy and paste element 58 as a new layer and position in front of bookcase.
Copy and paste element 92 as a new layer and re-size by 50%. This fancy book should be between your tube and the cat.
It should also be one the layer above the tree layer in your layers palette.
Add element 86 as a new layer and re-size by 30%. Position in front of book at center.
Add element 67 as a new layer and re-size by 30%. Position in front in between book and wine glass.
Add drop shadow to all your layers.
Now for your castle, I added two more turrets. So you should have one at top left, one top right and one right beside the one on the right and make it a little higher then the others.
Activate your crop tool. Click on "Snap crop rectangle to: Merged Opaque" . You can either click on the little green arrow to apply or double click on
your tag.
Add artist copyright as your top layer.
To animate:
Go to Selections, select all.
Go to Edit and copy merged. Paste as a new animation in Animation Shop.
Hold your Ctrl key down and repeatedly hit letter L on your keyboard for a total of 15 frames.
You can watch the count on the lower right hand side of your screen in AS.
Open SimoneAni-Sorceress-06
Go to Edit, select all.
Go to Edit, copy.
Activate your tag.
Go to Edit, select all.
Go to Edit, make sure Propagate Paste is selected.
Go to Edit, Paste, paste into selected frames.
Position on your tag and click into place. I placed mine on the right side in her hand.
Delete the first 3 frames. You should now have 12 frames.
Play and save.
Don't forget to add your name.
To save:
Go to File, Save as, enter the name of your file and select the folder to save to.
Now click on Customize:
Under COLORS TAB:
Number of colors: 255 Colors
Create palette by: OPTIMIZED OCTREE
Reduce colors by: Error Diffusion
Under OPTIMIZATIONS TAB:
set a check mark beside the second, third and forth choices. UN-check the 1st and last.
Under PARTIAL TRANSPARENCY:
check Convert pixels less than 92
Yes, blend with this color: change to white #FFFFFF
Click OK. Click Next, next, next, next.
Play your animation.
At times your animation may or will come out terrible. Optimization in Animation Shop is not the greatest.
You can play around will your settings, especially under the Tab: Optimization. I change this setting at times from anywhere between 70 and 100.
Some people add a white background. To add background, go to Animation: Animation Properties, select Opaque and change color to white.
Hope you enjoyed this tutorial,
Hugs Simone
Please, always direct people to my blog to download my animations.
Do not load to any other download site and don't claim as your own.
Tutorial written by SophisticatSimone aka Lorraine Halle on Sunday August 11, 2013.

Thursday, August 8, 2013

♥♥♥
Please click on TAG to see in full size.
••• Supplies needed to complete this tutorial. •••
________________________________________________________________________
Programs: Paint Shop Pro, I'm using version 10. Animation Shop 3.
Plugin : Gradient Glow (Eye Candy) for the name
Font used: BickhamScriptFancy2
Tube of choice: I'm using "Andrea" by Verymany.
Scrap Kit : I'm using "Andrea" by SkyScraps from SATC(no longer in business)
Animation: SimoneAni-Andrea
Mask: 0110 HERE
________________________________________________________________________
♥♥♥
Save your tag often. Nothing like working long and hard on a tag and PSP crashes.
♥♥♥
Open a new canvas 700 x 700 transparent.
Copy and paste tube as a new layer.
Copy and paste element 66 as a new layer layer.
Using your Magic wand, remove some of the wires that are really close to the edges of your tag.
Now set your selection tool to Point to Point, Mode: Add shift, feather 0, smoothing 0, anti-alias checked.
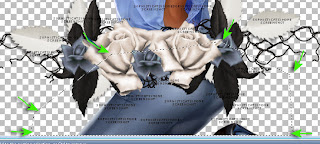
Surround and remove the lower portion of your tube by clicking around from one point to the next.
Hit delete on your keyboard.
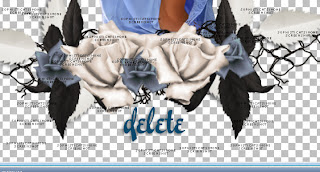
Copy and paste element 65 as a new layer. Move a bit to the left and should be behind your tube in the layers palette.
Copy and paste element 27 as a new layer. Re-size by 50% and position in lower right hand side of tag.
Copy and paste element 23 as a new layer and position behind your tube on the right side of tag.
Duplicate this layer and re-size by 50%. Hold down your shift key and using your mover tool, drag this layer to the left hand side of tag.
Duplicate this layer and free rotate to the right by 45 degrees. Move to right side of tag.
Duplicate this layer and mirror. Move to upper left hand side. You can rearrange once the crate is in place.
Copy and paste element 31 as a new layer and Re-size by 70%. Position behind your tube on the left side.
Copy and paste element 37 as a new layer and position as second to last layer and in the upper right hand side of tag.
Duplicate layer and re-size by 70%. Go to Image and flip.
Hold down your shift key and using your mover tool, drag this layer to the lower left hand side.
Copy and paste element 56 as a new layer and move it to the right side of tag. Should be behind the beautiful blue flower.
Duplicate and change the blend mode of top copy to Screen. Should make the flower whiter.
Copy and paste element 76 as a new layer and re-size by 60%. Place inside the crate. Sharpen.
Copy and paste element 54 as a new layer and re-size by 45%. Place inside crate and beside the wiskey bottle.
Copy and paste element 36 as a new layer. Re-size by 45%. Position as bottom layer and in the lower left hand side of tag.
Duplicate and move this one beside the 1st one.
Duplicate and move beside the 2nd one.
Duplicate and move beside the 3rd.
Duplicate and move to right side.
Should make a type of leave floor.
Copy and paste element 102 as a new layer and re-size by 30%. Move the left side tag about half way mark.
Duplicate butterfly and mirror. Move this one to upper left hand side.
Add drop shadow to all layers.
Add any other element that you feel would make it better.
Merge visible.
Go to Selections > Select all.
Copy and paste Paper 1 Into the Selection.
De-select.
Apply Mask0110 and merge group.
Duplicate, merge down. Duplicate and merge down (twice).
Merge all visible.
Add artist copyright and your license number.
Add your name.
Merge visible.
To animate:
Go to Selections, select all.
Go to Edit and copy merged. Paste as a new animation in Animation Shop.
Hold your Ctrl key down and repeatedly hit letter L on your keyboard for a total of 16 frames.
You can watch the count on the lower right hand side of your screen in AS.
Open SimoneAni-Andrea-01-MNG
Go to Edit, select all.
Go to Edit, copy.
Activate your tag.
Go to Edit, select all.
Go to Edit, make sure Propagate Paste is selected.
Go to Edit, Paste, paste into selected frames.
Position on your tag and click into place. I placed mine as the middle.
Play and save.
To save:
Go to File, Save as, enter the name of your file and select the folder to save to.
Now click on Customize:
Under COLORS TAB:
Number of colors: 255 Colors
Create palette by: OPTIMIZED OCTREE
Reduce colors by: Error Diffusion
Under OPTIMIZATIONS TAB:
set a check mark beside the second, third and forth choices. UN-check the 1st and last.
Under PARTIAL TRANSPARENCY:
check Convert pixels less than 92
Yes, blend with this color: change to white #FFFFFF
Click OK. Click Next, next, next, next.
Play your animation.
At times your animation may or will come out terrible. Optimization in Animation Shop is not the greatest.
You can play around will your settings, especially under the Tab: Optimization. I change this setting at times from anywhere between 70 and 100.
Some people add a white background. To add background, go to Animation: Animation Properties, select Opaque and change color to white.
Hope you enjoyed this tutorial,
Hugs Simone
Please, always direct people to my blog to download my animations.
Do not load to any other download site and don't claim as your own.
Tutorial written by SophisticatSimone aka Lorraine Halle on Thursay August 8, 2013
Please click on TAG to see in full size.
••• Supplies needed to complete this tutorial. •••
________________________________________________________________________
Programs: Paint Shop Pro, I'm using version 10. Animation Shop 3.
Plugin : Gradient Glow (Eye Candy) for the name
Font used: BickhamScriptFancy2
Tube of choice: I'm using "Andrea" by Verymany.
Scrap Kit : I'm using "Andrea" by SkyScraps from SATC(no longer in business)
Animation: SimoneAni-Andrea
Mask: 0110 HERE
________________________________________________________________________
♥♥♥
Save your tag often. Nothing like working long and hard on a tag and PSP crashes.
♥♥♥
Open a new canvas 700 x 700 transparent.
Copy and paste tube as a new layer.
Copy and paste element 66 as a new layer layer.
Using your Magic wand, remove some of the wires that are really close to the edges of your tag.
Now set your selection tool to Point to Point, Mode: Add shift, feather 0, smoothing 0, anti-alias checked.

Surround and remove the lower portion of your tube by clicking around from one point to the next.
Hit delete on your keyboard.

Copy and paste element 65 as a new layer. Move a bit to the left and should be behind your tube in the layers palette.
Copy and paste element 27 as a new layer. Re-size by 50% and position in lower right hand side of tag.
Copy and paste element 23 as a new layer and position behind your tube on the right side of tag.
Duplicate this layer and re-size by 50%. Hold down your shift key and using your mover tool, drag this layer to the left hand side of tag.
Duplicate this layer and free rotate to the right by 45 degrees. Move to right side of tag.
Duplicate this layer and mirror. Move to upper left hand side. You can rearrange once the crate is in place.
Copy and paste element 31 as a new layer and Re-size by 70%. Position behind your tube on the left side.
Copy and paste element 37 as a new layer and position as second to last layer and in the upper right hand side of tag.
Duplicate layer and re-size by 70%. Go to Image and flip.
Hold down your shift key and using your mover tool, drag this layer to the lower left hand side.
Copy and paste element 56 as a new layer and move it to the right side of tag. Should be behind the beautiful blue flower.
Duplicate and change the blend mode of top copy to Screen. Should make the flower whiter.
Copy and paste element 76 as a new layer and re-size by 60%. Place inside the crate. Sharpen.
Copy and paste element 54 as a new layer and re-size by 45%. Place inside crate and beside the wiskey bottle.
Copy and paste element 36 as a new layer. Re-size by 45%. Position as bottom layer and in the lower left hand side of tag.
Duplicate and move this one beside the 1st one.
Duplicate and move beside the 2nd one.
Duplicate and move beside the 3rd.
Duplicate and move to right side.
Should make a type of leave floor.
Copy and paste element 102 as a new layer and re-size by 30%. Move the left side tag about half way mark.
Duplicate butterfly and mirror. Move this one to upper left hand side.
Add drop shadow to all layers.
Add any other element that you feel would make it better.
Merge visible.
Go to Selections > Select all.
Copy and paste Paper 1 Into the Selection.
De-select.
Apply Mask0110 and merge group.
Duplicate, merge down. Duplicate and merge down (twice).
Merge all visible.
Add artist copyright and your license number.
Add your name.
Merge visible.
To animate:
Go to Selections, select all.
Go to Edit and copy merged. Paste as a new animation in Animation Shop.
Hold your Ctrl key down and repeatedly hit letter L on your keyboard for a total of 16 frames.
You can watch the count on the lower right hand side of your screen in AS.
Open SimoneAni-Andrea-01-MNG
Go to Edit, select all.
Go to Edit, copy.
Activate your tag.
Go to Edit, select all.
Go to Edit, make sure Propagate Paste is selected.
Go to Edit, Paste, paste into selected frames.
Position on your tag and click into place. I placed mine as the middle.
Play and save.
To save:
Go to File, Save as, enter the name of your file and select the folder to save to.
Now click on Customize:
Under COLORS TAB:
Number of colors: 255 Colors
Create palette by: OPTIMIZED OCTREE
Reduce colors by: Error Diffusion
Under OPTIMIZATIONS TAB:
set a check mark beside the second, third and forth choices. UN-check the 1st and last.
Under PARTIAL TRANSPARENCY:
check Convert pixels less than 92
Yes, blend with this color: change to white #FFFFFF
Click OK. Click Next, next, next, next.
Play your animation.
At times your animation may or will come out terrible. Optimization in Animation Shop is not the greatest.
You can play around will your settings, especially under the Tab: Optimization. I change this setting at times from anywhere between 70 and 100.
Some people add a white background. To add background, go to Animation: Animation Properties, select Opaque and change color to white.
Hope you enjoyed this tutorial,
Hugs Simone
Please, always direct people to my blog to download my animations.
Do not load to any other download site and don't claim as your own.
Tutorial written by SophisticatSimone aka Lorraine Halle on Thursay August 8, 2013
Tuesday, August 6, 2013

Sweet Fairy
Please click on TAG to see in full size.
••• Supplies needed to complete this tutorial. •••
________________________________________________________________________
Programs: Paint Shop Pro, I'm using version 10. Animation Shop 3.
Plugin : Eye Candy: Gradient Glow for name.
Font used: Easter Parade
Tube of choice: I'm using "Sweet Fairy" by The Hunter from SATC.
Scrap Kit : I'm using "Sweet Fairy" by Bibi's Collection from SATC
Animation: SimoneAni492-496, SimoneAni467-471 and SimoneAni513-517
Mask: 25
________________________________________________________________________
***
Save your tag often. Nothing like working long and hard on a tag and PSP crashes.
***
Let's Start!
Open a new image 700 x 655, transparent.
Copy and paste element 5 as a new layer and add drop shadow.
Copy and paste your tube as a new layer and re-size by 70%. Add drop shadow.
Copy and paste element 15 as a new layer and re-size by 70%. Position bottom left side of tag beside your tube. Add drop shadow.
Copy and paste element 2 as a new layer and re-size by 60%. Position bottom right side of tag beside your tube. Add drop shadow.
Copy and paste element 14 as a new layer and re-size by 75%. Position at top of tag and behind your tube. Add drop shadow.
Copy and paste element 33 as a new layer and re-size by 50%. Position right side of tag behind your tube. Add drop shadow.
Copy and paste element 38 as a new layer and re-size by 33%. Position bottom left side of tag behind the bird and your tube layer. Add drop shadow.
Copy and paste element 65 as a new layer and position in left upper hand side of tag. Layer should be behind your tube layer. Add drop shadow.
Copy and paste element 64 as a new layer and position on right side of tag. Re-size by 70%. Layer should be behind your tube layer and tree layer.
Add drop shadow.
Copy and paste element 75 as a new layer and re-size by 28%. Position in front of tube, down center, beside the fawn.
Duplicate, mirror, move to right side and position behind fawn layer at edge of tag.
Copy and paste element 61 as a new layer and re-size by 58%. Move to right side of tube behind fawn.
Duplicate, move to left side, make sure it's behind the boot-house and the grapes.
Add drop shadow to each.
Copy and paste paper 11 as a new layer and send to bottom.
Crop your tag.
Add mask and merge group. I used Mask25. I duplicated by layer and merged them together. I sharpened twice and duplicated again.
I added noise of 17%, gaussian checked. Merge all visible.
Add artist copyright and your license number.
Merge visible.
To animate:
Go to Selections, select all.
Go to Edit and copy merged. Paste as a new animation in Animation Shop.
Hold your Ctrl key down and repeatedly hit letter L on your keyboard for a total of 16 frames.
You can watch the count on the lower right hand side of your screen in AS.
Open SimoneAni496-MNG
Go to Edit, select all.
Go to Edit, copy.
Activate your tag.
Go to Edit, select all.
Go to Edit, make sure Propagate Paste is selected.
Go to Edit, Paste, paste into selected frames.
Position on your tag and click into place. I placed mine as the middle flower on my tag.
Ok now go back to SimoneAni496-MNG. Click to activate. Go to Animation> Mirror.
Go to Edit>Copy.
Now activate your tag again and then go to Edit, paste, paste into selected frames.
Now position (with your cursor/mouse) to the left of previous flower and closer to your tube.
Ok now go back to SimoneAni496-MNG. Click to activate. Go to Animation>Re-size and enter: 75%, smart size checked.
Go to Edit>Copy.
Now activate your tag again and then go to Edit, paste, paste into selected frames.
Now position (with your cursor/mouse) to far right of tag and slightly higher up on the branch.
See my tag for reference.
I also ended up using animation 471 which you'll find on my blog as well as animation 515
Play and save.
Don't forget to add your name.
To save:
Go to File, Save as, enter the name of your file and select the folder to save to.
Now click on Customize:
Under COLORS TAB:
Number of colors: 255 Colors
Create palette by: OPTIMIZED OCTREE
Reduce colors by: Error Diffusion
Under OPTIMIZATIONS TAB:
set a check mark beside the second, third and forth choices. UN-check the 1st and last.
Under PARTIAL TRANSPARENCY:
check Convert pixels less than 92
Yes, blend with this color: change to white #FFFFFF
Click OK. Click Next, next, next, next.
Play your animation.
At times your animation may or will come out terrible. Optimization in Animation Shop is not the greatest.
You can play around will your settings, especially under the Tab: Optimization. I change this setting at times from anywhere between 70 and 100.
Some people add a white background. To add background, go to Animation: Animation Properties, select Opaque and change color to white.
Hope you enjoyed this tutorial,
Hugs Simone
Please, always direct people to my blog to download my animations.
Do not load to any other download site and don't claim as your own.
Tutorial written by SophisticatSimone aka Lorraine Halle on Tuesday August 6, 2013
Please click on TAG to see in full size.
••• Supplies needed to complete this tutorial. •••
________________________________________________________________________
Programs: Paint Shop Pro, I'm using version 10. Animation Shop 3.
Plugin : Eye Candy: Gradient Glow for name.
Font used: Easter Parade
Tube of choice: I'm using "Sweet Fairy" by The Hunter from SATC.
Scrap Kit : I'm using "Sweet Fairy" by Bibi's Collection from SATC
Animation: SimoneAni492-496, SimoneAni467-471 and SimoneAni513-517
Mask: 25
________________________________________________________________________
***
Save your tag often. Nothing like working long and hard on a tag and PSP crashes.
***
Let's Start!
Open a new image 700 x 655, transparent.
Copy and paste element 5 as a new layer and add drop shadow.
Copy and paste your tube as a new layer and re-size by 70%. Add drop shadow.
Copy and paste element 15 as a new layer and re-size by 70%. Position bottom left side of tag beside your tube. Add drop shadow.
Copy and paste element 2 as a new layer and re-size by 60%. Position bottom right side of tag beside your tube. Add drop shadow.
Copy and paste element 14 as a new layer and re-size by 75%. Position at top of tag and behind your tube. Add drop shadow.
Copy and paste element 33 as a new layer and re-size by 50%. Position right side of tag behind your tube. Add drop shadow.
Copy and paste element 38 as a new layer and re-size by 33%. Position bottom left side of tag behind the bird and your tube layer. Add drop shadow.
Copy and paste element 65 as a new layer and position in left upper hand side of tag. Layer should be behind your tube layer. Add drop shadow.
Copy and paste element 64 as a new layer and position on right side of tag. Re-size by 70%. Layer should be behind your tube layer and tree layer.
Add drop shadow.
Copy and paste element 75 as a new layer and re-size by 28%. Position in front of tube, down center, beside the fawn.
Duplicate, mirror, move to right side and position behind fawn layer at edge of tag.
Copy and paste element 61 as a new layer and re-size by 58%. Move to right side of tube behind fawn.
Duplicate, move to left side, make sure it's behind the boot-house and the grapes.
Add drop shadow to each.
Copy and paste paper 11 as a new layer and send to bottom.
Crop your tag.
Add mask and merge group. I used Mask25. I duplicated by layer and merged them together. I sharpened twice and duplicated again.
I added noise of 17%, gaussian checked. Merge all visible.
Add artist copyright and your license number.
Merge visible.
To animate:
Go to Selections, select all.
Go to Edit and copy merged. Paste as a new animation in Animation Shop.
Hold your Ctrl key down and repeatedly hit letter L on your keyboard for a total of 16 frames.
You can watch the count on the lower right hand side of your screen in AS.
Open SimoneAni496-MNG
Go to Edit, select all.
Go to Edit, copy.
Activate your tag.
Go to Edit, select all.
Go to Edit, make sure Propagate Paste is selected.
Go to Edit, Paste, paste into selected frames.
Position on your tag and click into place. I placed mine as the middle flower on my tag.
Ok now go back to SimoneAni496-MNG. Click to activate. Go to Animation> Mirror.
Go to Edit>Copy.
Now activate your tag again and then go to Edit, paste, paste into selected frames.
Now position (with your cursor/mouse) to the left of previous flower and closer to your tube.
Ok now go back to SimoneAni496-MNG. Click to activate. Go to Animation>Re-size and enter: 75%, smart size checked.
Go to Edit>Copy.
Now activate your tag again and then go to Edit, paste, paste into selected frames.
Now position (with your cursor/mouse) to far right of tag and slightly higher up on the branch.
See my tag for reference.
I also ended up using animation 471 which you'll find on my blog as well as animation 515
Play and save.
Don't forget to add your name.
To save:
Go to File, Save as, enter the name of your file and select the folder to save to.
Now click on Customize:
Under COLORS TAB:
Number of colors: 255 Colors
Create palette by: OPTIMIZED OCTREE
Reduce colors by: Error Diffusion
Under OPTIMIZATIONS TAB:
set a check mark beside the second, third and forth choices. UN-check the 1st and last.
Under PARTIAL TRANSPARENCY:
check Convert pixels less than 92
Yes, blend with this color: change to white #FFFFFF
Click OK. Click Next, next, next, next.
Play your animation.
At times your animation may or will come out terrible. Optimization in Animation Shop is not the greatest.
You can play around will your settings, especially under the Tab: Optimization. I change this setting at times from anywhere between 70 and 100.
Some people add a white background. To add background, go to Animation: Animation Properties, select Opaque and change color to white.
Hope you enjoyed this tutorial,
Hugs Simone
Please, always direct people to my blog to download my animations.
Do not load to any other download site and don't claim as your own.
Tutorial written by SophisticatSimone aka Lorraine Halle on Tuesday August 6, 2013

♥♥♥
Please click on TAG to see in full size.
••• Supplies needed to complete this tutorial. •••
________________________________________________________________________
Programs: Paint Shop Pro, I'm using version 10. Animation Shop 3.
Plugin : Gradient Glow (Eye Candy) for the name
Font used: Playball
Tube of choice: I'm using "Backslide" package 29 by Barbara Jensen
Scrap Kit : I'm using "Tequila Sunrise" by SkyScraps (no longer in business)
Animation: SimoneAni-Tequila Sunrise
Mask: 0105 HERE
________________________________________________________________________
♥♥♥
Save your tag often. Nothing like working long and hard on a tag and PSP crashes.
♥♥♥
Open a new image 650 x 650, transparent.
Copy and paste element 40 as a new layer and re-size by 70%. Duplicate and merge down.
Copy and paste element 26 as a new layer and re-size by 70%. Position in lower right hand side of the pink circle frame.
Copy and paste your tube as a new layer and move to the left of the boat.
Copy and paste element 55 as a new layer and move behind your tube on the left, and below the pink frame layer.
Duplicate and re-size by 70% and free rotate to the right by 45 degrees. Move this element above the other. Sharpen.
Add drop shadow to each and merge together.
Duplicate this merged layer and mirror.
Copy and paste element 58 as a new layer and re-size by 65%. This element should be between the boat and pink circle frame layer in the layers
palette.
Add drop shadow.
Copy and paste element 17 as a new layer. Should be behind the bird element. Add drop shadow.
Copy and paste element 60 as a new layer. Position in the upper right hand side of tag.
Copy and paste element 34 as a new layer. Position in the lower right hand side of tag.
Copy and paste element 39 as a new layer. Position in the lower right hand side of tag. Colorize pink or color from your tube or leave as is.
Copy and paste element 2 as a new layer. Re-size by 55% and position in the lower right hand side of tag behind the crab.
Make sure all elements have a drop shadow.
Select your crop tool and click on Crop Merged Opaque.
Now go to Selections > Select All.
Copy and paste Paper 8 into selection.
Apply Mask of choice or the one I used Masks0105. Merge group.
Duplicate this layer and merge down.
Add Noise of 30%, Gaussian checked.
Add artist's copyright and your license number.
Merge visible.
To animate:
Go to selections, select all and copy.
In animation shop, right click and paste as a new animation.
Hold your Ctrl key down and repeatedly hit letter L on your keyboard for a total of 15 frames.
You can watch the count on the lower right hand side of your screen in AS.
Open SimoneAni-TequilaSunrise
Go to Edit, select all.
Go to Edit, copy.
Activate your tag.
Go to Edit, select all.
Go to Edit, make sure Propagate Paste is selected.
Go to Edit, Paste, paste into selected frames.
Add your name or someone else's and save.
To save:
Go to File, Save as, enter the name of your file and select the folder to save to.
Now click on Customize:
Under COLORS TAB:
Number of colors: 255 Colors
Create palette by: OPTIMIZED OCTREE
Reduce colors by: Error Diffusion
Under OPTIMIZATIONS TAB:
set a check mark beside the second, third and forth choices. UN-check the 1st and last.
Under PARTIAL TRANSPARENCY:
check Convert pixels less than 96
Yes, blend with this color: change to white #FFFFFF
Click OK. Click Next, next, next, next.
Play your animation.
At times your animation may or will come out terrible. Optimization in Animation Shop is not the greatest.
You can play around will your settings, especially under the Tab: Optimization. I change this setting at times from anywhere between 70 and 100.
Some people add a white background. To add background, go to Animation: Animation Properties, select Opaque and change color to white.
Hope you enjoyed this tutorial,
Hugs Simone
Please, always direct people to my blog to download my animations.
Do not load to any other download site and don't claim as your own.
Tutorial written by SophisticatSimone aka Lorraine Halle on Tuesday August 6, 2013
Please click on TAG to see in full size.
••• Supplies needed to complete this tutorial. •••
________________________________________________________________________
Programs: Paint Shop Pro, I'm using version 10. Animation Shop 3.
Plugin : Gradient Glow (Eye Candy) for the name
Font used: Playball
Tube of choice: I'm using "Backslide" package 29 by Barbara Jensen
Scrap Kit : I'm using "Tequila Sunrise" by SkyScraps (no longer in business)
Animation: SimoneAni-Tequila Sunrise
Mask: 0105 HERE
________________________________________________________________________
♥♥♥
Save your tag often. Nothing like working long and hard on a tag and PSP crashes.
♥♥♥
Open a new image 650 x 650, transparent.
Copy and paste element 40 as a new layer and re-size by 70%. Duplicate and merge down.
Copy and paste element 26 as a new layer and re-size by 70%. Position in lower right hand side of the pink circle frame.
Copy and paste your tube as a new layer and move to the left of the boat.
Copy and paste element 55 as a new layer and move behind your tube on the left, and below the pink frame layer.
Duplicate and re-size by 70% and free rotate to the right by 45 degrees. Move this element above the other. Sharpen.
Add drop shadow to each and merge together.
Duplicate this merged layer and mirror.
Copy and paste element 58 as a new layer and re-size by 65%. This element should be between the boat and pink circle frame layer in the layers
palette.
Add drop shadow.
Copy and paste element 17 as a new layer. Should be behind the bird element. Add drop shadow.
Copy and paste element 60 as a new layer. Position in the upper right hand side of tag.
Copy and paste element 34 as a new layer. Position in the lower right hand side of tag.
Copy and paste element 39 as a new layer. Position in the lower right hand side of tag. Colorize pink or color from your tube or leave as is.
Copy and paste element 2 as a new layer. Re-size by 55% and position in the lower right hand side of tag behind the crab.
Make sure all elements have a drop shadow.
Select your crop tool and click on Crop Merged Opaque.
Now go to Selections > Select All.
Copy and paste Paper 8 into selection.
Apply Mask of choice or the one I used Masks0105. Merge group.
Duplicate this layer and merge down.
Add Noise of 30%, Gaussian checked.
Add artist's copyright and your license number.
Merge visible.
To animate:
Go to selections, select all and copy.
In animation shop, right click and paste as a new animation.
Hold your Ctrl key down and repeatedly hit letter L on your keyboard for a total of 15 frames.
You can watch the count on the lower right hand side of your screen in AS.
Open SimoneAni-TequilaSunrise
Go to Edit, select all.
Go to Edit, copy.
Activate your tag.
Go to Edit, select all.
Go to Edit, make sure Propagate Paste is selected.
Go to Edit, Paste, paste into selected frames.
Add your name or someone else's and save.
To save:
Go to File, Save as, enter the name of your file and select the folder to save to.
Now click on Customize:
Under COLORS TAB:
Number of colors: 255 Colors
Create palette by: OPTIMIZED OCTREE
Reduce colors by: Error Diffusion
Under OPTIMIZATIONS TAB:
set a check mark beside the second, third and forth choices. UN-check the 1st and last.
Under PARTIAL TRANSPARENCY:
check Convert pixels less than 96
Yes, blend with this color: change to white #FFFFFF
Click OK. Click Next, next, next, next.
Play your animation.
At times your animation may or will come out terrible. Optimization in Animation Shop is not the greatest.
You can play around will your settings, especially under the Tab: Optimization. I change this setting at times from anywhere between 70 and 100.
Some people add a white background. To add background, go to Animation: Animation Properties, select Opaque and change color to white.
Hope you enjoyed this tutorial,
Hugs Simone
Please, always direct people to my blog to download my animations.
Do not load to any other download site and don't claim as your own.
Tutorial written by SophisticatSimone aka Lorraine Halle on Tuesday August 6, 2013
Monday, August 5, 2013

♥♥♥
Please click on TAG to see in full size.
••• Supplies needed to complete this tutorial. •••
________________________________________________________________________
Programs: Paint Shop Pro, I'm using version 10. Animation Shop 3.
Plugin : none
Font used: Praying Angel
Tube of choice: I'm using "Lady Vampire" by Jose A Cano
Please click on TAG to see in full size.
••• Supplies needed to complete this tutorial. •••
________________________________________________________________________
Programs: Paint Shop Pro, I'm using version 10. Animation Shop 3.
Plugin : none
Font used: Praying Angel
Tube of choice: I'm using "Lady Vampire" by Jose A Cano
Scrap Kit : I'm using "Lady Vampire" by SkyScraps(no longer in business)
Animation: SimoneAni-LadyVampire
Mask: 0149 HERE
________________________________________________________________________
♥♥♥
Save your tag often. Nothing like working long and hard on a tag and PSP crashes.
♥♥♥
Let's start.
Open element 50 and duplicate. Close original. Re-size the duplicate by 80% and 72 dpi.
Go to image> canvas size> enter 700x700.
Using your lasso tool, set to Point to point, mode: add shift, feather : 0, smoothing: 0 and anti-alias checked.
Mask: 0149 HERE
________________________________________________________________________
♥♥♥
Save your tag often. Nothing like working long and hard on a tag and PSP crashes.
♥♥♥
Let's start.
Open element 50 and duplicate. Close original. Re-size the duplicate by 80% and 72 dpi.
Go to image> canvas size> enter 700x700.
Using your lasso tool, set to Point to point, mode: add shift, feather : 0, smoothing: 0 and anti-alias checked.

Click on the thickest portion of the branch (frame), so you need to make little movements with clicks every bend in the branch.
See my screenshot.
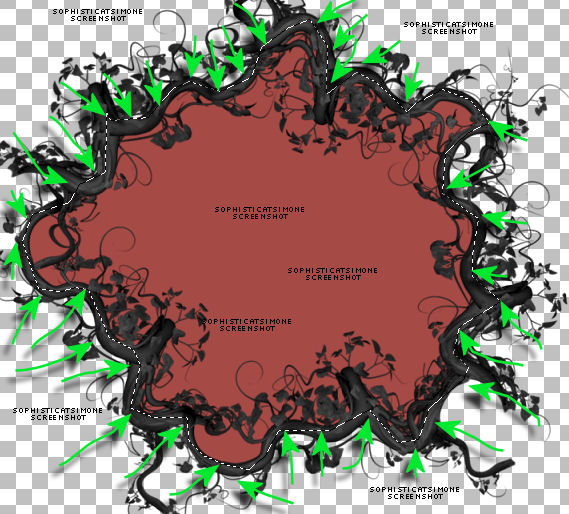
Add a new raster layer and send to bottom. Flood fill the selection with this color : #a74945 or a color from your tube.
Copy the close up of your tube and paste as a new layer.
Using your mover tool, position the face within the selection.
Go to Selections > invert > hit delete on your keyboard.
Selections > select none.
Duplicate the close up. On the original go to Adjust > Blur > Gaussian Blur > 5.
Go to Effects, Photo Effects, Black and White Film, filter color: blue, strength: 0
On the duplicate close up, change blend mode to : soft light.
Select Manual Color Correction:
Source should be black and target should be : #dc403b
Add drop shadow to the branch frame. Merge layers together.
C/P element 58 as a new layer and position behind the frame layer and to the left side of tag.
Add drop shadow.
C/P element 57 as a new layer and triplicate.
1st layer re-size by 60% and move to left side of frame and colorize red. Add d/s.
2nd layer re-size by 45% and move to lower right side of frame. Add d/s.
3rd layer re-size by 45% and mirror. Move to left side of tag and behind the tombstone. Add d/s.
C/P the regular sized tube. I had to re-size by 50%. Position to the right side of tag. Add d/s.
C/P element 61 and re-size by 35% and move down below in front of your tube on the right hand side of tag.
C/P element 6 and re-size by 50% and move to upper left hand side of tag. Add d/s.
C/P element 32 and re-size by 50%. Position lower center of tag/frame. Add d/s. Should be close to your tube. This is the flower cluster.
See my tag for reference.
C/P again. This time re-size by 40% and flip. Move to upper center right. Duplicate and mirror. Add drop shadow to each. These should be at top of
frame and at center of tag.
C/P element 2 and re-size by 35%. Move to lower right hand side. In front of your tube layer and the black grassy layer. Add d/s.
C/P element 1 and re-size by 35%. Move to lower right hand side. In front of red bottle layer. Colorize red. Add d/s.
C/P element 74 as a new layer and re-size by 50%. Move to the left side of tag in front of tombstone and frame. Add drop shadow.
C/P element 53 as a new layer and re-size by 60%. Move to the left side of tag and in front of carriage. Add d/s.
C/P element 64 and re-size by 50%. Place behind the carriage front section and duplicate. Move duplicated layer over to the left behind the read
portion of carriage. Merge these two layers together.
Duplicate this merged layer and move to the upper right hand side of tag and behind the merged frame layer.
C/P element 47 and re-size by 50%, mirror and add small drop shadow. Move to left side of tag over the carriage.
C/P element 23 as a new layer and re-size by 35%. Duplicate and mirror.
Position one left in front of book, add d/s.
Position the other right climbing the bottle, add d/s.
C/P element 8 as a new layer and re-size by 50%. Move in front of your tube, at the bottom of tag. Add drop shadow.
Crop merged opaque. Add paper to bottom and apply Mask of choice or the one I used Masks0149.
Add artist copyright and your license number.
Merge visible.
To animate:
Go to selections, select all and copy.
In animation shop, right click and paste as a new animation.
Hold your Ctrl key down and repeatedly hit letter L on your keyboard for a total of 16 frames.
You can watch the count on the lower right hand side of your screen in AS.
Open SimoneAni-LadyVampire-01
Go to Edit, select all.
Go to Edit, copy.
Activate your tag.
Go to Edit, select all.
Go to Edit, make sure Propagate Paste is selected.
Go to Edit, Paste, paste into selected frames.
Position on the skull's forehead, click into place.
Now open SimoneAni-LadyVampire-02 and repeat.
Position just a bit above the current animation.
For third animation, open SimoneAni-LadyVampire-06
Position this one on the little bottle at bottom right of tag.
To save:
Go to File, Save as, enter the name of your file and select the folder to save to.
Now click on Customize:
Under COLORS TAB:
Number of colors: 255 Colors
Create palette by: OPTIMIZED OCTREE
Reduce colors by: Error Diffusion
Under OPTIMIZATIONS TAB:
set a check mark beside the second, third and forth choices. UN-check the 1st and last.
Under PARTIAL TRANSPARENCY:
check Convert pixels less than 96
Yes, blend with this color: change to white #FFFFFF
Click OK. Click Next, next, next, next.
Play your animation.
At times your animation may or will come out terrible. Optimization in Animation Shop is not the greatest.
You can play around will your settings, especially under the Tab: Optimization. I change this setting at times from anywhere between 70 and 100.
Some people add a white background. To add background, go to Animation: Animation Properties, select Opaque and change color to white.
Hope you enjoyed this tutorial,
Hugs Simone
Please, always direct people to my blog to download my animations.
Do not load to any other download site and don't claim as your own.
Tutorial written by SophisticatSimone aka Lorraine Hallé on Sunday August 4, 2013
Wednesday, July 31, 2013

`♥♥♥
Please click on TAG to see in full size.
••• Supplies needed to complete this tutorial. •••
________________________________________________________________________
Programs: Paint Shop Pro, I'm using version 10. Animation Shop 3.
Plugin : none
Font used: A&S Rhino
Tube of choice: I'm using "HOT 911" by Jose A Cano.
Scrap Kit : I'm using "HOT 911" by SkyScraps
Please click on TAG to see in full size.
••• Supplies needed to complete this tutorial. •••
________________________________________________________________________
Programs: Paint Shop Pro, I'm using version 10. Animation Shop 3.
Plugin : none
Font used: A&S Rhino
Tube of choice: I'm using "HOT 911" by Jose A Cano.
Scrap Kit : I'm using "HOT 911" by SkyScraps
Animation: SimoneAni-Fire911
Mask: 0156 HERE
________________________________________________________________________
♥♥♥
Save your tag often. Nothing like working long and hard on a tag and PSP crashes.
♥♥♥
Open a new image 694 x 694, transparent background.
Flood fill black.
Open Masks0156 in PSP and minimize.
Go to Layers, new mask layer, from image.
In drop down box find the mask and apply.
In layers palette, right click on mask and merge group.
Duplicate layer and mirror, then flip. Merge them together.
Add noise of 7%. Go to Adjust, add noise, random checked and enter 7.
Copy and paste element e44 as a new layer and re-size by 65%, smart size, 72 dpi.
Duplicate layer and merge down.
Using your magic wand tool, set to add shift, RGB Value, tolerance of 18, and feather of 0, anti-alias checked, click inside the circle frame.
Go to Selections, modify, expand, enter : 4.
In layers palette, click on Mask layer to highlight and make active.
Go to Layers, add new Raster Layer.
Open paper PP6 and copy. Close that paper.
On your tag, go to Edit and Paste INTO selection.
Go to Adjust, sharpeness, sharpen.
Do it again, but choose sharpen more.
Now copy your close-up tube and paste as a new layer.
Using your mover tool, position your tube in center of selection.
Go to Selections, invert and hit delete on your keyboard or go to Edit and cut.
Go to Selections, select all. Go to Image, crop to selection.
On the close up layer, change the blend mode to Luminance (L) and decrease Opacity to 51.
Merge it down.
Go to Adjust, Brightness and Contrast, Brightness/Contrast and enter :
Brightness : -4
Contrast : 42
OK
Click on your frame (circle) layer.
Go to Effect, drop shadow and enter:
V= 3, H= 4, Opacity= 75, Blur= 10, Color= black.
Check : shadow on a new layer.
Click on your frame (circle) layer again.
This time change the V & H to -3 and -4.
Now merge the drop shadow layers only.
Go to Adjust, Blur, Gaussian Blur, enter 10.
OK you can merge your frame layer down with the shadow layer.
Copy and paste element e43 as a new layer. Re-size by 65%.
Move this element below your frame layer, including the closeup layer. Position at upper left hand side of the frame.
Duplicate and free rotate to the right by 45 degrees and move this layer at top of circle. Sharpen.
Duplicate and flip and mirror.
Now duplicate the very first one again (left upper hand side) and mirror.
Duplicate that one and flip.
Duplicate that one and mirror.
Add a single drop shadow to each of these flower layers.
REMOVE the check mark on the shadow layer.
Use the very fist shadow settings only.
Copy and paste element e20 as a new layer and re-size by 40%. Position in right upper hand side of tag.
Add same drop shadow.
Now merge all visible and save your tag as .pspimage.
Go to Selections, select all and copy your layer and paste as a new animation in Animation Shop.
Hold Ctrl key down on keyboard and repeatedly hit the L letter until you have 21 frames.
Back in PSP, select none.
C/P element e19 as a new layer and position in left lower hand side of tag.
Add same drop shadow.
C/P element e7 as a new layer and free rotate to the right by 90 degrees.
Position at top of frame. Add same drop shadow. Don't block the wording on your sign.
Copy and paste your regular sized tube as a new layer and re-size by 80%.
Move her to the right side of tag.
Grab your selection tool, set to rectangle, MODE: add shift, Feather: 25, Anti-alias: checked.
Select the bottom portion of her pants/legs and delete. Don't remove too much, but just enough to eliminate the sharp edge.
De-select and add same drop shadow to your tube.
Copy element e12 and paste as a new layer. Re-size by 65% and move to lower left hand side in front of grass. Add drop shadow.
Copy element e6 and paste as a new layer. Re-size by 75% and move to lower left hand side leaning on the hydrant. Add drop shadow.
Move axe layer below the hydrant layer.
Copy element e1 and paste as a new layer. Re-size by 55% and move to lower center of tag. Add drop shadow.
Copy element e8 and paste as a new layer. Re-size by 55% and move to lower right hand side of tag. Add drop shadow.
C/P element e34 and paste as a new layer. Free rotate to the right by 90 degrees. Position at bottom of tag.
This layer should be just above the tube layer and below all the elements.
Duplicate and re-size by 55% and move that layer lower on tag and in front of tube.
Add drop shadow to each layer.
Now X-out your bottom layer, (the merged one).
Highlight any other layer to make active and merge all visible.
Add artist copyright and license info. Merge down to your top layer.
Go to selections, select all and copy.
In animation shop, right click and paste as a new animation.
Hold your Ctrl key down and repeatedly hit letter L on your keyboard for a total of 21 frames.
You can watch the count on the lower right hand side of your screen in AS.
Open SimoneAni-Fire911.
Go to Edit, select all.
Go to Edit, copy.
Activate your tag.
Go to Edit, select all.
Go to Edit, make sure Propagate Paste is selected.
Go to Edit, Paste, paste into selected frames.
Position in center.
Now copy the top layer and paste as a new layer. Try to position as best as you can.
You can maximize PSP again to verify where you need to align things.
Click into place.
Now open SimoneAni-Fire911_02 and repeat.
For the name animation.
In PSP create the name you want, adding drop shadow and any pattern or color of choice.
I also free rotated my name 45 degrees to the left.
I used font : A&S Rhino.
Copy and paste as a new animation in AS.
Go to Effects, Insert Image Effect.
Select : Start with animation frame.
Effect length : 1.7 secs
Frames per second : 8 fps
Effect contains a total of 13 frames.
Select UNDERWATER and click on the Customize button.
Enter the following:
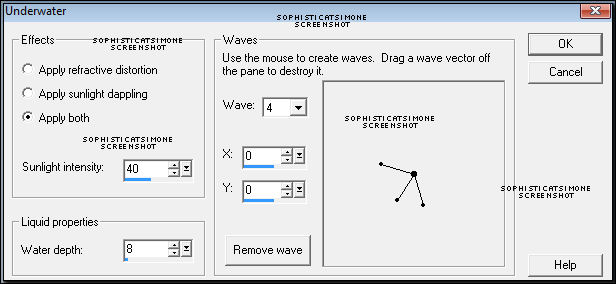
OK now delete frame 1.
Go to Edit, select all.
Go to Edit, copy.
Activate your tag.
Go to Edit, select all.
Go to Edit, Paste, paste into selected frames.
Position in the frame in the upper left hand section of it.
Play and save.
To save:
Go to File, Save as, enter the name of your file and select the folder to save to.
Now click on Customize:
Under COLORS TAB:
Number of colors: 255 Colors
Create palette by: OPTIMIZED OCTREE
Reduce colors by: Error Diffusion
Under OPTIMIZATIONS TAB:
set a check mark beside the second, third and forth choices. UN-check the 1st and last.
Under PARTIAL TRANSPARENCY:
check Convert pixels less than 96
Yes, blend with this color: change to white #FFFFFF
Click OK. Click Next, next, next, next.
Play your animation.
At times your animation may or will come out terrible. Optimization in Animation Shop is not the greatest.
You can play around will your settings, especially under the Tab: Optimization. I change this setting at times from anywhere between 70 and 100.
Some people add a white background. To add background, go to Animation: Animation Properties, select Opaque and change color to white.
Hope you enjoyed this tutorial,
Hugs Simone
Please, always direct people to my blog to download my animations.
Do not load to any other download site and don't claim as your own.
Tutorial written by SophisticatSimone aka Lorraine Halle on Wednesday July 31, 2013
Mask: 0156 HERE
________________________________________________________________________
♥♥♥
Save your tag often. Nothing like working long and hard on a tag and PSP crashes.
♥♥♥
Open a new image 694 x 694, transparent background.
Flood fill black.
Open Masks0156 in PSP and minimize.
Go to Layers, new mask layer, from image.
In drop down box find the mask and apply.
In layers palette, right click on mask and merge group.
Duplicate layer and mirror, then flip. Merge them together.
Add noise of 7%. Go to Adjust, add noise, random checked and enter 7.
Copy and paste element e44 as a new layer and re-size by 65%, smart size, 72 dpi.
Duplicate layer and merge down.
Using your magic wand tool, set to add shift, RGB Value, tolerance of 18, and feather of 0, anti-alias checked, click inside the circle frame.
Go to Selections, modify, expand, enter : 4.
In layers palette, click on Mask layer to highlight and make active.
Go to Layers, add new Raster Layer.
Open paper PP6 and copy. Close that paper.
On your tag, go to Edit and Paste INTO selection.
Go to Adjust, sharpeness, sharpen.
Do it again, but choose sharpen more.
Now copy your close-up tube and paste as a new layer.
Using your mover tool, position your tube in center of selection.
Go to Selections, invert and hit delete on your keyboard or go to Edit and cut.
Go to Selections, select all. Go to Image, crop to selection.
On the close up layer, change the blend mode to Luminance (L) and decrease Opacity to 51.
Merge it down.
Go to Adjust, Brightness and Contrast, Brightness/Contrast and enter :
Brightness : -4
Contrast : 42
OK
Click on your frame (circle) layer.
Go to Effect, drop shadow and enter:
V= 3, H= 4, Opacity= 75, Blur= 10, Color= black.
Check : shadow on a new layer.
Click on your frame (circle) layer again.
This time change the V & H to -3 and -4.
Now merge the drop shadow layers only.
Go to Adjust, Blur, Gaussian Blur, enter 10.
OK you can merge your frame layer down with the shadow layer.
Copy and paste element e43 as a new layer. Re-size by 65%.
Move this element below your frame layer, including the closeup layer. Position at upper left hand side of the frame.
Duplicate and free rotate to the right by 45 degrees and move this layer at top of circle. Sharpen.
Duplicate and flip and mirror.
Now duplicate the very first one again (left upper hand side) and mirror.
Duplicate that one and flip.
Duplicate that one and mirror.
Add a single drop shadow to each of these flower layers.
REMOVE the check mark on the shadow layer.
Use the very fist shadow settings only.
Copy and paste element e20 as a new layer and re-size by 40%. Position in right upper hand side of tag.
Add same drop shadow.
Now merge all visible and save your tag as .pspimage.
Go to Selections, select all and copy your layer and paste as a new animation in Animation Shop.
Hold Ctrl key down on keyboard and repeatedly hit the L letter until you have 21 frames.
Back in PSP, select none.
C/P element e19 as a new layer and position in left lower hand side of tag.
Add same drop shadow.
C/P element e7 as a new layer and free rotate to the right by 90 degrees.
Position at top of frame. Add same drop shadow. Don't block the wording on your sign.
Copy and paste your regular sized tube as a new layer and re-size by 80%.
Move her to the right side of tag.
Grab your selection tool, set to rectangle, MODE: add shift, Feather: 25, Anti-alias: checked.
Select the bottom portion of her pants/legs and delete. Don't remove too much, but just enough to eliminate the sharp edge.
De-select and add same drop shadow to your tube.
Copy element e12 and paste as a new layer. Re-size by 65% and move to lower left hand side in front of grass. Add drop shadow.
Copy element e6 and paste as a new layer. Re-size by 75% and move to lower left hand side leaning on the hydrant. Add drop shadow.
Move axe layer below the hydrant layer.
Copy element e1 and paste as a new layer. Re-size by 55% and move to lower center of tag. Add drop shadow.
Copy element e8 and paste as a new layer. Re-size by 55% and move to lower right hand side of tag. Add drop shadow.
C/P element e34 and paste as a new layer. Free rotate to the right by 90 degrees. Position at bottom of tag.
This layer should be just above the tube layer and below all the elements.
Duplicate and re-size by 55% and move that layer lower on tag and in front of tube.
Add drop shadow to each layer.
Now X-out your bottom layer, (the merged one).
Highlight any other layer to make active and merge all visible.
Add artist copyright and license info. Merge down to your top layer.
Go to selections, select all and copy.
In animation shop, right click and paste as a new animation.
Hold your Ctrl key down and repeatedly hit letter L on your keyboard for a total of 21 frames.
You can watch the count on the lower right hand side of your screen in AS.
Open SimoneAni-Fire911.
Go to Edit, select all.
Go to Edit, copy.
Activate your tag.
Go to Edit, select all.
Go to Edit, make sure Propagate Paste is selected.
Go to Edit, Paste, paste into selected frames.
Position in center.
Now copy the top layer and paste as a new layer. Try to position as best as you can.
You can maximize PSP again to verify where you need to align things.
Click into place.
Now open SimoneAni-Fire911_02 and repeat.
For the name animation.
In PSP create the name you want, adding drop shadow and any pattern or color of choice.
I also free rotated my name 45 degrees to the left.
I used font : A&S Rhino.
Copy and paste as a new animation in AS.
Go to Effects, Insert Image Effect.
Select : Start with animation frame.
Effect length : 1.7 secs
Frames per second : 8 fps
Effect contains a total of 13 frames.
Select UNDERWATER and click on the Customize button.
Enter the following:
OK now delete frame 1.
Go to Edit, select all.
Go to Edit, copy.
Activate your tag.
Go to Edit, select all.
Go to Edit, Paste, paste into selected frames.
Position in the frame in the upper left hand section of it.
Play and save.
To save:
Go to File, Save as, enter the name of your file and select the folder to save to.
Now click on Customize:
Under COLORS TAB:
Number of colors: 255 Colors
Create palette by: OPTIMIZED OCTREE
Reduce colors by: Error Diffusion
Under OPTIMIZATIONS TAB:
set a check mark beside the second, third and forth choices. UN-check the 1st and last.
Under PARTIAL TRANSPARENCY:
check Convert pixels less than 96
Yes, blend with this color: change to white #FFFFFF
Click OK. Click Next, next, next, next.
Play your animation.
At times your animation may or will come out terrible. Optimization in Animation Shop is not the greatest.
You can play around will your settings, especially under the Tab: Optimization. I change this setting at times from anywhere between 70 and 100.
Some people add a white background. To add background, go to Animation: Animation Properties, select Opaque and change color to white.
Hope you enjoyed this tutorial,
Hugs Simone
Please, always direct people to my blog to download my animations.
Do not load to any other download site and don't claim as your own.
Tutorial written by SophisticatSimone aka Lorraine Halle on Wednesday July 31, 2013
Tuesday, July 30, 2013


♥♥♥
Please click on TAG to see in full size.
••• Supplies needed to complete this tutorial. •••
________________________________________________________________________
Programs: Paint Shop Pro, I'm using version 10. Animation Shop 3.
Plugin : Eye Candy 4: Gradient Glow for name only.
Font used: Carpenter
Tube of choice: I'm using "Lucinda" by Angelica S from SATC.
Scrap Kit : I'm using "Lucinda" by Tiny Turtle Designs
________________________________________________________________________
♥♥♥
Save your tag often. Nothing like working long and hard on a tag and PSP crashes.
♥♥♥
Open a new image 600 x 215.
Copy and paste your tube as a new layer. Position the portion of your tube that is most colorful.
Highlight (click on) Raster 1 in layers palette.
Go to Selections > Select all.
Go to Image > Crop to selection.
Click on Raster 2 layer. Duplicate. Work on the copy layer.
Go to Effects > Texture Effect > Mosaic-Antique
Number of columns: 25
Number of columns: 25
Tile diffusion : 37
Grout width : 1
Grout diffusion : 74
OK
Go to Adjust > Sharpen > Sharpen.
Change blend mode to Screen. If that doesn't look good to you, just play around with the other choices and select the one that works best for your tag.
Merge down.
Copy and paste your tube as a new layer. Re-size by 25% if using the same one I did.
Copy and paste element 29 as a new layer and re-size by 55%. Position in left upper hand side of tag. Add drop shadow.
Copy and paste element 52 as a new layer and re-size by 44%. Position as your top layer, above your tube and in the lower right hand side of tag. Add drop shadow.
Copy and paste element 76 as a new layer. Position middle upper left side of tag. See my tag for reference. Add drop shadow.
This element should be behind the tube and in front of the clock cluster element.
Copy and paste element 112 as a new layer and re-size by 33%. Position in lower left hand side of tag. Add drop shadow.
Copy and paste element 129 as a new layer and re-size by 33%. Position on right side of tag on the hat. Add drop shadow.
Ok go back to your bottom Raster 1 layer and highlight in layers palette.
Go to Selections > Select all.
Go to Image > Crop to selection.
Highlight your background layer.
Go to Effects > Reflection Effects > Kaleidoscope >
Horizontal offset : -74
Vertical offset : 1
Rotation angle : 146
Scale factor : 12
Number of petals : 3
Number of orbits : 1
Radial suction : 19
Edge Mode : Wrap
OK
Go to Image > Sharpen > Sharpen
Now go to Adjust > Add/Remove Noise > Add Noise: check Random and 4%. Monochrome checked.
Merge visible.
Go to Effect > Plugins > AAA Frame > Texture Frame:
Width : 8
Stroke : 1
Brightness : -73
Soften : 2
Opacity : 66
OK
Copy and paste as a new layer in Animation Shop.
Back in PSP, go to Edit > Undo Texture Frame > Undo Merge visible
Undo layers selection > Undo add noise.
Now add noise, change to 5%.
Add the same frame settings.
Merge visible.
Copy and paste in AS after current frame.
Back in PSP, go to Edit and undo frame and noise.
Repeat noise, change to 6%.
Add frame again.
Merge visible and copy. Paste in AS after the second frame.
You should now have a total of 3 frames.
Add artist copyright and your name.
SAVE as gif.
Back in PSP, undo again.
Make your avatar.
Click on your crop tool and enter 145 by 180 if it's a forum avatar. If it's a Facebook avatar change to 180 x 180.
Move your crop tool over the area you want as your avatar and double click.
Merge visible and add the frame effect again. You can mirror layer.
Add copyright/license number and your initial or name.
Save as PNG.
Hope you enjoyed this tutorial,
Hugs Simone
Please, always direct people to my blog to download my animations.
Do not load to any other download site and don't claim as your own.
Tutorial written by SophisticatSimone aka Lorraine Halle on Tuesday July 30, 2013
Please click on TAG to see in full size.
••• Supplies needed to complete this tutorial. •••
________________________________________________________________________
Programs: Paint Shop Pro, I'm using version 10. Animation Shop 3.
Plugin : Eye Candy 4: Gradient Glow for name only.
Font used: Carpenter
Tube of choice: I'm using "Lucinda" by Angelica S from SATC.
Scrap Kit : I'm using "Lucinda" by Tiny Turtle Designs
________________________________________________________________________
♥♥♥
Save your tag often. Nothing like working long and hard on a tag and PSP crashes.
♥♥♥
Open a new image 600 x 215.
Copy and paste your tube as a new layer. Position the portion of your tube that is most colorful.
Highlight (click on) Raster 1 in layers palette.
Go to Selections > Select all.
Go to Image > Crop to selection.
Click on Raster 2 layer. Duplicate. Work on the copy layer.
Go to Effects > Texture Effect > Mosaic-Antique
Number of columns: 25
Number of columns: 25
Tile diffusion : 37
Grout width : 1
Grout diffusion : 74
OK
Go to Adjust > Sharpen > Sharpen.
Change blend mode to Screen. If that doesn't look good to you, just play around with the other choices and select the one that works best for your tag.
Merge down.
Copy and paste your tube as a new layer. Re-size by 25% if using the same one I did.
Copy and paste element 29 as a new layer and re-size by 55%. Position in left upper hand side of tag. Add drop shadow.
Copy and paste element 52 as a new layer and re-size by 44%. Position as your top layer, above your tube and in the lower right hand side of tag. Add drop shadow.
Copy and paste element 76 as a new layer. Position middle upper left side of tag. See my tag for reference. Add drop shadow.
This element should be behind the tube and in front of the clock cluster element.
Copy and paste element 112 as a new layer and re-size by 33%. Position in lower left hand side of tag. Add drop shadow.
Copy and paste element 129 as a new layer and re-size by 33%. Position on right side of tag on the hat. Add drop shadow.
Ok go back to your bottom Raster 1 layer and highlight in layers palette.
Go to Selections > Select all.
Go to Image > Crop to selection.
Highlight your background layer.
Go to Effects > Reflection Effects > Kaleidoscope >
Horizontal offset : -74
Vertical offset : 1
Rotation angle : 146
Scale factor : 12
Number of petals : 3
Number of orbits : 1
Radial suction : 19
Edge Mode : Wrap
OK
Go to Image > Sharpen > Sharpen
Now go to Adjust > Add/Remove Noise > Add Noise: check Random and 4%. Monochrome checked.
Merge visible.
Go to Effect > Plugins > AAA Frame > Texture Frame:
Width : 8
Stroke : 1
Brightness : -73
Soften : 2
Opacity : 66
OK
Copy and paste as a new layer in Animation Shop.
Back in PSP, go to Edit > Undo Texture Frame > Undo Merge visible
Undo layers selection > Undo add noise.
Now add noise, change to 5%.
Add the same frame settings.
Merge visible.
Copy and paste in AS after current frame.
Back in PSP, go to Edit and undo frame and noise.
Repeat noise, change to 6%.
Add frame again.
Merge visible and copy. Paste in AS after the second frame.
You should now have a total of 3 frames.
Add artist copyright and your name.
SAVE as gif.
Back in PSP, undo again.
Make your avatar.
Click on your crop tool and enter 145 by 180 if it's a forum avatar. If it's a Facebook avatar change to 180 x 180.
Move your crop tool over the area you want as your avatar and double click.
Merge visible and add the frame effect again. You can mirror layer.
Add copyright/license number and your initial or name.
Save as PNG.
Hope you enjoyed this tutorial,
Hugs Simone
Please, always direct people to my blog to download my animations.
Do not load to any other download site and don't claim as your own.
Tutorial written by SophisticatSimone aka Lorraine Halle on Tuesday July 30, 2013
Subscribe to:
Posts
(Atom)
CT TEAM