My Blinkie

Sunday, October 27, 2013

♥♥♥
Please click on TAG to see in full size.
••• Supplies needed to complete this tutorial. •••
________________________________________________________________________
Programs: Paint Shop Pro, I'm using version 10. Animation Shop 3.
Plugin : Eye Candy: Gradient Glow for name.
Font used: Brother Tattoo
Tube of choice: I'm using "Rose" by José Cano
Please click on TAG to see in full size.
••• Supplies needed to complete this tutorial. •••
________________________________________________________________________
Programs: Paint Shop Pro, I'm using version 10. Animation Shop 3.
Plugin : Eye Candy: Gradient Glow for name.
Font used: Brother Tattoo
Tube of choice: I'm using "Rose" by José Cano
Scrap Kit : I'm using "Rosso" by Bibi's Collection from SATC
Animation: SimoneAni-Sparkle Roses
Mask: none
________________________________________________________________________
♥♥♥
Save your tag often. Nothing like working long and hard on a tag and PSP crashes.
♥♥♥
Open a new image 650W x 550H, transparent background, 72 resolution.
Select all.
Open paper 4 and copy. Paste INTO selection on your tag. Deselect.
C/P element 22 as a new layer.
Copy and paste your tube as a new layer .Re-size by 68%. Position to the right side of tag. Add drop shadow.
Copy and paste element 19 and position behind your tube and in center of tag.
Add drop shadow.
Copy and paste 46 and position behind your tube and in front of petals. Add drop shadow.
Copy and paste 29 and re-size by 45%. Position in upper left hand side of tag. Add drop shadow.
Copy and paste element 4 as a new layer and mirror. Position in lower left hand side.
Add drop shadow.
Add artist copyright. Merge all visible.
Copy and paste into Animation Shop as a new animation.
Hold Ctrl key down and hit letter L repeatedly until you have 20 frames.
Open SimoneAni-SparkleRoses. Go to Edit>Select all.
Go to Edit>Copy.
Activate your tag. Go to Edit>Select All.
Go to Edit>Propagate Paste.
Go to Edit>Paste>Paste into Selected Frames.
Click into place.
Add your name and save.
To add a border, go back into PSP.
Select all, go to selection, modify, contract by 10.
Go to selection, invert. Add a new raster layer.
Using your flood fill tool, add a color from your tube.
Go to selection>invert.
Add a new raster layer. Add drop shadow. Deselect.
Ok now hide the tag layer. You should only have the frame and the drop shadow.
Activate your frame layer and go to Adjust and add noise. Gaussian, 60%.
Go to Edit, copy merged.
In AS, right click and paste as a new animation.
Back in PSP, undo noise.
Add noise of 66%. Copy merged.
In AS, right click on frame layer and paste after selected frame.
Back in PSP, undo noise.
Add noise of 72%. Copy merged.
In AS, right click on the last frame and paste after selected frame.
Go to Edit and select all.
Go to Edit and copy.
Activate your tag.
Go to Edit and select all.
Go to Edit and paste>paste into selected frames.
You may have to slightly adjust the position with your cursor. Before you click border
frame into place, make sure all four corners are covered, lined up perfectly.
Click play.
Add your name and save.
To save:
Go to File, Save as, enter the name of your file and select the folder to save to.
Now click on Customize:
Under COLORS TAB:
Number of colors: 255 Colors
Create palette by: OPTIMIZED OCTREE
Reduce colors by: Error Diffusion
Under OPTIMIZATIONS TAB:
set a check mark beside the second, third and forth choices. UN-check the 1st and last.
Under PARTIAL TRANSPARENCY:
check Convert pixels less than 92
Yes, blend with this color: change to white #FFFFFF
Click OK. Click Next, next, next, next.
Play your animation.
At times your animation may or will come out terrible. Optimization in Animation Shop is not the greatest.
You can play around will your settings, especially under the Tab: Optimization. I change this setting at times from anywhere between 70 and 100.
Some people add a white background. To add background, go to Animation: Animation Properties, select Opaque and change color to white.
Hope you enjoyed this tutorial,
Hugs Simone
Please, always direct people to my blog to download my animations.
Do not load to any other download site and don't claim as your own.
Tutorial written by SophisticatSimone aka Lorraine Halle on Sunday October 27, 2013.
Animation: SimoneAni-Sparkle Roses
Mask: none
________________________________________________________________________
♥♥♥
Save your tag often. Nothing like working long and hard on a tag and PSP crashes.
♥♥♥
Open a new image 650W x 550H, transparent background, 72 resolution.
Select all.
Open paper 4 and copy. Paste INTO selection on your tag. Deselect.
C/P element 22 as a new layer.
Copy and paste your tube as a new layer .Re-size by 68%. Position to the right side of tag. Add drop shadow.
Copy and paste element 19 and position behind your tube and in center of tag.
Add drop shadow.
Copy and paste 46 and position behind your tube and in front of petals. Add drop shadow.
Copy and paste 29 and re-size by 45%. Position in upper left hand side of tag. Add drop shadow.
Copy and paste element 4 as a new layer and mirror. Position in lower left hand side.
Add drop shadow.
Add artist copyright. Merge all visible.
Copy and paste into Animation Shop as a new animation.
Hold Ctrl key down and hit letter L repeatedly until you have 20 frames.
Open SimoneAni-SparkleRoses. Go to Edit>Select all.
Go to Edit>Copy.
Activate your tag. Go to Edit>Select All.
Go to Edit>Propagate Paste.
Go to Edit>Paste>Paste into Selected Frames.
Click into place.
Add your name and save.
To add a border, go back into PSP.
Select all, go to selection, modify, contract by 10.
Go to selection, invert. Add a new raster layer.
Using your flood fill tool, add a color from your tube.
Go to selection>invert.
Add a new raster layer. Add drop shadow. Deselect.
Ok now hide the tag layer. You should only have the frame and the drop shadow.
Activate your frame layer and go to Adjust and add noise. Gaussian, 60%.
Go to Edit, copy merged.
In AS, right click and paste as a new animation.
Back in PSP, undo noise.
Add noise of 66%. Copy merged.
In AS, right click on frame layer and paste after selected frame.
Back in PSP, undo noise.
Add noise of 72%. Copy merged.
In AS, right click on the last frame and paste after selected frame.
Go to Edit and select all.
Go to Edit and copy.
Activate your tag.
Go to Edit and select all.
Go to Edit and paste>paste into selected frames.
You may have to slightly adjust the position with your cursor. Before you click border
frame into place, make sure all four corners are covered, lined up perfectly.
Click play.
Add your name and save.
To save:
Go to File, Save as, enter the name of your file and select the folder to save to.
Now click on Customize:
Under COLORS TAB:
Number of colors: 255 Colors
Create palette by: OPTIMIZED OCTREE
Reduce colors by: Error Diffusion
Under OPTIMIZATIONS TAB:
set a check mark beside the second, third and forth choices. UN-check the 1st and last.
Under PARTIAL TRANSPARENCY:
check Convert pixels less than 92
Yes, blend with this color: change to white #FFFFFF
Click OK. Click Next, next, next, next.
Play your animation.
At times your animation may or will come out terrible. Optimization in Animation Shop is not the greatest.
You can play around will your settings, especially under the Tab: Optimization. I change this setting at times from anywhere between 70 and 100.
Some people add a white background. To add background, go to Animation: Animation Properties, select Opaque and change color to white.
Hope you enjoyed this tutorial,
Hugs Simone
Please, always direct people to my blog to download my animations.
Do not load to any other download site and don't claim as your own.
Tutorial written by SophisticatSimone aka Lorraine Halle on Sunday October 27, 2013.
Sunday, October 20, 2013

♥♥♥
Please click on TAG to see in full size.
••• Supplies needed to complete this tutorial. •••
________________________________________________________________________
Programs: Paint Shop Pro, I'm using version 10. Animation Shop 3.
Plugin : Eye Candy: Gradient Glow for name.
Font used: A&S Black Swan
Tube of choice: I'm using "Rush" by Christine Marie Kotlark from SATC.
Scrap Kit : I'm using "Roller Princess" by Bibi's Collection from SATC
My supplies HERE.
You will find the Mask 0179, the flames, the animations (SimoneAni-Rush).
________________________________________________________________________
♥♥♥
Save your tag often. Nothing like working long and hard on a tag and PSP crashes.
♥♥♥
Open a new image 700 x 700.
Select ALL.
Copy and paste INTO selection paper of choice. I used paper 3.
Select none.
Go to Adjust/ Brightness & Contrast/ Histogram Adjustment
Enter the following:
Low: 38
Gamma: 0.80
High: 239
Open Mask0179 and apply. Merge group.
Copy and paste the tube "Rush" and re-size by 82%.
If you are animating you must re-size by 82% otherwise, things won't match up.
I created the animation specifically for her hoop at this size.
Copy and paste element 29 as a new layer and re-size by 92%.
Duplicate and merge down. Add drop shadow.
Make sure this element is at bottom of tag behind your tube.
Making it appear like she's standing on the keys.
Copy and paste my frames element from supplies and position at bottom of tag behind your tube and the keyboard layers.
C/P element 42 as a new layer and move to lower left hand side of tag on the keyboard.
Add drop shadow.
C/P element 129 as a new layer. Re-size by 34% and position behind tube layer in the right upper hand corner.
Add drop shadow.
C/P element 78 as a new layer. Position behind flame layer and in the right lower hand corner of tag.
Add drop shadow.
C/P element 121 as a new layer and mirror. Re-size by 70% and position to right side of skull cone at the bottom.
Add drop shadow.
C/P element 30 as a new layer and position him on the barrel. Add drop shadow.
C/P element 112 as a new layer and re-size by 65% and position in the upper left hand side of tag.
Add drop shadow.
C/P element 66 and positon mid tag, beside the radio and below it in the layers palette.
Add drop shadow.
C/P element 26 and re-size by 75%. Position beside the pop bottle. Make it's below the drink layer in layers palette.
Add drop shadow.
C/P element 44 and move to right lower hand side of tag. Add drop shadow.
C/P element 101 and move in front of cupcake. Add drop shadow.
C/P element 27 and free rotate this layer to the left by 90 degrees. Re-size by 70% and add drop shadow.
Position over the mask layer in your layers palette and over on the right side of tag.
C/P element 45 and re-size by 28%. Move to the right side of tag and behind the cupcack layer. Add drop shadow.
C/P element 34 and position behind your tube. Using your selection tool, set to lasso, feather of zero, remove some of the pink heart. Add drop shadow.
I tripled my disco ball. Position one at top center and one to the left side of tag.
Add artist copyright.
Add your name or wait till after you've added the animations.
Merge visible.
For Animation: I'm using
I - SimoneAni-Rushbling, (will be on the hoop)
II - SimoneAni-RushSingeNote2 (single note add-on)
III- SimoneAni-RushMusicNotes (group of notes, coming from radio)
OK in PSP, select all, copy merged.
In Animation Shop, right click on your workspace and paste as a New Animation.
Holding the Ctrl key down, tap the L key repeatedly until you have 22 frames.
Open SimoneAni-Rushbling. Go to Edit, select All.
Go to Edit and Copy.
Back on your tag, activate by clicking it.
Go to Edit, Select all.
Go to Edit, make sure "Propagate Paste" is selected.
Go to Edit, Paste>Paste into selected frames.
Using your cursor, position on the right side of hoop, on the light green area.
See my screenshot.
Please click on TAG to see in full size.
••• Supplies needed to complete this tutorial. •••
________________________________________________________________________
Programs: Paint Shop Pro, I'm using version 10. Animation Shop 3.
Plugin : Eye Candy: Gradient Glow for name.
Font used: A&S Black Swan
Tube of choice: I'm using "Rush" by Christine Marie Kotlark from SATC.
Scrap Kit : I'm using "Roller Princess" by Bibi's Collection from SATC
My supplies HERE.
You will find the Mask 0179, the flames, the animations (SimoneAni-Rush).
________________________________________________________________________
♥♥♥
Save your tag often. Nothing like working long and hard on a tag and PSP crashes.
♥♥♥
Open a new image 700 x 700.
Select ALL.
Copy and paste INTO selection paper of choice. I used paper 3.
Select none.
Go to Adjust/ Brightness & Contrast/ Histogram Adjustment
Enter the following:
Low: 38
Gamma: 0.80
High: 239
Open Mask0179 and apply. Merge group.
Copy and paste the tube "Rush" and re-size by 82%.
If you are animating you must re-size by 82% otherwise, things won't match up.
I created the animation specifically for her hoop at this size.
Copy and paste element 29 as a new layer and re-size by 92%.
Duplicate and merge down. Add drop shadow.
Make sure this element is at bottom of tag behind your tube.
Making it appear like she's standing on the keys.
Copy and paste my frames element from supplies and position at bottom of tag behind your tube and the keyboard layers.
C/P element 42 as a new layer and move to lower left hand side of tag on the keyboard.
Add drop shadow.
C/P element 129 as a new layer. Re-size by 34% and position behind tube layer in the right upper hand corner.
Add drop shadow.
C/P element 78 as a new layer. Position behind flame layer and in the right lower hand corner of tag.
Add drop shadow.
C/P element 121 as a new layer and mirror. Re-size by 70% and position to right side of skull cone at the bottom.
Add drop shadow.
C/P element 30 as a new layer and position him on the barrel. Add drop shadow.
C/P element 112 as a new layer and re-size by 65% and position in the upper left hand side of tag.
Add drop shadow.
C/P element 66 and positon mid tag, beside the radio and below it in the layers palette.
Add drop shadow.
C/P element 26 and re-size by 75%. Position beside the pop bottle. Make it's below the drink layer in layers palette.
Add drop shadow.
C/P element 44 and move to right lower hand side of tag. Add drop shadow.
C/P element 101 and move in front of cupcake. Add drop shadow.
C/P element 27 and free rotate this layer to the left by 90 degrees. Re-size by 70% and add drop shadow.
Position over the mask layer in your layers palette and over on the right side of tag.
C/P element 45 and re-size by 28%. Move to the right side of tag and behind the cupcack layer. Add drop shadow.
C/P element 34 and position behind your tube. Using your selection tool, set to lasso, feather of zero, remove some of the pink heart. Add drop shadow.
I tripled my disco ball. Position one at top center and one to the left side of tag.
Add artist copyright.
Add your name or wait till after you've added the animations.
Merge visible.
For Animation: I'm using
I - SimoneAni-Rushbling, (will be on the hoop)
II - SimoneAni-RushSingeNote2 (single note add-on)
III- SimoneAni-RushMusicNotes (group of notes, coming from radio)
OK in PSP, select all, copy merged.
In Animation Shop, right click on your workspace and paste as a New Animation.
Holding the Ctrl key down, tap the L key repeatedly until you have 22 frames.
Open SimoneAni-Rushbling. Go to Edit, select All.
Go to Edit and Copy.
Back on your tag, activate by clicking it.
Go to Edit, Select all.
Go to Edit, make sure "Propagate Paste" is selected.
Go to Edit, Paste>Paste into selected frames.
Using your cursor, position on the right side of hoop, on the light green area.
See my screenshot.

Click play. If it looks good, move to the next step.
If not, go to Edit > Undo paste and try again.
Open SimoneAni-RushMusicNotes.
Repeat steps. Positon the note on the radio.
See screenshot.
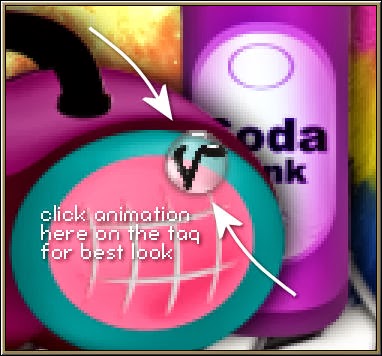
Open SimoneAni-RushSingeNote2. Select all and copy.
Paste on your tag just above the radio handle.
If happy with your tag, save.
Don't forget to add your name
To save:
Go to File, Save as, enter the name of your file and select the folder to save to.
Now click on Customize:
Under COLORS TAB:
Number of colors: 255 Colors
Create palette by: OPTIMIZED OCTREE
Reduce colors by: Error Diffusion
Under OPTIMIZATIONS TAB:
set a check mark beside the second, third and forth choices. UN-check the 1st and last.
Under PARTIAL TRANSPARENCY:
check Convert pixels less than 92
Yes, blend with this color: change to white #FFFFFF
Click OK. Click Next, next, next, next.
Play your animation.
At times your animation may or will come out terrible. Optimization in Animation Shop is not the greatest.
You can play around will your settings, especially under the Tab: Optimization. I change this setting at times from anywhere between 70 and 100.
Some people add a white background. To add background, go to Animation: Animation Properties, select Opaque and change color to white.
Hope you enjoyed this tutorial,
Hugs Simone
Please, always direct people to my blog to download my animations.
Do not load to any other download site and don't claim as your own.
Tutorial written by SophisticatSimone aka Lorraine Halle on Sunday October 20, 2013.
Wednesday, October 16, 2013

♥♥♥
Please click on TAG to see in full size.
••• Supplies needed to complete this tutorial. •••
________________________________________________________________________
Programs: Paint Shop Pro, I'm using version 10. Animation Shop 3.
Plugin : Eye Candy: Gradient Glow for name.
Font used: 2Peas Drip
Tube of choice: I'm using "CM Witch" by Jay Trembly
Please click on TAG to see in full size.
••• Supplies needed to complete this tutorial. •••
________________________________________________________________________
Programs: Paint Shop Pro, I'm using version 10. Animation Shop 3.
Plugin : Eye Candy: Gradient Glow for name.
Font used: 2Peas Drip
Tube of choice: I'm using "CM Witch" by Jay Trembly
Mask: ONE of mine: Mask 178
________________________________________________________________________
♥♥♥
Save your tag often. Nothing like working long and hard on a tag and PSP crashes.
♥♥♥
Open paper 1 and shift + D to duplicate. Close original.
Re-size Paper 85% smart size checked and 72 dpi.
Sharpen if it's a little blurry.
Promote background to layer.
Apply Mask 178 and merge group.
Copy and paste your tube as a new layer and re-size by 77%.
Add following drop shadow to your tube:
V=5
H=10
Opacity=76
Blur=34
Color=black
C/P element 45 as a new layer and re-size by 79%. Position as your top layer and adjust so his hand is covering her bottom. It's not necessary but my blog is PG so I'm covering it :)
Add same drop shadow.
C/P element 68 as a new layer and move to the right side of tag. Make sure this layer is below your tube layer. Drop shadow:
V=0
H=-24
Opacity=50
Blur=27
Color=black
C/P element 1 as a new layer and re-size by 42%. Position in bottom left hand side of tag. Add same drop shadow as your tube layer, so first one we used, but increase opacity to 90.
C/P element 2 as a new layer. Make sure this is your top layer. Duplicate. On the bottom layer, add gaussian blur of 2.
Merge the Top layer down. Now move this to the right lower hand side of tag. Don't cover the skeleton's face.
C/P element 12 as a new layer and re-size by 42%. Position in front of cauldron. Add a drop shadow.
C/P element 16 as a new layer and position to the left of tag.
Add drop shadow, -2, 4, 100, 15.94, black. Layer should be behind the cauldron.
C/P element 72 as a new layer, re-size by 42% and position on trunk of tree. Add drop shadow.
C/P element 66 as a new layer and re-size by 42%, add drop shadow and move to lower right hand side of tag.
C/P element 30 as a new layer and re-size by 64%. Position in the lower right hand side. Add drop shadow.
C/P element 67 as a new layer and re-size by 50%. Position in the lower left hand side. Add drop shadow.
C/P element 26 as a new layer. Add drop shadow. Position at top, behind your tube layer.
Merge your layers. Crop your tag to size.
Re-size by 92% and sharpen.
Add your artist copyright and your name.
Save as PNG or if animating, go to selections, select all.
Go to Edit and Copy.
Paste as a new animation in Animation Shop.
Hold your Ctrl key down and repeatedly hit letter L on your keyboard for a total of 24 frames.
You can watch the count on the lower right hand side of your screen in AS.
Open Simone-SnakeEye-3
Go to Edit, select all.
Go to Edit, copy.
Activate your tag.
Go to Edit, select all.
Go to Edit, make sure Propagate Paste is selected.
Go to Edit, Paste, paste into selected frames.
Position on your tag and click into place. I placed mine in the bottom portion of the tag.
Some of the sparkles start at the cauldron.
Play and save.
Don't forget to add your name if you didn't.
To save:
Go to File, Save as, enter the name of your file and select the folder to save to.
Now click on Customize:
Under COLORS TAB:
Number of colors: 255 Colors
Create palette by: OPTIMIZED OCTREE
Reduce colors by: Error Diffusion
Under OPTIMIZATIONS TAB:
set a check mark beside the second, third and forth choices. UN-check the 1st and last.
Under PARTIAL TRANSPARENCY:
check Convert pixels less than 92
Yes, blend with this color: change to white #FFFFFF
Click OK. Click Next, next, next, next.
Play your animation.
At times your animation may or will come out terrible. Optimization in Animation Shop is not the greatest.
You can play around will your settings, especially under the Tab: Optimization. I change this setting at times from anywhere between 70 and 100.
Some people add a white background. To add background, go to Animation: Animation Properties, select Opaque and change color to white.
Hope you enjoyed this tutorial,
Hugs Simone
Please, always direct people to my blog to download my animations.
Do not load to any other download site and don't claim as your own.
Tutorial written by SophisticatSimone aka Lorraine Halle on Wednesday October 16, 2013.
________________________________________________________________________
♥♥♥
Save your tag often. Nothing like working long and hard on a tag and PSP crashes.
♥♥♥
Open paper 1 and shift + D to duplicate. Close original.
Re-size Paper 85% smart size checked and 72 dpi.
Sharpen if it's a little blurry.
Promote background to layer.
Apply Mask 178 and merge group.
Copy and paste your tube as a new layer and re-size by 77%.
Add following drop shadow to your tube:
V=5
H=10
Opacity=76
Blur=34
Color=black
C/P element 45 as a new layer and re-size by 79%. Position as your top layer and adjust so his hand is covering her bottom. It's not necessary but my blog is PG so I'm covering it :)
Add same drop shadow.
C/P element 68 as a new layer and move to the right side of tag. Make sure this layer is below your tube layer. Drop shadow:
V=0
H=-24
Opacity=50
Blur=27
Color=black
C/P element 1 as a new layer and re-size by 42%. Position in bottom left hand side of tag. Add same drop shadow as your tube layer, so first one we used, but increase opacity to 90.
C/P element 2 as a new layer. Make sure this is your top layer. Duplicate. On the bottom layer, add gaussian blur of 2.
Merge the Top layer down. Now move this to the right lower hand side of tag. Don't cover the skeleton's face.
C/P element 12 as a new layer and re-size by 42%. Position in front of cauldron. Add a drop shadow.
C/P element 16 as a new layer and position to the left of tag.
Add drop shadow, -2, 4, 100, 15.94, black. Layer should be behind the cauldron.
C/P element 72 as a new layer, re-size by 42% and position on trunk of tree. Add drop shadow.
C/P element 66 as a new layer and re-size by 42%, add drop shadow and move to lower right hand side of tag.
C/P element 30 as a new layer and re-size by 64%. Position in the lower right hand side. Add drop shadow.
C/P element 67 as a new layer and re-size by 50%. Position in the lower left hand side. Add drop shadow.
C/P element 26 as a new layer. Add drop shadow. Position at top, behind your tube layer.
Merge your layers. Crop your tag to size.
Re-size by 92% and sharpen.
Add your artist copyright and your name.
Save as PNG or if animating, go to selections, select all.
Go to Edit and Copy.
Paste as a new animation in Animation Shop.
Hold your Ctrl key down and repeatedly hit letter L on your keyboard for a total of 24 frames.
You can watch the count on the lower right hand side of your screen in AS.
Open Simone-SnakeEye-3
Go to Edit, select all.
Go to Edit, copy.
Activate your tag.
Go to Edit, select all.
Go to Edit, make sure Propagate Paste is selected.
Go to Edit, Paste, paste into selected frames.
Position on your tag and click into place. I placed mine in the bottom portion of the tag.
Some of the sparkles start at the cauldron.
Play and save.
Don't forget to add your name if you didn't.
To save:
Go to File, Save as, enter the name of your file and select the folder to save to.
Now click on Customize:
Under COLORS TAB:
Number of colors: 255 Colors
Create palette by: OPTIMIZED OCTREE
Reduce colors by: Error Diffusion
Under OPTIMIZATIONS TAB:
set a check mark beside the second, third and forth choices. UN-check the 1st and last.
Under PARTIAL TRANSPARENCY:
check Convert pixels less than 92
Yes, blend with this color: change to white #FFFFFF
Click OK. Click Next, next, next, next.
Play your animation.
At times your animation may or will come out terrible. Optimization in Animation Shop is not the greatest.
You can play around will your settings, especially under the Tab: Optimization. I change this setting at times from anywhere between 70 and 100.
Some people add a white background. To add background, go to Animation: Animation Properties, select Opaque and change color to white.
Hope you enjoyed this tutorial,
Hugs Simone
Please, always direct people to my blog to download my animations.
Do not load to any other download site and don't claim as your own.
Tutorial written by SophisticatSimone aka Lorraine Halle on Wednesday October 16, 2013.
Friday, October 11, 2013


S E X Y W I T C H
♥♥♥
Please click on TAG to see in full size.
••• Supplies needed to complete this tutorial. •••
________________________________________________________________________
Programs: Paint Shop Pro, I'm using version 10. Animation Shop 3.
Plugin : None
Font used: Feathergraphy Decoration
Tube of choice: I'm using "Sexy Witch" by José Cano
Scrap Kit : I'm using "Demona" by Bibi's Collection from SATC
Animation: SimoneAni-SexyWitch
Mask: none
________________________________________________________________________
♥♥♥
Save your tag often. Nothing like working long and hard on a tag and PSP crashes.
♥♥♥
Open a new image 600 x 250.
Copy and paste paper of choice as background.
Crop merged opaque.
Copy and paste element 45 as a new layer and position in the center, change blend mode to soft light and your opacity to 59.
Copy and paste close up of your tube and position to the right side of tag.
Copy and paste element 21 as a new layer, move slightly to the left. Add drop shadow. Cover the skeletal man a bit, but make sure you see his head in the background.
Copy and paste element 23 as a new layer behind the tree line and in front of skeletal man. Using your mover tool, adjust so make sure it's not covering too much of the skeletal man.
Copy and paste element 57 as a new layer and re-size by 45% and position behind the close up layer and a little to the right of center line. Add drop shadow.
Copy and paste element 1 as a new layer and re-size by 45%. Move to the left side of tag.
Crop your tag.
Now select all and contract selection by 3. Add a new layer. Make sure it's your top layer.
Add a color from your tube. De-select and add drop shadow.
X-out this layer.
Highlight any of the other layers.
Go to Edit, copy merged.
In Animation Shop, right click and paste as a new animation.
Hold your Ctrl key and hit the L key 20 times. You should have a total of 21 frames.
Open SimoneAni-SexyWitch.
Go to Edit, select all.
Go to Edit, copy.
Activate your tag.
Go to Edit, select all.
Go to Edit and activate Propagate Paste.
Go to Edit and Paste, paste into selected frames.
I pasted it 3 different times, 1 in the center, 1 lower on tag near her hat and 1 time to the left of tag, on the phatom tombstone.
In PSP, select your layer with the banner. Copy.
In AS, right click anywhere on workspace and paste as new animation.
Go to Edit and Copy.
Activate your tag again and go to Edit, Paste into selected frames. It should line up perfectly. Click into place.
You can now add your copyright info and your license number.
Add your name.
Repeat for the avatar.
To save:
Go to File, Save as, enter the name of your file and select the folder to save to.
Now click on Customize:
Under COLORS TAB:
Number of colors: 255 Colors
Create palette by: OPTIMIZED OCTREE
Reduce colors by: Error Diffusion
Under OPTIMIZATIONS TAB:
set a check mark beside the second, third and forth choices. UN-check the 1st and last.
Under PARTIAL TRANSPARENCY:
check Convert pixels less than 92
Yes, blend with this color: change to white #FFFFFF
Click OK. Click Next, next, next, next.
Play your animation.
At times your animation may or will come out terrible. Optimization in Animation Shop is not the greatest.
You can play around will your settings, especially under the Tab: Optimization. I change this setting at times from anywhere between 70 and 100.
Some people add a white background. To add background, go to Animation: Animation Properties, select Opaque and change color to white.
Hope you enjoyed this tutorial,
Hugs Simone
Please, always direct people to my blog to download my animations.
Do not load to any other download site and don't claim as your own.
Tutorial written by SophisticatSimone aka Lorraine Halle on Friday October 11, 2013
♥♥♥
Please click on TAG to see in full size.
••• Supplies needed to complete this tutorial. •••
________________________________________________________________________
Programs: Paint Shop Pro, I'm using version 10. Animation Shop 3.
Plugin : None
Font used: Feathergraphy Decoration
Tube of choice: I'm using "Sexy Witch" by José Cano
Scrap Kit : I'm using "Demona" by Bibi's Collection from SATC
Animation: SimoneAni-SexyWitch
Mask: none
________________________________________________________________________
♥♥♥
Save your tag often. Nothing like working long and hard on a tag and PSP crashes.
♥♥♥
Open a new image 600 x 250.
Copy and paste paper of choice as background.
Crop merged opaque.
Copy and paste element 45 as a new layer and position in the center, change blend mode to soft light and your opacity to 59.
Copy and paste close up of your tube and position to the right side of tag.
Copy and paste element 21 as a new layer, move slightly to the left. Add drop shadow. Cover the skeletal man a bit, but make sure you see his head in the background.
Copy and paste element 23 as a new layer behind the tree line and in front of skeletal man. Using your mover tool, adjust so make sure it's not covering too much of the skeletal man.
Copy and paste element 57 as a new layer and re-size by 45% and position behind the close up layer and a little to the right of center line. Add drop shadow.
Copy and paste element 1 as a new layer and re-size by 45%. Move to the left side of tag.
Crop your tag.
Now select all and contract selection by 3. Add a new layer. Make sure it's your top layer.
Add a color from your tube. De-select and add drop shadow.
X-out this layer.
Highlight any of the other layers.
Go to Edit, copy merged.
In Animation Shop, right click and paste as a new animation.
Hold your Ctrl key and hit the L key 20 times. You should have a total of 21 frames.
Open SimoneAni-SexyWitch.
Go to Edit, select all.
Go to Edit, copy.
Activate your tag.
Go to Edit, select all.
Go to Edit and activate Propagate Paste.
Go to Edit and Paste, paste into selected frames.
I pasted it 3 different times, 1 in the center, 1 lower on tag near her hat and 1 time to the left of tag, on the phatom tombstone.
In PSP, select your layer with the banner. Copy.
In AS, right click anywhere on workspace and paste as new animation.
Go to Edit and Copy.
Activate your tag again and go to Edit, Paste into selected frames. It should line up perfectly. Click into place.
You can now add your copyright info and your license number.
Add your name.
Repeat for the avatar.
To save:
Go to File, Save as, enter the name of your file and select the folder to save to.
Now click on Customize:
Under COLORS TAB:
Number of colors: 255 Colors
Create palette by: OPTIMIZED OCTREE
Reduce colors by: Error Diffusion
Under OPTIMIZATIONS TAB:
set a check mark beside the second, third and forth choices. UN-check the 1st and last.
Under PARTIAL TRANSPARENCY:
check Convert pixels less than 92
Yes, blend with this color: change to white #FFFFFF
Click OK. Click Next, next, next, next.
Play your animation.
At times your animation may or will come out terrible. Optimization in Animation Shop is not the greatest.
You can play around will your settings, especially under the Tab: Optimization. I change this setting at times from anywhere between 70 and 100.
Some people add a white background. To add background, go to Animation: Animation Properties, select Opaque and change color to white.
Hope you enjoyed this tutorial,
Hugs Simone
Please, always direct people to my blog to download my animations.
Do not load to any other download site and don't claim as your own.
Tutorial written by SophisticatSimone aka Lorraine Halle on Friday October 11, 2013
Wednesday, September 18, 2013

♥♥♥
Please click on TAG to see in full size.
••• Supplies needed to complete this tutorial. •••
________________________________________________________________________
Programs: Paint Shop Pro, I'm using version 10. Animation Shop 3.
Plugin : none
Font used: Alice in Wonderland
Tube of choice: I'm using "Zombie" by Jose Cano.
Scrap Kit : I'm using "Zombie Zone"
Please click on TAG to see in full size.
••• Supplies needed to complete this tutorial. •••
________________________________________________________________________
Programs: Paint Shop Pro, I'm using version 10. Animation Shop 3.
Plugin : none
Font used: Alice in Wonderland
Tube of choice: I'm using "Zombie" by Jose Cano.
Scrap Kit : I'm using "Zombie Zone"
Animation: SimoneAni-486-491
Mask: 0176 HERE
________________________________________________________________________
♥♥♥
Save your tag often. Nothing like working long and hard on a tag and PSP crashes.
♥♥♥
Open a new image 700 x 700, transparent.
Copy and paste element 19 as a new layer. Re-size for fit if it's to big.
Duplicate and mirror. Adjust so you cover the majority of your background from side to side and merge them
together.
Copy and paste again and re-size by 50%.
Duplicate. Position these two on either side of the canvas.
Copy and paste element 26 as a new layer and re-size. Position to the left.
Duplicate one of the bush layers and drag it up above the cross tombstone and place it a little to the right of it.
Copy and paste element 12 as a new layer. Using your magic wand tool, set to Point to point, select the chain portion
and delete.
Re-size if you need to make it fit and position at the top of the tag.
Copy and paste element 14 as a new layer and re-size to fit. Position to the right side of canvas.
Copy and paste element 32 as a new layer and position to the right side.
Copy and paste element 31 as a new layer. Re-size and move over towards the center, away from the white flowers.
Copy and paste element 13 as a new layer and re-size. Position to the right side.
Copy and paste element 11 as a new layer and position mid tag in center.
Copy and paste element 5 as a new layer, move to the top.
Copy and paste element 67 as a new layer and re-size. Move to top center of tag.
Copy and paste your tube of choice and re-size to fit. Move to the left side of tag.
Copy and paste element 21 as new layer and re-size. Position in right lower hand side of tag.
Copy and paste element 20 as a new layer and re-size. Position on the cauldron.
Copy and paste element 6 as a new layer and re-size. Position beside cauldron.
Copy and paste element 9 as a new layer and re-size. Position high above cauldron.
Copy and paste element 4 as a new layer and re-size. Position in lower right hand side.
Add drop shadow to all layers except the webbing layer.
Merge all layers.
Crop tag and re-size if to large.
Add copyright.
Add a new raster layer and drag down to bottom.
Selections> select all.
Copy and paste paper of choice.
I used paper2. Paste it into the selection.
Apply Mask to layer and merge group. I used Mask 176. Duplicate and merge.
Merge all visible.
Add your name and save as PNG.
Go to Selections, select all.
Go to Edit and copy merged. Paste as a new animation in Animation Shop.
Hold your Ctrl key down and repeatedly hit letter L on your keyboard for a total of 16 frames.
You can watch the count on the lower right hand side of your screen in AS.
Open SimoneAni487
Go to Edit, select all.
Go to Edit, copy.
Activate your tag.
Go to Edit, select all.
Go to Edit, make sure Propagate Paste is selected.
Go to Edit, Paste, paste into selected frames.
Position on your tag and click into place. I placed mine just above and within the cauldron.
Play and save.
Don't forget to add your name.
To save:
Go to File, Save as, enter the name of your file and select the folder to save to.
Now click on Customize:
Under COLORS TAB:
Number of colors: 255 Colors
Create palette by: OPTIMIZED OCTREE
Reduce colors by: Error Diffusion
Under OPTIMIZATIONS TAB:
set a check mark beside the second, third and forth choices. UN-check the 1st and last.
Under PARTIAL TRANSPARENCY:
check Convert pixels less than 92
Yes, blend with this color: change to white #FFFFFF
Click OK. Click Next, next, next, next.
Play your animation.
At times your animation may or will come out terrible. Optimization in Animation Shop is not the greatest.
You can play around will your settings, especially under the Tab: Optimization. I change this setting at times from
anywhere between 70 and 100.
Some people add a white background. To add background, go to Animation: Animation Properties, select Opaque
and change color to white.
Hope you enjoyed this tutorial,
Hugs Simone
Please, always direct people to my blog to download my animations.
Do not load to any other download site and don't claim as your own.
Tutorial written by SophisticatSimone aka Lorraine Halle on Wednesday September 18, 2013.
Mask: 0176 HERE
________________________________________________________________________
♥♥♥
Save your tag often. Nothing like working long and hard on a tag and PSP crashes.
♥♥♥
Open a new image 700 x 700, transparent.
Copy and paste element 19 as a new layer. Re-size for fit if it's to big.
Duplicate and mirror. Adjust so you cover the majority of your background from side to side and merge them
together.
Copy and paste again and re-size by 50%.
Duplicate. Position these two on either side of the canvas.
Copy and paste element 26 as a new layer and re-size. Position to the left.
Duplicate one of the bush layers and drag it up above the cross tombstone and place it a little to the right of it.
Copy and paste element 12 as a new layer. Using your magic wand tool, set to Point to point, select the chain portion
and delete.
Re-size if you need to make it fit and position at the top of the tag.
Copy and paste element 14 as a new layer and re-size to fit. Position to the right side of canvas.
Copy and paste element 32 as a new layer and position to the right side.
Copy and paste element 31 as a new layer. Re-size and move over towards the center, away from the white flowers.
Copy and paste element 13 as a new layer and re-size. Position to the right side.
Copy and paste element 11 as a new layer and position mid tag in center.
Copy and paste element 5 as a new layer, move to the top.
Copy and paste element 67 as a new layer and re-size. Move to top center of tag.
Copy and paste your tube of choice and re-size to fit. Move to the left side of tag.
Copy and paste element 21 as new layer and re-size. Position in right lower hand side of tag.
Copy and paste element 20 as a new layer and re-size. Position on the cauldron.
Copy and paste element 6 as a new layer and re-size. Position beside cauldron.
Copy and paste element 9 as a new layer and re-size. Position high above cauldron.
Copy and paste element 4 as a new layer and re-size. Position in lower right hand side.
Add drop shadow to all layers except the webbing layer.
Merge all layers.
Crop tag and re-size if to large.
Add copyright.
Add a new raster layer and drag down to bottom.
Selections> select all.
Copy and paste paper of choice.
I used paper2. Paste it into the selection.
Apply Mask to layer and merge group. I used Mask 176. Duplicate and merge.
Merge all visible.
Add your name and save as PNG.
Go to Selections, select all.
Go to Edit and copy merged. Paste as a new animation in Animation Shop.
Hold your Ctrl key down and repeatedly hit letter L on your keyboard for a total of 16 frames.
You can watch the count on the lower right hand side of your screen in AS.
Open SimoneAni487
Go to Edit, select all.
Go to Edit, copy.
Activate your tag.
Go to Edit, select all.
Go to Edit, make sure Propagate Paste is selected.
Go to Edit, Paste, paste into selected frames.
Position on your tag and click into place. I placed mine just above and within the cauldron.
Play and save.
Don't forget to add your name.
To save:
Go to File, Save as, enter the name of your file and select the folder to save to.
Now click on Customize:
Under COLORS TAB:
Number of colors: 255 Colors
Create palette by: OPTIMIZED OCTREE
Reduce colors by: Error Diffusion
Under OPTIMIZATIONS TAB:
set a check mark beside the second, third and forth choices. UN-check the 1st and last.
Under PARTIAL TRANSPARENCY:
check Convert pixels less than 92
Yes, blend with this color: change to white #FFFFFF
Click OK. Click Next, next, next, next.
Play your animation.
At times your animation may or will come out terrible. Optimization in Animation Shop is not the greatest.
You can play around will your settings, especially under the Tab: Optimization. I change this setting at times from
anywhere between 70 and 100.
Some people add a white background. To add background, go to Animation: Animation Properties, select Opaque
and change color to white.
Hope you enjoyed this tutorial,
Hugs Simone
Please, always direct people to my blog to download my animations.
Do not load to any other download site and don't claim as your own.
Tutorial written by SophisticatSimone aka Lorraine Halle on Wednesday September 18, 2013.
Monday, September 2, 2013

♥♥♥
Please click on TAG to see in full size.
••• Supplies needed to complete this tutorial. •••
________________________________________________________________________
Programs: Paint Shop Pro, I'm using version 10. Animation Shop 3.
Plugin : none
Font used: Sweetly Broken
Tube of choice: I'm using "Lucky 13" by José Cano.
Scrap Kit : I'm using "Lucky 13" by Bibi's Collection from S&Co
Animation: SimoneAni-Lucky13
Mask: 0164 HERE
________________________________________________________________________
♥♥♥
Save your tag often. Nothing like working long and hard on a tag and PSP crashes.
♥♥♥
Open a new image 700 x 700, resolution 72 dpi, transparent background.
Copy and paste your tube as a new layer and re-size by 75%.
C/P element 82 as a new layer and re-size by 58%. Move this element behind the tube. Sharpen. Duplicate and merge together.
C/P element 81 (car) as a new layer and re-size by 40%. Mirror and position lower left hand side behind your tube layer.
C/P element 80 (leaf) as a new layer and position behind car layer in the left upper hand side of tag.
C/P element 15 (branch) as a new layer and re-size by 40%. Position behind red curtain layer in the left upper hand side of tag. Duplicate, free rotate to the right by 90 degrees. Flip and position mid center and on right side of tag.
C/P element 1 (cat) as a new layer and re-size by 75%. Position as top layer in the lower right hand side of tag.
Highlight Raster 1 layer in layers palette. It should be blank. If not, add a new raster layer and send to bottom.
Go to Selections, select all.
Copy element 30 (clocks). Paste INTO selection. Select none.
Re-size by 92%. Duplicate and merge together. Add drop shadow {V and H =5, Opacity=37, Blur=3, Color=black}and move this layer up to above the car layer.
C/P element 49 (cards) as a new layer and position on right side. Should be below the clocks.
C/P element 43 (checkered tile) as a new layer and position in lower right hand side of tag.
This should be your bottom layer.
Activate your top layer in layers palette.
C/P element 56 (skull) as a new layer and re-size by 45%. Mirror. Position bottom center of tag. Covering a portion of your tubes legs.
C/P element 89 (flowers) as a new layer and re-size by 30%. Position beside the skull (make sure skill is still above this layer). Duplicate flowers layer and move it to the other side of the skull. Move cat a bit if you need to. Line them up perfectly at the bottom.
C/P element 27 (card) as a new layer and mirror. Position to the right side of tag. Make sure this layer is behind the flower layer.
C/P element 31 (button) as a new layer and position behind the flowers on the lower right hand side of tag.
Add a new Raster layer and send to bottom.
Selection, select all.
Copy paper 9 and paste INTO selection. Select none.
Apply Mask of choice or mine Masks0164. Merge group. Duplicate. On top layer change blend mode to Multiply.
Add artist copyright.
Mask sure all your elements and your tube have a drop shadow.
Starting with your top layer, merge down one by one until you reach the tube. Include the tube in this merged layer.
X-out this layer now, highlight a bottom layer and merge visible all layers.
Ok now make sure your bottom layer is highlighted in layers palette.
Go to Selections, select all.
Go to Edit and copy. Paste as a new animation in Animation Shop.
Hold your Ctrl key down and repeatedly hit letter L on your keyboard for a total of 20 frames.
You can watch the count on the lower right hand side of your screen in AS.
Open SimoneAni-Lucky13
Go to Edit, select all.
Go to Edit, copy.
Activate your tag.
Go to Edit, select all.
Go to Edit, make sure Propagate Paste is selected.
Go to Edit, Paste, paste into selected frames.
Position on your tag and click into place. I placed mine in the center of the tag.
Go back to PSP now and highlight (activate) your tube layer and copy.
Paste as a NEW animation in AS.
Go to Edit, copy.
Activate your tag.
Go to Edit, Paste, paste into selected frames.
Try to position it as centered as possible. Click into place.
Play and save.
Don't forget to add your name.
To save:
Go to File, Save as, enter the name of your file and select the folder to save to.
Now click on Customize:
Under COLORS TAB:
Number of colors: 255 Colors
Create palette by: OPTIMIZED OCTREE
Reduce colors by: Error Diffusion
Under OPTIMIZATIONS TAB:
set a check mark beside the second, third and forth choices. UN-check the 1st and last.
Under PARTIAL TRANSPARENCY:
check Convert pixels less than 92
Yes, blend with this color: change to white #FFFFFF
Click OK. Click Next, next, next, next.
Play your animation.
At times your animation may or will come out terrible. Optimization in Animation Shop is not the greatest.
You can play around will your settings, especially under the Tab: Optimization. I change this setting at times from anywhere between 70 and 100.
Some people add a white background. To add background, go to Animation: Animation Properties, select Opaque and change color to white.
Hope you enjoyed this tutorial,
Hugs Simone
Please, always direct people to my blog to download my animations.
Do not load to any other download site and don't claim as your own.
Tutorial written by SophisticatSimone aka Lorraine Halle on Monday September 2, 2013
Please click on TAG to see in full size.
••• Supplies needed to complete this tutorial. •••
________________________________________________________________________
Programs: Paint Shop Pro, I'm using version 10. Animation Shop 3.
Plugin : none
Font used: Sweetly Broken
Tube of choice: I'm using "Lucky 13" by José Cano.
Scrap Kit : I'm using "Lucky 13" by Bibi's Collection from S&Co
Animation: SimoneAni-Lucky13
Mask: 0164 HERE
________________________________________________________________________
♥♥♥
Save your tag often. Nothing like working long and hard on a tag and PSP crashes.
♥♥♥
Open a new image 700 x 700, resolution 72 dpi, transparent background.
Copy and paste your tube as a new layer and re-size by 75%.
C/P element 82 as a new layer and re-size by 58%. Move this element behind the tube. Sharpen. Duplicate and merge together.
C/P element 81 (car) as a new layer and re-size by 40%. Mirror and position lower left hand side behind your tube layer.
C/P element 80 (leaf) as a new layer and position behind car layer in the left upper hand side of tag.
C/P element 15 (branch) as a new layer and re-size by 40%. Position behind red curtain layer in the left upper hand side of tag. Duplicate, free rotate to the right by 90 degrees. Flip and position mid center and on right side of tag.
C/P element 1 (cat) as a new layer and re-size by 75%. Position as top layer in the lower right hand side of tag.
Highlight Raster 1 layer in layers palette. It should be blank. If not, add a new raster layer and send to bottom.
Go to Selections, select all.
Copy element 30 (clocks). Paste INTO selection. Select none.
Re-size by 92%. Duplicate and merge together. Add drop shadow {V and H =5, Opacity=37, Blur=3, Color=black}and move this layer up to above the car layer.
C/P element 49 (cards) as a new layer and position on right side. Should be below the clocks.
C/P element 43 (checkered tile) as a new layer and position in lower right hand side of tag.
This should be your bottom layer.
Activate your top layer in layers palette.
C/P element 56 (skull) as a new layer and re-size by 45%. Mirror. Position bottom center of tag. Covering a portion of your tubes legs.
C/P element 89 (flowers) as a new layer and re-size by 30%. Position beside the skull (make sure skill is still above this layer). Duplicate flowers layer and move it to the other side of the skull. Move cat a bit if you need to. Line them up perfectly at the bottom.
C/P element 27 (card) as a new layer and mirror. Position to the right side of tag. Make sure this layer is behind the flower layer.
C/P element 31 (button) as a new layer and position behind the flowers on the lower right hand side of tag.
Add a new Raster layer and send to bottom.
Selection, select all.
Copy paper 9 and paste INTO selection. Select none.
Apply Mask of choice or mine Masks0164. Merge group. Duplicate. On top layer change blend mode to Multiply.
Add artist copyright.
Mask sure all your elements and your tube have a drop shadow.
Starting with your top layer, merge down one by one until you reach the tube. Include the tube in this merged layer.
X-out this layer now, highlight a bottom layer and merge visible all layers.
Ok now make sure your bottom layer is highlighted in layers palette.
Go to Selections, select all.
Go to Edit and copy. Paste as a new animation in Animation Shop.
Hold your Ctrl key down and repeatedly hit letter L on your keyboard for a total of 20 frames.
You can watch the count on the lower right hand side of your screen in AS.
Open SimoneAni-Lucky13
Go to Edit, select all.
Go to Edit, copy.
Activate your tag.
Go to Edit, select all.
Go to Edit, make sure Propagate Paste is selected.
Go to Edit, Paste, paste into selected frames.
Position on your tag and click into place. I placed mine in the center of the tag.
Go back to PSP now and highlight (activate) your tube layer and copy.
Paste as a NEW animation in AS.
Go to Edit, copy.
Activate your tag.
Go to Edit, Paste, paste into selected frames.
Try to position it as centered as possible. Click into place.
Play and save.
Don't forget to add your name.
To save:
Go to File, Save as, enter the name of your file and select the folder to save to.
Now click on Customize:
Under COLORS TAB:
Number of colors: 255 Colors
Create palette by: OPTIMIZED OCTREE
Reduce colors by: Error Diffusion
Under OPTIMIZATIONS TAB:
set a check mark beside the second, third and forth choices. UN-check the 1st and last.
Under PARTIAL TRANSPARENCY:
check Convert pixels less than 92
Yes, blend with this color: change to white #FFFFFF
Click OK. Click Next, next, next, next.
Play your animation.
At times your animation may or will come out terrible. Optimization in Animation Shop is not the greatest.
You can play around will your settings, especially under the Tab: Optimization. I change this setting at times from anywhere between 70 and 100.
Some people add a white background. To add background, go to Animation: Animation Properties, select Opaque and change color to white.
Hope you enjoyed this tutorial,
Hugs Simone
Please, always direct people to my blog to download my animations.
Do not load to any other download site and don't claim as your own.
Tutorial written by SophisticatSimone aka Lorraine Halle on Monday September 2, 2013
Sunday, September 1, 2013

♥♥♥
Please click on TAG to see in full size.
••• Supplies needed to complete this tutorial. •••
________________________________________________________________________
Programs: Paint Shop Pro, I'm using version 10. Animation Shop 3.
Plugin : none
Font used: Ornatique
Tube of choice: I'm using "Sasha Redux" by Jose A Cano.
Scrap Kit : I'm using "Born Free" by Angelica No longer available.
Please click on TAG to see in full size.
••• Supplies needed to complete this tutorial. •••
________________________________________________________________________
Programs: Paint Shop Pro, I'm using version 10. Animation Shop 3.
Plugin : none
Font used: Ornatique
Tube of choice: I'm using "Sasha Redux" by Jose A Cano.
Scrap Kit : I'm using "Born Free" by Angelica No longer available.
Animation: none
Mask: 0170 HERE
________________________________________________________________________
♥♥♥
Save your tag often. Nothing like working long and hard on a tag and PSP crashes.
♥♥♥
Open a new image 700 x 700, transparent.
Copy and paste element 6 (frame) as a new layer.
Select the inside and paste paper of choice as a new layer. Move it below.
Add drop shadow to frame.
Copy and paste element 13 (teepee) as a new layer. Re-size by 75%. Mirror and position on left side of tag.
Copy and paste element 44 (horse) as a new layer. Re-size by 60%. Mirror and position on right side of tag.
Copy and paste element 49 (branch) as a new layer. Re-size by 60%. Position upper left hand side of tag behind teepee and within the frame. Should be behind frame. Remove any extra using your selection tool.
Copy and paste your tube as a new layer and re-size by 50%. Make sure this tube is your top layer in layers palette.
Copy and paste element 12 (eagle) as a new layer. Re-size by 50%. Position on upper left hand side of tag. Add drop shadow.
Copy and paste element 18 (little man) as a new layer. Re-size by 22% and place on the frame.
Copy and paste element 29 (features) as a new layer and re-size. Duplicate and free rotate one of them to the left by 40
degrees. Add drop shadow to each and add element 23 (re-sized) as the pivot point between the two. Merge them
together and move to the right hand side of tag.
Copy and paste element 26 as a new layer. Re-size and position in lower left hand side.
Copy and paste element 24 as a new layer and center at bottom of tag. Covering the lower portion of your tube.
Add drop shadow.
Add element 15 (hand) re-sized and positioned on the teepee.
Add any other elements you like.
Make sure you've added drop shadow to all your layers.
Merge visible.
Add paper of choice to bottom and apply Mask 0170 and merge group.
Add artist copyright and your name.
Merge all visible and save as PNG.
Hope you enjoyed this tutorial,
Hugs Simone
Please, always direct people to my blog to download my animations.
Do not load to any other download site and don't claim as your own.
Tutorial written by SophisticatSimone aka Lorraine Halle on Sunday September 1, 2013
Mask: 0170 HERE
________________________________________________________________________
♥♥♥
Save your tag often. Nothing like working long and hard on a tag and PSP crashes.
♥♥♥
Open a new image 700 x 700, transparent.
Copy and paste element 6 (frame) as a new layer.
Select the inside and paste paper of choice as a new layer. Move it below.
Add drop shadow to frame.
Copy and paste element 13 (teepee) as a new layer. Re-size by 75%. Mirror and position on left side of tag.
Copy and paste element 44 (horse) as a new layer. Re-size by 60%. Mirror and position on right side of tag.
Copy and paste element 49 (branch) as a new layer. Re-size by 60%. Position upper left hand side of tag behind teepee and within the frame. Should be behind frame. Remove any extra using your selection tool.
Copy and paste your tube as a new layer and re-size by 50%. Make sure this tube is your top layer in layers palette.
Copy and paste element 12 (eagle) as a new layer. Re-size by 50%. Position on upper left hand side of tag. Add drop shadow.
Copy and paste element 18 (little man) as a new layer. Re-size by 22% and place on the frame.
Copy and paste element 29 (features) as a new layer and re-size. Duplicate and free rotate one of them to the left by 40
degrees. Add drop shadow to each and add element 23 (re-sized) as the pivot point between the two. Merge them
together and move to the right hand side of tag.
Copy and paste element 26 as a new layer. Re-size and position in lower left hand side.
Copy and paste element 24 as a new layer and center at bottom of tag. Covering the lower portion of your tube.
Add drop shadow.
Add element 15 (hand) re-sized and positioned on the teepee.
Add any other elements you like.
Make sure you've added drop shadow to all your layers.
Merge visible.
Add paper of choice to bottom and apply Mask 0170 and merge group.
Add artist copyright and your name.
Merge all visible and save as PNG.
Hope you enjoyed this tutorial,
Hugs Simone
Please, always direct people to my blog to download my animations.
Do not load to any other download site and don't claim as your own.
Tutorial written by SophisticatSimone aka Lorraine Halle on Sunday September 1, 2013
Subscribe to:
Posts
(Atom)
CT TEAM