My Blinkie

Subscribe for Updates
Contact Me
Followers
Blog Archive
-
►
2023
(1)
- ► 04/09 - 04/16 (1)
-
▼
2022
(7)
- ► 09/04 - 09/11 (1)
- ► 08/28 - 09/04 (3)
- ► 06/12 - 06/19 (1)
- ► 05/29 - 06/05 (1)
-
►
2018
(1)
- ► 03/04 - 03/11 (1)
-
►
2013
(109)
- ► 11/24 - 12/01 (1)
- ► 10/27 - 11/03 (2)
- ► 10/20 - 10/27 (1)
- ► 10/13 - 10/20 (1)
- ► 10/06 - 10/13 (1)
- ► 09/15 - 09/22 (1)
- ► 09/01 - 09/08 (2)
- ► 08/25 - 09/01 (1)
- ► 08/11 - 08/18 (7)
- ► 08/04 - 08/11 (4)
- ► 07/28 - 08/04 (2)
- ► 07/14 - 07/21 (1)
- ► 07/07 - 07/14 (6)
- ► 06/30 - 07/07 (6)
- ► 06/23 - 06/30 (5)
- ► 06/16 - 06/23 (4)
- ► 06/09 - 06/16 (5)
- ► 06/02 - 06/09 (6)
- ► 05/26 - 06/02 (3)
- ► 05/19 - 05/26 (6)
- ► 05/12 - 05/19 (6)
- ► 05/05 - 05/12 (7)
- ► 04/28 - 05/05 (3)
- ► 04/21 - 04/28 (4)
- ► 04/14 - 04/21 (4)
- ► 04/07 - 04/14 (6)
- ► 03/31 - 04/07 (7)
- ► 03/24 - 03/31 (1)
- ► 03/17 - 03/24 (2)
- ► 03/10 - 03/17 (2)
- ► 03/03 - 03/10 (2)
Saturday, May 21, 2022
9:27 PM | Edit Post
Tube Little Fairy Girl Riding a Bird by Laguna found HERE
Scrapkit Fairy Garden by SadCrow found HERE
Font: Lovin Florist HERE
Mask 0292: HERE
You can make this tag using any version of PSP.
I used PSP X and Animation Shop.
Let's begin!
Open your tube in PSP, Hold the Shiftkey + letter D to duplicate. Close the original.
Open paper 17 from scrap kit. Shift + D to duplicate and close the original.
In layers palette right click on the background layer and promote background to layer.
Let's open our mask SophisticatSimoneMasks0292 and minimize in PSP.
Make sure your background layer is active and go to Layers, New Mask Layers, From Image.
In source window, select the mask.
Make sure Create mask from Source luminance is selected and Invert mask date is UN-checked.
Click OK.
In layers palette right click on Mask-Raster 1 layer, select Merge/ Merge Group.
Select Crop tool and click on the Merged Opaque option. Click the green check mark OR double click on your canvas/image.

Click on the tube image(this tube has many layers) and open and close whichever layer you want to get the colors you want for this tag.
I chose green t-shirt, green socks and yellow skirt.
Once you've closed all the layers except the one you want, right click on the top blue band on the image and select copy merged.

Right click anywhere on your workspace and paste as a new image.
Select Crop tool and click on the Merged Opaque option. Click the green check mark OR double click on your canvas/image.
Let resize this tube by 30%. Copy and paste on your mask/background image.
You can minimize your tube now.
Move your tube to the lower right hand side of canvas.
Save.
In layers palette activate the background layer(mask).
Activate your selection tool.
Selection type should be set to Rectangle, Mode set to Add(Shift), Feather set to 0 and anti-alias checked.
Let's make 3 long skinny rectangles on our canvas.
Right click on layer in layers palette and select Promote selection to layer.
Drag this layer below the promoted layer.
Flood fill with a matching color of choice and add noise.
Go to Adjust/Add Remove noise, add noise,
Random, 23, monochrome checked.
Click OK.
Go back to the original promoted layer and add blur.
Go to Adjust/Blur/Gaussian Blur and enter 4.
Let's add a texture.
Go to Effects/Textures/Mosaic-Glass, enter:
50
50
symmetric checked
50
Edge curvature 0
Grout width 2
Grout diffusion 50
click OK
Making sure you still have the mosaic layer active let's animate it.
Right click and copy. Open Animation Shop and right click on workspace and paste as a new animation.
Go to Effect, Insert Image Effect.
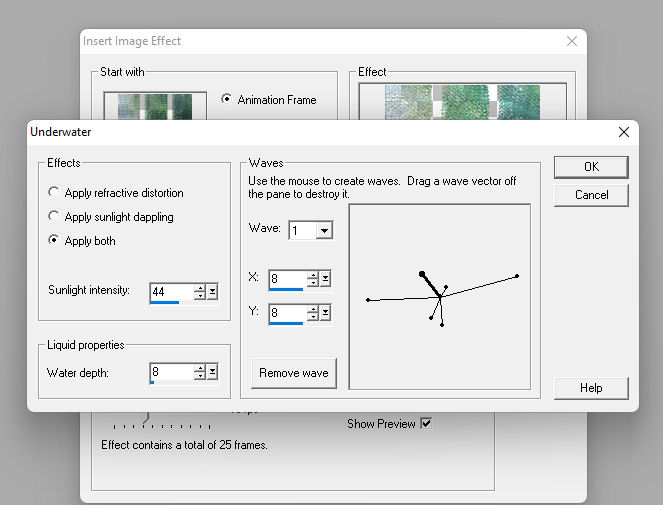
Select Underwater. Effect length 1.7sec, Frames per second 15 fps (25 frames total)
Click on Customize and enter the following:
Effects : Apply both
Sunlight intensity 44
Liquid properties (water depth) 8
Place your waves like mine in my screenshot and then click on OK
Delete Frame 1 (You will have 26).
Go to Edit/ Select All
Go to Animation/Cull.
Enter 2 in the box and click ok. Press play, which is the little black box.

It's a little fast so we are going to slow it down.
Go to Animation/Frame properties and enter 15, click ok.
Play again. It's better.
Ok let's go back to PSP, we will come back to this in little later.
Let's add a cutout.
Make sure your rectangle layer(mosaic glass layer) is still selected in layers palette and go to layers, add new raster layer.
Your should still have your marching ants(selections) visible.
Go to Effects/3D Effects/Cutout and enter the following.
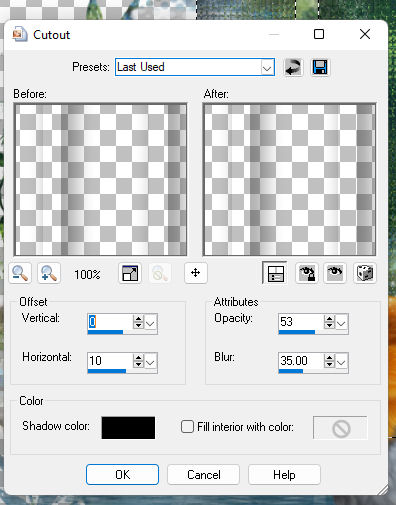
Open element 85 and resize by 45%.
Copy and paste and position at the top of the rectangles.
Add the following drop shadow.
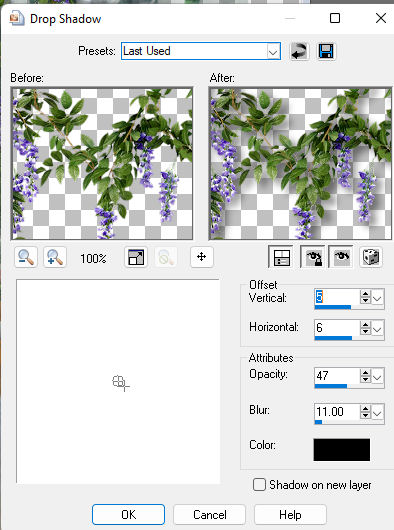
Add drop shadow to all your elements as you go.
Open element 134 and resize by 45%.
Copy and paste and position at the top and a little more to the side of previous element.
I moved this layer below the purple flowers.
You can just drag your layers up or down in the layers palette.
Add element 106, repeat steps and look at my tag for placement.
Element 63.
Element 69. Don't resize but Sharpen (I found it blurry, but it could be my eyes LOL).
Element 66.
Element 141. I duplicated this one just to see it better on the tag.
Element 137.
Element 114 (not resized).
Element 15, resize by 35% add drop shadow.
Element 19, resize by 25% add drop shadow.
Element 25, resize by 16% add drop shadow.
Element 45, resize by 30% add drop shadow.
Element 77, resize by 48% add drop shadow.
Add your copyright information.
Now in your layers palette X out the mask layer, the flood fill layer (rectangles) and the mosaic glass layer.
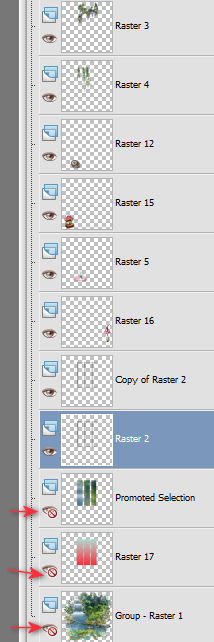
Activate any other layer and right click in layers palette and select Merge visible.
Now X out the newly merge layer and open the other 3 and merge visible again.
You should have two layers now.
Make sure your bottom layer is active.
Go to selections, select all and copy.
Let's go to Animation Shop.
Right click and paste as a new animation.
Hold your Ctrl key down and hit letter L until you have 13 frames.
Make sure your underwater animation we did earlier is active. If not go to edit, select all. Go to edit and copy.
Now on the background image, making sure it's active, go to edit, select all.
Go to Edit and select Propagate Paste,
Go to Edit and select Paste/ Paste into selected frame.
Using your mouse move the animation so if fits into the rectangle frames.
Click mouse to place.
Press play and if you like it let's go to PSP and copy the top layer (you may need to x out the background layer) and back in AS right click and paste as new animation.
Go to Edit and copy.
Now activate your tag and go to Edit select all, go to edit/ paste/paste into selected frame.
Try to position as best as possible.
You can use the cutout to line up perfectly on the rectangles.
You may need to adjust your frames properties again.
Go to Animation/Frame properties and enter 15, click ok.
Add your name and save.

Labels:PFD,PTU kit,PTU tube,Teaching Tutorial
Subscribe to:
Post Comments
(Atom)
Leave Some Love
Categories
- 2 animations same tag using Photoshop (2)
- 2 animations using PSP and AS (1)
- adding 2 animations to tag (2)
- Al Rio (1)
- aldodark (1)
- Alex McMillan (4)
- Alex Prihodko (1)
- AmyMarie Kits (2)
- Angelica S (6)
- Animation (63)
- ARMY (1)
- Barbara Jensen (2)
- Baseball (1)
- Bibi's Collection Kit (38)
- bling (9)
- BLOOD (1)
- bubbles (12)
- CDO Tutorial (1)
- Christine Marie Kotlark (6)
- Christmas (1)
- circles (1)
- Cowgirl (1)
- CU Animations (1)
- Danny Lee (6)
- Design by Joan (3)
- Diana Gali (9)
- Disturbed Scraps (9)
- Easter (1)
- Fairy Dust (3)
- Fire (3)
- Fish (1)
- Forum Set (2)
- Freebie Kit (1)
- FTU Kit (1)
- Glitter (17)
- Goth (9)
- Grunge (6)
- Gunshot (1)
- Hania Designs (1)
- Heatbeatz Creationz (2)
- Jay Trembly (4)
- Jose Cano Tubes (25)
- July 4th (1)
- Lady Mishka Tubes (2)
- LizquisScraps (7)
- Marc Duval (1)
- Mask Tutorial (1)
- Max-13-Tulmes (1)
- Meine Bastelwelt (1)
- Misticheskaya (5)
- Money (1)
- Music (1)
- P-O Concept Kits (4)
- Particle Illusion (1)
- PFD (2)
- PFD Tutorial (1)
- Pink (1)
- Pinup Bombshells (3)
- PIRATE (1)
- Popcorn (1)
- PSP tutorial (1)
- ptu animation (5)
- PTU kit (45)
- PTU tube (46)
- PTU Tutorial (1)
- Rock n Roll (3)
- Roses (1)
- S&Co Store (1)
- SATC (5)
- Scrapz n Pleazure (1)
- SkyScraps Kits (25)
- SkyScraps Tubes (8)
- Sparkle (5)
- Spazz (1)
- Spring (5)
- stars (1)
- Steam Punk (1)
- Summer (1)
- Sweet Occasion Designs (1)
- Teaching Tutorial (5)
- The Hunter (8)
- Timeline Banner (3)
- Tiny Turtle Designs Kits (6)
- Tutorial (43)
- tuts by Rene (1)
- USA (1)
- VeryMany (6)
- Video Tutorial (1)
- waterfall (1)
- ZlataM Tube (5)


0 comments:
Post a Comment