My Blinkie

Monday, July 8, 2013

♥♥♥
Please click on TAG to see in full size.
••• Supplies needed to complete this tutorial. •••
________________________________________________________________________
Programs: Paint Shop Pro, I'm using version 10. Animation Shop 3.
Plugin : Eye Candy Gradient Glow for name
Font used: Quickier Demo
Tube of choice: I'm using "Cowgirl 2" by Jose Cano from SATC.
Scrap Kit : I'm using "Cowgirl" by Disturbed ScrapsAnimation: none
Mask: 0146
________________________________________________________________________
♥♥♥
Save your tag often. Nothing like working long and hard on a tag and PSP crashes.
♥♥♥
Open Paper 1 and duplicate. Close original and re-size the duplicate by 87%, make sure it's set to 72 dpi.
Apply mask of choice or the one I made for this tutorial, Mask0146. Merge group. Close Mask.
Copy and paste element 68 as a new layer and move to top of tag.
Copy and paste your tube of choice. I used the close-up tube. Move to the left of tag.
Copy and paste element 41 as a new layer, re-size by 65% and mirror.
Copy and paste element 16 as a new layer, re-size by 65% and move behind the truck.
Make sure you don't see any of the fence below the bottom of the truck.
Copy and paste element 72 (directional sign) as a new layer. Position to the right of your tube.
Copy and paste element 23 (crow on skull) as a new layer. Position bottom center in front of tube layer. Re-size by 55%.
Copy and paste element 30 (boots) as a new layer. Position bottom left hand side in front of tube layer. Re-size by 55%.
Copy and paste element 20 (c0w) as a new layer. Re-size by 75% and position behind fence.
Copy and paste element 145 (cactus) as a new layer. Move this element behind your tube ont the left side.
Duplicate and re-size by 65% and position behind fence and on the right hand side of tag.
Copy and paste element 19 (rooster) as a new layer. Re-size by 40% and position in front and to the right hand side of tag.
Copy and paste element 34 (bag of money) as a new layer. Re-size by 55% and position in front of direction post, near the rooster.
Copy and paste element 53 (cactus trio) as a new layer. Re-size by 80% and position as layer above Mask layer.
Copy and paste element 107 (burnt newspaper) as a new layer. Position one layer above the truck layer. Position so it's at bottom of truck.
Add cowboy hat (32), bow (125) and scorpion (17). I placed them at bottom front of tag.
Make sure all your layers have a nice drop shadow.
Open element 38 and duplicate. Close original. Copy and paste your tube close-up as a new layer onto this poster.
Center and remove any portion of the tube that is blocking the wording, using your selection tool.
Change blend mode to Overlay and duplicate. Merge all visible. Re-size by 25%. Copy and paste as a new layer on your tag.
Position in upper right hand side of tag. Free rotate to the left by 28 degree. Add drop shadow.
Merge all visible. Add artist copyright, merge down.
Add your name and save as PNG.
Hope you enjoyed this tutorial,
Hugs Simone
Please, always direct people to my blog to download my animations.
Do not load to any other download site and don't claim as your own.
Tutorial written by SophisticatSimone aka Lorraine Halle on Tuesday July 9, 2013.
Please click on TAG to see in full size.
••• Supplies needed to complete this tutorial. •••
________________________________________________________________________
Programs: Paint Shop Pro, I'm using version 10. Animation Shop 3.
Plugin : Eye Candy Gradient Glow for name
Font used: Quickier Demo
Tube of choice: I'm using "Cowgirl 2" by Jose Cano from SATC.
Scrap Kit : I'm using "Cowgirl" by Disturbed ScrapsAnimation: none
Mask: 0146
________________________________________________________________________
♥♥♥
Save your tag often. Nothing like working long and hard on a tag and PSP crashes.
♥♥♥
Open Paper 1 and duplicate. Close original and re-size the duplicate by 87%, make sure it's set to 72 dpi.
Apply mask of choice or the one I made for this tutorial, Mask0146. Merge group. Close Mask.
Copy and paste element 68 as a new layer and move to top of tag.
Copy and paste your tube of choice. I used the close-up tube. Move to the left of tag.
Copy and paste element 41 as a new layer, re-size by 65% and mirror.
Copy and paste element 16 as a new layer, re-size by 65% and move behind the truck.
Make sure you don't see any of the fence below the bottom of the truck.
Copy and paste element 72 (directional sign) as a new layer. Position to the right of your tube.
Copy and paste element 23 (crow on skull) as a new layer. Position bottom center in front of tube layer. Re-size by 55%.
Copy and paste element 30 (boots) as a new layer. Position bottom left hand side in front of tube layer. Re-size by 55%.
Copy and paste element 20 (c0w) as a new layer. Re-size by 75% and position behind fence.
Copy and paste element 145 (cactus) as a new layer. Move this element behind your tube ont the left side.
Duplicate and re-size by 65% and position behind fence and on the right hand side of tag.
Copy and paste element 19 (rooster) as a new layer. Re-size by 40% and position in front and to the right hand side of tag.
Copy and paste element 34 (bag of money) as a new layer. Re-size by 55% and position in front of direction post, near the rooster.
Copy and paste element 53 (cactus trio) as a new layer. Re-size by 80% and position as layer above Mask layer.
Copy and paste element 107 (burnt newspaper) as a new layer. Position one layer above the truck layer. Position so it's at bottom of truck.
Add cowboy hat (32), bow (125) and scorpion (17). I placed them at bottom front of tag.
Make sure all your layers have a nice drop shadow.
Open element 38 and duplicate. Close original. Copy and paste your tube close-up as a new layer onto this poster.
Center and remove any portion of the tube that is blocking the wording, using your selection tool.
Change blend mode to Overlay and duplicate. Merge all visible. Re-size by 25%. Copy and paste as a new layer on your tag.
Position in upper right hand side of tag. Free rotate to the left by 28 degree. Add drop shadow.
Merge all visible. Add artist copyright, merge down.
Add your name and save as PNG.
Hope you enjoyed this tutorial,
Hugs Simone
Please, always direct people to my blog to download my animations.
Do not load to any other download site and don't claim as your own.
Tutorial written by SophisticatSimone aka Lorraine Halle on Tuesday July 9, 2013.



♥♥♥
Please click on TAG to see in full size.
••• Supplies needed to complete this tutorial. •••
________________________________________________________________________
Programs: Paint Shop Pro, I'm using version 10. Animation Shop 3.
Plugin : AAA Frame Works, Gradient Glow:EyeCandy for name.
Font used: Playball
Tube of choice: I'm using "Beach Babe 1" by Pinup Bombshells from SATC.
Scrap Kit : I'm using "Beach Girl" by Design by Joan from SATC
Animation: none
Mask: none
________________________________________________________________________
♥♥♥
Save your tag often. Nothing like working long and hard on a tag and PSP crashes.
♥♥♥
Open a new image 846 x 350, transparent.
Copy and paste paper 3 as a new layer and position so the left side is completely covered.
You will notice that some of your right side is uncovered, that's OK we will be adding our tube there.
But first, duplicate the paper layer.
Highlight the bottom paper in layers palette.
Using your shift key, hold it down and using your mover tool, move the paper to the edge on the right side.
Copy and paste your tube as a new layer and move it over to the right side, covering the seem, where the paper layers overlap.
Copy and paste element 45 as a new layer (boat). Position to the left side of banner.
Copy and paste element 61 as a new layer (beach word). Position at top left.
Copy and paste element 71 as a new layer (grass). Duplicate, re-size by 62%. Do it a couple of more times, and scatter behind your tube and in front of the
palm trees. Place them all on the right side of banner.
Copy and paste element 39 as a new layer (palm tree). Duplicate and re-size by 50%. Free rotate to the left by 20 degrees. Position large tree behind your
tube and position smaller one if front of the large one and pull it out a little towards the center of the banner. Place all on the right side of banner.
Copy and paste element 37 as a new layer (seahorse net). Position to the left side of banner.
Copy and paste element 27 as a new layer (lighthouse). Re-size by 62%. Place 1/4 of the way from the left edge of your banner.
Copy and paste element 76 as a new layer (dolphin). Re-size by 62%. Mirror. Position center middle.
Copy and paste element 1 as a new layer (water splash). Position center bottom of banner.
Copy and paste element 51 as a new layer (shell). Position center bottom.
Copy and paste element 50 as a new layer (starfish). Re-size by 50%. Position to the side of boat.
Copy and paste element 62 as a new layer (crab). Re-size by 50%. Position at bottom near your tube's hip.
Make sure all your layers have a drop shadow.
Save your tag as pspimage.
Go to Edit, copy merged. Right click on workspace and paste as a new image. Duplicate.
Minimize your original Banner you were working on. We will use again for the avatar.
Back to duplicated banner.
On bottom copy, blur by 3. On top layer, change blend mode to screen.
Merge visible. Add artist copyright. Merge down.
Add your name is you like or a cute summer saying!
Save as jpeg or png.
Let's make the avatar now.
Go back to original Banner.
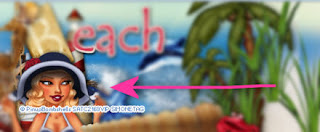
With your mover tool, move your tube over the left hand side of banner and near bottom. Re-size by 78%.
See screenshot:
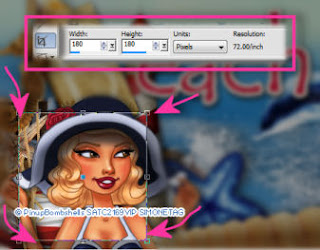
Now grab your crop tool, and enter 180 x 180. Move the crop box over the area down by the bottom, which of course has your tube's face.
See screenshot:
Double click. If the layers are all separate, merge visible. Duplicate. On bottom copy, blur by 3. On top layer, change blend mode to screen.
Merge visible. Add artist copyright. Merge down. You can add your initial or your name.
Adding the frame border.
Go to Effects, Plugins, AAA Frame Works and enter the following for both the avatar and the banner.
See screenshot:
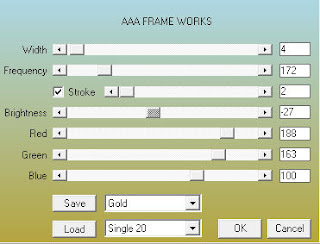
Save both to your Banner Folder, if you have one, or save to your tagging folder.
Go to Facebook and upload to your page.
Hope you enjoyed this tutorial,
Hugs Simone
Please, always direct people to my blog to download my animations.
Do not load to any other download site and don't claim as your own.
Tutorial written by SophisticatSimone aka Lorraine Halle on Monday July 8, 2013.
Please click on TAG to see in full size.
••• Supplies needed to complete this tutorial. •••
________________________________________________________________________
Programs: Paint Shop Pro, I'm using version 10. Animation Shop 3.
Plugin : AAA Frame Works, Gradient Glow:EyeCandy for name.
Font used: Playball
Tube of choice: I'm using "Beach Babe 1" by Pinup Bombshells from SATC.
Scrap Kit : I'm using "Beach Girl" by Design by Joan from SATC
Animation: none
Mask: none
________________________________________________________________________
♥♥♥
Save your tag often. Nothing like working long and hard on a tag and PSP crashes.
♥♥♥
Open a new image 846 x 350, transparent.
Copy and paste paper 3 as a new layer and position so the left side is completely covered.
You will notice that some of your right side is uncovered, that's OK we will be adding our tube there.
But first, duplicate the paper layer.
Highlight the bottom paper in layers palette.
Using your shift key, hold it down and using your mover tool, move the paper to the edge on the right side.
Copy and paste your tube as a new layer and move it over to the right side, covering the seem, where the paper layers overlap.
Copy and paste element 45 as a new layer (boat). Position to the left side of banner.
Copy and paste element 61 as a new layer (beach word). Position at top left.
Copy and paste element 71 as a new layer (grass). Duplicate, re-size by 62%. Do it a couple of more times, and scatter behind your tube and in front of the
palm trees. Place them all on the right side of banner.
Copy and paste element 39 as a new layer (palm tree). Duplicate and re-size by 50%. Free rotate to the left by 20 degrees. Position large tree behind your
tube and position smaller one if front of the large one and pull it out a little towards the center of the banner. Place all on the right side of banner.
Copy and paste element 37 as a new layer (seahorse net). Position to the left side of banner.
Copy and paste element 27 as a new layer (lighthouse). Re-size by 62%. Place 1/4 of the way from the left edge of your banner.
Copy and paste element 76 as a new layer (dolphin). Re-size by 62%. Mirror. Position center middle.
Copy and paste element 1 as a new layer (water splash). Position center bottom of banner.
Copy and paste element 51 as a new layer (shell). Position center bottom.
Copy and paste element 50 as a new layer (starfish). Re-size by 50%. Position to the side of boat.
Copy and paste element 62 as a new layer (crab). Re-size by 50%. Position at bottom near your tube's hip.
Make sure all your layers have a drop shadow.
Save your tag as pspimage.
Go to Edit, copy merged. Right click on workspace and paste as a new image. Duplicate.
Minimize your original Banner you were working on. We will use again for the avatar.
Back to duplicated banner.
On bottom copy, blur by 3. On top layer, change blend mode to screen.
Merge visible. Add artist copyright. Merge down.
Add your name is you like or a cute summer saying!
Save as jpeg or png.
Let's make the avatar now.
Go back to original Banner.
With your mover tool, move your tube over the left hand side of banner and near bottom. Re-size by 78%.
See screenshot:

Now grab your crop tool, and enter 180 x 180. Move the crop box over the area down by the bottom, which of course has your tube's face.
See screenshot:

Double click. If the layers are all separate, merge visible. Duplicate. On bottom copy, blur by 3. On top layer, change blend mode to screen.
Merge visible. Add artist copyright. Merge down. You can add your initial or your name.
Adding the frame border.
Go to Effects, Plugins, AAA Frame Works and enter the following for both the avatar and the banner.
See screenshot:

Save both to your Banner Folder, if you have one, or save to your tagging folder.
Go to Facebook and upload to your page.
Hope you enjoyed this tutorial,
Hugs Simone
Please, always direct people to my blog to download my animations.
Do not load to any other download site and don't claim as your own.
Tutorial written by SophisticatSimone aka Lorraine Halle on Monday July 8, 2013.
Friday, July 5, 2013

♥♥♥
Please click on TAG to see in full size.
••• Supplies needed to complete this tutorial. •••
________________________________________________________________________
Programs: Paint Shop Pro, I'm using version 10. Animation Shop 3.
Plugin : Eye Candy 4: Gradient Glow for name
Font used: LD Edward
Tube of choice: I'm using "Christine" by Christine Marie Kotlark from CDO.
Scrap Kit : I'm using "Twilight" by SkyScraps from SATC (no longer in business)
Animation: SimoneAni-DarkMagic
Mask: 0145 HERE
________________________________________________________________________
♥♥♥
Save your tag often. Nothing like working long and hard on a tag and PSP crashes.
♥♥♥
Open Paper 2, Mask0145, and open a new image 700 x 700 transparent.
Copy your paper.
Activate your blank canvas and go to Selections, select all.
Go to Edit, Paste, Paste into selection.
De-select. Go to Selections, select none.
Close original paper.
Apply mask. Go to Layers, new mask layer, from image and search your drop down box for Mask0145 and apply.
Merge group.
Close Mask.
Copy and paste your tube as a new layer. I selected the medium sized tube from Christine Marie Kotlark.
Re-size by 76%. Add drop shadow. Close original tube.
C/P element 20 as a new layer on top of your tube layer and re-size by 85%. Add drop shadow.
C/P element 18 as a new layer and re-size by 60%. Add drop shadow. Move this layer behind your tube and to the left.
C/P element Wolf1 as a new layer and re-size by 60%. Add drop shadow. Move this layer behind your tube and to the
right.
C/P element 10 as a new layer and re-size by 60%. Move to the left and over the grave marker.
C/P element Flower2 as a new layer and move to upper right side of tag, behind your tube and your wolf layers.
Add drop shadow. Duplicate and mirror. Merge together.
Make sure all your layers have drop shadows.
Add artist copyright and your license number.
Save your tag as pspimage.
Ok now merge the following layers together. The flower layer, the grave maker, the black wolf and the mask layer.
This is your bottom layer. Hide this layer (click eye on layer, in layers palette). Activate the tube layer and right click
merge all visible. UN-hide your bottom layer.
Now to animate.
Making sure your merged BOTTOM layer is selected,
Go to Selections, select all.
Go to Edit and copy merged. Paste as a new animation in Animation Shop.
Hold your Ctrl key down and repeatedly hit letter L on your keyboard for a total of 15 frames.
You can watch the count on the lower right hand side of your screen in AS.
Open SimoneAni-DarkMagic-001
Go to Edit, select all.
Go to Edit, copy.
Activate your tag.
Go to Edit, select all.
Go to Edit, make sure Propagate Paste is selected.
Go to Edit, Paste, paste into selected frames. See my screenshot.
Move your cursor around on the tag and you will see a little star, place that on the right hand side,
near edge of mask.
Go back to PSP now and highlight (activate) your tube layer and copy.
Paste as a NEW animation in AS.
Go to Edit, copy.
Activate your tag.
IMPORTANT PART!
Before you click into place, do the following.
On your active tag, place a registration Mark.
Click on the cross icon on your tool bar at top in AS, and select Spanning Cross under Mark Style.
Now with your cursor move the mark on your tiny sparkle animation.
Go to Edit, select all. Go to Edit, Paste, paste into selected frames.
IMPORTANT AGAIN!
So with your cursor you will move your top layer around positioning it as precisely as possible.
JUST BEFORE you click into place, take a screen shot.
Screenshot key is on your keyboard: prt scr/sys rq.
Click into place now.
Right click on your workspace and paste as a NEW animation.
Grab your crop tool and just select the area that shows your sparkle ani with the cross over-top it.
Make sure this image is visible to you because when placing the second animation you will need to rely on this visual aid.
To remove spanning cross, click "Clear" at top tool bar.
Ok activate SimoneAni-DarkMagic-002.
Go to Edit, select all.
Go to Edit and copy.
Activate your tag.
Go to Edit, select all.
Go to Edit, Paste, paste into selected frames.
Move your cursor around on the tag and place on the right hand side, near edge of mask.
Look over at your reference and you should be placing it just over the tree trunk on the right side of tag.
Play and save.
Don't forget to add your name.
To save:
Go to File, Save as, enter the name of your file and select the folder to save to.
Now click on Customize:
Under COLORS TAB:
Number of colors: 255 Colors
Create palette by: OPTIMIZED OCTREE
Reduce colors by: Error Diffusion
Under OPTIMIZATIONS TAB:
set a check mark beside the second, third and forth choices. UN-check the 1st and last.
Under PARTIAL TRANSPARENCY:
check Convert pixels less than 92
Yes, blend with this color: change to white #FFFFFF
Click OK. Click Next, next, next, next.
Play your animation.
At times your animation may or will come out terrible. Optimization in Animation Shop is not the greatest.
You can play around will your settings, especially under the Tab: Optimization. I change this setting at times from anywhere between 70 and 100.
Some people add a white background. To add background, go to Animation: Animation Properties, select Opaque and change color to white.
Hope you enjoyed this tutorial,
Hugs Simone
Please, always direct people to my blog to download my animations.
Do not load to any other download site and don't claim as your own.
Tutorial written by SophisticatSimone aka Lorraine Halle on Friday July 5, 2013.
Please click on TAG to see in full size.
••• Supplies needed to complete this tutorial. •••
________________________________________________________________________
Programs: Paint Shop Pro, I'm using version 10. Animation Shop 3.
Plugin : Eye Candy 4: Gradient Glow for name
Font used: LD Edward
Tube of choice: I'm using "Christine" by Christine Marie Kotlark from CDO.
Scrap Kit : I'm using "Twilight" by SkyScraps from SATC (no longer in business)
Animation: SimoneAni-DarkMagic
Mask: 0145 HERE
________________________________________________________________________
♥♥♥
Save your tag often. Nothing like working long and hard on a tag and PSP crashes.
♥♥♥
Open Paper 2, Mask0145, and open a new image 700 x 700 transparent.
Copy your paper.
Activate your blank canvas and go to Selections, select all.
Go to Edit, Paste, Paste into selection.
De-select. Go to Selections, select none.
Close original paper.
Apply mask. Go to Layers, new mask layer, from image and search your drop down box for Mask0145 and apply.
Merge group.
Close Mask.
Copy and paste your tube as a new layer. I selected the medium sized tube from Christine Marie Kotlark.
Re-size by 76%. Add drop shadow. Close original tube.
C/P element 20 as a new layer on top of your tube layer and re-size by 85%. Add drop shadow.
C/P element 18 as a new layer and re-size by 60%. Add drop shadow. Move this layer behind your tube and to the left.
C/P element Wolf1 as a new layer and re-size by 60%. Add drop shadow. Move this layer behind your tube and to the
right.
C/P element 10 as a new layer and re-size by 60%. Move to the left and over the grave marker.
C/P element Flower2 as a new layer and move to upper right side of tag, behind your tube and your wolf layers.
Add drop shadow. Duplicate and mirror. Merge together.
Make sure all your layers have drop shadows.
Add artist copyright and your license number.
Save your tag as pspimage.
Ok now merge the following layers together. The flower layer, the grave maker, the black wolf and the mask layer.
This is your bottom layer. Hide this layer (click eye on layer, in layers palette). Activate the tube layer and right click
merge all visible. UN-hide your bottom layer.
Now to animate.
Making sure your merged BOTTOM layer is selected,
Go to Selections, select all.
Go to Edit and copy merged. Paste as a new animation in Animation Shop.
Hold your Ctrl key down and repeatedly hit letter L on your keyboard for a total of 15 frames.
You can watch the count on the lower right hand side of your screen in AS.
Open SimoneAni-DarkMagic-001
Go to Edit, select all.
Go to Edit, copy.
Activate your tag.
Go to Edit, select all.
Go to Edit, make sure Propagate Paste is selected.
Go to Edit, Paste, paste into selected frames. See my screenshot.
Move your cursor around on the tag and you will see a little star, place that on the right hand side,
near edge of mask.
Go back to PSP now and highlight (activate) your tube layer and copy.
Paste as a NEW animation in AS.
Go to Edit, copy.
Activate your tag.
IMPORTANT PART!
Before you click into place, do the following.
On your active tag, place a registration Mark.
Click on the cross icon on your tool bar at top in AS, and select Spanning Cross under Mark Style.
Now with your cursor move the mark on your tiny sparkle animation.
Go to Edit, select all. Go to Edit, Paste, paste into selected frames.
IMPORTANT AGAIN!
So with your cursor you will move your top layer around positioning it as precisely as possible.
JUST BEFORE you click into place, take a screen shot.
Screenshot key is on your keyboard: prt scr/sys rq.
Click into place now.
Right click on your workspace and paste as a NEW animation.
Grab your crop tool and just select the area that shows your sparkle ani with the cross over-top it.
Make sure this image is visible to you because when placing the second animation you will need to rely on this visual aid.
To remove spanning cross, click "Clear" at top tool bar.
Ok activate SimoneAni-DarkMagic-002.
Go to Edit, select all.
Go to Edit and copy.
Activate your tag.
Go to Edit, select all.
Go to Edit, Paste, paste into selected frames.
Move your cursor around on the tag and place on the right hand side, near edge of mask.
Look over at your reference and you should be placing it just over the tree trunk on the right side of tag.
Play and save.
Don't forget to add your name.
To save:
Go to File, Save as, enter the name of your file and select the folder to save to.
Now click on Customize:
Under COLORS TAB:
Number of colors: 255 Colors
Create palette by: OPTIMIZED OCTREE
Reduce colors by: Error Diffusion
Under OPTIMIZATIONS TAB:
set a check mark beside the second, third and forth choices. UN-check the 1st and last.
Under PARTIAL TRANSPARENCY:
check Convert pixels less than 92
Yes, blend with this color: change to white #FFFFFF
Click OK. Click Next, next, next, next.
Play your animation.
At times your animation may or will come out terrible. Optimization in Animation Shop is not the greatest.
You can play around will your settings, especially under the Tab: Optimization. I change this setting at times from anywhere between 70 and 100.
Some people add a white background. To add background, go to Animation: Animation Properties, select Opaque and change color to white.
Hope you enjoyed this tutorial,
Hugs Simone
Please, always direct people to my blog to download my animations.
Do not load to any other download site and don't claim as your own.
Tutorial written by SophisticatSimone aka Lorraine Halle on Friday July 5, 2013.


♥♥♥
Please click on TAG to see in full size.
••• Supplies needed to complete this tutorial. •••
________________________________________________________________________
Programs: Paint Shop Pro, I'm using version 10. Animation Shop 3.
Plugin : Eye Candy: Gradient Glow for name.
Font used: BadaBoom
Tube of choice: I'm using "Bikini3" by Jose A Cano.
Scrap Kit : I'm using "Super Hero Girls" by Bibi's Collection.
Animation: SimoneAni-Kaplow!
Mask: by me 0145
________________________________________________________________________
♥♥♥
Save your tag often. Nothing like working long and hard on a tag and PSP crashes.
♥♥♥
Open a new image 700 x 700, transparent background.
Go to Selections, select all.
Open Paper 12 and copy.
On your new image, right click on top border and select Paste INTO selection.
De-select.
Close original paper to save for later.
Open your mask of choice and apply or use the one I made Mask0145.
Merge group.
Save this file now in case of crash or loss of power. This happened to me earlier today and I've had to redo the whole tag. Sad story.
Copy and paste element 65 as a new layer and re-size by 40%. Duplicate layer and mirror. Merge them together.
Save your tag.
Copy and paste element 82 as a new layer and re-size by 48%. Add drop shadow.
Copy and paste element 11 as a new layer. Add drop shadow.
Save your tag.
C/P element 67 as a new layer. Drag this layer to the top. Add drop shadow.
C/P element 5 as a new layer and re-size by 80%. This should be your top layer now.
Save your tag.
C/P element 71 as a new layer and re-size by 25%. Move this "Boom" to the upper left hand side of tag. Add drop shadow.
At this time, copy and paste your tube of choice as a new layer. I re-sized mine by 75%. Add drop shadow.
C/P element 70 as a new layer and re-size by 40%. Place in the lower right hand side of tag. Add drop shadow.
Save your tag.
C/P element 77 as a new layer and re-size by 15%. Position over scuffle cloud on the lower right hand side of tag.
Add drop shadow.
C/P element 83 as a new layer and re-size by 23%. Position over the "Boom" word near bottom edge. Add drop shadow.
C/P element 38 as a new layer and move to right upper hand side of tag.
C/P element 133 as a new layer and re-size by 75%. Drag this layer down in the palette until it's just above the big WOW word/element. Position to the left of your character/tube. Add drop shadow.
C/P element 132 as a new layer, mirror and re-size by 70%. Position behind your tube. Add drop shadow.
C/P element 109 as a new layer and re-size by 60%. Move to lower right hand side and add drop shadow. Save tag.
C/P element 66 as a new layer and re-size by 31%. Mirror and move behind your tube on her right side. Duplicate and mirror. Make sure this layer in behind your car. Add drop shadow to each.
C/P element 78 as a new layer and re-size by 16%. Move to left hand side and add drop shadow.
Make sure all your layers have a drop shadow. Add your artist copyright and license number. Place where it will be
visible. Merge this layer down on your tube layer.
Hide your tube, X out the layer.
Activate your Mask layer and right click Merge all visible.
Un hide your tube.
Now to animate.
Making sure your merged layer is selected,
Go to Selections, select all.
Go to Edit and copy merged. Paste as a new animation in Animation Shop.
Hold your Ctrl key down and repeatedly hit letter L on your keyboard for a total of 14 frames.
You can watch the count on the lower right hand side of your screen in AS.
Open SimoneAni-Kaplow!-01
Go to Edit, select all.
Go to Edit, copy.
Activate your tag.
Go to Edit, select all.
Go to Edit, make sure Propagate Paste is selected.
Go to Edit, Paste, paste into selected frames.
Position on your tag and click into place. I placed mine about 3/4 of the way up the tag, so head level in reference to your tube position.
Go back to PSP now and highlight (activate) your tube layer and copy.
Paste as a NEW animation in AS.
Go to Edit, copy.
Activate your tag.
Go to Edit, Paste, paste into selected frames.
I also added SimoneAni-Kaplow!-04 to the center of my tube's chest area.
Play and save.
Don't forget to add your name.
To save:
Go to File, Save as, enter the name of your file and select the folder to save to.
Now click on Customize:
Under COLORS TAB:
Number of colors: 255 Colors
Create palette by: OPTIMIZED OCTREE
Reduce colors by: Error Diffusion
Under OPTIMIZATIONS TAB:
set a check mark beside the second, third and forth choices. UN-check the 1st and last.
Under PARTIAL TRANSPARENCY:
check Convert pixels less than 92
Yes, blend with this color: change to white #FFFFFF
Click OK. Click Next, next, next, next.
Play your animation.
At times your animation may or will come out terrible. Optimization in Animation Shop is not the greatest.
You can play around will your settings, especially under the Tab: Optimization. I change this setting at times from anywhere between 70 and 100.
Some people add a white background. To add background, go to Animation: Animation Properties, select Opaque and change color to white.
Hope you enjoyed this tutorial,
Hugs Simone
Please, always direct people to my blog to download my animations.
Do not load to any other download site and don't claim as your own.
Tutorial written by SophisticatSimone aka Lorraine Halle on Thursday July 4, 2013.
Please click on TAG to see in full size.
••• Supplies needed to complete this tutorial. •••
________________________________________________________________________
Programs: Paint Shop Pro, I'm using version 10. Animation Shop 3.
Plugin : Eye Candy: Gradient Glow for name.
Font used: BadaBoom
Tube of choice: I'm using "Bikini3" by Jose A Cano.
Scrap Kit : I'm using "Super Hero Girls" by Bibi's Collection.
Animation: SimoneAni-Kaplow!
Mask: by me 0145
________________________________________________________________________
♥♥♥
Save your tag often. Nothing like working long and hard on a tag and PSP crashes.
♥♥♥
Open a new image 700 x 700, transparent background.
Go to Selections, select all.
Open Paper 12 and copy.
On your new image, right click on top border and select Paste INTO selection.
De-select.
Close original paper to save for later.
Open your mask of choice and apply or use the one I made Mask0145.
Merge group.
Save this file now in case of crash or loss of power. This happened to me earlier today and I've had to redo the whole tag. Sad story.
Copy and paste element 65 as a new layer and re-size by 40%. Duplicate layer and mirror. Merge them together.
Save your tag.
Copy and paste element 82 as a new layer and re-size by 48%. Add drop shadow.
Copy and paste element 11 as a new layer. Add drop shadow.
Save your tag.
C/P element 67 as a new layer. Drag this layer to the top. Add drop shadow.
C/P element 5 as a new layer and re-size by 80%. This should be your top layer now.
Save your tag.
C/P element 71 as a new layer and re-size by 25%. Move this "Boom" to the upper left hand side of tag. Add drop shadow.
At this time, copy and paste your tube of choice as a new layer. I re-sized mine by 75%. Add drop shadow.
C/P element 70 as a new layer and re-size by 40%. Place in the lower right hand side of tag. Add drop shadow.
Save your tag.
C/P element 77 as a new layer and re-size by 15%. Position over scuffle cloud on the lower right hand side of tag.
Add drop shadow.
C/P element 83 as a new layer and re-size by 23%. Position over the "Boom" word near bottom edge. Add drop shadow.
C/P element 38 as a new layer and move to right upper hand side of tag.
C/P element 133 as a new layer and re-size by 75%. Drag this layer down in the palette until it's just above the big WOW word/element. Position to the left of your character/tube. Add drop shadow.
C/P element 132 as a new layer, mirror and re-size by 70%. Position behind your tube. Add drop shadow.
C/P element 109 as a new layer and re-size by 60%. Move to lower right hand side and add drop shadow. Save tag.
C/P element 66 as a new layer and re-size by 31%. Mirror and move behind your tube on her right side. Duplicate and mirror. Make sure this layer in behind your car. Add drop shadow to each.
C/P element 78 as a new layer and re-size by 16%. Move to left hand side and add drop shadow.
Make sure all your layers have a drop shadow. Add your artist copyright and license number. Place where it will be
visible. Merge this layer down on your tube layer.
Hide your tube, X out the layer.
Activate your Mask layer and right click Merge all visible.
Un hide your tube.
Now to animate.
Making sure your merged layer is selected,
Go to Selections, select all.
Go to Edit and copy merged. Paste as a new animation in Animation Shop.
Hold your Ctrl key down and repeatedly hit letter L on your keyboard for a total of 14 frames.
You can watch the count on the lower right hand side of your screen in AS.
Open SimoneAni-Kaplow!-01
Go to Edit, select all.
Go to Edit, copy.
Activate your tag.
Go to Edit, select all.
Go to Edit, make sure Propagate Paste is selected.
Go to Edit, Paste, paste into selected frames.
Position on your tag and click into place. I placed mine about 3/4 of the way up the tag, so head level in reference to your tube position.
Go back to PSP now and highlight (activate) your tube layer and copy.
Paste as a NEW animation in AS.
Go to Edit, copy.
Activate your tag.
Go to Edit, Paste, paste into selected frames.
I also added SimoneAni-Kaplow!-04 to the center of my tube's chest area.
Play and save.
Don't forget to add your name.
To save:
Go to File, Save as, enter the name of your file and select the folder to save to.
Now click on Customize:
Under COLORS TAB:
Number of colors: 255 Colors
Create palette by: OPTIMIZED OCTREE
Reduce colors by: Error Diffusion
Under OPTIMIZATIONS TAB:
set a check mark beside the second, third and forth choices. UN-check the 1st and last.
Under PARTIAL TRANSPARENCY:
check Convert pixels less than 92
Yes, blend with this color: change to white #FFFFFF
Click OK. Click Next, next, next, next.
Play your animation.
At times your animation may or will come out terrible. Optimization in Animation Shop is not the greatest.
You can play around will your settings, especially under the Tab: Optimization. I change this setting at times from anywhere between 70 and 100.
Some people add a white background. To add background, go to Animation: Animation Properties, select Opaque and change color to white.
Hope you enjoyed this tutorial,
Hugs Simone
Please, always direct people to my blog to download my animations.
Do not load to any other download site and don't claim as your own.
Tutorial written by SophisticatSimone aka Lorraine Halle on Thursday July 4, 2013.
Tuesday, July 2, 2013

♥♥♥
Please click on TAG to see in full size.
••• Supplies needed to complete this tutorial. •••
________________________________________________________________________
Programs: Paint Shop Pro, I'm using version 10. Animation Shop 3.
Plugin : Eye Candy 4: Gradient Glow for name
Font used: Carpenter
Tube of choice: I'm using "Monique" by Zlata M
Please click on TAG to see in full size.
••• Supplies needed to complete this tutorial. •••
________________________________________________________________________
Programs: Paint Shop Pro, I'm using version 10. Animation Shop 3.
Plugin : Eye Candy 4: Gradient Glow for name
Font used: Carpenter
Tube of choice: I'm using "Monique" by Zlata M
Scrap Kit : I'm using "Monica" by SkyScraps
This is a freebie kit.
Animation: SimoneAni472-485
Mask: 0144 HERE
________________________________________________________________________
♥♥♥
Save your tag often. Nothing like working long and hard on a tag and PSP crashes.
♥♥♥
Open Paper 5 and duplicate. Re-size by 87%, smart size checked and resolution is 72 dpi.
Open mask0144 and minimize. Make sure your paper is active.
Go to Layers, New mask layer, from image. Find the mask in drop down list and apply.
Merge group.
Close Mask, it's no longer needed.
Copy and paste element 14 as a new layer. Position at bottom of tag.
Duplicate element and flip and mirror. Fit them together to make a closed frame and merge them together.
We will add little stars later on the seams to hide were they join.
With your magic wand, feather 0, click inside the frame and go to Selections, modify and expand by 8.
Copy and paste your tube as a new layer.
Drag it below your frame in the layers palette.
Use your mover tool to position your tube inside the frame.
Go to selections, invert and hit delete on your keyboard.
Select another paper of choice and copy and paste as a new layer, make sure this layer is below your tube.
I used paper 2 and re-sized by 70%.
Add drop shadow to frame and tube.
Copy and paste element 25 as a new layer. Re-size by 45% and move over seam on the left side of frame, add drop shadow.
Copy and paste element 35 as a new layer. Move this over the right side of frame and add drop shadow.
Using the font : LD Mosquito with background color set to: #32516e I typed out the words "of july" and positioned it just below "Happy 4th" . My kerning was -25, size was 122, bold selected and anti-alias: sharp. If you have gradient glow, add a white glow of 3 around your text and add drop shadow.
Copy and paste element 8 as a new layer and re-size by 80%. Move to upper right side of frame.
Increase your canvas size to 985 x 700. We will re-size at the end. I just like a lot of room to play on.
Copy and paste element 28 as a new layer and position upper left hand side of tag behind the frame and it's background. Duplicate and move this down lower and on the edge of the frame. Duplicate and mirror. Move this one out a little bit from the frame on the right side. Add drop shadow to each layer.
Merge all visible and crop merged opaque.
Re-size your tag by 82% and sharpen.
Add artist copyright and license number, merge down.
Save your tag.
Now to animate.
Go to Selections, select all.
Go to Edit and copy merged. Paste as a new animation in Animation Shop.
Hold your Ctrl key down and repeatedly hit letter L on your keyboard for a total of 15 frames.
You can watch the count on the lower right hand side of your screen in AS.
Open SimoneAni484 or 474. Either one works well here. I tried both and it looked good.
Go to Edit, select all.
Go to Edit, copy.
Activate your tag.
Go to Edit, select all.
Go to Edit, make sure Propagate Paste is selected.
Go to Edit, Paste, paste into selected frames.
Position on your tag OVER the firework element and click into place.
Play and save.
Don't forget to add your name. I used the font: Carpenter and the color: #7b1d18
To save:
Go to File, Save as, enter the name of your file and select the folder to save to.
Now click on Customize:
Under COLORS TAB:
Number of colors: 255 Colors
Create palette by: OPTIMIZED OCTREE
Reduce colors by: Error Diffusion
Under OPTIMIZATIONS TAB:
set a check mark beside the second, third and forth choices. UN-check the 1st and last.
Under PARTIAL TRANSPARENCY:
check Convert pixels less than 92
Yes, blend with this color: change to white #FFFFFF
Click OK. Click Next, next, next, next.
Play your animation.
At times your animation may or will come out terrible. Optimization in Animation Shop is not the greatest.
You can play around will your settings, especially under the Tab: Optimization. I change this setting at times from anywhere between 70 and 100.
Some people add a white background. To add background, go to Animation: Animation Properties, select Opaque and change color to white.
Hope you enjoyed this tutorial,
Hugs Simone
Please, always direct people to my blog to download my animations.
Do not load to any other download site and don't claim as your own.
Tutorial written by SophisticatSimone aka Lorraine Halle on Tuesday July 2, 2013.
Animation: SimoneAni472-485
Mask: 0144 HERE
________________________________________________________________________
♥♥♥
Save your tag often. Nothing like working long and hard on a tag and PSP crashes.
♥♥♥
Open Paper 5 and duplicate. Re-size by 87%, smart size checked and resolution is 72 dpi.
Open mask0144 and minimize. Make sure your paper is active.
Go to Layers, New mask layer, from image. Find the mask in drop down list and apply.
Merge group.
Close Mask, it's no longer needed.
Copy and paste element 14 as a new layer. Position at bottom of tag.
Duplicate element and flip and mirror. Fit them together to make a closed frame and merge them together.
We will add little stars later on the seams to hide were they join.
With your magic wand, feather 0, click inside the frame and go to Selections, modify and expand by 8.
Copy and paste your tube as a new layer.
Drag it below your frame in the layers palette.
Use your mover tool to position your tube inside the frame.
Go to selections, invert and hit delete on your keyboard.
Select another paper of choice and copy and paste as a new layer, make sure this layer is below your tube.
I used paper 2 and re-sized by 70%.
Add drop shadow to frame and tube.
Copy and paste element 25 as a new layer. Re-size by 45% and move over seam on the left side of frame, add drop shadow.
Copy and paste element 35 as a new layer. Move this over the right side of frame and add drop shadow.
Using the font : LD Mosquito with background color set to: #32516e I typed out the words "of july" and positioned it just below "Happy 4th" . My kerning was -25, size was 122, bold selected and anti-alias: sharp. If you have gradient glow, add a white glow of 3 around your text and add drop shadow.
Copy and paste element 8 as a new layer and re-size by 80%. Move to upper right side of frame.
Increase your canvas size to 985 x 700. We will re-size at the end. I just like a lot of room to play on.
Copy and paste element 28 as a new layer and position upper left hand side of tag behind the frame and it's background. Duplicate and move this down lower and on the edge of the frame. Duplicate and mirror. Move this one out a little bit from the frame on the right side. Add drop shadow to each layer.
Merge all visible and crop merged opaque.
Re-size your tag by 82% and sharpen.
Add artist copyright and license number, merge down.
Save your tag.
Now to animate.
Go to Selections, select all.
Go to Edit and copy merged. Paste as a new animation in Animation Shop.
Hold your Ctrl key down and repeatedly hit letter L on your keyboard for a total of 15 frames.
You can watch the count on the lower right hand side of your screen in AS.
Open SimoneAni484 or 474. Either one works well here. I tried both and it looked good.
Go to Edit, select all.
Go to Edit, copy.
Activate your tag.
Go to Edit, select all.
Go to Edit, make sure Propagate Paste is selected.
Go to Edit, Paste, paste into selected frames.
Position on your tag OVER the firework element and click into place.
Play and save.
Don't forget to add your name. I used the font: Carpenter and the color: #7b1d18
To save:
Go to File, Save as, enter the name of your file and select the folder to save to.
Now click on Customize:
Under COLORS TAB:
Number of colors: 255 Colors
Create palette by: OPTIMIZED OCTREE
Reduce colors by: Error Diffusion
Under OPTIMIZATIONS TAB:
set a check mark beside the second, third and forth choices. UN-check the 1st and last.
Under PARTIAL TRANSPARENCY:
check Convert pixels less than 92
Yes, blend with this color: change to white #FFFFFF
Click OK. Click Next, next, next, next.
Play your animation.
At times your animation may or will come out terrible. Optimization in Animation Shop is not the greatest.
You can play around will your settings, especially under the Tab: Optimization. I change this setting at times from anywhere between 70 and 100.
Some people add a white background. To add background, go to Animation: Animation Properties, select Opaque and change color to white.
Hope you enjoyed this tutorial,
Hugs Simone
Please, always direct people to my blog to download my animations.
Do not load to any other download site and don't claim as your own.
Tutorial written by SophisticatSimone aka Lorraine Halle on Tuesday July 2, 2013.

♥♥♥
Please click on TAG to see in full size.
••• Supplies needed to complete this tutorial. •••
________________________________________________________________________
Programs: Paint Shop Pro, I'm using version 10. Animation Shop 3.
Plugin : Eye Candy: Gradient Glow for name.
Please click on TAG to see in full size.
••• Supplies needed to complete this tutorial. •••
________________________________________________________________________
Programs: Paint Shop Pro, I'm using version 10. Animation Shop 3.
Plugin : Eye Candy: Gradient Glow for name.
Font used: LD Modern Mix
Tube of choice: I'm using "USA Cowgirl" by The Hunter from SATC.
Scrap Kit : I'm using "USA Cowgirl" by Bibi's Collection from SATC
Animation: SimoneAni-AmericanCowgirl
Mask: 0143 HERE
________________________________________________________________________
♥♥♥
Save your tag often. Nothing like working long and hard on a tag and PSP crashes.
♥♥♥
Open paper 10 and duplicate, close original. Re-size by 88%, smart size checked and 72 dpi. Sharpen.
Open Mask. Go to Layers, New mask layer, from image. Apply mask and merge group.
Copy and paste your tube as a new layer. Delete the tube from the knees down using your selection tool, set to rectangle, feather set to 16. Add drop shadow to tube.
C/P element 45 as a new layer and re-size by 55%. Move to right lower hand side in front of tube layer. Add d/s.
C/P element 71 as a new layer and re-size by 45%. Move to left hand side behind tube layer. Add d/s.
C/P element 11 as a new layer and re-size by 60%. Free rotate to the left by 45 degrees. Move to right lower hand side in front of tube layer. Add d/s.
C/P element 9 as a new layer and duplicate. Change blend mode to multiply. Merge down. Re-size by 80%. Position to the left side of tag.
C/P element 5 as a new layer. Re-size by 60% and duplicate. Position side by side in front of your tube and the barrel. Add d/s to each and merge together. Duplicate and re-size by 75% and move this layer behind the barrel on the left side of tag.
C/P element 10 as a new layer and re-size by 50%. Move to right lower hand side of tag. Add d/s.
C/P element 24 as a new layer and re-size by 50%. Move to upper center of tag. This element should be just above the mask layer. Add d/s.
C/P element 51 as a new layer and re-size by 50%. Move to bottom center of tag. This element should be below skull and above the grass. You can extra grass behind the fence. Add drop shadow.
C/P element 78 as a new layer and free rotate to right by 45 degrees. Add drop shadow. Position to left lower hand side.
Add artist copyright and your license number.
Starting from tube layer moving down to mask, merge down each layer.
X-out this layer now. Click on any other layer and merge visible.
You should have two layers now.
Crop merged opaque.
Now to animate.
Go to Selections, select all.
Go to Edit and copy merged. Paste as a new animation in Animation Shop.
Hold your Ctrl key down and repeatedly hit letter L on your keyboard for a total of 15 frames.
You can watch the count on the lower right hand side of your screen in AS.
Open SimoneAni-AmericanCowgirl-001
Go to Edit, select all.
Go to Edit, copy.
Activate your tag.
Go to Edit, select all.
Go to Edit, make sure Propagate Paste is selected.
Go to Edit, Paste, paste into selected frames.
Position on your tag OVER the frame area and click into place. I positioned mine more to the left side of the tag.
Go to PSP and select the tube layer and copy.
Paste in Animation Shop as a new layer.
Copy.
Click on your tag to activate.
Go to Edit and paste into selected frame.
Careful you don't cut off anything from that layer when you click it into place.
You can move it around on the frame until you are happy, click into place.
Repeat steps using SimoneAni-VIPGirl-03 and position this animation over the wagon on the right hand side of tag.
Play and save.
Don't forget to add your name.
To save:
Go to File, Save as, enter the name of your file and select the folder to save to.
Now click on Customize:
Under COLORS TAB:
Number of colors: 255 Colors
Create palette by: OPTIMIZED OCTREE
Reduce colors by: Error Diffusion
Under OPTIMIZATIONS TAB:
set a check mark beside the second, third and forth choices. UN-check the 1st and last.
Under PARTIAL TRANSPARENCY:
check Convert pixels less than 92
Yes, blend with this color: change to white #FFFFFF
Click OK. Click Next, next, next, next.
Play your animation.
At times your animation may or will come out terrible. Optimization in Animation Shop is not the greatest.
You can play around will your settings, especially under the Tab: Optimization. I change this setting at times from anywhere between 70 and 100.
Some people add a white background. To add background, go to Animation: Animation Properties, select Opaque and change color to white.
Hope you enjoyed this tutorial,
Hugs Simone
Please, always direct people to my blog to download my animations.
Do not load to any other download site and don't claim as your own.
Tutorial written by SophisticatSimone aka Lorraine Halle on Tuesday July 2, 2013.
Tube of choice: I'm using "USA Cowgirl" by The Hunter from SATC.
Scrap Kit : I'm using "USA Cowgirl" by Bibi's Collection from SATC
Animation: SimoneAni-AmericanCowgirl
Mask: 0143 HERE
________________________________________________________________________
♥♥♥
Save your tag often. Nothing like working long and hard on a tag and PSP crashes.
♥♥♥
Open paper 10 and duplicate, close original. Re-size by 88%, smart size checked and 72 dpi. Sharpen.
Open Mask. Go to Layers, New mask layer, from image. Apply mask and merge group.
Copy and paste your tube as a new layer. Delete the tube from the knees down using your selection tool, set to rectangle, feather set to 16. Add drop shadow to tube.
C/P element 45 as a new layer and re-size by 55%. Move to right lower hand side in front of tube layer. Add d/s.
C/P element 71 as a new layer and re-size by 45%. Move to left hand side behind tube layer. Add d/s.
C/P element 11 as a new layer and re-size by 60%. Free rotate to the left by 45 degrees. Move to right lower hand side in front of tube layer. Add d/s.
C/P element 9 as a new layer and duplicate. Change blend mode to multiply. Merge down. Re-size by 80%. Position to the left side of tag.
C/P element 5 as a new layer. Re-size by 60% and duplicate. Position side by side in front of your tube and the barrel. Add d/s to each and merge together. Duplicate and re-size by 75% and move this layer behind the barrel on the left side of tag.
C/P element 10 as a new layer and re-size by 50%. Move to right lower hand side of tag. Add d/s.
C/P element 24 as a new layer and re-size by 50%. Move to upper center of tag. This element should be just above the mask layer. Add d/s.
C/P element 51 as a new layer and re-size by 50%. Move to bottom center of tag. This element should be below skull and above the grass. You can extra grass behind the fence. Add drop shadow.
C/P element 78 as a new layer and free rotate to right by 45 degrees. Add drop shadow. Position to left lower hand side.
Add artist copyright and your license number.
Starting from tube layer moving down to mask, merge down each layer.
X-out this layer now. Click on any other layer and merge visible.
You should have two layers now.
Crop merged opaque.
Now to animate.
Go to Selections, select all.
Go to Edit and copy merged. Paste as a new animation in Animation Shop.
Hold your Ctrl key down and repeatedly hit letter L on your keyboard for a total of 15 frames.
You can watch the count on the lower right hand side of your screen in AS.
Open SimoneAni-AmericanCowgirl-001
Go to Edit, select all.
Go to Edit, copy.
Activate your tag.
Go to Edit, select all.
Go to Edit, make sure Propagate Paste is selected.
Go to Edit, Paste, paste into selected frames.
Position on your tag OVER the frame area and click into place. I positioned mine more to the left side of the tag.
Go to PSP and select the tube layer and copy.
Paste in Animation Shop as a new layer.
Copy.
Click on your tag to activate.
Go to Edit and paste into selected frame.
Careful you don't cut off anything from that layer when you click it into place.
You can move it around on the frame until you are happy, click into place.
Repeat steps using SimoneAni-VIPGirl-03 and position this animation over the wagon on the right hand side of tag.
Play and save.
Don't forget to add your name.
To save:
Go to File, Save as, enter the name of your file and select the folder to save to.
Now click on Customize:
Under COLORS TAB:
Number of colors: 255 Colors
Create palette by: OPTIMIZED OCTREE
Reduce colors by: Error Diffusion
Under OPTIMIZATIONS TAB:
set a check mark beside the second, third and forth choices. UN-check the 1st and last.
Under PARTIAL TRANSPARENCY:
check Convert pixels less than 92
Yes, blend with this color: change to white #FFFFFF
Click OK. Click Next, next, next, next.
Play your animation.
At times your animation may or will come out terrible. Optimization in Animation Shop is not the greatest.
You can play around will your settings, especially under the Tab: Optimization. I change this setting at times from anywhere between 70 and 100.
Some people add a white background. To add background, go to Animation: Animation Properties, select Opaque and change color to white.
Hope you enjoyed this tutorial,
Hugs Simone
Please, always direct people to my blog to download my animations.
Do not load to any other download site and don't claim as your own.
Tutorial written by SophisticatSimone aka Lorraine Halle on Tuesday July 2, 2013.

♥♥♥
Please click on TAG to see in full size.
••• Supplies needed to complete this tutorial. •••
________________________________________________________________________
Programs: Paint Shop Pro, I'm using version 10. Animation Shop 3.
Plugin : Eye Candy 4: Gradient Glow for name
Font used: Olivier
Tube of choice: I'm using "Festive" by Zlata M from SATC.
Scrap Kit : I'm using "Festive Evening" by SkyScraps from SATC
Animation: SimoneAni-VIPGirl-Tutorial
Mask: 0142 HERE
________________________________________________________________________
♥♥♥
Save your tag often. Nothing like working long and hard on a tag and PSP crashes.
♥♥♥
Open a new image, transparent, 700 x 700.
Copy and paste your tube as a new layer. Re-size by 80% and add drop shadow.
C/P element 27 as a new layer and re-size by 75%.
Grab your magic wand, tolerance and feather set to 0 and click inside the frame.
Go to Selections, modify, expand by 5. C/P element 77 as a new layer. Re-size by 75%.
Move this layer below the frame element.
Go to Selections, invert and hit delete on keyboard.
C/P paper 4 as a new layer and drag below the skyline element.
Hit delete and deselect.
Add drop shadow to skyline and to the frame.
On your skyline image add a little noise: Random 5, monochrome checked.
C/P element 6 as a new layer and re-size by 75%. Position on left side of tag.
C/P element 68 as a new layer and re-size by 55%. Position over the left side of frame.
C/P element 11 as a new layer and mirror. Re-size by 35%. Position behind your tube on the left side.
Duplicate and free rotate to the left by 40 degrees. Sharpen and move above the other flowers. Duplicate and flip.
Position near bottom of her dress. Add drop shadow to each layer.
Paste original again and re-size by 27% and free rotate to the left by 70 degrees. Add a couple at top and bottom of the other flowers.
C/P element 60 as a new layer and re-size by 60%. Sharpen. Position behind your tubes back. Add drop shadow.
Repeat paste and re-size by 60, sharpen, mirror, free rotate by 90 degrees to the left. Place behind the chair, and near the tube. Duplicate and move to upper right hand side of frame and send this layer to bottom. Should appear behind the frame. Make sure all your layers have drop shadows.
C/P element 1 and position to the right side of tag. Add drop shadow. This element should be just above your frame layer.
C/P element 7 and re-size by 50%. Place on chair and add drop shadow.
C/P element 5 and re-size by 50%. Place in front of chair and add drop shadow.
C/P element 8 and re-size by 20%. Place on frame. Triplicate, add move those around. Add drop shadow to each.
C/P element 43 and re-size by 55%. Place at top of frame on left side and add drop shadow.
C/P element 76 and move to lower left hand side and add drop shadow. Duplicate and free rotate to the right by 90 degrees. Move to the right hand side of tag. Merge together.
Starting with your frame layer, merge all your layers down one by one till you get to bottom.
X-out that layer. Click on your tube layer and merge all visible.
Un hide your bottom layer.
Add new Raster layer and send to bottom. Go to Selections, select all.
Open paper 4 and copy. Paste into selection. De-select.
Open Mask 0142 and apply to paper layer on your tag.
Merge group. Merge your frame layer down.
Add artist copyright and merge that to the tube layer.
Now to animate.
Go to Selections, select all.
Go to Edit and copy merged. Paste as a new animation in Animation Shop.
Hold your Ctrl key down and repeatedly hit letter L on your keyboard for a total of 12 frames.
You can watch the count on the lower right hand side of your screen in AS.
Open SimoneAni-VIPGirl
Go to Edit, select all.
Go to Edit, copy.
Activate your tag.
Go to Edit, select all.
Go to Edit, make sure Propagate Paste is selected.
Go to Edit, Paste, paste into selected frames.
Position on your tag OVER the frame area and click into place.
Go to PSP and select the tube layer and copy.
Paste in Animation Shop as a new layer.
Copy.
Click on your tag to activate.
Go to Edit and paste into selected frame.
Careful you don't cut off anything from that layer when you click it into place.
You can move it around on the frame until you are happy, click into place.
Repeat steps using SimoneAni-VIPGirl-02 and position this animation at the feet of your tube on the lower right hand side of tag.
Play and save.
Don't forget to add your name.
To save:
Go to File, Save as, enter the name of your file and select the folder to save to.
Now click on Customize:
Under COLORS TAB:
Number of colors: 255 Colors
Create palette by: OPTIMIZED OCTREE
Reduce colors by: Error Diffusion
Under OPTIMIZATIONS TAB:
set a check mark beside the second, third and forth choices. UN-check the 1st and last.
Under PARTIAL TRANSPARENCY:
check Convert pixels less than 92
Yes, blend with this color: change to white #FFFFFF
Click OK. Click Next, next, next, next.
Play your animation.
At times your animation may or will come out terrible. Optimization in Animation Shop is not the greatest.
You can play around will your settings, especially under the Tab: Optimization. I change this setting at times from anywhere between 70 and 100.
Some people add a white background. To add background, go to Animation: Animation Properties, select Opaque and change color to white.
Hope you enjoyed this tutorial,
Hugs Simone
Please, always direct people to my blog to download my animations.
Do not load to any other download site and don't claim as your own.
Tutorial written by SophisticatSimone aka Lorraine Halle on Tuesday July 2, 2013.
Please click on TAG to see in full size.
••• Supplies needed to complete this tutorial. •••
________________________________________________________________________
Programs: Paint Shop Pro, I'm using version 10. Animation Shop 3.
Plugin : Eye Candy 4: Gradient Glow for name
Font used: Olivier
Tube of choice: I'm using "Festive" by Zlata M from SATC.
Scrap Kit : I'm using "Festive Evening" by SkyScraps from SATC
Animation: SimoneAni-VIPGirl-Tutorial
Mask: 0142 HERE
________________________________________________________________________
♥♥♥
Save your tag often. Nothing like working long and hard on a tag and PSP crashes.
♥♥♥
Open a new image, transparent, 700 x 700.
Copy and paste your tube as a new layer. Re-size by 80% and add drop shadow.
C/P element 27 as a new layer and re-size by 75%.
Grab your magic wand, tolerance and feather set to 0 and click inside the frame.
Go to Selections, modify, expand by 5. C/P element 77 as a new layer. Re-size by 75%.
Move this layer below the frame element.
Go to Selections, invert and hit delete on keyboard.
C/P paper 4 as a new layer and drag below the skyline element.
Hit delete and deselect.
Add drop shadow to skyline and to the frame.
On your skyline image add a little noise: Random 5, monochrome checked.
C/P element 6 as a new layer and re-size by 75%. Position on left side of tag.
C/P element 68 as a new layer and re-size by 55%. Position over the left side of frame.
C/P element 11 as a new layer and mirror. Re-size by 35%. Position behind your tube on the left side.
Duplicate and free rotate to the left by 40 degrees. Sharpen and move above the other flowers. Duplicate and flip.
Position near bottom of her dress. Add drop shadow to each layer.
Paste original again and re-size by 27% and free rotate to the left by 70 degrees. Add a couple at top and bottom of the other flowers.
C/P element 60 as a new layer and re-size by 60%. Sharpen. Position behind your tubes back. Add drop shadow.
Repeat paste and re-size by 60, sharpen, mirror, free rotate by 90 degrees to the left. Place behind the chair, and near the tube. Duplicate and move to upper right hand side of frame and send this layer to bottom. Should appear behind the frame. Make sure all your layers have drop shadows.
C/P element 1 and position to the right side of tag. Add drop shadow. This element should be just above your frame layer.
C/P element 7 and re-size by 50%. Place on chair and add drop shadow.
C/P element 5 and re-size by 50%. Place in front of chair and add drop shadow.
C/P element 8 and re-size by 20%. Place on frame. Triplicate, add move those around. Add drop shadow to each.
C/P element 43 and re-size by 55%. Place at top of frame on left side and add drop shadow.
C/P element 76 and move to lower left hand side and add drop shadow. Duplicate and free rotate to the right by 90 degrees. Move to the right hand side of tag. Merge together.
Starting with your frame layer, merge all your layers down one by one till you get to bottom.
X-out that layer. Click on your tube layer and merge all visible.
Un hide your bottom layer.
Add new Raster layer and send to bottom. Go to Selections, select all.
Open paper 4 and copy. Paste into selection. De-select.
Open Mask 0142 and apply to paper layer on your tag.
Merge group. Merge your frame layer down.
Add artist copyright and merge that to the tube layer.
Now to animate.
Go to Selections, select all.
Go to Edit and copy merged. Paste as a new animation in Animation Shop.
Hold your Ctrl key down and repeatedly hit letter L on your keyboard for a total of 12 frames.
You can watch the count on the lower right hand side of your screen in AS.
Open SimoneAni-VIPGirl
Go to Edit, select all.
Go to Edit, copy.
Activate your tag.
Go to Edit, select all.
Go to Edit, make sure Propagate Paste is selected.
Go to Edit, Paste, paste into selected frames.
Position on your tag OVER the frame area and click into place.
Go to PSP and select the tube layer and copy.
Paste in Animation Shop as a new layer.
Copy.
Click on your tag to activate.
Go to Edit and paste into selected frame.
Careful you don't cut off anything from that layer when you click it into place.
You can move it around on the frame until you are happy, click into place.
Repeat steps using SimoneAni-VIPGirl-02 and position this animation at the feet of your tube on the lower right hand side of tag.
Play and save.
Don't forget to add your name.
To save:
Go to File, Save as, enter the name of your file and select the folder to save to.
Now click on Customize:
Under COLORS TAB:
Number of colors: 255 Colors
Create palette by: OPTIMIZED OCTREE
Reduce colors by: Error Diffusion
Under OPTIMIZATIONS TAB:
set a check mark beside the second, third and forth choices. UN-check the 1st and last.
Under PARTIAL TRANSPARENCY:
check Convert pixels less than 92
Yes, blend with this color: change to white #FFFFFF
Click OK. Click Next, next, next, next.
Play your animation.
At times your animation may or will come out terrible. Optimization in Animation Shop is not the greatest.
You can play around will your settings, especially under the Tab: Optimization. I change this setting at times from anywhere between 70 and 100.
Some people add a white background. To add background, go to Animation: Animation Properties, select Opaque and change color to white.
Hope you enjoyed this tutorial,
Hugs Simone
Please, always direct people to my blog to download my animations.
Do not load to any other download site and don't claim as your own.
Tutorial written by SophisticatSimone aka Lorraine Halle on Tuesday July 2, 2013.
Subscribe to:
Posts
(Atom)
CT TEAM