My Blinkie

Subscribe for Updates
Contact Me
Followers
Blog Archive
-
►
2023
(1)
- ► 04/09 - 04/16 (1)
-
►
2022
(7)
- ► 09/04 - 09/11 (1)
- ► 08/28 - 09/04 (3)
- ► 06/12 - 06/19 (1)
- ► 05/29 - 06/05 (1)
- ► 05/15 - 05/22 (1)
-
►
2018
(1)
- ► 03/04 - 03/11 (1)
-
▼
2013
(109)
- ► 11/24 - 12/01 (1)
- ► 10/27 - 11/03 (2)
- ► 10/20 - 10/27 (1)
- ► 10/13 - 10/20 (1)
- ► 10/06 - 10/13 (1)
- ► 09/15 - 09/22 (1)
- ► 09/01 - 09/08 (2)
- ► 08/25 - 09/01 (1)
- ► 08/11 - 08/18 (7)
- ► 08/04 - 08/11 (4)
- ► 07/28 - 08/04 (2)
- ► 07/14 - 07/21 (1)
- ► 07/07 - 07/14 (6)
- ► 06/30 - 07/07 (6)
- ► 06/23 - 06/30 (5)
- ► 06/16 - 06/23 (4)
- ► 06/09 - 06/16 (5)
- ► 06/02 - 06/09 (6)
- ► 05/26 - 06/02 (3)
- ► 05/19 - 05/26 (6)
- ► 05/12 - 05/19 (6)
- ▼ 05/05 - 05/12 (7)
- ► 04/28 - 05/05 (3)
- ► 04/21 - 04/28 (4)
- ► 04/14 - 04/21 (4)
- ► 04/07 - 04/14 (6)
- ► 03/31 - 04/07 (7)
- ► 03/24 - 03/31 (1)
- ► 03/17 - 03/24 (2)
- ► 03/10 - 03/17 (2)
- ► 03/03 - 03/10 (2)
Monday, May 6, 2013
5:59 PM | Edit Post
♥♥♥
Please click on TAG to see in full size.
••• Supplies needed to complete this tutorial. •••
________________________________________________________________________
Programs: Paint Shop Pro, I'm using version 10. Animation Shop 3.
Plugin : none
Font used: Genial
Tube of choice: I'm using "Roxanne" by Diana Gali from SATC.
Scrap Kit : I'm using "Roxanne" by Bibi's Collection from SATC
Animation: I'm using my own, SimoneAni441-443
________________________________________________________________________
♥♥♥
Save your tag often. Nothing like working long and hard on a tag and PSP crashes.
♥♥♥
________________________________________________________________________
♥♥♥
Save your tag often. Nothing like working long and hard on a tag and PSP crashes.
♥♥♥
Open element 103, duplicate. Close original.
Re-size by 60%.
Change canvas size to 650 x 650.
Move skyline up higher on tag.
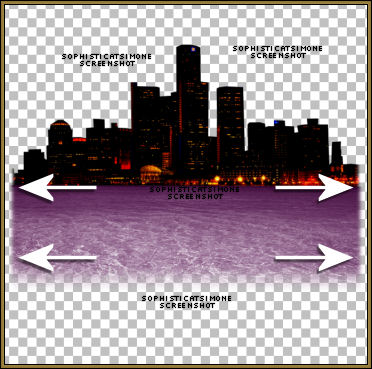
C/P element 61 as a new layer. Using your selection tool, set to rectangle, feather of 10.
Select each side, and delete extra water from edges.
Should look like this:

C/P element 56 as a new layer. Using your selection tool, set to rectangle, feather of 10.
Select each side, and delete extra sand from edges.
C/P element 89 as a new layer. Move to left side of tag and place top edge of sand. Add drop shadow.
C/P element 20 as a new layer. Move to right side of tag and place near bottom edge of sand. Add drop shadow.
C/P element 37 as a new layer. Re-size by 25%. Duplicate till you have 4 layers. Position each at base of palm tree. Add drop
shadow. Two of them I mirrored.
C/P element 51 as a new layer. Re-size by 64%. Place at edge of water, center tag. Add drop shadow.
C/P element 81 as a new layer. Re-size by 43%. Place center of palm trees and behind them. Add drop shadow.
C/P element 67 as a new layer. Re-size by 43%. Place to left side of tag. Add drop shadow.
C/P element 2 as a new layer. Re-size by 30%. Place in front of palm trees and behind fence, duplicate and move over. Add drop
shadow.
C/P element 23 as a new layer. Re-size by 26%. Place in front of fence. Add drop shadow.
C/P element 45 as a new layer. Re-size by 26%. Duplicate and place one on each fire pole. Add drop shadow.
C/P element 93 as a new layer. Re-size by 50%. Move to the upper right hand side of tag. Add drop shadow.
C/P element 82 as a new layer. Move to the left hand side of tag. Add drop shadow. Should be behind fence layer.
C/P element 79 as a new layer. Move to center of tag. Duplicate if it's to light. Should be behind purple left tree layer.
C/P element 1 as a new layer. Re-size by 50%. Move doggie near fence. Add drop shadow.
Copy and paste your tube of choice as a new layer. Move it behind the car layer and add drop shadow.
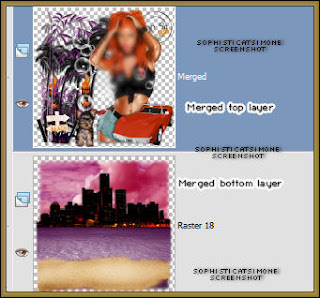
Merge all top layers down to sand.
Merge sand layer all the way down to bottom layer.
You can add another paper if you choose to, for the sky. I added paper 4.
Feather your sky like you did the water and sand.
Grab your crop tool and Snap crop rectangle to : Merged Opaque.
You should have two layers

Now to animate.
Click on bottom layer.
Go to Selections, select all.
Go to Edit and copy. Paste as a new animation in Animation Shop.
Hold your Ctrl key down and repeatedly hit letter L on your keyboard for a total of 16 frames.
You can watch the count on the lower right hand side of your screen in AS.
Open SimoneAni443
Go to Edit, select all.
Go to Edit, copy.
Activate your tag.
Go to Edit, select all.
Go to Edit, make sure Propagate Paste is selected.
Go to Edit, Paste, paste into selected frames.
Position on your tag ALONG the water and city edge and click into place.
Copy and paste your top layer as a new animation in AS.
Go to Edit and Copy.
Activate your tag.
Go to Edit, select all.
Go to Edit, Paste, paste into selected frames. If you add it selected in PSP if should line right up.
Play and save.
Don't forget to add your name.
You can see my name tutorial HERE.
To save:
Go to File, Save as, enter the name of your file and select the folder to save to.
Now click on Customize:
Under COLORS TAB:
Number of colors: 255 Colors
Create palette by: OPTIMIZED OCTREE
Reduce colors by: Error Diffusion
Under OPTIMIZATIONS TAB:
set a check mark beside the second, third and forth choices. UN-check the 1st and last.
Under PARTIAL TRANSPARENCY:
check Convert pixels less than 92
Yes, blend with this color: change to white #FFFFFF
Click OK. Click Next, next, next, next.
Play your animation.
At times your animation may or will come out terrible. Optimization in Animation Shop is not the greatest.
You can play around will your settings, especially under the Tab: Optimization. I change this setting at times from anywhere between 70 and 100.
Some people add a white background. To add background, go to Animation: Animation Properties, select Opaque and change color to white.
Hope you enjoyed this tutorial,
Hugs Simone
Please, always direct people to my blog to download my animations.
Do not load to any other download site and don't claim as your own.
Tutorial written by SophisticatSimone aka Lorraine Halle on Monday, May 6, 2013.
Re-size by 60%.
Change canvas size to 650 x 650.
Move skyline up higher on tag.
C/P element 61 as a new layer. Using your selection tool, set to rectangle, feather of 10.
Select each side, and delete extra water from edges.
Should look like this:

C/P element 56 as a new layer. Using your selection tool, set to rectangle, feather of 10.
Select each side, and delete extra sand from edges.
C/P element 89 as a new layer. Move to left side of tag and place top edge of sand. Add drop shadow.
C/P element 20 as a new layer. Move to right side of tag and place near bottom edge of sand. Add drop shadow.
C/P element 37 as a new layer. Re-size by 25%. Duplicate till you have 4 layers. Position each at base of palm tree. Add drop
shadow. Two of them I mirrored.
C/P element 51 as a new layer. Re-size by 64%. Place at edge of water, center tag. Add drop shadow.
C/P element 81 as a new layer. Re-size by 43%. Place center of palm trees and behind them. Add drop shadow.
C/P element 67 as a new layer. Re-size by 43%. Place to left side of tag. Add drop shadow.
C/P element 2 as a new layer. Re-size by 30%. Place in front of palm trees and behind fence, duplicate and move over. Add drop
shadow.
C/P element 23 as a new layer. Re-size by 26%. Place in front of fence. Add drop shadow.
C/P element 45 as a new layer. Re-size by 26%. Duplicate and place one on each fire pole. Add drop shadow.
C/P element 93 as a new layer. Re-size by 50%. Move to the upper right hand side of tag. Add drop shadow.
C/P element 82 as a new layer. Move to the left hand side of tag. Add drop shadow. Should be behind fence layer.
C/P element 79 as a new layer. Move to center of tag. Duplicate if it's to light. Should be behind purple left tree layer.
C/P element 1 as a new layer. Re-size by 50%. Move doggie near fence. Add drop shadow.
Copy and paste your tube of choice as a new layer. Move it behind the car layer and add drop shadow.
Merge all top layers down to sand.
Merge sand layer all the way down to bottom layer.
You can add another paper if you choose to, for the sky. I added paper 4.
Feather your sky like you did the water and sand.
Grab your crop tool and Snap crop rectangle to : Merged Opaque.
You should have two layers

Now to animate.
Click on bottom layer.
Go to Selections, select all.
Go to Edit and copy. Paste as a new animation in Animation Shop.
Hold your Ctrl key down and repeatedly hit letter L on your keyboard for a total of 16 frames.
You can watch the count on the lower right hand side of your screen in AS.
Open SimoneAni443
Go to Edit, select all.
Go to Edit, copy.
Activate your tag.
Go to Edit, select all.
Go to Edit, make sure Propagate Paste is selected.
Go to Edit, Paste, paste into selected frames.
Position on your tag ALONG the water and city edge and click into place.
Copy and paste your top layer as a new animation in AS.
Go to Edit and Copy.
Activate your tag.
Go to Edit, select all.
Go to Edit, Paste, paste into selected frames. If you add it selected in PSP if should line right up.
Play and save.
Don't forget to add your name.
You can see my name tutorial HERE.
To save:
Go to File, Save as, enter the name of your file and select the folder to save to.
Now click on Customize:
Under COLORS TAB:
Number of colors: 255 Colors
Create palette by: OPTIMIZED OCTREE
Reduce colors by: Error Diffusion
Under OPTIMIZATIONS TAB:
set a check mark beside the second, third and forth choices. UN-check the 1st and last.
Under PARTIAL TRANSPARENCY:
check Convert pixels less than 92
Yes, blend with this color: change to white #FFFFFF
Click OK. Click Next, next, next, next.
Play your animation.
At times your animation may or will come out terrible. Optimization in Animation Shop is not the greatest.
You can play around will your settings, especially under the Tab: Optimization. I change this setting at times from anywhere between 70 and 100.
Some people add a white background. To add background, go to Animation: Animation Properties, select Opaque and change color to white.
Hope you enjoyed this tutorial,
Hugs Simone
Please, always direct people to my blog to download my animations.
Do not load to any other download site and don't claim as your own.
Tutorial written by SophisticatSimone aka Lorraine Halle on Monday, May 6, 2013.

Subscribe to:
Post Comments
(Atom)
Leave Some Love
Categories
- 2 animations same tag using Photoshop (2)
- 2 animations using PSP and AS (1)
- adding 2 animations to tag (2)
- Al Rio (1)
- aldodark (1)
- Alex McMillan (4)
- Alex Prihodko (1)
- AmyMarie Kits (2)
- Angelica S (6)
- Animation (63)
- ARMY (1)
- Barbara Jensen (2)
- Baseball (1)
- Bibi's Collection Kit (38)
- bling (9)
- BLOOD (1)
- bubbles (12)
- CDO Tutorial (1)
- Christine Marie Kotlark (6)
- Christmas (1)
- circles (1)
- Cowgirl (1)
- CU Animations (1)
- Danny Lee (6)
- Design by Joan (3)
- Diana Gali (9)
- Disturbed Scraps (9)
- Easter (1)
- Fairy Dust (3)
- Fire (3)
- Fish (1)
- Forum Set (2)
- Freebie Kit (1)
- FTU Kit (1)
- Glitter (17)
- Goth (9)
- Grunge (6)
- Gunshot (1)
- Hania Designs (1)
- Heatbeatz Creationz (2)
- Jay Trembly (4)
- Jose Cano Tubes (25)
- July 4th (1)
- Lady Mishka Tubes (2)
- LizquisScraps (7)
- Marc Duval (1)
- Mask Tutorial (1)
- Max-13-Tulmes (1)
- Meine Bastelwelt (1)
- Misticheskaya (5)
- Money (1)
- Music (1)
- P-O Concept Kits (4)
- Particle Illusion (1)
- PFD (2)
- PFD Tutorial (1)
- Pink (1)
- Pinup Bombshells (3)
- PIRATE (1)
- Popcorn (1)
- PSP tutorial (1)
- ptu animation (5)
- PTU kit (45)
- PTU tube (46)
- PTU Tutorial (1)
- Rock n Roll (3)
- Roses (1)
- S&Co Store (1)
- SATC (5)
- Scrapz n Pleazure (1)
- SkyScraps Kits (25)
- SkyScraps Tubes (8)
- Sparkle (5)
- Spazz (1)
- Spring (5)
- stars (1)
- Steam Punk (1)
- Summer (1)
- Sweet Occasion Designs (1)
- Teaching Tutorial (5)
- The Hunter (8)
- Timeline Banner (3)
- Tiny Turtle Designs Kits (6)
- Tutorial (43)
- tuts by Rene (1)
- USA (1)
- VeryMany (6)
- Video Tutorial (1)
- waterfall (1)
- ZlataM Tube (5)


thanks
ReplyDelete